ホームページ >ウェブフロントエンド >フロントエンドQ&A >vue-roter にはいくつかのモードがあります
vue-roter にはいくつかのモードがあります
- 青灯夜游オリジナル
- 2022-07-21 19:02:032444ブラウズ
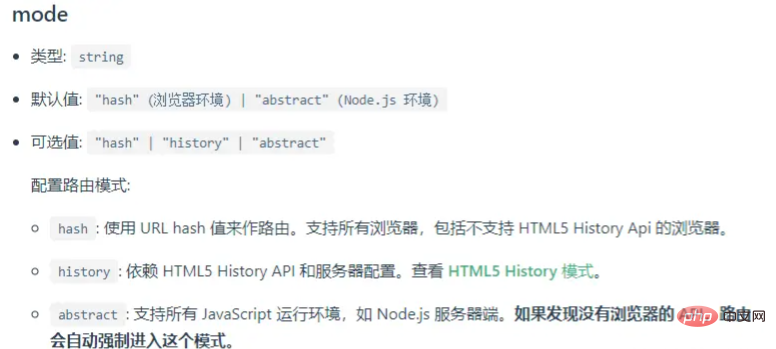
vue-roter には 3 つのモードがあります: 1. ハッシュ モード、ルーティングに URL ハッシュ値を使用し、すべてのブラウザをサポートします。このモードで実装されたルーティングでは、リンクの後に「"#" ルーティング名」が追加されます。 2. h5 によって提供される履歴オブジェクトによって実装される履歴モードは、H5 History API とサーバー構成に依存します。 3. 抽象モードは、ノード サーバーなどのすべての JS 実行環境をサポートします。ブラウザ API がないことが判明した場合、ルートは自動的にこのモードに強制されます。

Vue-router は、vue フレームワークのルーティング プラグインです。
vue-roter にはいくつかのモードがあります

- hash
- history
- abstract# には 3 つのモード値があります。
まず結論について話しましょう。spa アプリケーション ルーティングにはハッシュとヒストリーの 2 つのモードがあり、vue ルーティングには 3 つのモードがあり、1 つは spa よりも抽象的です。
ソースコード分析vue-router の mode パラメーターを使用してルーティング モードを変更します。
const router = new VueRouter({
  mode: 'history',
  routes: [...]
})
具体的な実装方法。まずダウンロードします。
vue-routerclass vueRouter {
constructor(options) {
let mode = options.mode || 'hash'
this.fallback =
mode === 'history' && !supportsPushState && options.fallback !== false
if (this.fallback) {
mode = 'hash'
}
if (!inBrowser) {
mode = 'abstract'
}
this.mode = mode
switch (mode) {
case 'history':
this.history = new HTML5History(this, options.base)
break
case 'hash':
this.history = new HashHistory(this, options.base, this.fallback)
break
case 'abstract':
this.history = new AbstractHistory(this, options.base)
break
default:
if (process.env.NODE_ENV !== 'production') {
assert(false, `invalid mode: ${mode}`)
}
}
}
}
の処理を抜粋すると、デフォルトでハッシュモードが使用されていることがわかります。はサポートされていません。履歴メソッドではハッシュ モードの使用も強制されます。 ノードなどのブラウザ環境ではない場合、抽象モードの使用が直接強制されます。
ハッシュ モード
ソース コードのこの部分を読む前に、まずハッシュの基本を理解しましょう。 MDN の紹介によると、Location インターフェイスのハッシュ属性は、URL 識別子の '#' とそれに続く URL フラグメント識別子を含む USVString を返します。'#' とそれに続く URL フラグメント識別子はハッシュと呼ばれます。 これには次のような特徴があります。
- 最初の # の後に表示される文字は、ブラウザによって位置識別子として解釈されます。これは、これらの文字がサーバーに送信されないことを意味します。
- # 以降の部分のみを変更した場合、ブラウザは対応する位置までスクロールするだけで、Web ページはリロードされません。
- #の部分を変更するとブラウザのアクセス履歴に記録が追加されますので、「戻る」ボタンで前の位置に戻ります。
- ハッシュ値は window.location.hash プロパティを通じて読み取ることができ、window.location.hash プロパティは読み取りおよび書き込み可能です。
- window.addEventListener("hashchange", fun) を使用してハッシュの変更を監視する
- これらの基本知識を理解したら、続けて見てみましょう。 vue-router ソース コードの /src/history/hash.js の処理
    const handleRoutingEvent = () => {
      const current = this.current
      if (!ensureSlash()) {
        return
      }
      this.transitionTo(getHash(), route => {
        if (supportsScroll) {
          handleScroll(this.router, route, current, true)
        }
        if (!supportsPushState) {
          replaceHash(route.fullPath)
        }
      })
    }
    const eventType = supportsPushState ? 'popstate' : 'hashchange'
    window.addEventListener(
      eventType,
      handleRoutingEvent
    )
    this.listeners.push(() => {
      window.removeEventListener(eventType, handleRoutingEvent)
    })
まず、window.addEventListener("hashchange", fun) を使用してルーティングの変更を監視し、次に、transitionTo メソッドを使用してビューを更新します
  push (location: RawLocation, onComplete?: Function, onAbort?: Function) {
    const { current: fromRoute } = this
    this.transitionTo(
      location,
      route => {
        pushHash(route.fullPath)
        handleScroll(this.router, route, fromRoute, false)
        onComplete && onComplete(route)
      },
      onAbort
    )
  }

  replace (location: RawLocation, onComplete?: Function, onAbort?: Function) {
    const { current: fromRoute } = this
    this.transitionTo(
      location,
      route => {
        replaceHash(route.fullPath)
        handleScroll(this.router, route, fromRoute, false)
        onComplete && onComplete(route)
      },
      onAbort
    )
  }
vue-router の 2 つの主要な API のプッシュと置換も単純にハッシュを処理し、transitionTo メソッドを呼び出してビューを更新します
履歴モード
古いルールを使用しましょう。まずは HTML5 の歴史を理解する 次の基礎知識: MDN の紹介によると、History インターフェイスを使用すると、タブまたはフレームでアクセスされたブラウザのセッション履歴を操作できます。 ユーザーの履歴内で前後にジャンプするには、back()、forward()、および go() メソッドを使用します。 HTML5 では、履歴エントリをそれぞれ追加および変更できるhistory.pushState() メソッドとhistory.replaceState() メソッドが導入されました。 History.pushState() について少し理解してください:
window.onpopstate = function(e) {
   alert(2);
}

let stateObj = {
    foo: "bar",
};

history.pushState(stateObj, "page 2", "bar.html");
これにより、ブラウザのアドレス バーは
mozilla.org/bar.html として表示されますが、ブラウザのロード バーは表示されません。 .html は、 bar.html が存在するかどうかさえチェックしません。
つまり、ブラウザの URL が変更されても、リクエストはすぐにはサーバーに再送信されません。これは、スパ アプリケーションがビューを更新してもページを再リクエストしないための基礎でもあります。
次に、vue-router ソース コードの /src/history/html5.js の処理を続けて見ていきます。 <pre class="brush:php;toolbar:false"> const handleRoutingEvent = () => {
const current = this.current
// Avoiding first `popstate` event dispatched in some browsers but first
// history route not updated since async guard at the same time.
const location = getLocation(this.base)
if (this.current === START && location === this._startLocation) {
return
}
this.transitionTo(location, route => {
if (supportsScroll) {
handleScroll(router, route, current, true)
}
})
}
window.addEventListener('popstate', handleRoutingEvent)
this.listeners.push(() => {
window.removeEventListener('popstate', handleRoutingEvent)
})</pre>処理ロジックはハッシュに似ており、window.addEventListener("popstate", fun) を使用して実行します。ルーティングの変更を監視し、transitionTo メソッドを使用してビューを更新します。
プッシュや置換などのメソッドについては詳しくは紹介しません。
抽象モード
最後に、/src/history/abstract.jsの処理を直接見てみましょう:
  constructor (router: Router, base: ?string) {
    super(router, base)
    this.stack = []
    this.index = -1
  }
最初に2つの変数を定義し、スタックして呼び出しを記録します。 Record、index は、現在のポインターの位置を記録します。
  push (location: RawLocation, onComplete?: Function, onAbort?: Function) {
    this.transitionTo(
      location,
      route => {
        this.stack = this.stack.slice(0, this.index + 1).concat(route)
        this.index++
        onComplete && onComplete(route)
      },
      onAbort
    )
  }

  replace (location: RawLocation, onComplete?: Function, onAbort?: Function) {
    this.transitionTo(
      location,
      route => {
        this.stack = this.stack.slice(0, this.index).concat(route)
        onComplete && onComplete(route)
      },
      onAbort
    )
  }
push メソッドと replac メソッドは、スタック変数とインデックス変数を使用して、ブラウザーの履歴呼び出しレコードをシミュレートします。
まとめ
ついに、最終のまとめ段階に到達しました:
hash 和history 的使用方式差不多,hash 中路由帶# ,但是使用簡單,不需要服務端配合,站在技術角度講,這個是配置最簡單的模式,本人感覺這也是hash 被設為預設模式的原因
history 模式需要服務端配合處理404的情況,但是路由中不帶# ,比hash 美觀一點。
-
abstract 模式支援所有JavaScript運行環境,如Node.js伺服器端,如果發現沒有瀏覽器的API,路由會自動強制進入這個模式。
abstract 模式沒有使用瀏覽器api,可以放到node環境或桌面應用中,是 spa應用 的兜底和能力擴充。
以上がvue-roter にはいくつかのモードがありますの詳細内容です。詳細については、PHP 中国語 Web サイトの他の関連記事を参照してください。

