グラフィカルインターフェイスを使用せずに Centos7 に Oracle11g をインストールする方法を 10 分で学習します
- WBOYWBOYWBOYWBOYWBOYWBOYWBOYWBOYWBOYWBOYWBOYWBOYWB転載
- 2022-01-05 17:06:313199ブラウズ
本篇文章给大家带来了Centos7下无图形界面安装 Oracle11g的操作知识,希望对大家有帮助。

一、系统准备
- 物理内存不小于1G: 查看方式:
# grep MemTotal /proc/meminfo
- 可用硬盘不小于8G: 查看方式:
# df
- Swap分区空间不小于2G: 查看方式:
# grep SwapTotal /proc/meminfo
- 关闭防火墙
# systemctl status firewalld.service    #查看firewalld防火墙状态
# systemctl stop firewalld.service      #关闭firewalld防火墙
# systemctl disable firewalld.service   #禁止开机使用firewalld防火墙
- 修改CentOS系统标识 (由于Oracle默认不支持CentOS)
修改文件: /etc/redhat-release
将文件内容替换为:
redhat-7
- 修改内核参数
修改文件: /etc/sysctl.conf
添加以下内容:
fs.aio-max-nr = 1048576
fs.file-max = 6815744
kernel.shmmni = 4096
kernel.sem = 250 32000 100 128
kernel.shmall = 2097152
kernel.shmmax = 2147483648
net.ipv4.ip_local_port_range = 9000 65500
net.ipv4.icmp_echo_ignore_broadcasts = 1
net.ipv4.conf.all.rp_filter = 1
net.core.rmem_default = 262144
net.core.rmem_max= 4194304
net.core.wmem_default= 262144
net.core.wmem_max= 1048576
修改完后,启用新的配置:
# sysctl -p
- 安装必须的软件包
# yum -y install binutils* compat-libcap1* compat-libstdc++* gcc* gcc-c++* glibc* glibc-devel* ksh* libaio* libaio-devel* libgcc* libstdc++* libstdc++-devel* libXi* libXtst* make* sysstat* elfutils* unixODBC* unzip lrzsz net-tools
- 创建用户以及组
# groupadd oinstall                         #创建安装oracle程序用户组
# groupadd dba                              #创建DBA用户组
# useradd -g dba -m oracle                  #创建用户oracle 并加入到dba组
# usermod -a -G oinstall oracle             #将用户oracle加入到oinstall组

# passwd oracle                             #修改用户oracle的密码

# id oracle #查看用户oracle的信息

- 创建安装目录
# mkdir -p /opt/oracle                         #创建oracle主目录
# mkdir -p /opt/inventory                      #创建oralce配置目录
# mkdir -p /opt/src                            #创建oracle压缩包解压目录
# chown -R oracle:oinstall /opt/oracle         #修改目录权限
# chown -R oracle:oinstall /opt/inventory
# chown -R oracle:oinstall /opt/src
# ll /opt                                      #查看目录权限

- 修改oracle用户的安全性能设置
修改文件: /etc/security/limits.conf
在文件最后一行前,追加以下内容
#@student        -       maxlogins       4

oracle soft nproc 2047
oracle hard nproc 16384
oracle soft nofile 1024
oracle hard nofile 65536

# End of file
- 修改用户环境变量
修改文件: /home/oracle/.bashrc
追加以下内容
export PATH
export ORACLE_BASE=/opt/oracle
export ORACLE_HOME=$ORACLE_BASE/product/11.2.0/db_1
export ORACLE_SID=orcl
export ORACLE_UNQNAME=orcl
export PATH=$ORACLE_HOME/bin:/usr/sbin:$PATH
export LD_LIBRARY_PATH=$ORACLE_HOME/lib:/lib:/usr/lib
export LANG=C
export NLS_LANG=AMERICAN_AMERICA.AL32UTF8
修改完后立即启用:
# source /home/oracle/.bashrc
- 解压缩zip包到/opt/src
# unzip linux.x64_11gR2_database_1of2.zip -d /opt/src/
# unzip linux.x64_11gR2_database_2of2.zip -d /opt/src/
# chown -R oracle:oinstall /opt/src/
# ll /opt/src/

- 关闭selinux
修改文件: /etc/selinux/config
保存后需要重启机器
# This file controls the state of SELinux on the system.
# SELINUX= can take one of these three values:
#     enforcing - SELinux security policy is enforced.
#     permissive - SELinux prints warnings instead of enforcing.
#     disabled - No SELinux policy is loaded.
SELINUX=disabled      # ********修改此行******
# SELINUXTYPE= can take one of three two values:
#     targeted - Targeted processes are protected,
#     minimum - Modification of targeted policy. Only selected processes are protected.
#     mls - Multi Level Security protection.
SELINUXTYPE=targeted
# reboot
二、安装oracle
进入Oracle用户
# su oracle
- 安装oracle主程序
编辑数据库安装文件 /opt/src/database/response/db_install.rsp
oracle.install.option=INSTALL_DB_SWONLY                # 安装类型
ORACLE_HOSTNAME=oracle.server                            # 主机名称
UNIX_GROUP_NAME=oinstall                                   # 安装组
INVENTORY_LOCATION=/opt/inventory                         # INVENTORY目录
SELECTED_LANGUAGES=en,zh_CN                                # 选择语言
ORACLE_HOME=/opt/oracle/product/11.2.0/db_1               # oracle_home
ORACLE_BASE=/opt/oracle                                   # oracle_base
oracle.install.db.InstallEdition=EE                        # oracle版本
oracle.install.db.DBA_GROUP=dba                            # dba用户组
oracle.install.db.OPER_GROUP=oinstall                      # oper用户组
oracle.install.db.config.starterdb.type=GENERAL_PURPOSE    # 数据库类型
oracle.install.db.config.starterdb.globalDBName=orcl       # globalDBName
oracle.install.db.config.starterdb.SID=orcl                # SID
oracle.install.db.config.starterdb.characterSet=AL32UTF8   # 默认数据库编码
oracle.install.db.config.starterdb.memoryLimit=800         # 自动管理内存的最小内存(M)oracle.install.db.config.starterdb.password.ALL=oracle     # 设定所有数据库用户使用同一个密码
DECLINE_SECURITY_UPDATES=true
安装oracle
$ /opt/src/database/runInstaller -silent -responseFile /opt/src/database/response/db_install.rsp -ignorePrereq
此时需要慢慢等待······
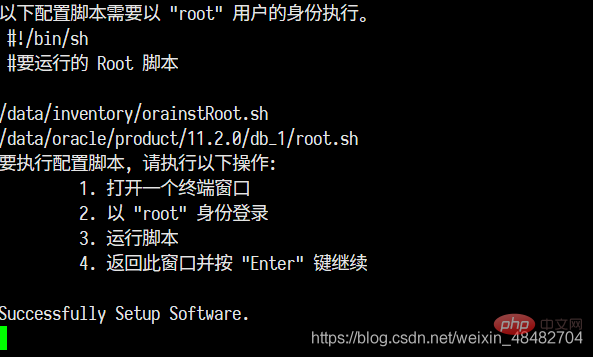
当出现以下画面时,请照做
要执行配置脚本,请执行以下操作:
1.打开一个终端窗口
2.以"root"身份登陆
3.运行脚本
/opt/inventory/orainstRoot.sh
/opt/oracle/product/11.2.0/db_1/root.sh
4.返回此窗口并按"Enter"键继续
三、配置oracle监听程序
编辑监听配置文件 /opt/src/database/response/netca.rsp
修改以下参数
INSTALL_TYPE=""custom""                               # 安装的类型
LISTENER_NUMBER=1                                     # 监听器数量
LISTENER_NAMES={"LISTENER"}                           # 监听器的名称列表
LISTENER_PROTOCOLS={"TCP;1521"}                       # 监听器使用的通讯协议列表
LISTENER_START=""LISTENER""                           # 监听器启动的名称
执行命令:
$ /opt/oracle/product/11.2.0/db_1/bin/netca /silent /responseFile /opt/src/database/response/netca.rsp
查看监听程序是否运行
$ netstat -tnulp | grep 1521

关于监听的开机和关闭
开启监听:/opt/oracle/product/11.2.0/db_1/bin/lsnrctl start
关闭监听:/opt/oracle/product/11.2.0/db_1/bin/lsnrctl stop
四、添加数据库实例
编辑数据库实例文件 /opt/src/database/response/dbca.rsp
修改以下参数
RESPONSEFILE_VERSION ="11.2.0"                              // 不要变哦
OPERATION_TYPE ="createDatabase"                            // 操作为创建实例
GDBNAME ="orcl"                                             // 数据库实例名
SID ="orcl"                                                 // 实例名字
TEMPLATENAME = "General_Purpose.dbc"                        // 建库用的模板文件
SYSPASSWORD = "oracle"                                      // SYS管理员密码
SYSTEMPASSWORD = "oracle"                                   // SYSTEM管理员密码
SYSMANPASSWORD= "oracle"
DBSNMPPASSWORD= "oracle"
DATAFILEDESTINATION =/opt/oracle/oradata                   // 数据文件存放目录
RECOVERYAREADESTINATION=/opt/oracle/flash_recovery_area    // 恢复数据存放目录
CHARACTERSET ="AL32UTF8"                                    // 字符集
NATIONALCHARACTERSET= "AL16UTF16"                           // 字符集
TOTALMEMORY ="1638"                                         // 1638MB,物理内存2G*80%。
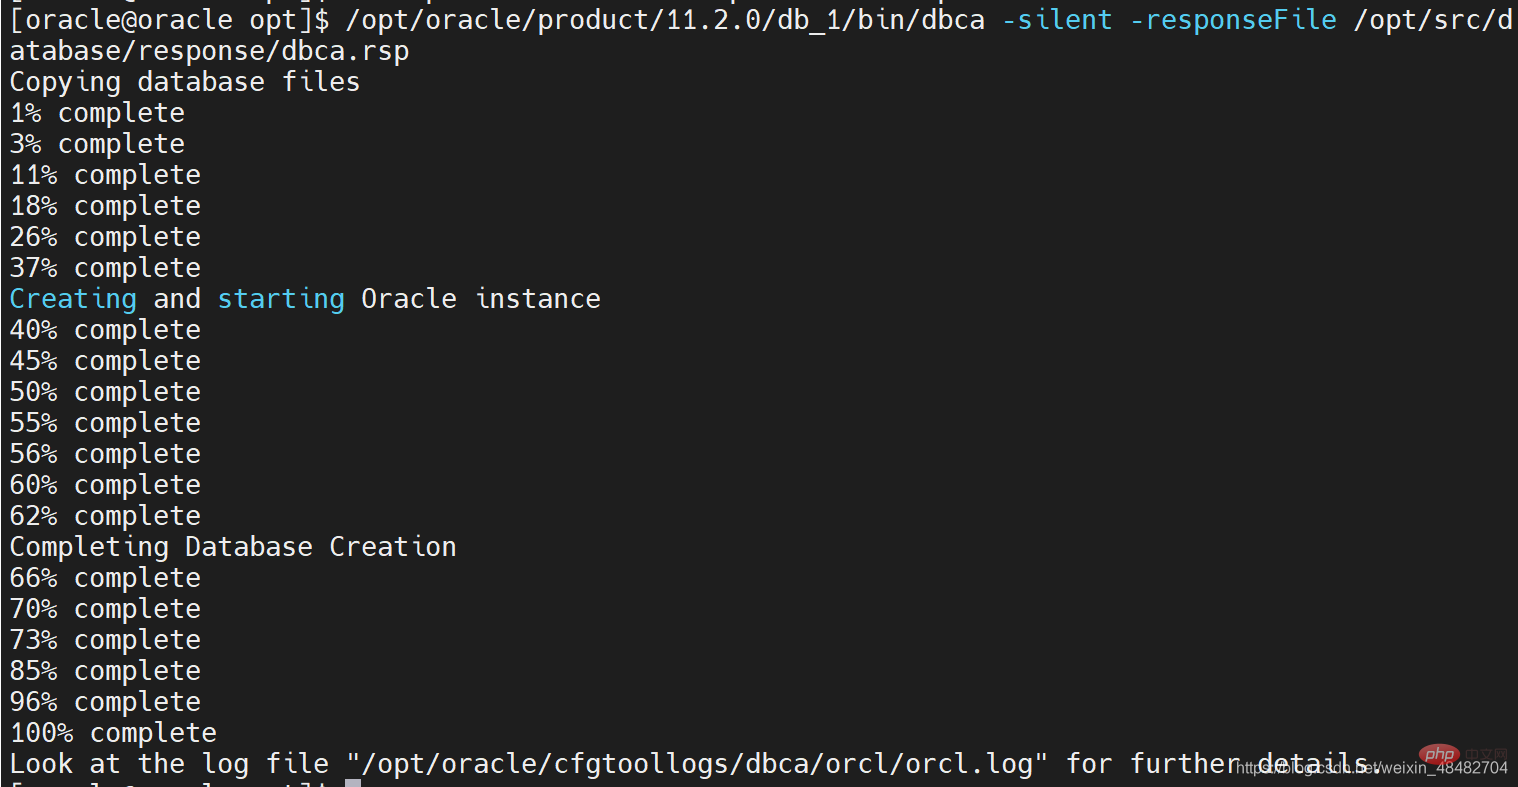
执行命令:
$ /opt/oracle/product/11.2.0/db_1/bin/dbca -silent -responseFile /opt/src/database/response/dbca.rsp

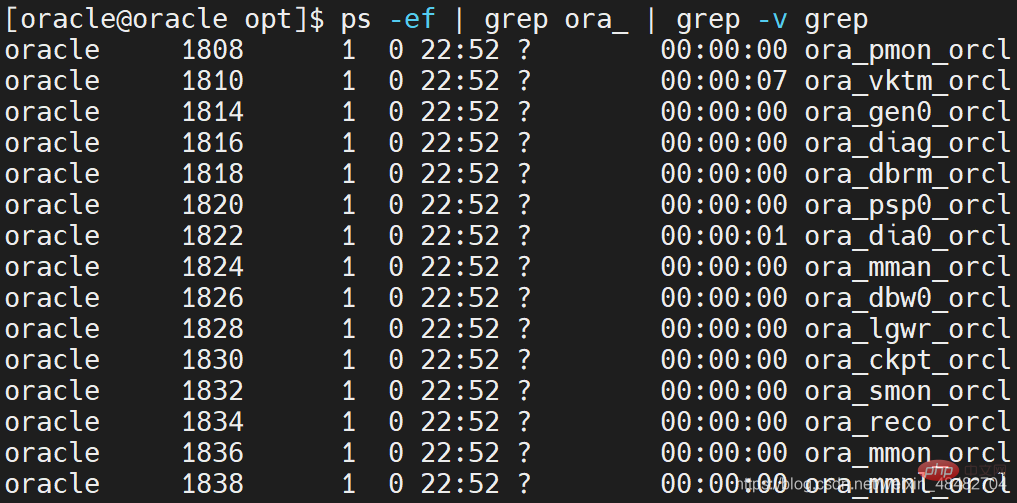
查看实例是否运行
$ ps -ef | grep ora_ | grep -v grep

修改启动和关闭实例的程序
修改文件: /opt/oracle/product/11.2.0/db_1/bin/dbstart
/opt/oracle/product/11.2.0/db_1/bin/dbshut
将
ORACLE_HOME_LISTNER=$1修改为
ORACLE_HOME_LISTNER=/opt/oracle/product/11.2.0/db_1
修改文件: /etc/oratab
将
orcl:/opt/oracle/product/11.2.0:N
修改为
orcl:/opt/oracle/product/11.2.0:Y
启动或者关闭实例
启动实例:/opt/oracle/product/11.2.0/db_1/bin/dbstart
关闭实例:/opt/oracle/product/11.2.0/db_1/bin/dbshut
五、开机启动oracle
Root用户模式下:
# chmod +x /etc/rc.d/rc.local

修改文件 /etc/rc.d/rc.local
在文件最后追加以下内容:

su oracle -lc "/opt/oracle/product/11.2.0/db_1/bin/lsnrctl start"su oracle -lc "/opt/oracle/product/11.2.0/db_1/bin/dbstart"
六、测试
先登录下数据库
# su - oracle
$ sqlplus / as sysdba


SQL> select * from v$version;BANNER--------------------------------------------------------------------------------Oracle Database 11g Enterprise Edition Release 11.2.0.1.0 - 64bit Production
PL/SQL Release 11.2.0.1.0 - Production
CORE    11.2.0.1.0      Production
TNS for Linux: Version 11.2.0.1.0 - Production
NLSRTL Version 11.2.0.1.0 - Production
成功查出版本,安装完毕
推荐教程:《Oracle教程》
以上がグラフィカルインターフェイスを使用せずに Centos7 に Oracle11g をインストールする方法を 10 分で学習しますの詳細内容です。詳細については、PHP 中国語 Web サイトの他の関連記事を参照してください。
声明:
この記事はcsdn.netで複製されています。侵害がある場合は、admin@php.cn までご連絡ください。

