
 ウェブフロントエンドjsチュートリアルavalon jsは、ソースコードdownload_javascriptスキルを使用してGoogle Plusを模倣して複数の画像のドラッグソートを実装します
avalon jsは、ソースコードdownload_javascriptスキルを使用してGoogle Plusを模倣して複数の画像のドラッグソートを実装します

ソースコードのダウンロード: http://xiazai.jb51.net/201509/yuanma/drag_sort1(jb51.net).rar
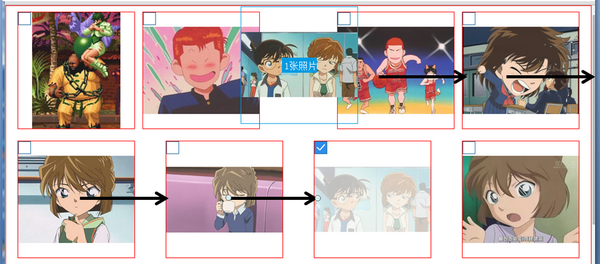
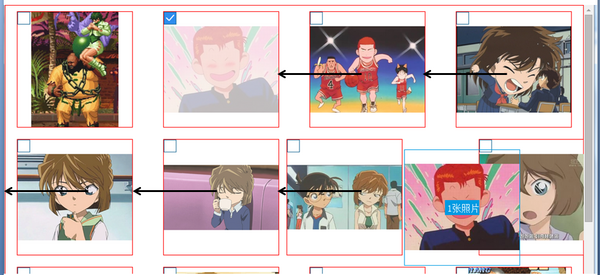
効果は以下のとおりです:
グーグルプラス
ドラッグ応答エフェクト:

要件
1. 両側の整列レイアウト、つまり画像間の間隔は同じですが、左右の画像と境界線の間の距離は必ずしも画像間の間隔と等しくありません。IE7 と互換性があります。 8、Firefox、Chrome。
2. ブラウザのサイズが一定サイズより大きくなると、各行の画像が自動的に追加または縮小され、そのときの左右の配置に合わせて画像間の間隔が自動的に調整されます。各画像は固定されており (ここでは 200*200px)、特定のサイズより小さい場合、各行の画像の数は固定され (ここでの最小列数は 3)、画像は常に引き伸ばされます。均等な比率で拡大縮小されます。
3. 異なるブラウザ サイズでもドラッグして並べ替えることができます。
4. 画像の場合、エージェント内で画像をドラッグして、常に同じ比率を維持し、水平方向と垂直方向の中央に配置します。
5. 対応する位置にドラッグすると、その位置の左右の画像がある程度オフセットされます。左端または右端にある場合は、行の最初または最後の画像のみがオフセットされます。
6. 複数の画像のドラッグと並べ替えをサポートします。
実績
レイアウトと CSS
 <div id='wrap'>
  <ul class='justify'>
   <li>
    <a href="javascript:;" class="no_selected"></a>
    <div class='photo_mask'></div>
    <div>
     <div class="dummy"></div>
     <p><img  src="/static/imghwm/default1.png"  data-src="http://files.jb51.net/file_images/article/201509/2015092410334112.png?x-oss-process=image/resize,p_40"  class="lazy"  alt="avalon jsは、ソースコードdownload_javascriptスキルを使用してGoogle Plusを模倣して複数の画像のドラッグソートを実装します" ><i></i></p>
    </div>
   </li>
   <li class='justify_fix'></li>
  </ul>
 </div>
inline-block+flex-box+text-align:justify
これは、以前のバージョンのブラウザと互換性がある必要があるため、リスト li レイアウトは inline-block を使用し、レイアウトは両側に揃えられます。
-下位バージョン: inline-block `text-align:justify`
-モダン: インラインブロック `flex-box`
詳細については、フレックスボックスの justify-content の space-between のシミュレーションを参照してください
フレックスボックスの `align-content:space-around` は、`text-align:justify` による下位バージョンのブラウザとの互換性がないため、ここでは使用されません。
`text-align:justify` では、左端と右端のテキストがボックスの端からの距離を自動的に調整することはできません。
のように外側のボックスに Padidng を追加した場合でも、
li{
 margin:0 1%;
 ...
}
#wrap{
 padding:0 1%;
}
左端と右端のボックスとボックスの境界の間の距離は、li間の距離と同じで、2%であるようです。実際、外側のボックスによって設定されたパディングは決して変更されず、li 間のマージンはそれらの間の間隔の最小値です。すべての li の間隔が 1% の場合、行にはまだ余分なスペースがあり、これらの li はスペースを均等に分割し、それらの間の間隔は 1% より大きくなります。
具体的な実装
li{
 list-style-type: none;
 display:inline-block;
 *display: inline;
 zoom:1;
 max-width: 200px;
 max-height: 200px;
 width: 28%;
 border:1px solid red;
 position: relative;
 overflow: hidden;
 margin:10px 2%;
}
li[class='justify_fix']{
 border:none;
}
.justify {
 display: flex;
 align-items: flex-start;
 flex-flow: row wrap;
 justify-content: space-between;
 text-align: justify;
 text-justify: inter-ideograph;
 *zoom: 1;
 -moz-text-align-last: justify;
 -webkit-text-align-last: justify;
 text-align-last: justify;
}
@media (-webkit-min-device-pixel-ratio:0) {
 .justify:after {
  content: "";
  display: inline-block;
  width: 100%;
 }
}
ここで `max-width` と `max-height` を追加する必要があります。後でわかるように、セルはパーセンテージで埋められており、外側の最大サイズを制限する必要があります。
レスポンシブ画像、水平方向と垂直方向の中央に配置
詳細については、この CSS 画像レスポンシブ垂直方向および水平方向のセンタリングを参照してください
写真を選択
Google Plus では、Ctrl キーを押しながら画像をクリックして複数の選択を完了します (ここでは「」)。
クリックすると、現在のピクチャのインデックスが、選択したピクチャのインデックスを保存する配列 (ここでは selected_index) に渡されます。インデックスが存在しない場合は追加し、既に存在する場合は削除します。 「ボックス」は、配列内にインデックスが存在するかどうかに基づいてスタイルを調整します。
<div id='wrap' ms-controller='photo_sort'>
  <ul class='justify'>
   <li ms-repeat='photo_list'>
    <a href="javascript:;" class="no_selected" ms-class-selected_icon='selected_index.indexOf($index)>-1' ms-click='select($index)'></a>
    ...
   </li>
   <li class='justify_fix'></li>
  </ul>
 </div>

var photo_sort=avalon.define({
 selected_index:[],//选中图片的index列表,
 ...
 select:function(i){
  var selected_index=photo_sort.selected_index;
  if(selected_index.indexOf(i)==-1)//选中图片的index列表不存在,添加
   photo_sort.selected_index.ensure(i);
  else
   photo_sort.selected_index.remove(i);
 }
});
マウスダウン
ここではマスク レイヤーが使用されており、mousedown イベントがそれにバインドされています。
<a href="javascript:;" class="no_selected" ms-class-selected_icon='selected_index.indexOf($index)>-1' ms-click='select($index)'></a>
<div class='photo_mask' ms-mousedown='start_drag($event,$index)'></div>
  var photo_sort=avalon.define({
   $id:'photo_sort',
   photo_list:[],//图片列表
   selected_index:[],//选中图片的index列表
   drag_flag:false,
   sort_array:[],//范围列表,
   cell_size:0,//每个单元格尺寸,这里宽高比为1
   target_index:-1,//最终目标位置的index
   col_num:0,//列数
   x_index:-1,//当前拖动位置的x方向index
   ...
  });
start_drag:function(e,index){
 if(photo_sort.selected_index.size()){//有选中的图片
  photo_sort.target_index=index;//避免用户没有拖动图片,但点击了图片,设置默认目标即当前点击图片
  photo_sort.cell_size=this.clientWidth;
  var xx=e.clientX-photo_sort.cell_size/2,yy=e.clientY-photo_sort.cell_size/2;//点下图片,设置代理位置以点击点为中心
  $('drag_proxy').style.top=yy+avalon(window).scrollTop()+'px';
  $('drag_proxy').style.left=xx+'px';
  $('drag_proxy').style.width=photo_sort.cell_size+'px';
  $('drag_proxy').style.height=photo_sort.cell_size+'px';
  drag_proxy.select_num=photo_sort.selected_index.length;//设置代理中选择图片的数量
  if(drag_proxy.select_num>0){
   var drag_img=photo_sort.photo_list[photo_sort.selected_index[drag_proxy.select_num-1]];
   drag_proxy.src=drag_img.src;//将选中的图片中最后一张作为代理对象的"封面"
   photo_sort.drag_flag=true;
   $('drag_proxy').style.display='block';
  }
  //cell_gap:图片间间距,first_gap:第一张图片和外部div间间距
  var wrap_width=avalon($('wrap')).width(),wrap_offset=$('wrap').offsetLeft,first_left=$('wrap_photo0').offsetLeft,
  second_left=$('wrap_photo1').offsetLeft,first_gap=first_left-wrap_offset,cell_gap=second_left-first_left;
  photo_sort.col_num=Math.round((wrap_width-2*first_gap+(cell_gap-photo_sort.cell_size))/cell_gap);
  for(var i=0;i<photo_sort.col_num;i++)//把一行图片里的每张图片中心坐标x方向的值作为分割点,添加到范围列表
   photo_sort.sort_array.push(first_gap+cell_gap*i+photo_sort.cell_size/2);
  var target=this.parentNode;
  avalon.bind(document,'mouseup',function(e){
   onMouseUp(target);
  });
  if(isIE)
   target.setCapture();//让ie下拖动顺滑
  e.stopPropagation();
  e.preventDefault();
 }
}
マウスをクリックすると、選択した写真のマスクが表示されます。 ここでは`.photo_maskon`を追加します
<div class='photo_mask' ms-class-photo_maskon='drag_flag&&selected_index.indexOf($index)>-1'
ms-mousedown='start_drag($event,$index)'></div>
マウス移動
drag_move:function(e){
 if(photo_sort.drag_flag){
  var xx=e.clientX,yy=e.clientY,offset=avalon($('wrap')).offset();
  var offsetX=xx-offset.left,offsetY=yy-offset.top;
  photo_sort.sort_array.push(offsetX);//把当前鼠标位置添加的范围列表
  photo_sort.sort_array.sort(function(a,b){//对范围列表排序
   return parseInt(a)-parseInt(b);//转为数值类型,否则会出现'1234'<'333'
  });
  //从已排序的范围列表中找出当前鼠标位置的index,即目标位置水平方向的index
  var x_index=photo_sort.sort_array.indexOf(offsetX),y_index=Math.floor(offsetY/(photo_sort.cell_size+20)),
  size=photo_sort.photo_list.size();
  photo_sort.x_index=x_index;
  photo_sort.target_index=photo_sort.col_num*y_index+x_index;//目标在所有图片中的index
  if(photo_sort.target_index>size)//目标位置越界
   photo_sort.target_index=size;
  photo_sort.sort_array.remove(offsetX);//移除当前位置
  $('drag_proxy').style.top=avalon(window).scrollTop()+yy-photo_sort.cell_size/2+'px';
  $('drag_proxy').style.left=xx-photo_sort.cell_size/2+'px';
 }
 e.stopPropagation();
}
いくつかのメモ
- 現在のドラッグ位置の決定
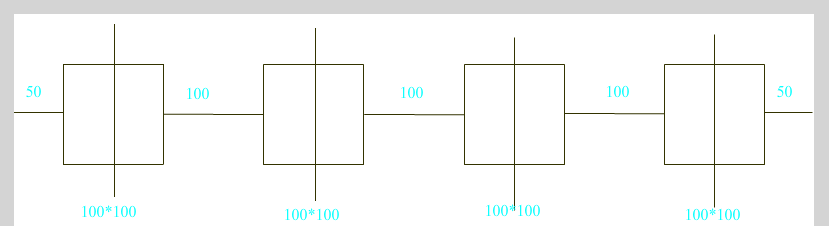
画像内の各セルの垂直線は、セルを水平方向の 2 つの辺に分割します。縦線ごとに行を 5 つの部分に分割し、現在のマウスの e.clientX が 5 つの部分のどの部分にあるかを見て判断します。
- ここでは審査時にソートが使用されます。具体的には、各垂直線の x 座標と現在のマウス位置の x 座標を配列 (ここでは `sort_array`) に保存し、並べ替えてから、`indexOf` を使用して現在のマウスの x 座標の位置を確認します。配列内の現在のドラッグターゲット位置を取得できます。
並べ替える必要がない場合、コードは次のようになります
var target;
if(x>50+50){
 if(x>3*100+3*100+50+50){//最后一部分
  target=4;
 }else{
  target=(x-50-50)/(50+100+50);
 }
}else
 target=0;
- その後、現在のマウス位置の x 座標を削除し、次のマウス移動イベントの x 座標用に空の位置を残します。
・現在ドラッグしている対象位置の左右の絵のオフセットについては、対象位置の左右の絵に対応するクラスを追加するだけです。
.prev{
 right: 40px;
}
.next{
 left: 40px;
}
 <div id='wrap' ms-controller='photo_sort'>
  <ul class='justify' ms-mousemove='drag_move($event)'>
   <li ms-repeat='photo_list' ms-attr-id='wrap_photo{{$index}}' ms-class-prev='$index==target_index-1'
   ms-class-next='$index==target_index'>
   ...
   </li>
   <li class='justify_fix'></li>
  </ul>
 </div>
这里需要注意,当代理拖动到最左边或最右边时,由于布局是`inline-block`,此时目标位置所在行的上一行(如果有)的最后一个单元格或下一行(如果有)的第一个单元格也会发生偏移。
解决方法是设置变量`x_index`,表示单元格在x方向的index.在添加偏移class的时候,增加判定条件
<li ms-repeat='photo_list' ms-attr-id='wrap_photo{{$index}}' ms-class-prev='$index==target_index-1&&x_index>0'
ms-class-next='$index==target_index&&x_index<col_num'>
...
</li>
mouseup
function onMouseUp(target){
   if(photo_sort.drag_flag){
    for(var i=0,len=photo_sort.selected_index.size();i<len;i++){//遍历选中图片
     var item_index=photo_sort.selected_index[i],data=photo_sort.photo_list,
     target_index=photo_sort.target_index,temp;
     if(item_index<target_index){//目标位置在选中图片之后
      temp=data[item_index].src;
      for(var j=item_index;j<target_index;j++)
       data[j].src=data[j+1].src;
      data[target_index-1].src=temp;
     }else{//目标位置在选中图片之前
      temp=data[item_index].src;
      for(var j=item_index;j>target_index;j--)
       data[j].src=data[j-1].src;
      data[target_index].src=temp;
     }
    }
    photo_sort.target_index=-1;//各种重置,初始化
    photo_sort.sort_array=[];
    photo_sort.col_num=0;
    photo_sort.x_index=-1;
    photo_sort.selected_index=[];
    $('drag_proxy').style.display='none';
    photo_sort.drag_flag=false;
    avalon.unbind(document,'mouseup');
    if(isIE)
     target.releaseCapture();
   }
  }
这里主要就是对图片列表的重排。
- 目标位置在选中图片之前
先把原始图片保存在`temp`,然后把从目标位置图片到原始图片前一位置的图片,依次后移一个位置,最后把`temp`放到目标位置。
- 目标位置在选中图片之后
和上面差不多,只不过这里是把从目标位置图片到原始图片后一位置的图片,依次前移一个位置。
注意
不能像`data[j]=data[j+1]`这样赋值,因为avalon不支持单个转换,如果想更新,需要将整个子VM重新赋以一个新的对象。也就是定义一个arr,然后从头开始向里面添加model,最后`photo_sort.photo_list.clear()`删除所有图片,`photo_sort.photo_list=arr`重新赋值,更新视图。
后记
事实上,google plus在细节上还做了
- 框选图片
- 如果有滚动条,且拖动位置快要超出当前界面,滚动条会自动上移或下移。
这两个本屌就不做了,原理也是很简单的。

 Python vs. JavaScript:開発環境とツールApr 26, 2025 am 12:09 AM
開発環境におけるPythonとJavaScriptの両方の選択が重要です。 1)Pythonの開発環境には、Pycharm、Jupyternotebook、Anacondaが含まれます。これらは、データサイエンスと迅速なプロトタイピングに適しています。 2)JavaScriptの開発環境には、フロントエンドおよびバックエンド開発に適したnode.js、vscode、およびwebpackが含まれます。プロジェクトのニーズに応じて適切なツールを選択すると、開発効率とプロジェクトの成功率が向上する可能性があります。
 JavaScriptはCで書かれていますか?証拠を調べるApr 25, 2025 am 12:15 AM
はい、JavaScriptのエンジンコアはCで記述されています。1)C言語は、JavaScriptエンジンの開発に適した効率的なパフォーマンスと基礎となる制御を提供します。 2)V8エンジンを例にとると、そのコアはCで記述され、Cの効率とオブジェクト指向の特性を組み合わせて書かれています。3)JavaScriptエンジンの作業原理には、解析、コンパイル、実行が含まれ、C言語はこれらのプロセスで重要な役割を果たします。
 JavaScriptの役割:WebをインタラクティブでダイナミックにするApr 24, 2025 am 12:12 AM
JavaScriptは、Webページのインタラクティブ性とダイナミズムを向上させるため、現代のWebサイトの中心にあります。 1)ページを更新せずにコンテンツを変更できます。2)Domapiを介してWebページを操作する、3)アニメーションやドラッグアンドドロップなどの複雑なインタラクティブ効果、4)ユーザーエクスペリエンスを改善するためのパフォーマンスとベストプラクティスを最適化します。
 CおよびJavaScript:接続が説明しましたApr 23, 2025 am 12:07 AM
CおよびJavaScriptは、WebAssemblyを介して相互運用性を実現します。 1)CコードはWebAssemblyモジュールにコンパイルされ、JavaScript環境に導入され、コンピューティングパワーが強化されます。 2)ゲーム開発では、Cは物理エンジンとグラフィックスレンダリングを処理し、JavaScriptはゲームロジックとユーザーインターフェイスを担当します。
 Webサイトからアプリまで:JavaScriptの多様なアプリケーションApr 22, 2025 am 12:02 AM
JavaScriptは、Webサイト、モバイルアプリケーション、デスクトップアプリケーション、サーバー側のプログラミングで広く使用されています。 1)Webサイト開発では、JavaScriptはHTMLおよびCSSと一緒にDOMを運用して、JQueryやReactなどのフレームワークをサポートします。 2)ReactNativeおよびIonicを通じて、JavaScriptはクロスプラットフォームモバイルアプリケーションを開発するために使用されます。 3)電子フレームワークにより、JavaScriptはデスクトップアプリケーションを構築できます。 4)node.jsを使用すると、JavaScriptがサーバー側で実行され、高い並行リクエストをサポートします。
 Python vs. JavaScript:ユースケースとアプリケーションと比較されますApr 21, 2025 am 12:01 AM
Pythonはデータサイエンスと自動化により適していますが、JavaScriptはフロントエンドとフルスタックの開発により適しています。 1. Pythonは、データ処理とモデリングのためにNumpyやPandasなどのライブラリを使用して、データサイエンスと機械学習でうまく機能します。 2。Pythonは、自動化とスクリプトにおいて簡潔で効率的です。 3. JavaScriptはフロントエンド開発に不可欠であり、動的なWebページと単一ページアプリケーションの構築に使用されます。 4. JavaScriptは、node.jsを通じてバックエンド開発において役割を果たし、フルスタック開発をサポートします。
 JavaScript通訳者とコンパイラにおけるC/Cの役割Apr 20, 2025 am 12:01 AM
CとCは、主に通訳者とJITコンパイラを実装するために使用されるJavaScriptエンジンで重要な役割を果たします。 1)cは、JavaScriptソースコードを解析し、抽象的な構文ツリーを生成するために使用されます。 2)Cは、Bytecodeの生成と実行を担当します。 3)Cは、JITコンパイラを実装し、実行時にホットスポットコードを最適化およびコンパイルし、JavaScriptの実行効率を大幅に改善します。
 JavaScript in Action:実際の例とプロジェクトApr 19, 2025 am 12:13 AM
現実世界でのJavaScriptのアプリケーションには、フロントエンドとバックエンドの開発が含まれます。 1)DOM操作とイベント処理を含むTODOリストアプリケーションを構築して、フロントエンドアプリケーションを表示します。 2)node.jsを介してRestfulapiを構築し、バックエンドアプリケーションをデモンストレーションします。


ホットAIツール

Undresser.AI Undress
リアルなヌード写真を作成する AI 搭載アプリ

AI Clothes Remover
写真から衣服を削除するオンライン AI ツール。

Undress AI Tool
脱衣画像を無料で

Clothoff.io
AI衣類リムーバー

Video Face Swap
完全無料の AI 顔交換ツールを使用して、あらゆるビデオの顔を簡単に交換できます。

人気の記事
ホットツール

メモ帳++7.3.1
使いやすく無料のコードエディター

SAP NetWeaver Server Adapter for Eclipse
Eclipse を SAP NetWeaver アプリケーション サーバーと統合します。

ZendStudio 13.5.1 Mac
強力な PHP 統合開発環境

MantisBT
Mantis は、製品の欠陥追跡を支援するために設計された、導入が簡単な Web ベースの欠陥追跡ツールです。 PHP、MySQL、Web サーバーが必要です。デモおよびホスティング サービスをチェックしてください。

PhpStorm Mac バージョン
最新(2018.2.1)のプロフェッショナル向けPHP統合開発ツール
ホットトピック
 7719
7719 15164114139652128925123329