ホームページ >ウェブフロントエンド >uni-app >uni-app 入門チュートリアル - サードパーティのログインと共有
uni-app 入門チュートリアル - サードパーティのログインと共有
- coldplay.xixi転載
- 2021-01-18 17:37:203986ブラウズ

推奨 (無料): ユニアプリ開発チュートリアル
記事目次
- 序文
- 1. 一般的な構成
- 1. WeChat アプレットの構成
- 2 .APP 側の設定
- 2. WeChat アプレットのサードパーティ ログイン
- 1. ログインするかどうかの決定
- 2. ログイン ページの開発
- 3. APP サードパーティ ログイン
- 4. 共有インターフェイス
- 1. ミニプログラム共有
- 2.APP共有
- 概要
序文
この記事は主にAPP 開発の 2 つの側面を紹介 基本的な機能はサードパーティのログインと共有です: 一般的なログイン設定、WeChat ミニ プログラムと APP のサードパーティのログイン方法、チャットとモーメントへの共有を含みます uni を使用したさまざまなインターフェイスと実装方法があります-アプリ。
1. 一般的な構成
アプレットと APP ログイン インターフェイスは異なるため、クロスエンド互換性処理を行う必要があります。フロントエンド 同時に、WeChat やその他のプラットフォーム上の小規模プログラムは、通常、ホスト プログラムのサードパーティ ログインのみをサポートし、Weibo、QQ などの他の一般的なサードパーティ ログイン方法を含めることはできません。 . そのため、APP から分離する必要があります。
1. WeChat ミニ プログラムの構成
WeChat ミニ プログラムを構成する必要がありますappid、ミニ プログラム開発者に申請し、個々の開発者をサポートするための appid および関連する秘密キー。 appid を取得した後、manifest.json を編集します。WeChat アプレットの構成を完了するか、ソース コード ビューに入力するかを選択できます。手順は次のとおりです:
"mp-weixin" : {
    "appid" : "appid"}
https:// をクリックできます。 developers.weixin.qq.com/ Miniprogram/dev/api/open-api/user-info/wx.getUserInfo.html WeChat の公式ドキュメントを参照してください。 HBuilder が提供するテスト AppID を使用すると、未定義のプロパティ 'forceUpdate' を読み取れませんなどのエラーが報告される場合があります。現時点では、WeChat パブリック プラットフォーム https を使用できます。 ://developers.weixin.qq. com/community/welogin?redirect_url=/sandbox でサンドボックス環境テスト番号の AppID と AppSecret 情報を申請し、プロジェクトのテストに使用すると、エラーが発生します。出力されなくなります。
2. APP 側の設定
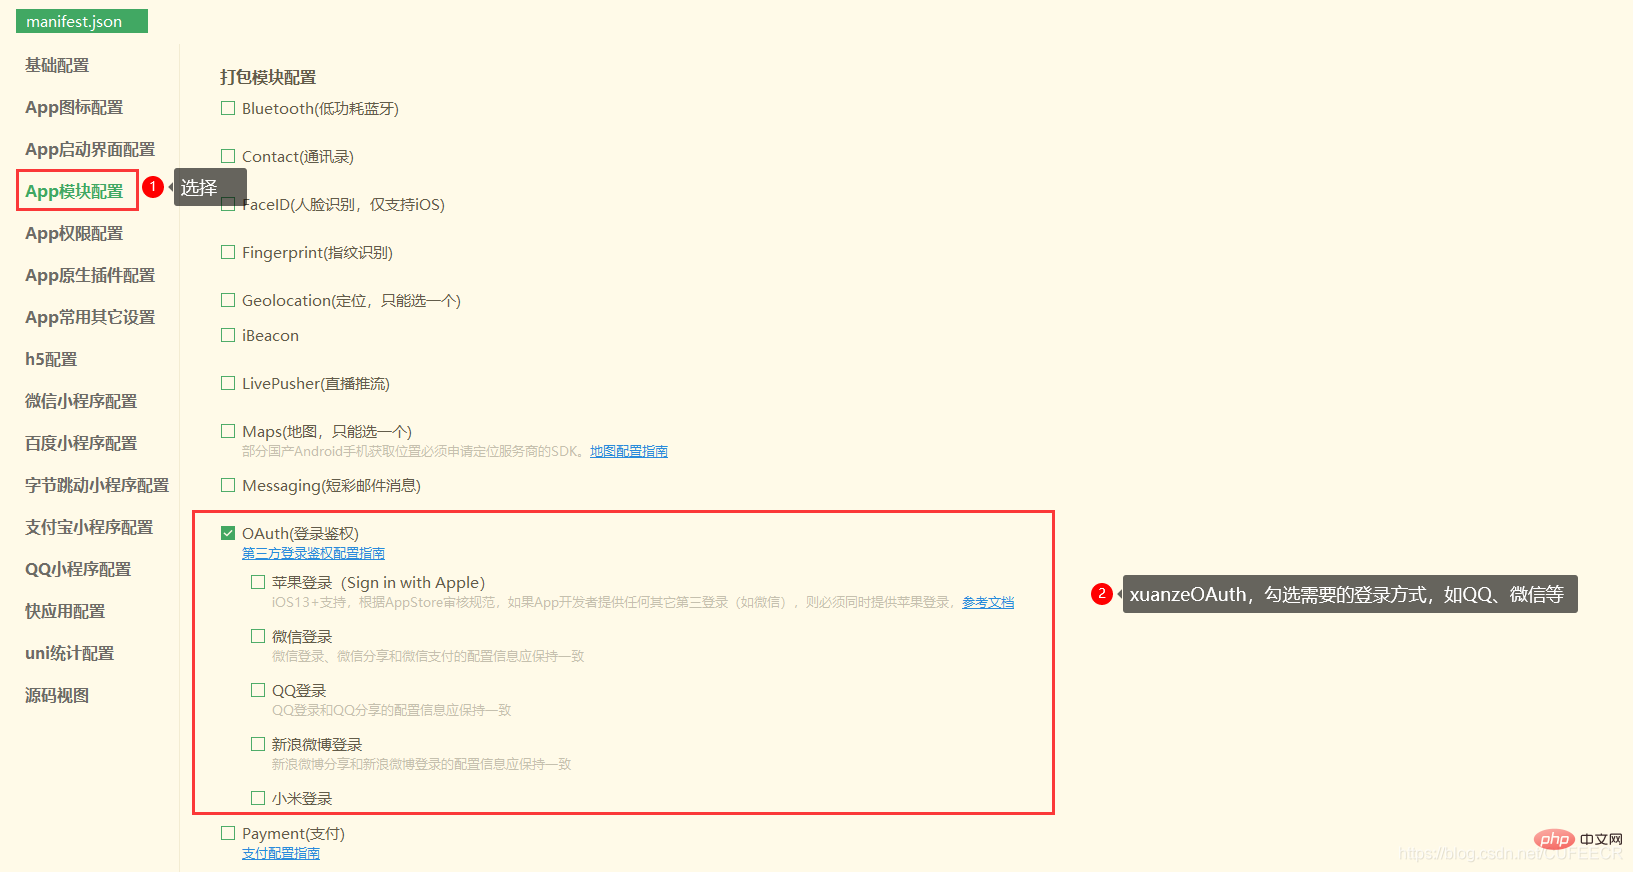
APP 側は、WeChat、QQ、Weibo などの複数のサードパーティのログイン方法をサポートしています。開発者にアクセスし、対応するアプリを取得します。 対応する appid を取得した後、次のように、manifest.json を編集し、視覚的な操作を実行し、アプリ モジュール構成を選択し、OAuth 認証構成を実行し、必要なログイン方法 (QQ、WeChat など) を選択します。
2. WeChat ミニ プログラムへのサードパーティのログイン
1. ログインするかどうかの決定
ログイン前に必須WeChat ミニ プログラムにログインするかどうかを決定するには、App.vue で定義されている変数とメソッドはグローバル変数とメソッド であり、呼び出すことができるため、この時点で App.vue で定義できます。他のページでは、 を使用するだけです。global キーワードを宣言するだけです。
ユーザー ID とランダム コードおよびその他の情報をキーに従ってローカル キャッシュから取得し、サーバーにユーザーが存在するかどうかの確認を要求します。
ランダムコードを設けてデータインターフェースのセキュリティを向上させているほか、RedisやMemCacheなどを利用してセキュリティを確保することも可能です。
<script>
	export default {
		onLaunch: function() {
			console.log('App Launch')
		},
		onShow: function() {
			console.log('App Show')
		},
		onHide: function() {
			console.log('App Hide')
		}
	}
	global.isLogin = function() {
		try{
			var suid = uni.getStorageSync('suid');
			var srand = uni.getStorageSync('srand');
		}catch(e){
			//TODO handle the exception
		}
		if(suid == '' || srand == ''){
			return false;
		}
		else{
			return [suid, srand];
		}
	}</script><style>
	/*每个页面公共css */
	.red{
		color:#ff0000;
	}</style>
次に、次のように、index.vue でグローバル メソッドを呼び出します。
<template>
	<view>
		Index...	</view></template><script>
	export default {
		data() {
			return {
			}
		},
		onLoad() {
			var res = global.isLogin();
			if(!res){
				uni.showModal({
					title: '登录提醒',
					content: '请登录',
					success:function(){
						uni.navigateTo({
							url: '/pages/login'
						})
					}
				})
			}
		},
		onShow() {
		},
		onHide() {
		},
		methods: {
		}
	}</script><style></style>
同時に、次のように、pages ディレクトリに新しいlogin.vueページを作成します:
<template>
	<view>
		login...	</view></template><script>
	export default {
		data() {
			return {
			}
		},
		onLoad() {
		},
		onShow() {
		},
		onHide() {
		},
		methods: {
		}
	}</script><style></style>
そして、それを次のようにpages.jsonに追加します:
{
	"pages": [ //pages数组中第一项表示应用启动页,参考:https://uniapp.dcloud.io/collocation/pages
		{
			"path": "pages/index/index",
			"style": {
				"navigationBarTitleText": "Uni Index",
				"backgroundColor": "#F0AD4E",
				"navigationBarTextStyle":"black"
			}
		},
		{
			"path": "pages/about/about",
			"style": {
				"navigationBarTitleText": "Uni About"
			}
		},
		{
			"path": "pages/news",
			"style": {
				"navigationBarTitleText": "Uni News",
				"navigationBarBackgroundColor":"#DD524D"
			}
		},
		{
			"path": "pages/login",
			"style": {
				"navigationBarTitleText": "Uni Login",
				"navigationBarBackgroundColor":"#00aaff"
			}
		}
	],
	"globalStyle": {
		"navigationBarTextStyle": "white",
		"navigationBarTitleText": "hello uniapp",
		"navigationBarBackgroundColor": "#ff557f",
		"backgroundColor": "#fffae8"
	},
	"tabBar": {
		"color":"#F0AD4E",
		"selectedColor":"#007AFF",
		"backgroundColor":"#FFFFFF",
		"list": [
			{
				"pagePath":"pages/index/index",
				"iconPath":"static/imgs/index_0.png",
				"selectedIconPath":"static/imgs/index_1.png",
				"text": "首页"
			},
			{
				"pagePath":"pages/about/about",
				"iconPath":"static/imgs/about_0.png",
				"selectedIconPath":"static/imgs/about_1.png",
				"text":"关于我们"
			}
		]
	},
	"condition": { //模式配置,仅开发期间生效
	    "current": 0, //当前激活的模式(list 的索引项)
	    "list": [{
	            "name": "index", //模式名称
	            "path": "pages/index/index", //启动页面,必选
	            "query": "interval=4000&autoplay=false" //启动参数,在页面的onLoad函数里面得到。
	        },
	        {
	            "name": "about", //模式名称
	            "path": "pages/about/about", //启动页面,必选
	            "query": "interval=4000&autoplay=false" //启动参数,在页面的onLoad函数里面得到。
	        }
	    ]
	}}
表示: 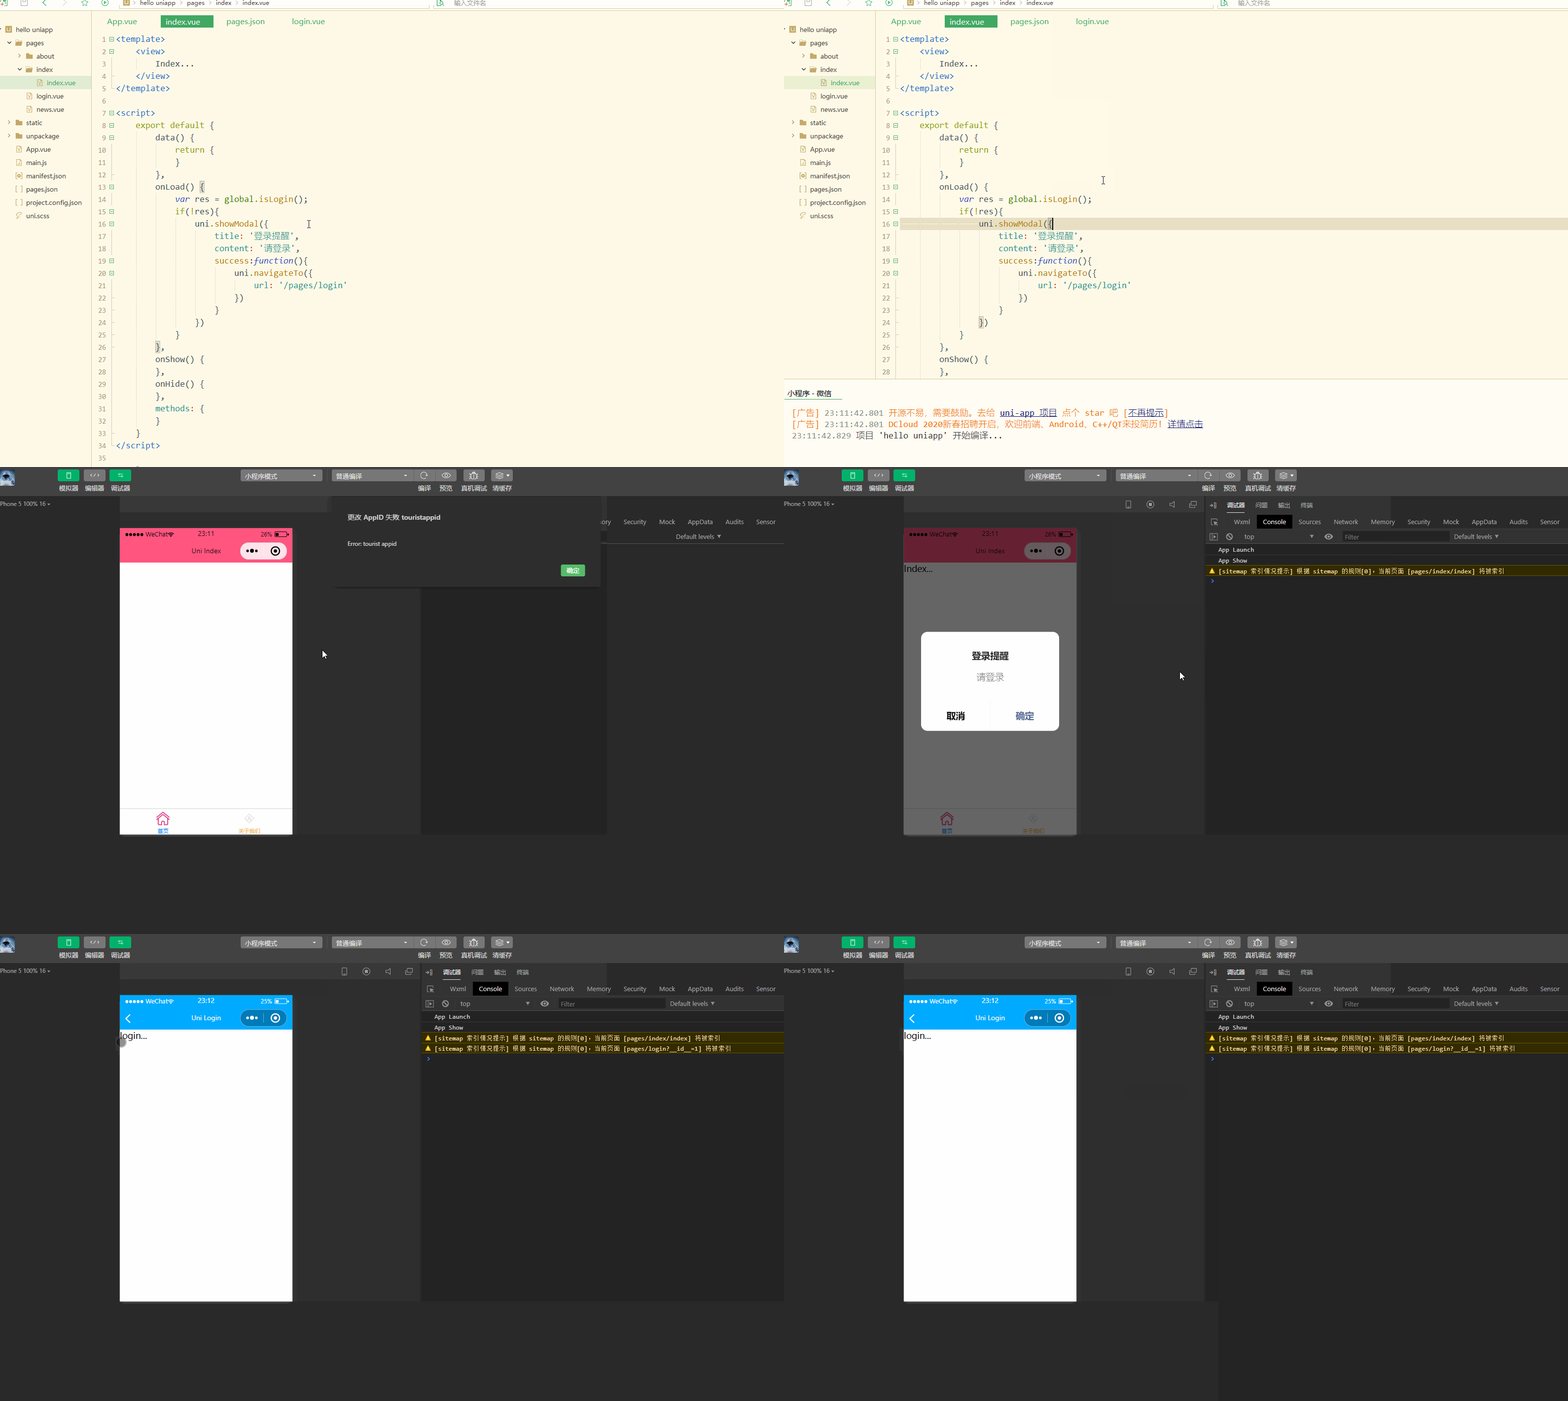
2. ログインページの開発
ログインではプラットフォームを決定し、クロスエンド開発を行う必要があるため、条件付きコンパイルが必要です。 .vue は次のとおりです:
<template>
	<view>
		<!-- #ifdef MP-WEIXIN -->
		<button type="primary" open-type="getUserInfo" @getuserinfo="getuserinfo" withCredentials="true">微信登录</button>
		<!-- #endif -->
	</view></template><script>
	export default {
		data() {
			return {}
		},
		onLoad() {},
		onShow() {},
		onHide() {},
		methods: {
			getuserinfo: function(res){
				console.log(res)
			}
		}
	}</script><style></style>
表示: 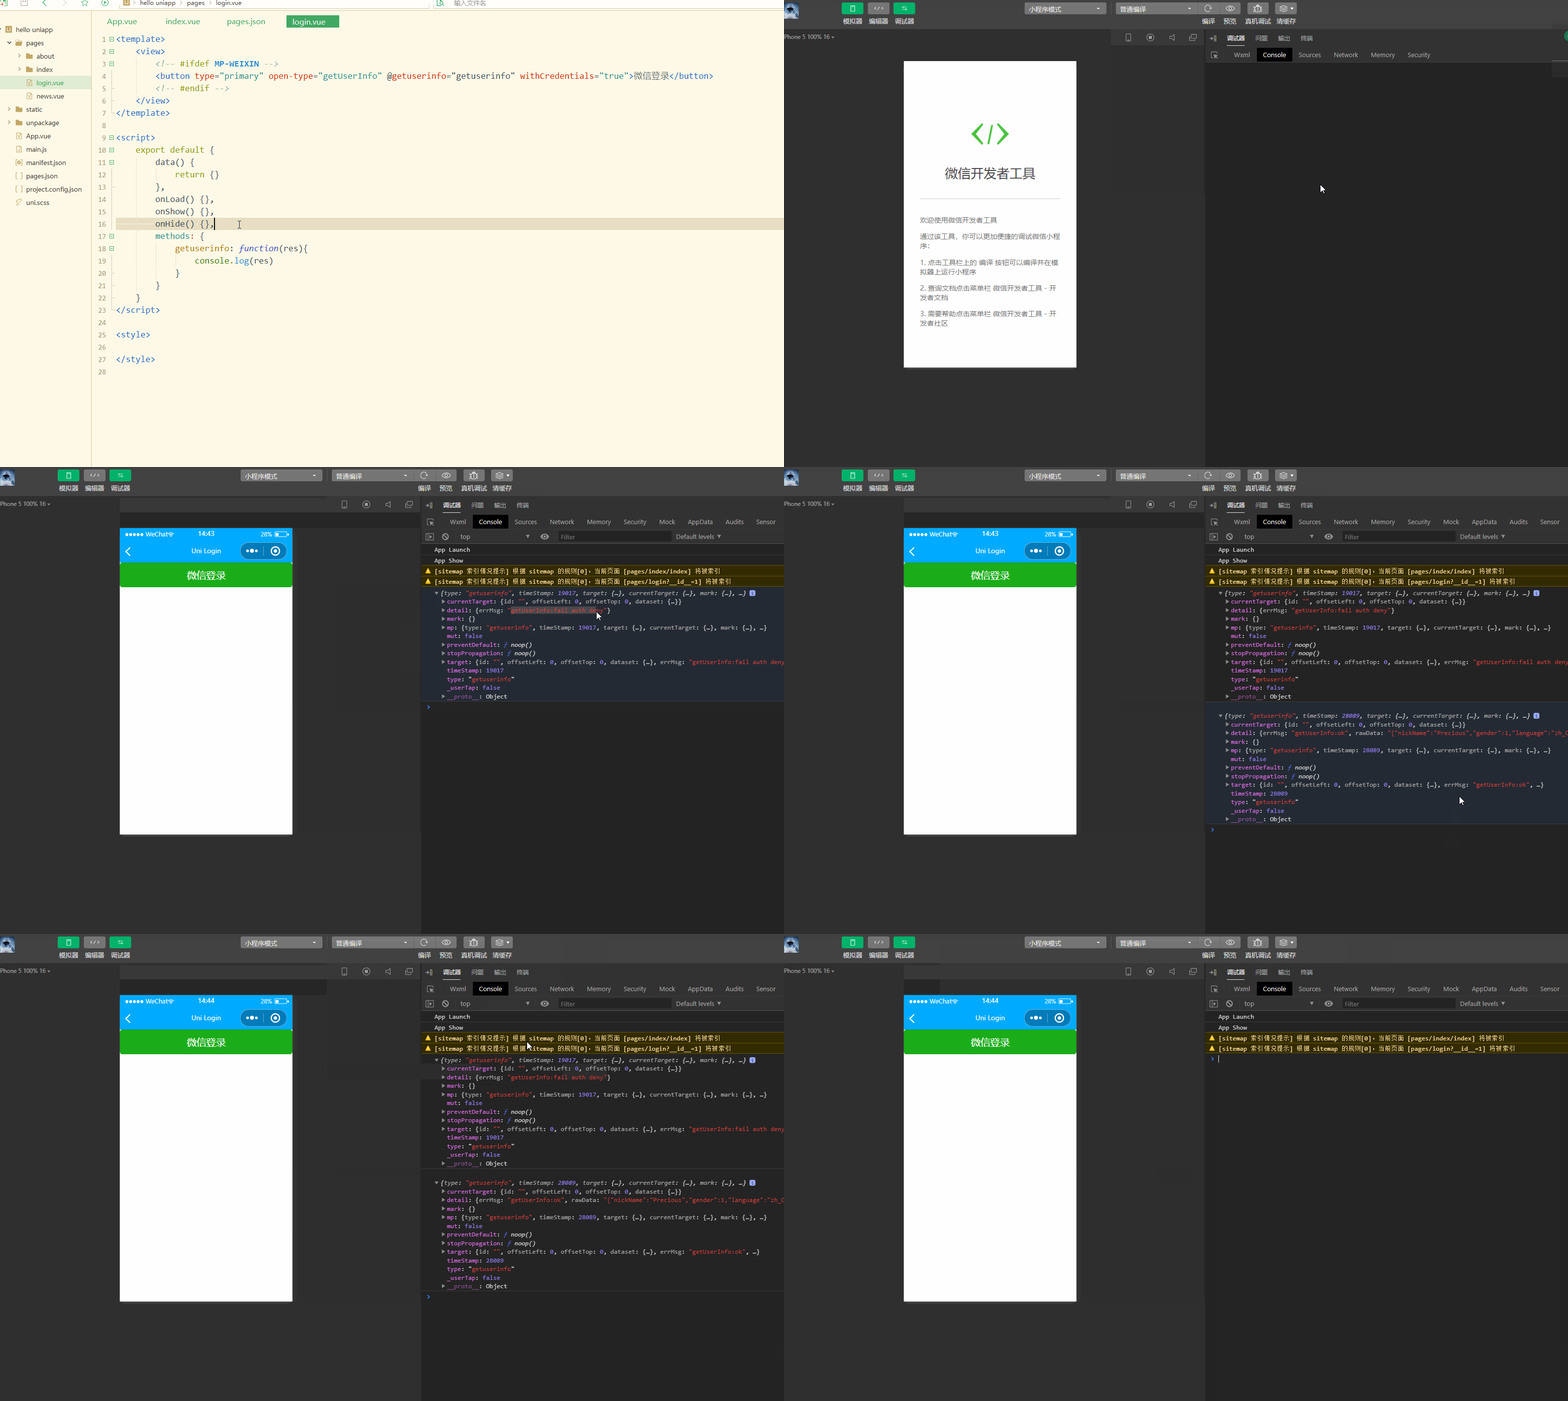
キャッシュをクリアした後ログインステータスが存在しないため、再度ログインする必要があります。
iv 属性があり、暗号化アルゴリズム#の初期ベクトルです。 ## ログインを許可するかどうかの判断基準として情報を使用することもできます。 rawData (機密情報を除いた元のデータ文字列) を使用して署名を計算します。 これには、さらに取得する必要がある openid や session_key などの情報は含まれていません。
まず、
uni.login(OBJECT)
を通じて、ユーザーのログイン認証情報であるコードを取得します。 次に、コードを渡して uni.request(OBJECT)
Get openid と session_key。 <p>login.vue如下:</p>
<pre class="brush:php;toolbar:false"><template>
<view>
<!-- #ifdef MP-WEIXIN -->
<button type="primary" open-type="getUserInfo" @getuserinfo="getuserinfo" withCredentials="true">微信登录</button>
<!-- #endif -->
</view></template><script>
export default {
data() {
return {}
},
onLoad() {},
onShow() {},
onHide() {},
methods: {
getuserinfo: function(res1) {
console.log(res1)
if (!res1.detail.iv) {
uni.showToast({
title: '您已取消授权,登录失败',
icon: "none"
})
return false;
}
uni.login({
provider: 'weixin',
success: function(res2) {
console.log(res2);
uni.request({
url: 'https://api.weixin.qq.com/sns/jscode2session?appid=wxd3d4ee5ed8017903&secret=83c0d5efdfca99fc0509ff0d8956b830&js_code='+res2.code+'&grant_type=authorization_code',
success:function(res3){
// get the openid and seesion key
console.log(res3)
},
fail:function(res4){
console.log(re4)
}
})
},
fail:function(r){
console.log(r)
}
});
}
}
}</script><style></style></pre>
<p>显示:<br><img src="/static/imghwm/default1.png" data-src="https://img.php.cn/upload/article/000/000/052/9b3702970fe6a054ea28c7a6c5b25aa8-4.gif" class="lazy" alt="uniapp login miniprogram get openid sessionkey"></p>
<p>显然,此时获取到了<code>openid和session key。
此外还可以获取unionid,其在满一定条件的情况下才会返回。
获取到了openid和session key后,可以解密iv。
通过微信官方提供的SDK进行解密,可以实现解密的接口,如下:
login.vue如下:
<template>
	<view>
		<!-- #ifdef MP-WEIXIN -->
		<button type="primary" open-type="getUserInfo" @getuserinfo="getuserinfo" withCredentials="true">微信登录</button>
		<!-- #endif -->
	</view></template><script>
	export default {
		data() {
			return {}
		},
		onLoad() {},
		onShow() {},
		onHide() {},
		methods: {
			getuserinfo: function(res1) {
				console.log(res1)
				if (!res1.detail.iv) {
					uni.showToast({
						title: '您已取消授权,登录失败',
						icon: "none"
					})
					return false;
				}
				uni.login({
					provider: 'weixin',
					success: function(res2) {
						console.log(res2);
						uni.request({
							url: 'https://api.weixin.qq.com/sns/jscode2session?appid=wxd3d4ee5ed8017903&secret=83c0d5efdfca99fc0509ff0d8956b830&js_code='+res2.code+'&grant_type=authorization_code',
							success:function(res3){
								// get the openid and seesion key
								console.log(res3)
								// decrypt
								uni.request({
									method: 'POST',
									url: 'https://hoa.hcoder.net/xcxencode/',
									header: {'content-type':'application/x-www-form-urlencoded'},
									data: {
										appid: 'wxd3d4ee5ed8017903',
										sessionKey: res3.data.session_key,
										iv: res1.detail.iv,
										encryptedData: res1.detail.encryptedData									},
									success:function(res4){
										console.log(res4)
									}
								})
							},
							fail:function(res5){
								console.log(re5)
							}
						})
					},
					fail:function(r){
						console.log(r)
					}
				});
			}
		}
	}</script><style></style>
小程序登录时,可以设置选择携带手机号。
从之前button组件的open-type属性中可以发现,getPhoneNumber属性可以获取用户手机号,可以从@getphonenumber回调中获取到用户信息。
三、APP第三方登录
实现APP登录也是通过条件编译实现。
login.vue如下:
<template>
	<view>
		<!-- #ifdef MP-WEIXIN -->
		<button type="primary" open-type="getUserInfo" @getuserinfo="getuserinfo" withCredentials="true">微信登录</button>
		<!-- #endif -->
		<!-- #ifdef APP-PLUS -->
		<button type="primary" @click="appWxLoin" withCredentials="true">用微信登录</button>
		<!-- #endif -->
		<button style="margin-top:50px;">手机号码登录</button>
	</view></template><script>
	export default {
		data() {
			return {}
		},
		onLoad() {},
		onShow() {},
		onHide() {},
		methods: {
			// miniprogram
			getuserinfo: function(res1) {
				console.log(res1)
				if (!res1.detail.iv) {
					uni.showToast({
						title: '您已取消授权,登录失败',
						icon: "none"
					})
					return false;
				}
				uni.login({
					provider: 'weixin',
					success: function(res2) {
						console.log(res2);
						uni.request({
							url: 'https://api.weixin.qq.com/sns/jscode2session?appid=wxd3d4ee5ed8017903&secret=83c0d5efdfca99fc0509ff0d8956b830&js_code=' +
								res2.code + '&grant_type=authorization_code',
							success: function(res3) {
								// get the openid and seesion key
								console.log(res3)
								// decrypt
								uni.request({
									method: 'POST',
									url: 'https://hoa.hcoder.net/xcxencode/',
									header: {
										'content-type': 'application/x-www-form-urlencoded'
									},
									data: {
										appid: 'wxd3d4ee5ed8017903',
										sessionKey: res3.data.session_key,
										iv: res1.detail.iv,
										encryptedData: res1.detail.encryptedData									},
									success: function(res4) {
										console.log(res4)
									}
								})
							},
							fail: function(res5) {
								console.log(re5)
							}
						})
					},
					fail: function(r) {
						console.log(r)
					}
				});
			},
			appWxLoin: function(){
				console.log('login...')
			}
		}
	}</script><style></style>
此时不需要open-type等属性,只需要进行事件绑定就可以。
显示: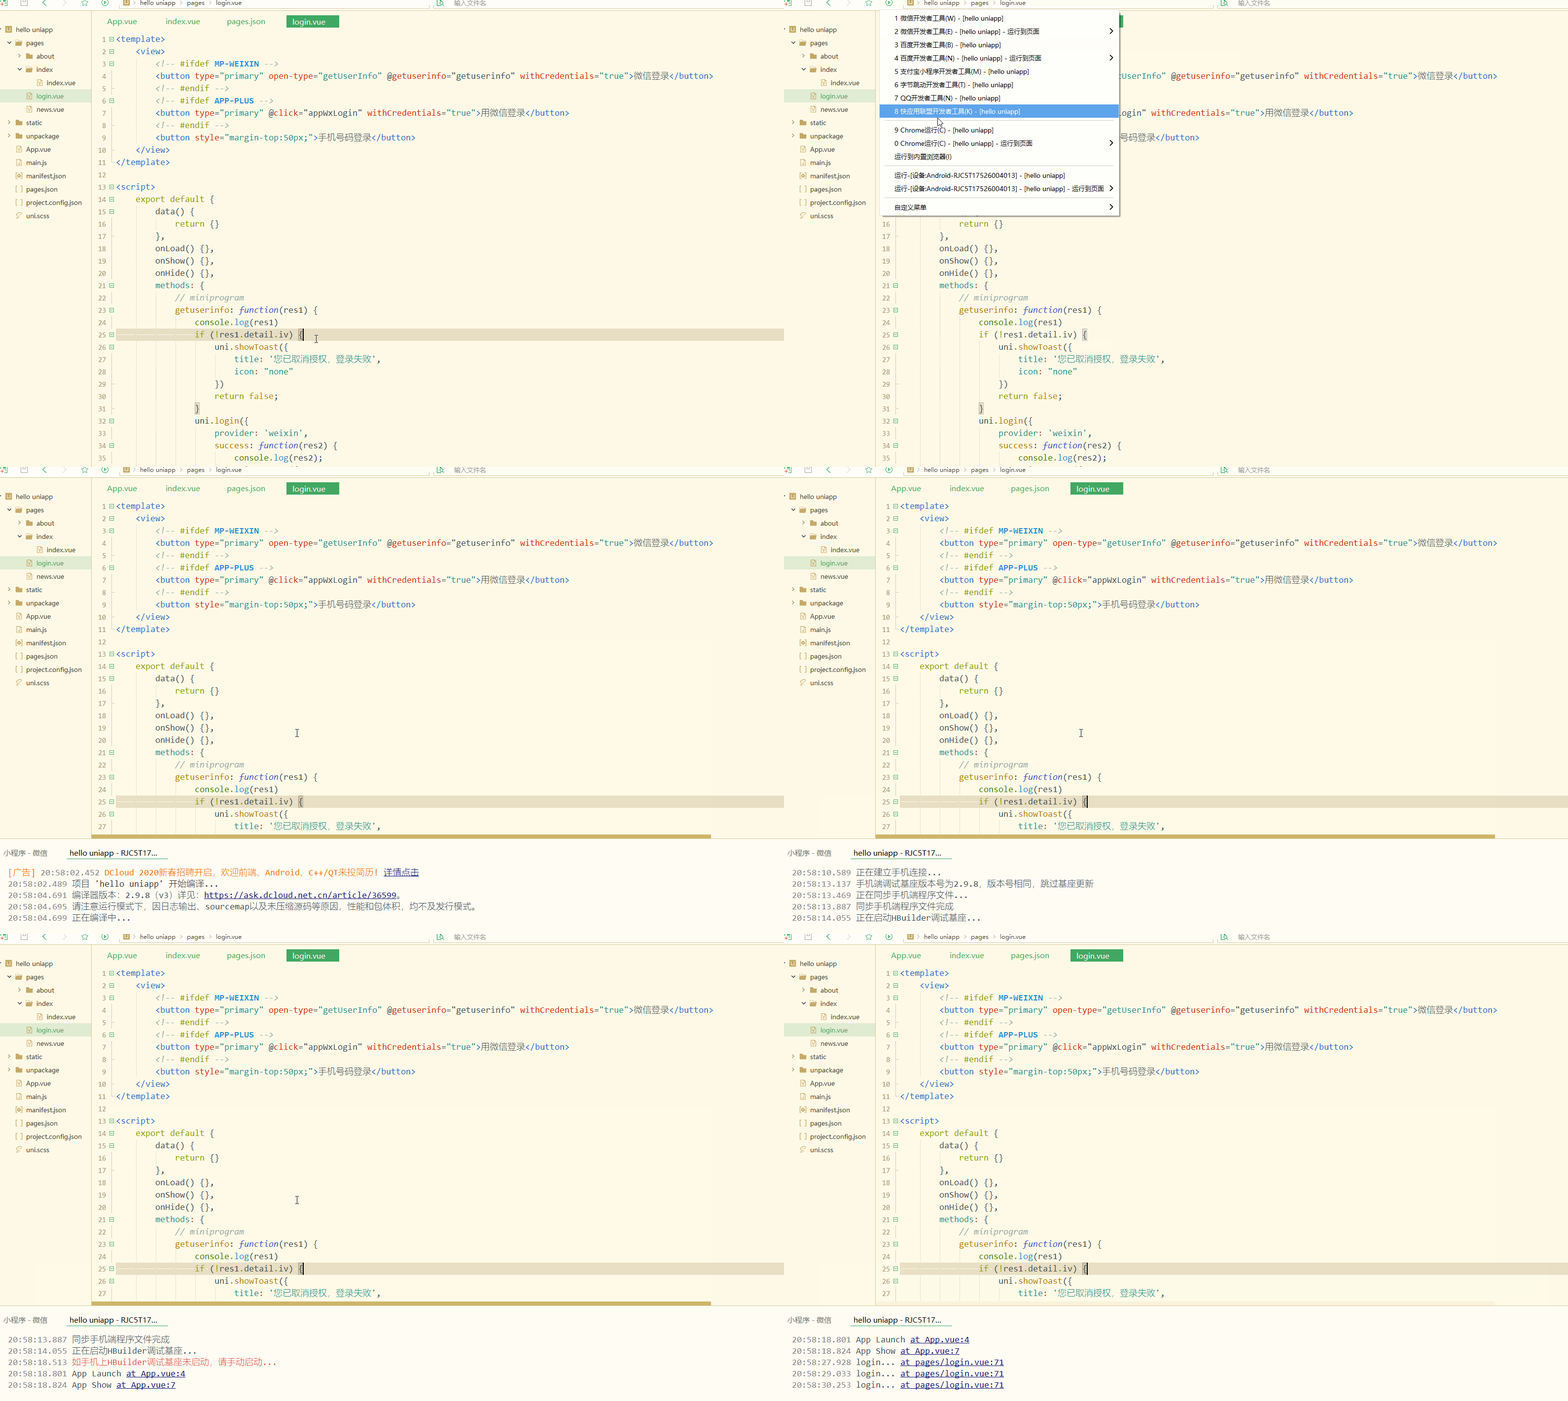
手机端显示:
显然,此时实现了条件编译,在不同的设备显示不同的按钮;
同时手机端点击时,控制台也输出信息。
先实现登录,需要获取服务商,判断是否安装微信,如果已安装则申请登录验证,如下:
<template>
	<view>
		<!-- #ifdef MP-WEIXIN -->
		<button type="primary" open-type="getUserInfo" @getuserinfo="getuserinfo" withCredentials="true">微信登录</button>
		<!-- #endif -->
		<!-- #ifdef APP-PLUS -->
		<button type="primary" @click="appWxLogin" withCredentials="true">用微信登录</button>
		<!-- #endif -->
		<button style="margin-top:50px;">手机号码登录</button>
	</view></template><script>
	export default {
		data() {
			return {}
		},
		onLoad() {},
		onShow() {},
		onHide() {},
		methods: {
			// miniprogram
			getuserinfo: function(res1) {
				console.log(res1)
				if (!res1.detail.iv) {
					uni.showToast({
						title: '您已取消授权,登录失败',
						icon: "none"
					})
					return false;
				}
				uni.login({
					provider: 'weixin',
					success: function(res2) {
						console.log(res2);
						uni.request({
							url: 'https://api.weixin.qq.com/sns/jscode2session?appid=wxd3d4ee5ed8017903&secret=83c0d5efdfca99fc0509ff0d8956b830&js_code=' +
								res2.code + '&grant_type=authorization_code',
							success: function(res3) {
								// get the openid and seesion key
								console.log(res3)
								// decrypt
								uni.request({
									method: 'POST',
									url: 'https://hoa.hcoder.net/xcxencode/',
									header: {
										'content-type': 'application/x-www-form-urlencoded'
									},
									data: {
										appid: 'wxd3d4ee5ed8017903',
										sessionKey: res3.data.session_key,
										iv: res1.detail.iv,
										encryptedData: res1.detail.encryptedData									},
									success: function(res4) {
										console.log(res4)
									}
								})
							},
							fail: function(res5) {
								console.log(re5)
							}
						})
					},
					fail: function(r) {
						console.log(r)
					}
				});
			},
			appWxLogin: function() {
				console.log('login...');
				uni.getProvider({
					service: 'oauth',
					success: function(res) {
						console.log(res.provider)
						if (~res.provider.indexOf('weixin')) {
							uni.login({
								provider: 'weixin',
								success: function(loginRes) {
									console.log(JSON.stringify(loginRes));
									uni.getUserInfo({
										provider: 'weixin',
										success: function(infoRes) {
											console.log(JSON.stringify(infoRes));
											console.log('用户昵称为:' + infoRes.userInfo.nickName);
										}
									});
								}
							});
						}
					}
				});
			}
		}
	}</script><style></style>
显示: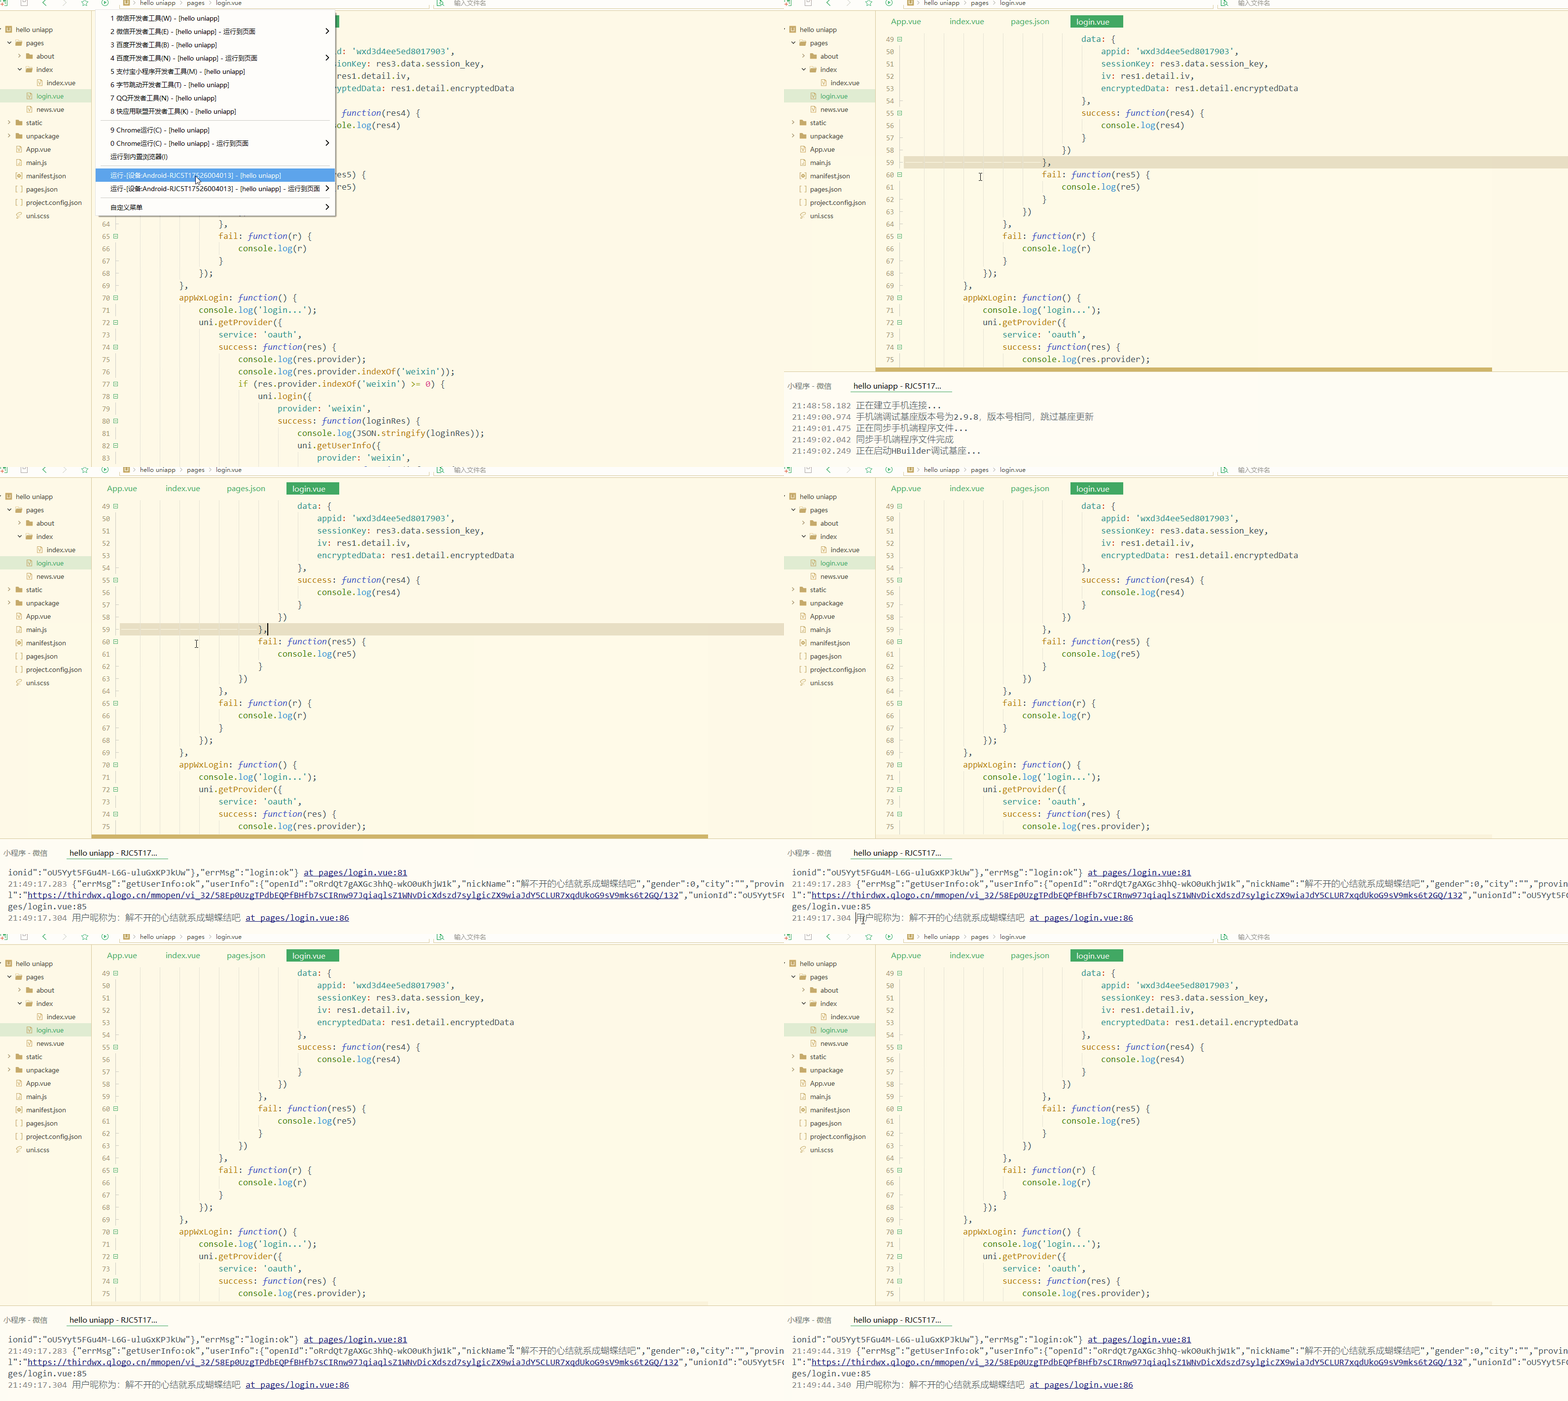
手机端显示:
显然,实现了在APP端调用微信登录;
登录后,输出了相应的信息。
四、分享接口
分享是一个很重要的功能。
1.小程序分享
小程序只支持分享到聊天界面(包括微信好友和微信群),不支持分享到朋友圈,是使用onShareAppMessage生命周期实现的。
index.vue如下:
<template>
	<view>
		Index...	</view></template><script>
	export default {
		data() {
			return {
			}
		},
		onLoad() {
			var res = global.isLogin();
			if(!res){
				uni.showModal({
					title: '登录提醒',
					content: '请登录',
					success:function(){
						uni.navigateTo({
							url: '/pages/login'
						})
					}
				})
			}
		},
		onShow() {
		},
		onHide() {
		},
		onShareAppMessage:function(){
			return {
				title: 'Share test...',
				path: 'pages/index/index'
			}
		},
		methods: {
		}
	}</script><style></style>
显示: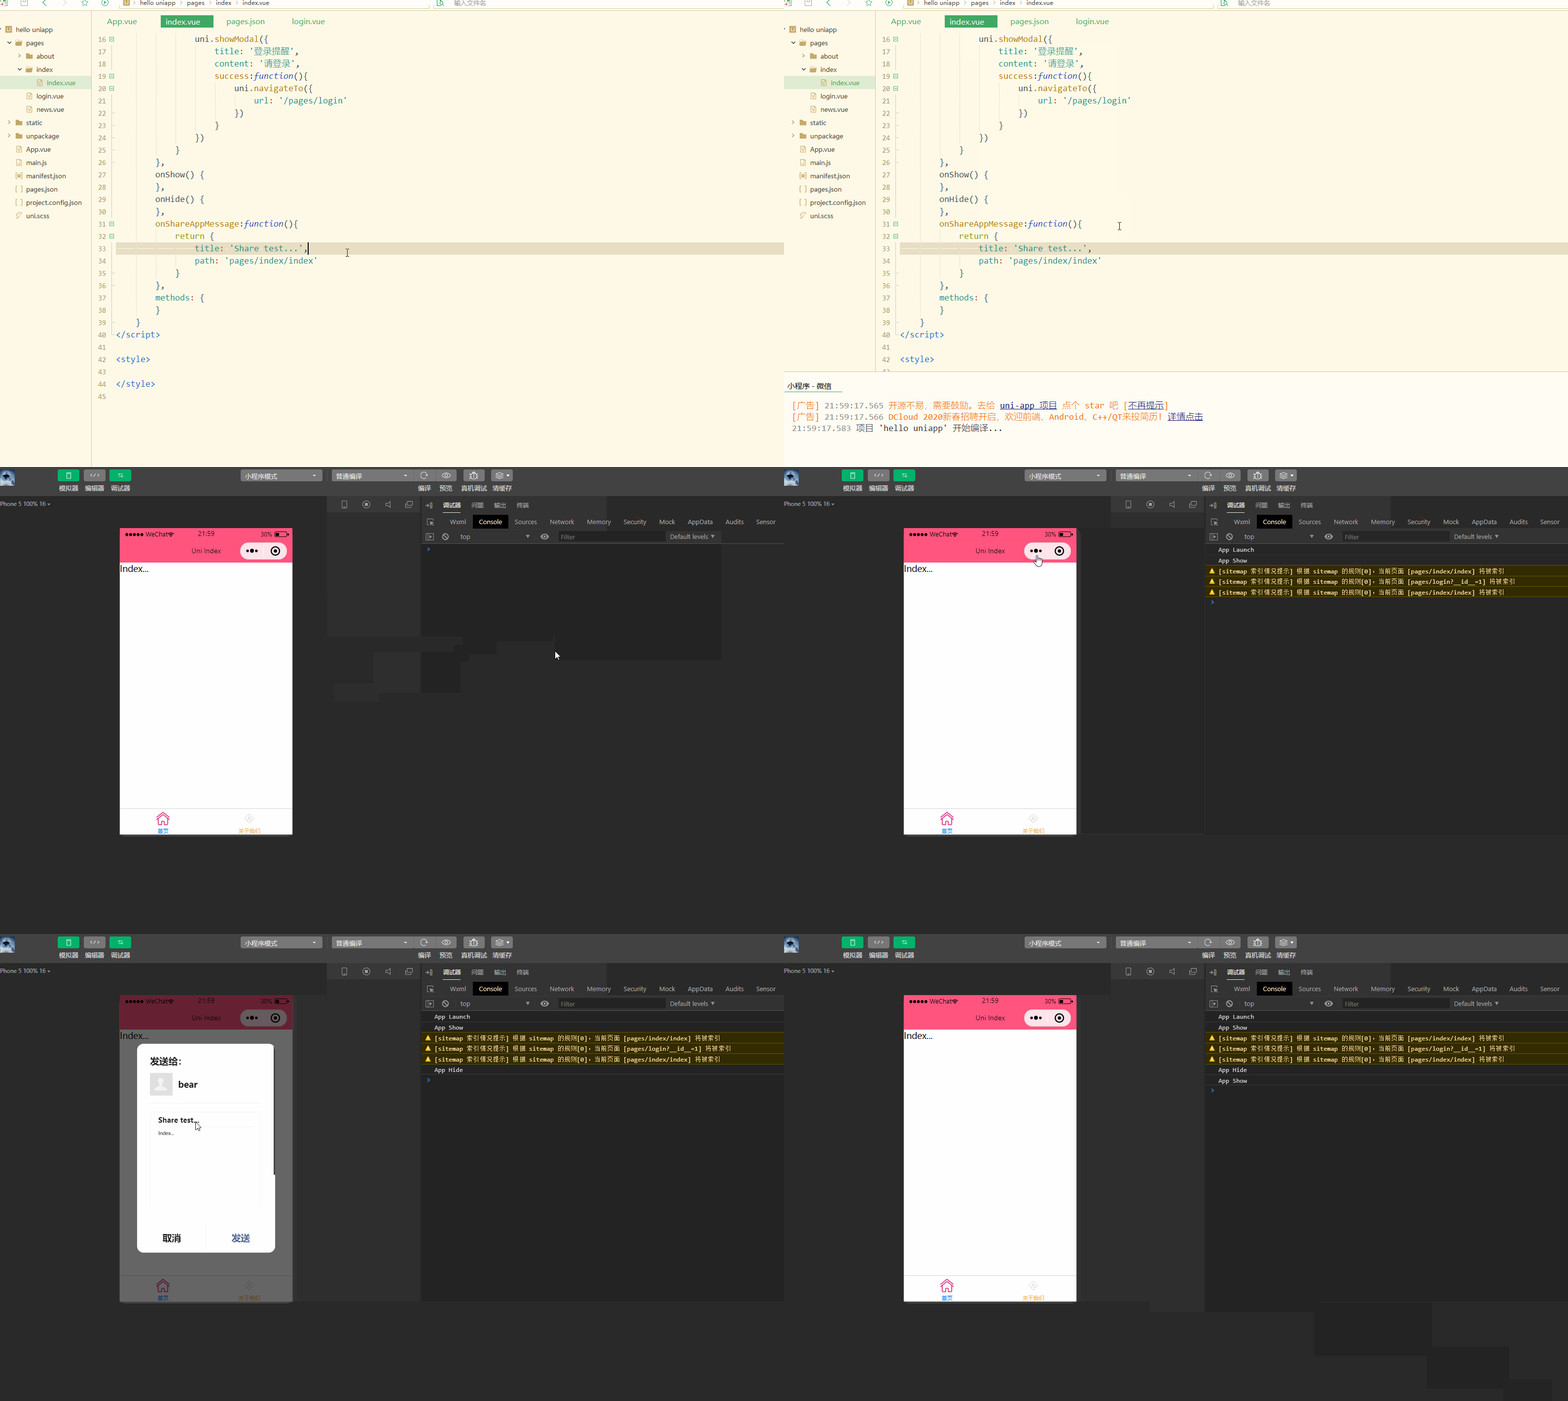
可以看到,实现了分享功能。
2.APP分享
APP中要实现分享,需要在manifest.json中进行配置,如下: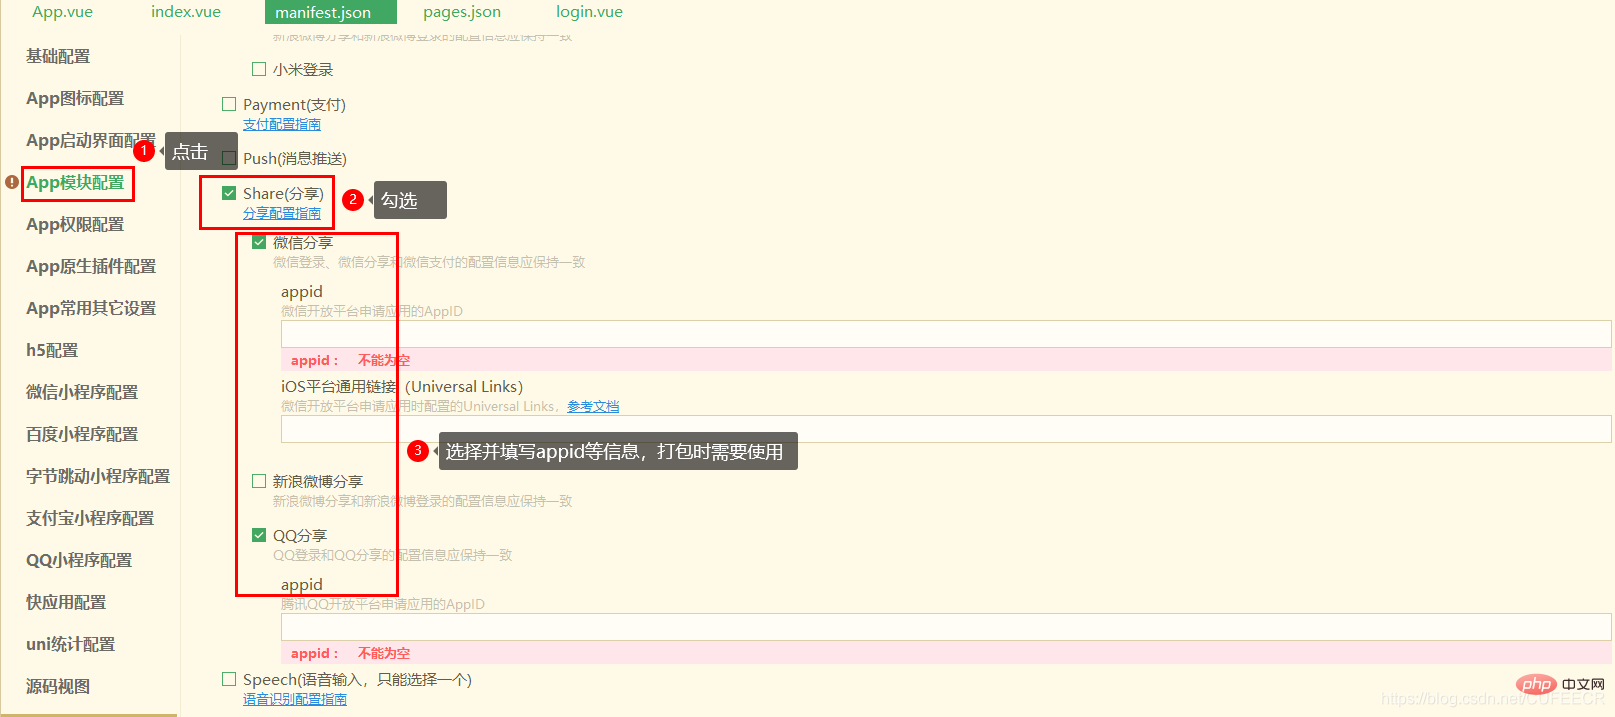
先实现分享纯文字,index.vue如下:
<template>
	<view>
		<!-- #ifdef APP-PLUS -->
		<button type="primary" @click="share">点击分享</button>
		<!-- #endif -->
	</view></template><script>
	export default {
		data() {
			return {
			}
		},
		onLoad() {
		},
		onShow() {
		},
		onHide() {
		},
		onShareAppMessage:function(){
			return {
				title: 'Share test...',
				path: 'pages/index/index'
			}
		},
		methods: {
			share: function(){
				uni.share({
				    provider: "weixin",
				    scene: "WXSceneSession",
				    type: 1,
				    summary: "我正在参加CSDN年度博客之星活动,请点击链接 https://bss.csdn.net/m/topic/blog_star2020/detail?username=cufeecr 投一票吧,先在此谢过啦!!",
				    success: function (res) {
				        console.log("success:" + JSON.stringify(res));
				    },
				    fail: function (err) {
				        console.log("fail:" + JSON.stringify(err));
				    }
				});
			}
		}
	}</script><style></style>
显示: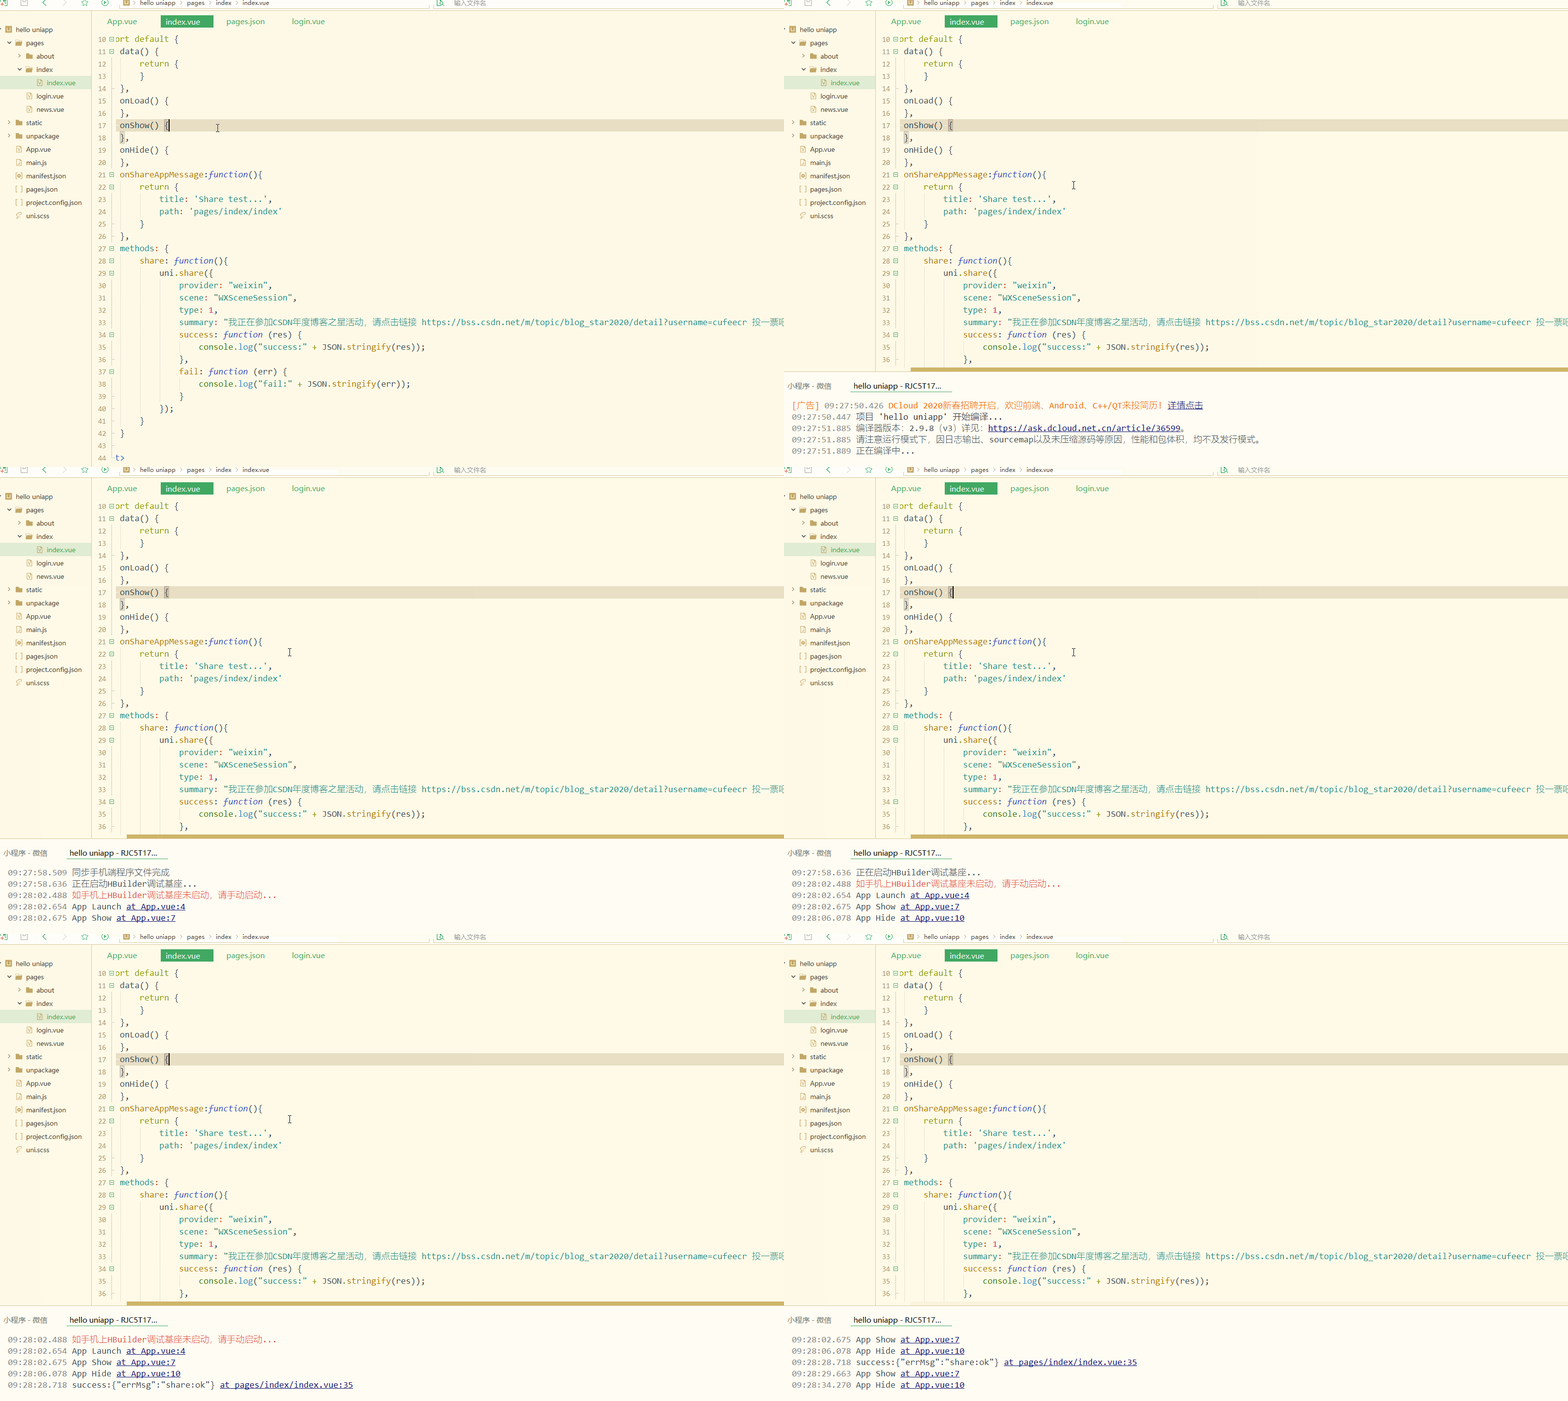
手机端显示:
显然,控制台输出了分享成功的信息;
同时,APP成功调用了微信分享。
再实现分享图文,如下:
<template>
	<view>
		<!-- #ifdef APP-PLUS -->
		<button type="primary" @click="share">点击分享</button>
		<!-- #endif -->
	</view></template><script>
	export default {
		data() {
			return {
			}
		},
		onLoad() {
		},
		onShow() {
		},
		onHide() {
		},
		onShareAppMessage:function(){
			return {
				title: 'Share test...',
				path: 'pages/index/index'
			}
		},
		methods: {
			share: function(){
				uni.share({
				    provider: "weixin",
				    scene: "WXSceneSession",
				    type: 0,
				    href: "https://bss.csdn.net/m/topic/blog_star2020/detail?username=cufeecr",
				    title: "cufeecr年度博客之星评选",
				    summary: "我正在参加CSDN年度博客之星活动,请点击链接 https://bss.csdn.net/m/topic/blog_star2020/detail?username=cufeecr 投一票吧,先在此谢过啦!!",
				    imageUrl: "https://img-blog.csdnimg.cn/20210112093810423.png",
				    success: function (res) {
				        console.log("success:" + JSON.stringify(res));
				    },
				    fail: function (err) {
				        console.log("fail:" + JSON.stringify(err));
				    }
				});
			}
		}
	}</script><style></style>
显示: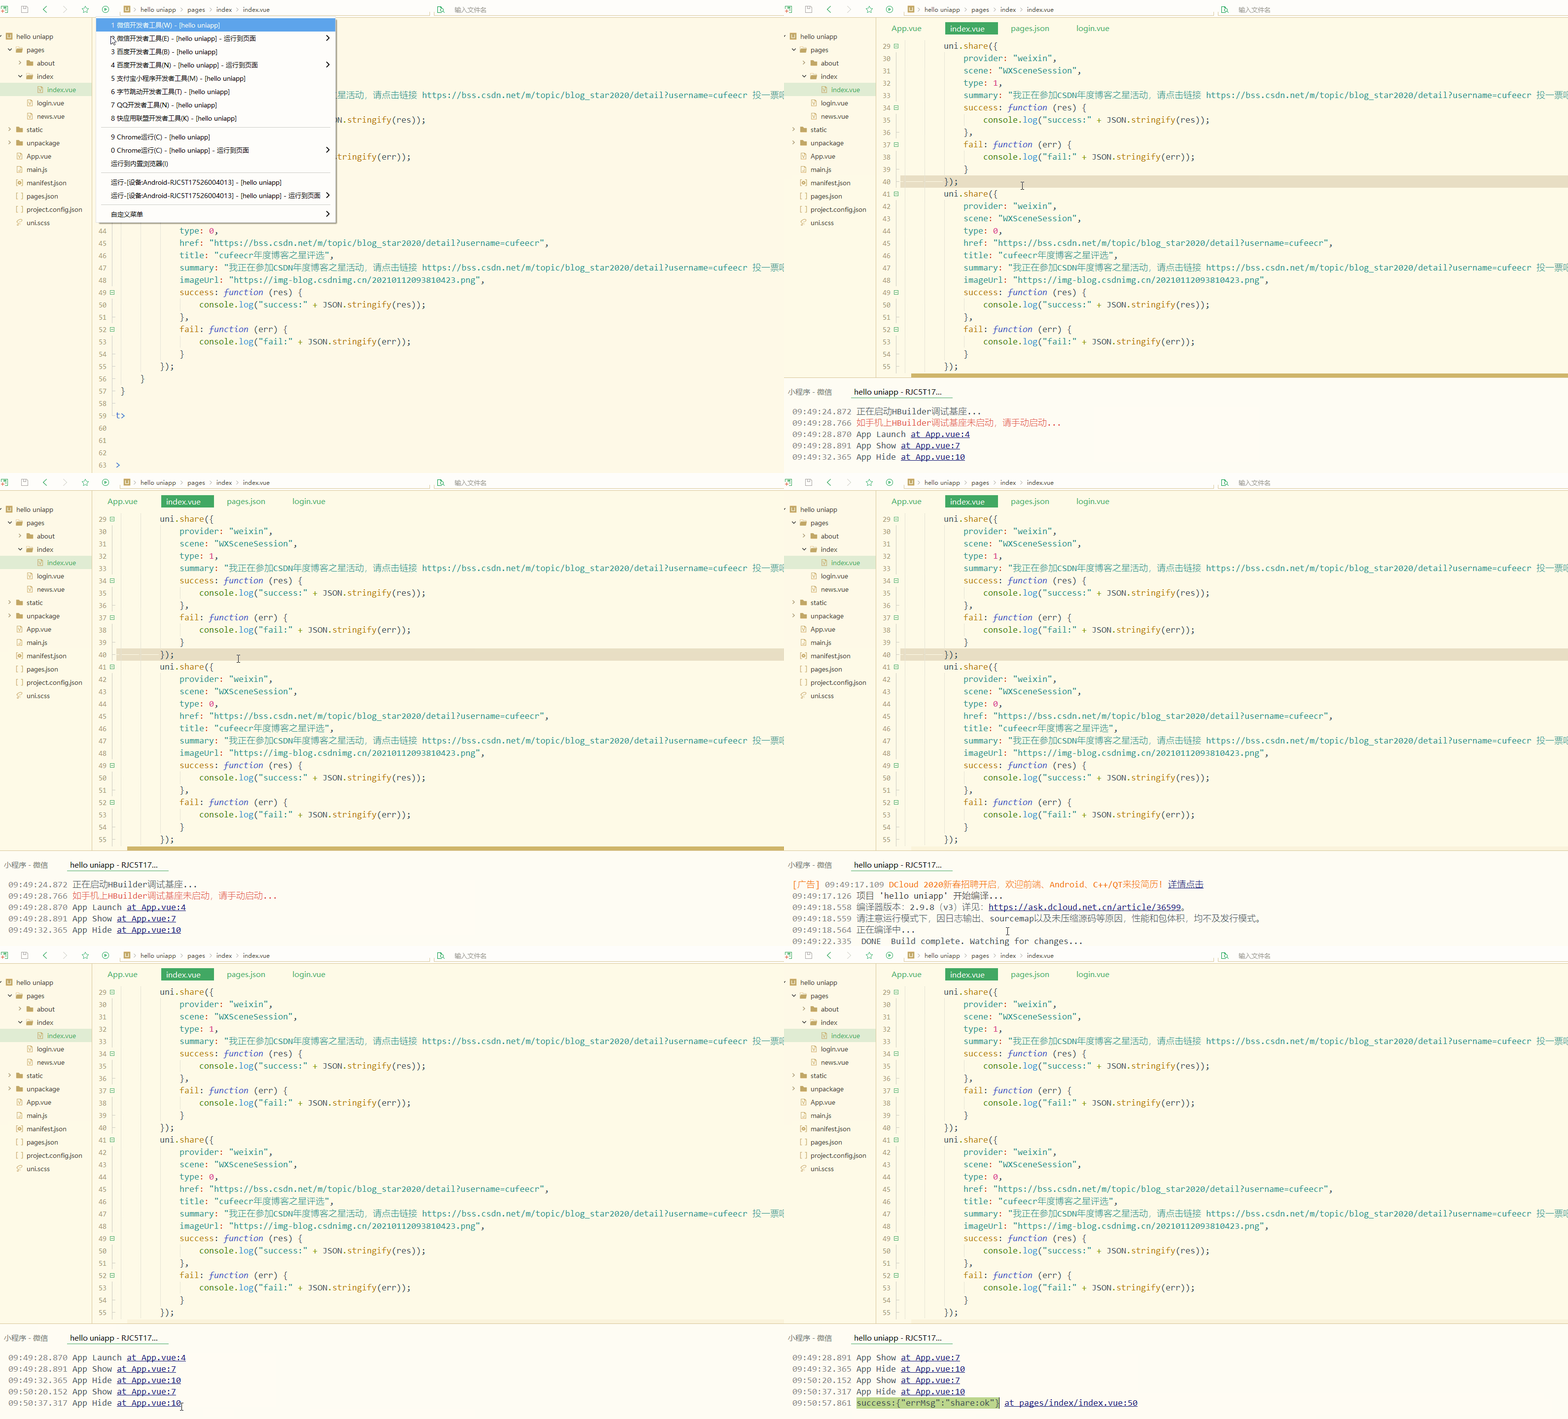
手机端显示:
显然,实现了分享图文到微信好友或微信群。
还可以分享到微信朋友圈,如下:
<template>
	<view>
		<!-- #ifdef APP-PLUS -->
		<button type="primary" @click="share">点击分享</button>
		<!-- #endif -->
	</view></template><script>
	export default {
		data() {
			return {
			}
		},
		onLoad() {
		},
		onShow() {
		},
		onHide() {
		},
		onShareAppMessage:function(){
			return {
				title: 'Share test...',
				path: 'pages/index/index'
			}
		},
		methods: {
			share: function(){
				uni.share({
				    provider: "weixin",
					scene: "WXSenceTimeline",
					type: 2,
					imageUrl: "https://img-blog.csdnimg.cn/20210112093810423.png",
					success: function (res) {
						console.log("success:" + JSON.stringify(res));
					},
					fail: function (err) {
						console.log("fail:" + JSON.stringify(err));
					}
				});
			}
		}
	}</script><style></style>
显示: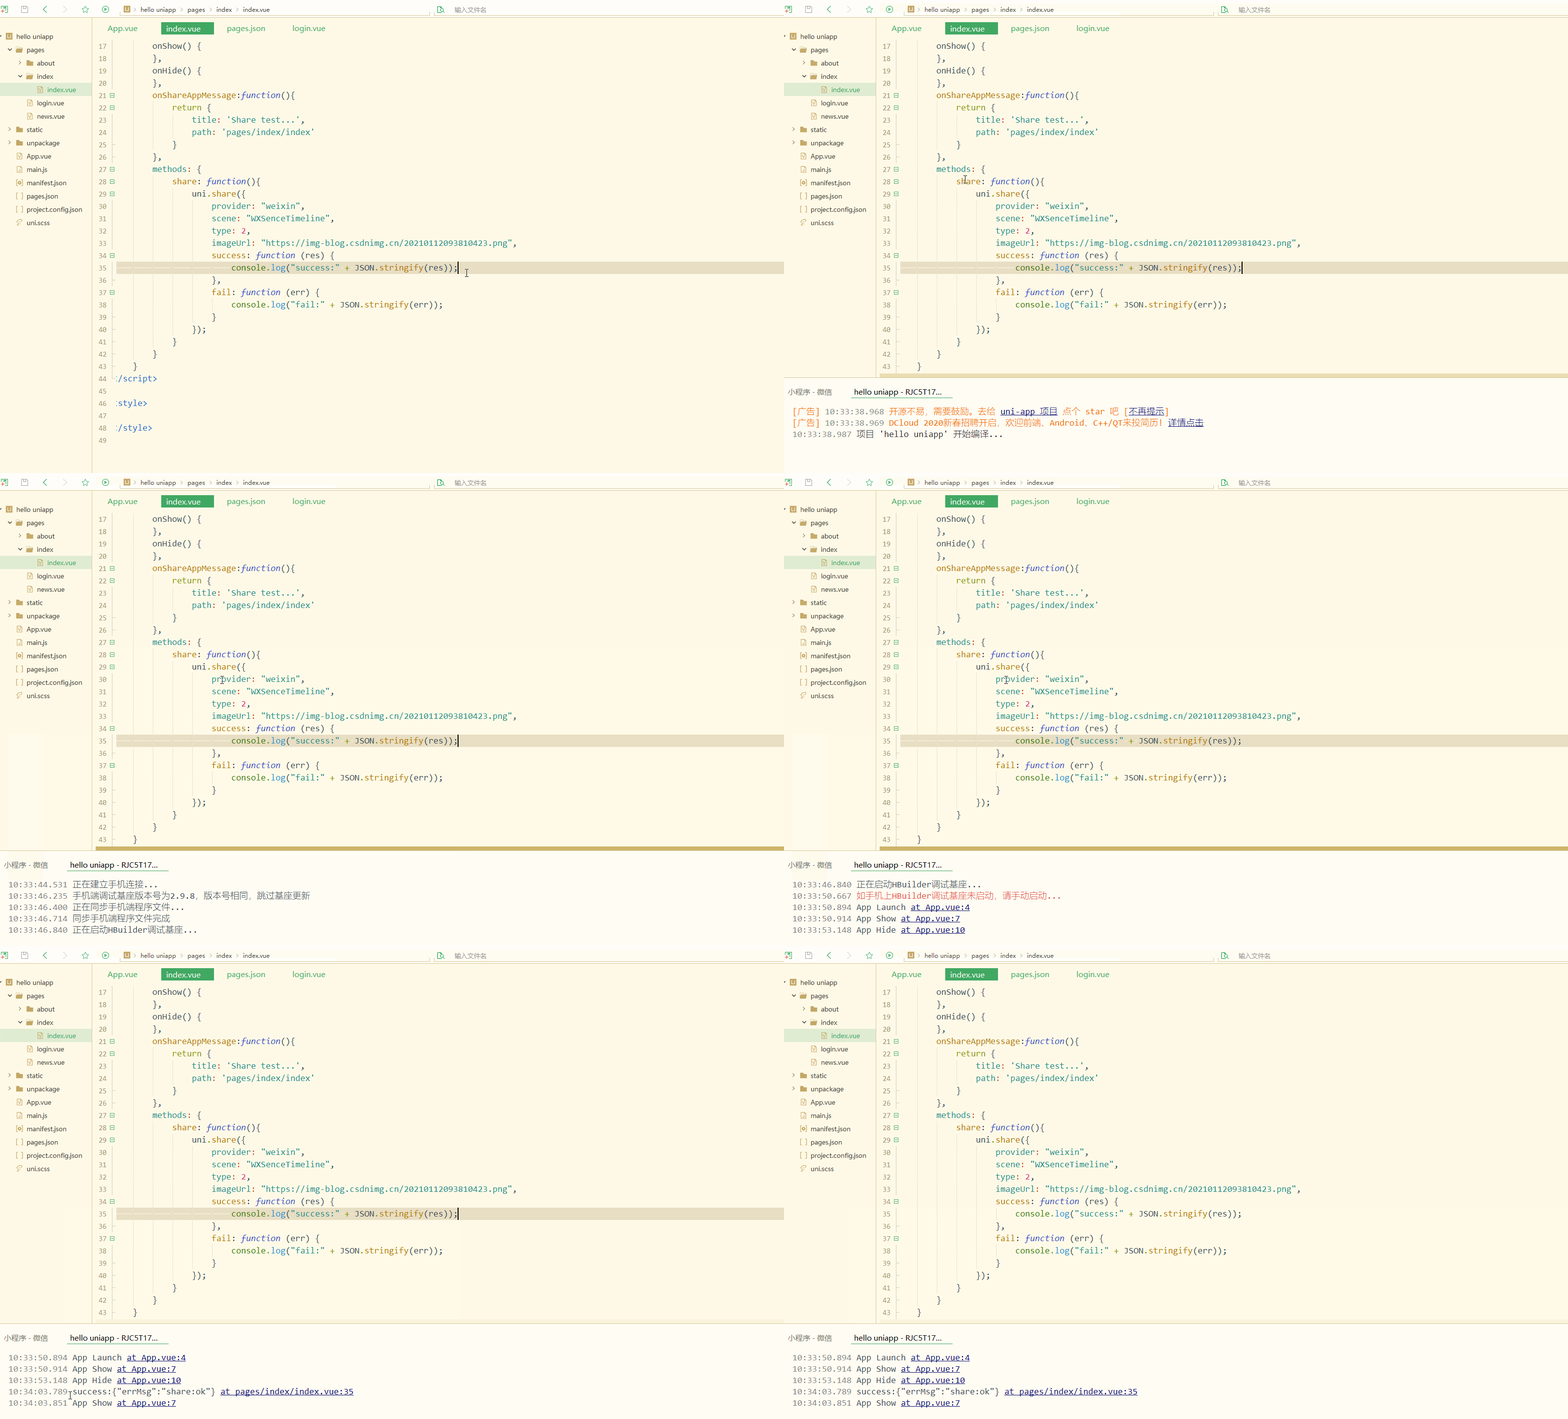
手机端显示:
已经实现了分享消息到朋友圈。
总结
第三方登录和分享是APP和小程序的基本功能,对于APP和小程序有不同的实现方式,相比较而言,APP实现更简单,都是其他功能的基础和起步。
更多相关免费了解敬请关注uni_app教程栏目!
以上がuni-app 入門チュートリアル - サードパーティのログインと共有の詳細内容です。詳細については、PHP 中国語 Web サイトの他の関連記事を参照してください。

