ホームページ >ウェブフロントエンド >CSSチュートリアル >CSS レイアウトの実践的なヒント: 負のマージン値
CSS レイアウトの実践的なヒント: 負のマージン値
- 青灯夜游転載
- 2020-11-17 17:51:374286ブラウズ

負のマージン、つまりマージン属性の値を負の値に設定することは、CSS レイアウトで非常に便利なテクニックです。正の値を使用するシナリオは非常に一般的であり、誰もがそのパフォーマンスに精通しています
margin-top と margin-left が負の値の場合、要素は上と左に移動します。これは、top と left を設定した後でも元の位置を占めるposition:relative要素とは異なります。 -bottom と margin-right が設定されています。 負の値の場合、要素自体の位置は変更されず、後続の要素は右下に移動します。
いくつかのアプリケーションを見てください。シナリオ
# 絶対配置要素
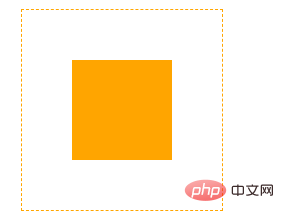
要素が絶対配置に設定されている場合、その上、右、下、左の値は次の値を参照します。最も近い非静的要素からの距離に古典的な垂直方向のセンタリング この方法は、絶対配置された要素の負のマージンを使用して実現されます。<style>
.wrap4{
position:relative;
margin:10px;
width:200px;
height:200px;
border:dashed 1px orange;
}
.wrap4 .content{
position:absolute;
width:100px;
height:100px;
top:50%;
left:50%;
margin-top:-50px;
margin-left:-50px;
background:orange;
}
</style>
<div class="wrap4">
<div class="content"></div>
</div>要素を絶対配置に設定し、上と左を設定します。 50% に設定します。このとき、要素の上端と左端は親要素の上端と左端に達します。50% では、負のマージンを要素自体の高さと長さに設定し、要素の中心を親要素の左端に移動します。中央揃えを実現するための親要素の中心
#float 要素
負のマージンの影響float 要素も上で説明したとおりですが、独自の特徴があります。明確にするために例を見てみましょう Floating element negative margin
<style>
.float{
overflow:hidden;
width:280px;
border:dashed 1px orange;
}
.float .item{
width:100px;
height:100px;
float:left;
}
.float .item:nth-child(1){
background:red;
}
.float .item:nth-child(2){
background:grey;
}
.float .item:nth-child(3){
background:blue;
}
</style>
<div class="float">
<div class="item"></div>
<div class="item"></div>
<div class="item"></div>
</div>
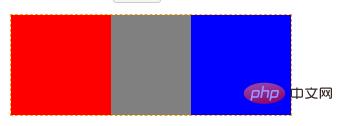
In a div幅が 280 ピクセルの場合、右側に幅 100 ピクセルの float:left サブ要素が 3 つあります。これらは 1 行に収まらないため、最後の要素は次の行# に移動されました。
#コードを少し変更します<style>
.float{
overflow:hidden;
width:280px;
border:dashed 1px orange;
}
.float .item{
width:100px;
height:100px;
float:left;
}
.float .item:nth-child(1){
background:red;
}
.float .item:nth-child(2){
background:grey;
}
.float .item:nth-child(3){
background:blue;
margin-left:-20px;
}
</style>
<div class="float">
<div class="item"></div>
<div class="item"></div>
<div class="item"></div>
</div>3 番目の要素に -20px の負のマージンを追加します
 複数列レイアウト
<style>
.body{
width:500px;
margin:10px;
border:dashed 1px orange;
overflow:hidden;
}
.wrap3{
float:left;
width:100%;
}
.wrap3 .content{
height:200px;
margin-right:100px;
background:rgba(255,0,0,0.5);
}
.body .right{
width:100px;
height:200px;
float:left;
margin-left:-100px;
background:rgba(0,255,0,0.5)
}
</style>
<div class="body">
<div class="wrap3">
<div class="content">
Content Content Content Content Content Content Content
Content Content Content Content Content Content Content Content
</div>
</div>
<div class="right">Right</div>
</div>コードは非常に単純です##コンテンツ要素に親要素を追加し、左フローティング、幅 100% に設定します
##コンテンツ要素右マージンを設定します。値は right の幅と等しくなります。- #right は left に浮動小数点数を設定し、その幅の負のマージンを設定します # # 本来は2行目にrightが表示されるはずですが、幅を左にフローティングすることで1行目の右端に来て折り返しの一部を覆いましたが、内容には右幅の右マージンがあり、覆われています。領域にはコンテンツがないため、2 列レイアウトを実装しました
- 通常の要素

<style>
li{
line-height:2em;
}
.col2{
margin-left:150px;
}
.col3{
margin-left:300px;
}
li.top{
margin-top:-9em;
}
</style>
<ul>
<li class="col1">aaa</li>
<li class="col1">bbb</li>
<li class="col1">ccc</li>
<li class="col2 top">ddd</li>
<li class="col2">eee</li>
<li class="col2">fff</li>
<li class="col3 top">ggg</li>
<li class="col3">hhh</li>
<li class="col3">iii</li>
</ul>
一般的なアプローチは、間違いなく次の方法で実装することです。先ほど紹介した知識があれば難しいことはなく、なぜそうなるのかを理解しておけば大丈夫です。通常の要素には何も異常がないようです。
え?負のマージンを使用すると要素が大きくなる場合もあります。 ! ! <style>
.wrap{
width:300px;
border:dashed 5px orange;
}
.wrap .inner{
height:50px;
margin:0 -50px;
background:blue;
opacity:0.5;
}
</style>
<div class="wrap0">
<div class="inner0">
inner inner inner inner inner inner inner inner inner inner inner inner
</div>
</div>この例は普通に見えますが、効果は驚くべきものです。水平方向の負のマージンを設定すると、内側の div が大きくなります。
# #PS. 効果の前提条件実現すべきことは、要素の幅を auto 以外の値に設定できないことです。
#右マージンのある浮動子要素のリストこの効果を見たとき、最初にどう思いましたか?子要素に margin-right が設定されており、トラバーサル中に nth-child(3n) が 0 に設定されている可能性はありますか? 上記の知識を使用して、これをどのように処理できるかを見てみましょう。 set nth-child( 3n) はマージンが 0 ですが、親要素を「大きく」するために負のマージンを使用します。 
プログラミング学習をご覧ください。 !
以上がCSS レイアウトの実践的なヒント: 負のマージン値の詳細内容です。詳細については、PHP 中国語 Web サイトの他の関連記事を参照してください。

