ホームページ >WeChat アプレット >ミニプログラム開発 >実践編 ---WeChat ミニ プログラム エンジニアリング探査 Webpack
実践編 ---WeChat ミニ プログラム エンジニアリング探査 Webpack
- coldplay.xixi転載
- 2020-09-19 10:07:243334ブラウズ

# はじめにWeChat ミニ プログラムは非常に速いスピードで普及し、その便利な使い方から多くのユーザーを魅了しています。市場の需要が急増する中、どのインターネット企業もそのメリットを最大限に活用したいと考えており、小規模なプログラム開発の技術を習得することはフロントエンド開発者にとって間違いなく必須のスキルです。ただし、小さなプログラムの開発には常に開発者から批判されてきたいくつかの不都合があり、その主な症状は次のとおりです:#関連する学習の推奨事項: WeChat ミニ プログラム チュートリアル
- 初期段階では便利な npm パッケージ管理メカニズムが欠如しています (現時点では)。 )
- プリコンパイルされた言語処理スタイルは使用できません
- スクリプト コマンドを使用して異なる開発環境を切り替えることはできません。対応する環境に必要な構成を手動で変更する必要があります (通常のプロジェクトには少なくとも開発環境と運用環境が必要です)
- 仕様チェック ツールをプロジェクト エンジニアリングに統合できません (EsLint や StyleLint の使用など)
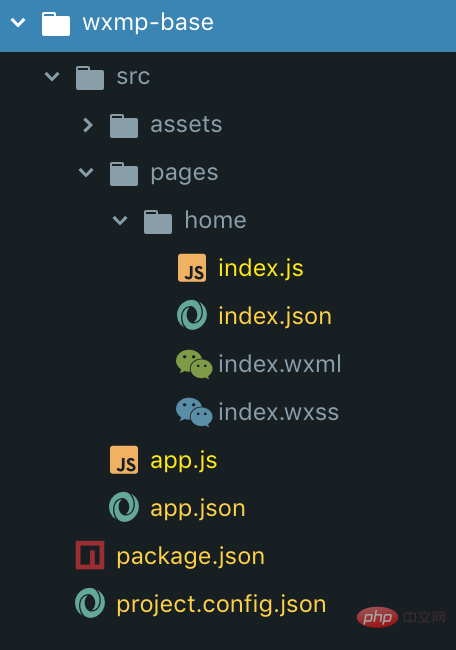
/* 创建项目 */$ mkdir wxmp-base$ cd ./wxmp-base/* 创建package.json */$ npm init/* 安装依赖包 */$ npm install webpack webpack-cli --dev复制代码依存関係をインストールした後、図に示すように、このプロジェクトの基本的なディレクトリ構造を作成します。
 app
appjs 系ファイルと、処理する必要のない wxml、wxss# 系のファイルに分けます。 ##、json ファイルは処理され、直接コピーできます。この考えに基づいて、webpack 実行用の構成ファイルの作成を開始し、webpack.config.js ファイルを保存するためのビルド ディレクトリをプロジェクトのルート ディレクトリに作成しました。 <pre class="brush:php;toolbar:false;">$ mkdir build$ cd ./build$ touch webpack.config.js复制代码</pre><pre class="brush:js;toolbar:false;">/** webpack.config.js */const path = require(&#39;path&#39;);const CopyPlugin = require(&#39;copy-webpack-plugin&#39;);const ABSOLUTE_PATH = process.cwd();module.exports = { context: path.resolve(ABSOLUTE_PATH, &#39;src&#39;), entry: { app: &#39;./app.js&#39;, &#39;pages/home/index&#39;: &#39;./pages/home/index.js&#39;
}, output: { filename: &#39;[name].js&#39;, path: path.resolve(ABSOLUTE_PATH, &#39;dist&#39;)
}, module: { rules: [
{ test: /\.js$/, exclude: /node_modules/, use: { loader: &#39;babel-loader&#39;, options: { presets: [&#39;@babel/preset-env&#39;], plugins: [&#39;@babel/plugin-transform-runtime&#39;],
},
},
}
]
}, plugins: [ new CopyPlugin([
{ from: &#39;**/*.wxml&#39;, toType: &#39;dir&#39;,
},
{ from: &#39;**/*.wxss&#39;, toType: &#39;dir&#39;,
},
{ from: &#39;**/*.json&#39;, toType: &#39;dir&#39;,
}
])
]
};复制代码</pre>上記のコードを書いた後、上記のコードが何をするのか説明しましょう: Entryentry
app.js
と- home/index.js
- を webpack の構築エントリ ポイントとして使用します。このファイルを開始点として使用して、それぞれの依存関係を作成します。他のファイルがエントリ ファイルに導入されている場合、インポートされたファイルも webpack で処理できます。
moduleでは、babel-loaderを使用して js - ファイルを ES6 から ES5 に変換し、新しい構文 Processing を追加しました。これにより、ネイティブの小さなプログラムの開発において
regenerator-runtimeが常に繰り返し導入されるという問題が解決されます。 (このステップでは、@babel/core、@babel/preset-env、@babel/plugin-transform-runtime、をインストールする必要があります。 @babel /runtime、babel-loaderこれらの依存関係パッケージ)再処理する必要のないファイルを処理するには、copy-webpack-pluginを使用します。このプラグインのファイルは、ターゲット ディレクトリに直接コピーできます。 これらのコードの実際の機能を理解したら、ターミナルで - webpack --config build/webpack.config.js
コマンドを実行できます。 webpack はソース コードをdist フォルダーにコンパイルします。このフォルダー内のコンテンツは開発者ツールで実行、プレビュー、アップロードできます。
最適化最も基本的な Webpack 構築戦略を完了した後、app と
ページの変換を達成しましたが、これはまだ遠いです。足りない。まだ多くの問題を解決する必要があります:
ページ ファイルが増えた場合の対処方法、コンポーネントへの対処方法予期されるプリコンパイルの方法
- 環境変数の扱い方
- 次に、上記の点に基づいて Webpack 戦略をアップグレードします:
- ページとコンポーネント
- はじめに I 実装方法は、
を使用してページとコンポーネントの下にある
jsファイルを収集し、エントリ オブジェクトを生成して渡すツール関数を作成することです。それを
entryに追加します。しかし実際には、このアプローチには次の 2 つの欠点があることがわかりました。
- 当终端中已经启动了命令,这时候新增页面或组件都不会自动生成新的入口,也就是我们要重跑一遍命令。
- 工具函数写死了匹配pages和components文件夹下的文件,不利于项目的延展性,如果我们需要分包或者文件夹命名需要改动时,我们就需要改动工具函数。
本着程序员应该是极度慵懒,能交给机器完成的事情绝不自己动手的信条,我开始研究新的入口生成方案。最终确定下来编写一个webpack的插件,在webpack构建的生命周期中生成入口,废话不多说上代码:
/** build/entry-extract-plugin.js */const fs = require('fs');const path = require('path');const chalk = require('chalk');const replaceExt = require('replace-ext');const { difference } = require('lodash');const SingleEntryPlugin = require('webpack/lib/SingleEntryPlugin');const MultiEntryPlugin = require('webpack/lib/MultiEntryPlugin');class EntryExtractPlugin {  constructor() {    this.appContext = null;    this.pages = [];    this.entries = [];
  }  /**
  	*	收集app.json文件中注册的pages和subpackages生成一个待处理数组
  	*/
  getPages() {    const app = path.resolve(this.appContext, 'app.json');    const content = fs.readFileSync(app, 'utf8');    const { pages = [], subpackages = [] } = JSON.parse(content);    const { length: pagesLength } = pages;    if (!pagesLength) {      console.log(chalk.red('ERROR in "app.json": pages字段缺失'));
      process.exit();
    }    /** 收集分包中的页面 */
    const { length: subPackagesLength } = subpackages;    if (subPackagesLength) {
      subpackages.forEach((subPackage) => {        const { root, pages: subPages = [] } = subPackage;        if (!root) {          console.log(chalk.red('ERROR in "app.json": 分包配置中root字段缺失'));
          process.exit();
        }        const { length: subPagesLength } = subPages;        if (!subPagesLength) {          console.log(chalk.red(`ERROR in "app.json": 当前分包 "${root}" 中pages字段为空`));
          process.exit();
        }
        subPages.forEach((subPage) => pages.push(`${root}/${subPage}`));
      });
    }    return pages;
  }  /**
  	*	以页面为起始点递归去寻找所使用的组件
  	*	@param {String} 当前文件的上下文路径
  	*	@param {String} 依赖路径
  	* @param {Array} 包含全部入口的数组
  	*/
  addDependencies(context, dependPath, entries) {    /** 生成绝对路径 */
    const isAbsolute = dependPath[0] === '/';    let absolutePath = '';    if (isAbsolute) {
      absolutePath = path.resolve(this.appContext, dependPath.slice(1));
    } else {
      absolutePath = path.resolve(context, dependPath);
    }    /** 生成以源代码目录为基准的相对路径 */
    const relativePath = path.relative(this.appContext, absolutePath);    /** 校验该路径是否合法以及是否在已有入口当中 */
    const jsPath = replaceExt(absolutePath, '.js');    const isQualification = fs.existsSync(jsPath);    if (!isQualification) {      console.log(chalk.red(`ERROR: in "${replaceExt(relativePath, '.js')}": 当前文件缺失`));
      process.exit();
    }    const isExistence = entries.includes((entry) => entry === absolutePath);    if (!isExistence) {
      entries.push(relativePath);
    }    /** 获取json文件内容 */
    const jsonPath = replaceExt(absolutePath, '.json');    const isJsonExistence = fs.existsSync(jsonPath);    if (!isJsonExistence) {      console.log(chalk.red(`ERROR: in "${replaceExt(relativePath, '.json')}": 当前文件缺失`));
      process.exit();
    }    try {      const content = fs.readFileSync(jsonPath, 'utf8');      const { usingComponents = {} } = JSON.parse(content);      const components = Object.values(usingComponents);      const { length } = components;      /** 当json文件中有再引用其他组件时执行递归 */
      if (length) {        const absoluteDir = path.dirname(absolutePath);
        components.forEach((component) => {          this.addDependencies(absoluteDir, component, entries);
        });
      }
    } catch (e) {      console.log(chalk.red(`ERROR: in "${replaceExt(relativePath, '.json')}": 当前文件内容为空或书写不正确`));
      process.exit();
    }
  }  /**
  	* 将入口加入到webpack中
  	*/
  applyEntry(context, entryName, module) {    if (Array.isArray(module)) {      return new MultiEntryPlugin(context, module, entryName);
    }    return new SingleEntryPlugin(context, module, entryName);
  }

  apply(compiler) {    /** 设置源代码的上下文 */
    const { context } = compiler.options;    this.appContext = context;

    compiler.hooks.entryOption.tap('EntryExtractPlugin', () => {      /** 生成入口依赖数组 */
      this.pages = this.getPages();      this.pages.forEach((page) => void this.addDependencies(context, page, this.entries));      this.entries.forEach((entry) => {        this.applyEntry(context, entry, `./${entry}`).apply(compiler);
      });
    });

    compiler.hooks.watchRun.tap('EntryExtractPlugin', () => {      /** 校验页面入口是否增加 */
      const pages = this.getPages();      const diffPages = difference(pages, this.pages);      const { length } = diffPages;      if (length) {        this.pages = this.pages.concat(diffPages);        const entries = [];        /** 通过新增的入口页面建立依赖 */
        diffPages.forEach((page) => void this.addDependencies(context, page, entries));        /** 去除与原有依赖的交集 */
        const diffEntries = difference(entries, this.entries);
        diffEntries.forEach((entry) => {          this.applyEntry(context, entry, `./${entry}`).apply(compiler);
        });        this.entries = this.entries.concat(diffEntries);
      }
    });
  }
}module.exports = EntryExtractPlugin;复制代码由于webpack的plugin相关知识不在我们这篇文章的讨论范畴,所以我只简单的介绍一下它是如何介入webpack的工作流程中并生成入口的。(如果有兴趣想了解这些可以私信我,有时间的话可能会整理一些资料出来给大家)该插件实际做了两件事:
- 通过compiler的entryOption钩子,我们将递归生成的入口数组一项一项的加入
entry中。 - 通过compiler的watchRun钩子监听重新编译时是否有新的页面加入,如果有就会以新加入的页面生成一个依赖数组,然后再加入
entry中。
现在我们将这个插件应用到之前的webpack策略中,将上面的配置更改为:(记得安装chalk replace-ext依赖)
/** build/webpack.config.js */const EntryExtractPlugin = require('./entry-extract-plugin');module.exports = {
  ...
  entry: {    app: './app.js'
  },  plugins: [
    ...
    new EntryExtractPlugin()
  ]
}复制代码
样式预编译与EsLint
样式预编译和EsLint应用其实已经有许多优秀的文章了,在这里我就只贴出我们的实践代码:
/** build/webpack.config.js */const MiniCssExtractPlugin = require('mini-css-extract-plugin');module.exports = {
  ...
  module: {    rules: [
      ...
      {        enforce: 'pre',        test: /\.js$/,        exclude: /node_modules/,        loader: 'eslint-loader',        options: {          cache: true,          fix: true,
        },
      },
      {        test: /\.less$/,        use: [
          {            loader: MiniCssExtractPlugin.loader,
          },
          {            loader: 'css-loader',
          },
          {            loader: 'less-loader',
          },
        ],
      },
    ]
  },  plugins: [
    ...
    new MiniCssExtractPlugin({ filename: '[name].wxss' })
  ]
}复制代码我们修改完策略后就可以将wxss后缀名的文件更改为less后缀名(如果你想用其他的预编译语言,可以自行修改loader),然后我们在js文件中加入import './index.less'语句就能看到样式文件正常编译生成了。样式文件能够正常的生成最大的功臣就是mini-css-extract-plugin工具包,它帮助我们转换了后缀名并且生成到目标目录中。
环境切换
环境变量的切换我们使用cross-env工具包来进行配置,我们在package.json文件中添加两句脚本命令:
"scripts": {
	"dev": "cross-env OPERATING_ENV=development webpack --config build/webpack.config.js --watch",
	"build": "cross-env OPERATING_ENV=production webpack --config build/webpack.config.js
}复制代码
相应的我们也修改一下webpack的配置文件,将我们应用的环境也告诉webpack,这样webpack会针对环境对代码进行优化处理。
/** build/webpack.config.js */const { OPERATING_ENV } = process.env;module.exports = {
  ...
mode: OPERATING_ENV, devtool: OPERATING_ENV === 'production' ? 'source-map' : 'inline-source-map'}复制代码虽然我们也可以通过命令为webpack设置mode,这样也可以在项目中通过process.env.NODE_ENV访问环境变量,但是我还是推荐使用工具包,因为你可能会有多个环境uat test pre等等。
针对JS优化
小程序对包的大小有严格的要求,单个包的大小不能超过2M,所以我们应该对JS做进一步的优化,这有利于我们控制包的大小。我所做的优化主要针对runtime和多个入口页面之间引用的公共部分,修改配置文件为:
/** build/webpack.config.js */module.exports = {
  ...
  optimization: {    splitChunks: {      cacheGroups: {        commons: {          chunks: 'initial',          name: 'commons',          minSize: 0,          maxSize: 0,          minChunks: 2,
        },
      },
    },    runtimeChunk: {      name: 'manifest',
    },
  },
}复制代码webpack会将公共的部分抽离出来在dist文件夹根目录中生成common.js和manifest.js文件,这样整个项目的体积就会有明显的缩小,但是你会发现当我们运行命令是开发者工具里面项目其实是无法正常运行的,这是为什么?
这主要是因为这种优化使小程序其他的js文件丢失了对公共部分的依赖,我们对webpack配置文件做如下修改就可以解决了:
/** build/webpack.config.js */module.exports = {
  ...
  output: {
    ...
    globalObject: 'global'
  },  plugins: [    new webpack.BannerPlugin({      banner: 'const commons = require("./commons");\nconst runtime = require("./runtime");',      raw: true,      include: 'app.js',
    })
  ]
}复制代码相关学习推荐:js视频教程
小小解惑
许多读者可能会有疑惑,为什么你不直接使用已有的框架进行开发,这些能力已经有许多框架支持了。选择框架确实是一个不错的选择,毕竟开箱即用为开发者带来了许多便利。但是这个选择是有利有弊的,我也对市面上的较流行框架做了一段时间的研究和实践。较为早期的腾讯的wepy、美团的mpvue,后来者居上的京东的taro、Dcloud的uni-app等,这些在应用当中我认为有以下一些点不受我青睐:
- ブラック ボックスのせいで、問題が私たち自身のコードにあるのか、それともフレームワークのコンパイル プロセスにあるのかを特定することが困難になることがあります (これにより、多くの落とし穴を踏むことになりました)
- フレームワークを中心に回す 利用できるリソースは限られており、例えばUIの利用は基本的に公式チームによる開発サポートに依存しており、コミュニティがないと必要なリソースを見つけるのが非常に困難です( uni-app コミュニティはこの点で良い仕事をしています)
- 一部の既存のネイティブ リソースと組み合わせることはできません これらのフレームワークは基本的にコンパイル原則に基づいており、開発として React または Vue を使用する機能を提供しますこれにより、ネイティブ リソースへのシームレスなアクセスを実現することが困難になります (会社が蓄積したビジネス コンポーネントの一部を失うと、頭痛の種になるでしょう)。
- 最後の点、そして私が最も懸念している点は、フレームワークのアップグレード速度が公式のイテレーション速度に追いつくことができるかどうか、そして既存のプロジェクトより遅れている場合はどう対処するかです
#最後に書きました
上記は、ネイティブ ミニ プログラム エンジニアリングについての私の理解です。また、関連するスタイル仕様をいくつかチームに適用しました。この記事では詳しく述べていません。興味がある場合は、記事「チーム仕様 -」を参照してください。スタイル仕様の実践』をコラムに掲載しました。実際には、静的リソースの管理やプロジェクト ディレクトリの追加もあり、これらの詳細はチームのニーズに応じて改善したり補足したりできます。この記事が、この分野を実践する必要があるチームに役立つことを願っています。間違った意見や改善が必要な点がある場合は、コメントでお知らせください。
以上が実践編 ---WeChat ミニ プログラム エンジニアリング探査 Webpackの詳細内容です。詳細については、PHP 中国語 Web サイトの他の関連記事を参照してください。

