Linuxコマンドラインからphpをインストールする方法
- 藏色散人オリジナル
- 2020-08-26 09:46:402320ブラウズ
Linux コマンド ラインから PHP をインストールする方法: まず、「php -version」コマンドで PHP バージョンを確認し、次に「sudo apt-get install php5-cli php5-cgi」コマンドを使用して、 PHP依存ライブラリ。

PHP ビデオ チュートリアル 」
Linux Ubuntu での PHP のインストール
Windows では少し面倒な設定に比べ、Ubuntu ではわずか数行のコマンドで設定を完了できます。 PHPとNginxを組み合わせたWebサーバー環境も構築します。 2.1 PHP をダウンロードしてインストールするデフォルトでは、Ubuntu には PHP が付属しています。# 查看PHP的版本 ~ php -version PHP 5.3.10-1ubuntu3.10 with Suhosin-Patch (cli) (built: Feb 28 2014 23:14:25) Copyright (c) 1997-2012 The PHP Group Zend Engine v2.3.0, Copyright (c) 1998-2012 Zend Technologies # 安装PHP依赖库 ~ sudo apt-get install php5-cli php5-cgi2.2 Nginxをダウンロードしてインストールしますnginxをダウンロードしてインストールします
~ sudo apt-get install nginx
# 启动nginx
~ sudo /etc/init.d/nginx start
# 查看Nginx运行状态
~ sudo /etc/init.d/nginx status
 * nginx is running
# 查看Nginx进程
~ ps -aux|grep nginx
root      2306  0.0  0.0  62860  1344 ?        Ss   15:31   0:00 nginx: master process /usr/sbin/nginx
www-data  2307  0.0  0.0  63216  1916 ?        S    15:31   0:00 nginx: worker process
www-data  2308  0.0  0.0  63216  1656 ?        S    15:31   0:00 nginx: worker process
www-data  2309  0.0  0.0  63216  1916 ?        S    15:31   0:00 nginx: worker process
www-data  2310  0.0  0.0  63216  1656 ?        S    15:31   0:00 nginx: worker process
2.3 spawnをダウンロードしてインストールしますspawnは、スケーラブルなFastCGIアプリケーションであり、インターフェイスですHTTP サーバーと動的スクリプト言語間の高速通信用。 spawn-fcgi
~ sudo apt-get install spawn-fcgispawn-fcgiの起動
~ sudo /usr/bin/spawn-fcgi -a 127.0.0.1 -C 5 -p 9000 -f /usr/bin/php-cgi -P /var/run/fastcgi-php.pid
spawn-fcgi: child spawned successfully: PID: 2940
# 查看进程
~ ps -axu|grep cgi
root      2940  0.0  0.0  55196  6292 ?        Ss   15:40   0:00 /usr/bin/php-cgi
root      2941  0.0  0.0  55196  2840 ?        S    15:40   0:00 /usr/bin/php-cgi
root      2942  0.0  0.0  55196  2840 ?        S    15:40   0:00 /usr/bin/php-cgi
root      2943  0.0  0.0  55196  2840 ?        S    15:40   0:00 /usr/bin/php-cgi
root      2944  0.0  0.0  55196  2840 ?        S    15:40   0:00 /usr/bin/php-cgi
root      2945  0.0  0.0  55196  2840 ?        S    15:40   0:00 /usr/bin/php-cgi
2.4 Nginx設定ファイルの変更PHPファイルの実行ディレクトリ、/home/conan/php アクセス ドメイン名、ubuntu.php.meを設定します。.php ファイルを設定し、fastcgi による分析のために 127.0.0.1:9000 に転送します。ファイル: nginx.conf
~ sudo vi /etc/nginx/nginx.conf
http {
   # 忽略部分代码
   server {
       set $htdocs /home/conan/php;
       listen 80;
       server_name ubuntu.php.me;
       location / {
           root $htdocs;
           autoindex on;
           index index.php index.html;
       }
       location ~ \.php$ {
           include fastcgi_params;
           fastcgi_index index.php;
           fastcgi_pass 127.0.0.1:9000;
           fastcgi_param SCRIPT_FILENAME $htdocs$fastcgi_script_name;
       }
   }
}
nginx サーバーを再起動します~ sudo /etc/init.d/nginx restart Restarting nginx: nginx.2.5 ホストを設定しますホストのドメイン名 ubuntu.php.me をローカル IP 127.0.0.1 にマッピングします。
~ sudo vi /etc/hosts
127.0.0.1       ubuntu.php.me
Ping テスト ubuntu.php.me を使用します
~ ping ubuntu.php.me
PING ubuntu.php.me (127.0.0.1) 56(84) bytes of data.
64 bytes from localhost (127.0.0.1): icmp_req=1 ttl=64 time=0.040 ms
64 bytes from localhost (127.0.0.1): icmp_req=2 ttl=64 time=0.031 ms
64 bytes from localhost (127.0.0.1): icmp_req=3 ttl=64 time=0.067 ms
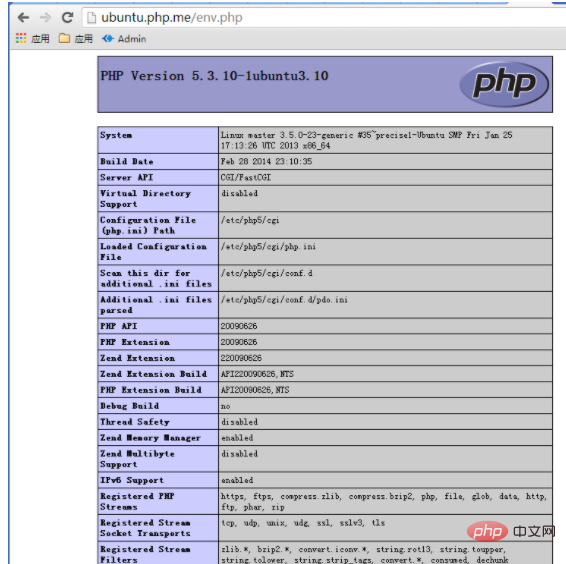
2.6 PHP テスト ファイルディレクトリ /home/conan/php に、新しい PHP ファイル env.php を作成します。
~ mkdir /home/conan/php
~ vi /home/conan/php/env.php
<?php phpinfo(); ?>
2.7 ブラウザで、PHP の実行ステータスを確認します。ブラウザで HTTP アドレスを開きます: http://ubuntu.php.me/env.php

以上がLinuxコマンドラインからphpをインストールする方法の詳細内容です。詳細については、PHP 中国語 Web サイトの他の関連記事を参照してください。
声明:
この記事の内容はネチズンが自主的に寄稿したものであり、著作権は原著者に帰属します。このサイトは、それに相当する法的責任を負いません。盗作または侵害の疑いのあるコンテンツを見つけた場合は、admin@php.cn までご連絡ください。
前の記事:php.exeが起動できない場合の対処法次の記事:php.exeが起動できない場合の対処法

