ホームページ >運用・保守 >Linuxの運用と保守 >Linux 仮想ネットワーク デバイス veth-pair の詳細な説明、この記事は非常に有益です
Linux 仮想ネットワーク デバイス veth-pair の詳細な説明、この記事は非常に有益です
- 若昕転載
- 2019-04-01 13:03:505876ブラウズ
この記事では、veth-pair とその接続、および 2 つの名前空間間の接続について紹介します。
01 veth-pair とは
名前が示すように、 , veth-pair は仮想デバイス インターフェイスのペアで、tap/tun デバイスとは異なり、すべてペアで表示されます。一方の端はプロトコル スタックに接続され、もう一方の端は相互に接続されます。次の図に示すように:

#この機能により、さまざまな仮想ネットワーク デバイスを接続するためのブリッジとして機能することがよくあります。典型的な例は、「2 つの名前空間の間」のようなものです。 " "間の接続"、"Bridge と OVS 間の接続"、"Docker コンテナ間の接続" など、OpenStack Neutron のような非常に複雑な仮想ネットワーク構造を構築します。
02 veth-pair 接続
上図の veth0 と veth1 に IP を割り当てます (それぞれ 10.1.1.2 と 10.1.1.3)。その後、veth0 から veth1 に ping を送信します。理論的には、これらは同じネットワーク セグメント上にあるため、ping は正常に実行できますが、結果として ping は失敗します。
パケットを取得して見てください。 tcpdump -nnt -i veth0
root@ubuntu:~# tcpdump -nnt -i veth0
tcpdump: verbose output suppressed, use -v or -vv for full protocol decode
listening on veth0, link-type EN10MB (Ethernet), capture size 262144 bytes
ARP, Request who-has 10.1.1.3 tell 10.1.1.2, length 28
ARP, Request who-has 10.1.1.3 tell 10.1.1.2, length 28
veth0 と veth1 が同じネットワーク セグメント内にあることがわかります。は初回接続なので事前にARPパケットを送信しますが、veth1はARPパケットに応答しません。
確認したところ、これは私が使用している Ubuntu システム カーネルの ARP 関連のデフォルト設定制限が原因であることがわかりました。設定項目を変更する必要があります:
echo 1 > /proc/sys/net/ipv4/conf/veth1/accept_local
echo 1 > /proc/sys/net/ipv4/conf/veth0/accept_local
echo 0 > /proc/sys/net/ipv4/conf/all/rp_filter
echo 0 > /proc/sys/net/ipv4/conf/veth0/rp_filter
echo 0 > /proc/sys/net/ipv4/conf/veth1/rp_filter
終了後にもう一度 ping してください。
root@ubuntu:~# ping -I veth0 10.1.1.3 -c 2
PING 10.1.1.3 (10.1.1.3) from 10.1.1.2 veth0: 56(84) bytes of data.
64 bytes from 10.1.1.3: icmp_seq=1 ttl=64 time=0.047 ms
64 bytes from 10.1.1.3: icmp_seq=2 ttl=64 time=0.064 ms

--- 10.1.1.3 ping statistics ---
2 packets transmitted, 2 received, 0% packet loss, time 3008ms
rtt min/avg/max/mdev = 0.047/0.072/0.113/0.025 ms
私たちはこの通信プロセスにさらに興味があるので、パケットをキャプチャして確認することができます。
veth0 ポートの場合:
root@ubuntu:~# tcpdump -nnt -i veth0
tcpdump: verbose output suppressed, use -v or -vv for full protocol decode
listening on veth0, link-type EN10MB (Ethernet), capture size 262144 bytes
ARP, Request who-has 10.1.1.3 tell 10.1.1.2, length 28
ARP, Reply 10.1.1.3 is-at 5a:07:76:8e:fb:cd, length 28
IP 10.1.1.2 > 10.1.1.3: ICMP echo request, id 2189, seq 1, length 64
IP 10.1.1.2 > 10.1.1.3: ICMP echo request, id 2189, seq 2, length 64
IP 10.1.1.2 > 10.1.1.3: ICMP echo request, id 2189, seq 3, length 64
IP 10.1.1.2 > 10.1.1.3: ICMP echo request, id 2244, seq 1, length 64
veth1 ポートの場合:
root@ubuntu:~# tcpdump -nnt -i veth1
tcpdump: verbose output suppressed, use -v or -vv for full protocol decode
listening on veth1, link-type EN10MB (Ethernet), capture size 262144 bytes
ARP, Request who-has 10.1.1.3 tell 10.1.1.2, length 28
ARP, Reply 10.1.1.3 is-at 5a:07:76:8e:fb:cd, length 28
IP 10.1.1.2 > 10.1.1.3: ICMP echo request, id 2189, seq 1, length 64
IP 10.1.1.2 > 10.1.1.3: ICMP echo request, id 2189, seq 2, length 64
IP 10.1.1.2 > 10.1.1.3: ICMP echo request, id 2189, seq 3, length 64
IP 10.1.1.2 > 10.1.1.3: ICMP echo request, id 2244, seq 1, length 64
奇妙なことに、ICMP echo Reply パケットが表示されませんでした。 pingしてもいいですか?
実際には、ここの echo Reply はローカルバック ポートを使用しています。信じられない場合は、パッケージを取得して見てください:
root@ubuntu:~# tcpdump -nnt -i lo
tcpdump: verbose output suppressed, use -v or -vv for full protocol decode
listening on lo, link-type EN10MB (Ethernet), capture size 262144 bytes
IP 10.1.1.3 > 10.1.1.2: ICMP echo reply, id 2244, seq 1, length 64
IP 10.1.1.3 > 10.1.1.2: ICMP echo reply, id 2244, seq 2, length 64
IP 10.1.1.3 > 10.1.1.2: ICMP echo reply, id 2244, seq 3, length 64
IP 10.1.1.3 > 10.1.1.2: ICMP echo reply, id 2244, seq 4, length 64
Why?
コミュニケーションプロセス全体を見てみると理解できます。
- まず、ping プログラムは ICMP
echo requestを構築し、ソケット経由でプロトコル スタックに送信します。 - ping は veth0 ポートを指定するため、初めての場合は ARP リクエストを送信する必要があります。送信しないと、プロトコル スタックがデータ パケットを veth0 に直接渡します。
- veth0 は veth1 に接続されているため、ICMP リクエストは veth1 に直接送信されます。
- リクエストを受信した後、veth1 はそれを相手側のプロトコル スタックに渡します。
- プロトコル スタックは、ローカルに 10.1.1.3 の IP アドレスがあることを認識するため、ICMP 応答パケットを構築し、ルーティング テーブルをチェックし、10.1.1.0 ネットワーク セグメントに返されるデータ パケットがlocalback ポートを経由するので、応答パケットを lo ポートに渡します (最初にルーティング テーブルのテーブル 0 をチェックし、
ip Route show table 0でチェックします)。 - lo プロトコル スタックから応答パケットを受信した後は、手を変えてプロトコル スタックに返すだけでした。
- プロトコル スタックは応答パケットを受信した後、パケットを待っているソケットがあることを検出し、そのソケットにパケットを渡します。
- ユーザー モードで ping プログラムがソケットからの応答を検出するのを待機しているため、ICMP 応答パケットが受信されます。
プロセス全体を以下の図に示します。

03 2 つの名前空間間の接続
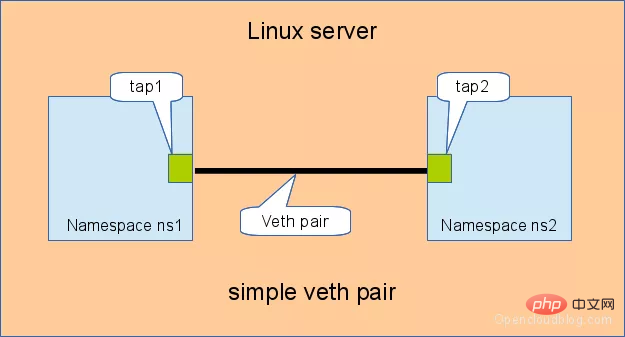
#namespace は、Linux 2.6.x カーネル バージョン以降でサポートされる機能で、主にリソースの分離に使用されます。名前空間を使用すると、Linux システムは複数のネットワーク サブシステムを抽象化でき、各サブシステムには、相互に影響を与えることなく、独自のネットワーク機器、プロトコル スタックなどがあります。 名前空間間で通信する必要がある場合はどうすればよいでしょうか? その答えは、veth-pair をブリッジとして使用することです。 接続方法や規模に応じて「直接接続」「Bridge経由接続」「OVS経由接続」に分けられます。3.1 直接接続
直接接続は最も単純な方法であり、次の図に示すように、1 組の veth-pair が 2 つの名前空間を直接接続します。
# 创建 namespace
ip netns a ns1
ip netns a ns2

# 创建一对 veth-pair veth0 veth1
ip l a veth0 type veth peer name veth1

# 将 veth0 veth1 分别加入两个 ns
ip l s veth0 netns ns1
ip l s veth1 netns ns2

# 给两个 veth0 veth1 配上 IP 并启用
ip netns exec ns1 ip a a 10.1.1.2/24 dev veth0
ip netns exec ns1 ip l s veth0 up
ip netns exec ns2 ip a a 10.1.1.3/24 dev veth1
ip netns exec ns2 ip l s veth1 up

# 从 veth0 ping veth1
[root@localhost ~]# ip netns exec ns1 ping 10.1.1.3
PING 10.1.1.3 (10.1.1.3) 56(84) bytes of data.
64 bytes from 10.1.1.3: icmp_seq=1 ttl=64 time=0.073 ms
64 bytes from 10.1.1.3: icmp_seq=2 ttl=64 time=0.068 ms

--- 10.1.1.3 ping statistics ---
15 packets transmitted, 15 received, 0% packet loss, time 14000ms
rtt min/avg/max/mdev = 0.068/0.084/0.201/0.032 ms
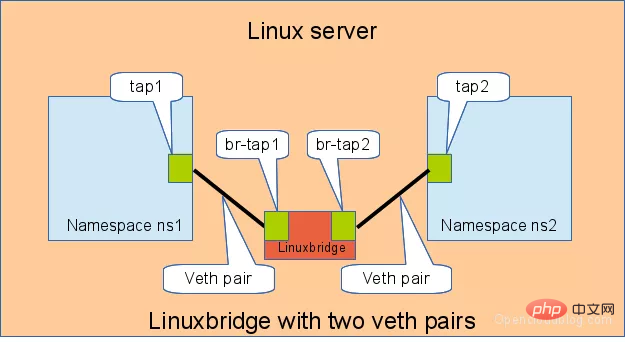
3.2 ブリッジを介して接続しますLinux ブリッジはスイッチに相当します。 2 つの名前空間のトラフィックを転送できます。その中で veth-pair がどのような役割を果たすかを見てみましょう。 以下に示すように、2 つの veth-pair ペアが 2 つの名前空間をブリッジに接続します。

# 首先创建 bridge br0
ip l a br0 type bridge
ip l s br0 up

# 然后创建两对 veth-pair
ip l a veth0 type veth peer name br-veth0
ip l a veth1 type veth peer name br-veth1

# 分别将两对 veth-pair 加入两个 ns 和 br0
ip l s veth0 netns ns1
ip l s br-veth0 master br0
ip l s br-veth0 up

ip l s veth1 netns ns2
ip l s br-veth1 master br0
ip l s br-veth1 up

# 给两个 ns 中的 veth 配置 IP 并启用
ip netns exec ns1 ip a a 10.1.1.2/24 dev veth0
ip netns exec ns1 ip l s veth0 up

ip netns exec ns2 ip a a 10.1.1.3/24 dev veth1
ip netns exec ns2 ip l s veth1 up

# veth0 ping veth1
[root@localhost ~]# ip netns exec ns1 ping 10.1.1.3
PING 10.1.1.3 (10.1.1.3) 56(84) bytes of data.
64 bytes from 10.1.1.3: icmp_seq=1 ttl=64 time=0.060 ms
64 bytes from 10.1.1.3: icmp_seq=2 ttl=64 time=0.105 ms

--- 10.1.1.3 ping statistics ---
2 packets transmitted, 2 received, 0% packet loss, time 999ms
rtt min/avg/max/mdev = 0.060/0.082/0.105/0.024 ms
3.3 OVS 経由で接続します
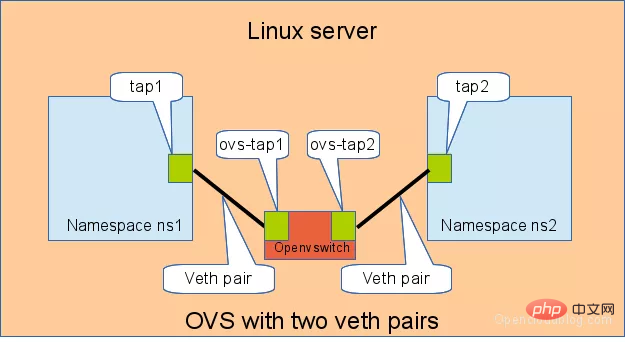
OVS は、Linux Bridge よりも強力な機能を備えたサードパーティのオープンソース Bridge であり、同じ実験でその効果を確認するために OVS を使用します。 下の図に示すように: ##2 つの名前空間間の接続もテストします:
# 用 ovs 提供的命令创建一个 ovs bridge
ovs-vsctl add-br ovs-br

# 创建两对 veth-pair
ip l a veth0 type veth peer name ovs-veth0
ip l a veth1 type veth peer name ovs-veth1

# 将 veth-pair 两端分别加入到 ns 和 ovs bridge 中
ip l s veth0 netns ns1
ovs-vsctl add-port ovs-br ovs-veth0
ip l s ovs-veth0 up

ip l s veth1 netns ns2
ovs-vsctl add-port ovs-br ovs-veth1
ip l s ovs-veth1 up

# 给 ns 中的 veth 配置 IP 并启用
ip netns exec ns1 ip a a 10.1.1.2/24 dev veth0
ip netns exec ns1 ip l s veth0 up

ip netns exec ns2 ip a a 10.1.1.3/24 dev veth1
ip netns exec ns2 ip l s veth1 up

# veth0 ping veth1
[root@localhost ~]# ip netns exec ns1 ping 10.1.1.3
PING 10.1.1.3 (10.1.1.3) 56(84) bytes of data.
64 bytes from 10.1.1.3: icmp_seq=1 ttl=64 time=0.311 ms
64 bytes from 10.1.1.3: icmp_seq=2 ttl=64 time=0.087 ms
^C
--- 10.1.1.3 ping statistics ---
2 packets transmitted, 2 received, 0% packet loss, time 999ms
rtt min/avg/max/mdev = 0.087/0.199/0.311/0.112 ms
相关课程推荐:Linux视频教程
总结
veth-pair 在虚拟网络中充当着桥梁的角色,连接多种网络设备构成复杂的网络。
veth-pair 的三个经典实验,直接相连、通过 Bridge 相连和通过 OVS 相连。
参考
http://www.opencloudblog.com/?p=66
https://segmentfault.com/a/1190000009251098
以上がLinux 仮想ネットワーク デバイス veth-pair の詳細な説明、この記事は非常に有益ですの詳細内容です。詳細については、PHP 中国語 Web サイトの他の関連記事を参照してください。

