ホームページ >Java >&#&チュートリアル >Spring Boot キャッシュのソース コードを理解する
Spring Boot キャッシュのソース コードを理解する
- 不言転載
- 2018-11-16 15:56:572396ブラウズ
この記事では、Spring Boot キャッシュのソース コードについて説明します。必要な方は参考にしていただければ幸いです。
アプリケーション キャッシュをプロジェクトに追加したいと考えています。最初は ehcache と springboot を統合する方法を考えていました。最終的に行う必要があるのは 3 つだけです。 :
pom 依存関係
ehcache 構成ファイルを作成します
アノテーション @EnableCaching をブート アプリケーションに追加します。これは魔法です。
<dependency>
            <groupid>net.sf.ehcache</groupid>
            <artifactid>ehcache</artifactid>
            <version>2.10.5</version>
</dependency>
<?xml  version="1.0" encoding="UTF-8"?>
<ehcache>
    <!-- 设定缓存的默认数据过期策略 -->
    <defaultcache></defaultcache>
</ehcache>
@SpringBootApplication
@EnableCaching
public class EhCacheApplication {

    public static void main(String[] args) {
        SpringApplication.run(EhCacheApplication.class, args);
    }
}
次に、次のようにコード内でキャッシュ アノテーションを使用できます。
@CachePut(value = "fish-ehcache", key = "#person.id")
    public Person save(Person person) {
        System.out.println("为id、key为:" + person.getId() + "数据做了缓存");
        return person;
    }

    @CacheEvict(value = "fish-ehcache")
    public void remove(Long id) {
        System.out.println("删除了id、key为" + id + "的数据缓存");
    }


    @Cacheable(value = "fish-ehcache", key = "#person.id")
    public Person findOne(Person person) {
        findCount.incrementAndGet();
        System.out.println("为id、key为:" + person.getId() + "数据做了缓存");
        return person;
    }
すごく便利ですよね?次に、もう少し深く掘り下げて、春がどのように起こるかを見てみましょう。これは主に 2 つの部分に分かれており、1 つは起動時に実行される内容、2 つ目は実行時に実行される内容、3 つ目はサードパーティのキャッシュ コンポーネントへの適応です。
実行時に実行される内容です。 starting,これは @EnableCaching タグで始まります。キャッシュ機能を使用する場合、このタグは
@Target({ElementType.TYPE})
@Retention(RetentionPolicy.RUNTIME)
@Documented
@Import({CachingConfigurationSelector.class})
public @interface EnableCaching {
    boolean proxyTargetClass() default false;
    AdviceMode mode() default AdviceMode.PROXY;
    int order() default 2147483647;
}
## を導入する注釈 @EnableCaching を追加する必要があります。 #CachingConfigurationSelector クラスの紹介。このクラスはキャッシュ機能の構成を可能にします。このクラスは、AutoProxyRegistrar.java と ProxyCachingConfiguration.java の 2 つのクラスを追加します。
AutoProxyRegistrar: ImportBeanDefinitionRegistrar インターフェースを実装します。ここがわかりません。学習を続ける必要があります。 - ProxyCachingConfiguration: BeanFactoryCacheOperationSourceAdvisor、CacheOperationSource、および CacheInterceptor の 3 つの Bean を生成する構成クラスです。
- CacheOperationSource は、キャッシュ メソッド シグネチャ アノテーションの解析作業をカプセル化し、CacheOperations のコレクションを形成します。 CacheInterceptor は、このコレクション フィルターを使用してキャッシュ処理を実行します。キャッシュのアノテーションを解析するクラスは SpringCacheAnnotationParser で、その主なメソッドは次のとおりです。
/**
由CacheOperationSourcePointcut作为注解切面,会解析
SpringCacheAnnotationParser.java
扫描方法签名,解析被缓存注解修饰的方法,将生成一个CacheOperation的子类并将其保存到一个数组中去
**/
protected Collection<cacheoperation> parseCacheAnnotations(SpringCacheAnnotationParser.DefaultCacheConfig cachingConfig, AnnotatedElement ae) {
        Collection<cacheoperation> ops = null;
        //找@cacheable注解方法
        Collection<cacheable> cacheables = AnnotatedElementUtils.getAllMergedAnnotations(ae, Cacheable.class);
        if (!cacheables.isEmpty()) {
            ops = this.lazyInit(ops);
            Iterator var5 = cacheables.iterator();

            while(var5.hasNext()) {
                Cacheable cacheable = (Cacheable)var5.next();
                ops.add(this.parseCacheableAnnotation(ae, cachingConfig, cacheable));
            }
        }
        //找@cacheEvict注解的方法
        Collection<cacheevict> evicts = AnnotatedElementUtils.getAllMergedAnnotations(ae, CacheEvict.class);
        if (!evicts.isEmpty()) {
            ops = this.lazyInit(ops);
            Iterator var12 = evicts.iterator();

            while(var12.hasNext()) {
                CacheEvict evict = (CacheEvict)var12.next();
                ops.add(this.parseEvictAnnotation(ae, cachingConfig, evict));
            }
        }
        //找@cachePut注解的方法
        Collection<cacheput> puts = AnnotatedElementUtils.getAllMergedAnnotations(ae, CachePut.class);
        if (!puts.isEmpty()) {
            ops = this.lazyInit(ops);
            Iterator var14 = puts.iterator();

            while(var14.hasNext()) {
                CachePut put = (CachePut)var14.next();
                ops.add(this.parsePutAnnotation(ae, cachingConfig, put));
            }
        }
        Collection<caching> cachings = AnnotatedElementUtils.getAllMergedAnnotations(ae, Caching.class);
        if (!cachings.isEmpty()) {
            ops = this.lazyInit(ops);
            Iterator var16 = cachings.iterator();

            while(var16.hasNext()) {
                Caching caching = (Caching)var16.next();
                Collection<cacheoperation> cachingOps = this.parseCachingAnnotation(ae, cachingConfig, caching);
                if (cachingOps != null) {
                    ops.addAll(cachingOps);
                }
            }
        }
        return ops;
}</cacheoperation></caching></cacheput></cacheevict></cacheable></cacheoperation></cacheoperation>
Cachable、Caching、CachePut、CachEevict の 4 つのアノテーションに対応するメソッドが Collectionメソッド実行時の動作
実行時には主にCacheInterceptorクラスが使用されます。
public class CacheInterceptor extends CacheAspectSupport implements MethodInterceptor, Serializable {
    public CacheInterceptor() {
    }

    public Object invoke(final MethodInvocation invocation) throws Throwable {
        Method method = invocation.getMethod();
        CacheOperationInvoker aopAllianceInvoker = new CacheOperationInvoker() {
            public Object invoke() {
                try {
                    return invocation.proceed();
                } catch (Throwable var2) {
                    throw new ThrowableWrapper(var2);
                }
            }
        };

        try {
            return this.execute(aopAllianceInvoker, invocation.getThis(), method, invocation.getArguments());
        } catch (ThrowableWrapper var5) {
            throw var5.getOriginal();
        }
    }
}
このインターセプターは、CacheAspectSupport クラスと MethodInterceptor インターフェイスを継承します。このうち、CacheAspectSupport はメイン ロジックをカプセル化します。たとえば、次の段落。
/**
CacheAspectSupport.java
执行@CachaEvict @CachePut @Cacheable的主要逻辑代码
**/

private Object execute(final CacheOperationInvoker invoker, Method method, CacheAspectSupport.CacheOperationContexts contexts) {
        if (contexts.isSynchronized()) {
            CacheAspectSupport.CacheOperationContext context = (CacheAspectSupport.CacheOperationContext)contexts.get(CacheableOperation.class).iterator().next();
            if (this.isConditionPassing(context, CacheOperationExpressionEvaluator.NO_RESULT)) {
                Object key = this.generateKey(context, CacheOperationExpressionEvaluator.NO_RESULT);
                Cache cache = (Cache)context.getCaches().iterator().next();

                try {
                    return this.wrapCacheValue(method, cache.get(key, new Callable<object>() {
                        public Object call() throws Exception {
                            return CacheAspectSupport.this.unwrapReturnValue(CacheAspectSupport.this.invokeOperation(invoker));
                        }
                    }));
                } catch (ValueRetrievalException var10) {
                    throw (ThrowableWrapper)var10.getCause();
                }
            } else {
                return this.invokeOperation(invoker);
            }
        } else {
            /**
            执行@CacheEvict的逻辑,这里是当beforeInvocation为true时清缓存
            **/
            this.processCacheEvicts(contexts.get(CacheEvictOperation.class), true, CacheOperationExpressionEvaluator.NO_RESULT);
            //获取命中的缓存对象
            ValueWrapper cacheHit = this.findCachedItem(contexts.get(CacheableOperation.class));
            List<cacheaspectsupport.cacheputrequest> cachePutRequests = new LinkedList();
            if (cacheHit == null) {
                //如果没有命中,则生成一个put的请求
                this.collectPutRequests(contexts.get(CacheableOperation.class), CacheOperationExpressionEvaluator.NO_RESULT, cachePutRequests);
            }


            Object cacheValue;
            Object returnValue;
            /**
                如果没有获得缓存对象,则调用业务方法获得返回对象,hasCachePut会检查exclude的情况
            **/
            if (cacheHit != null && cachePutRequests.isEmpty() && !this.hasCachePut(contexts)) {
                cacheValue = cacheHit.get();
                returnValue = this.wrapCacheValue(method, cacheValue);
            } else {

                returnValue = this.invokeOperation(invoker);
                cacheValue = this.unwrapReturnValue(returnValue);
            }

            this.collectPutRequests(contexts.get(CachePutOperation.class), cacheValue, cachePutRequests);
            Iterator var8 = cachePutRequests.iterator();

            while(var8.hasNext()) {
                CacheAspectSupport.CachePutRequest cachePutRequest = (CacheAspectSupport.CachePutRequest)var8.next();
                /**
                执行cachePut请求,将返回对象放到缓存中
                **/
                cachePutRequest.apply(cacheValue);
            }
            /**
            执行@CacheEvict的逻辑,这里是当beforeInvocation为false时清缓存
            **/
            this.processCacheEvicts(contexts.get(CacheEvictOperation.class), false, cacheValue);
            return returnValue;
        }
    }</cacheaspectsupport.cacheputrequest></object>
上記のコード スニペットは比較的コアであり、aop のソース コードについては、ここでは詳しく説明しません。別の記事で説明します。主要なクラスとインターフェイスは、Spring コンテキストの org.springframework.cache パッケージ内にあります。
サードパーティ キャッシュ コンポーネントへの適応
上記の分析を通じて、Spring キャッシュ機能の詳細がわかりました。以下に分析する必要があるのはその理由です。必要なのは Maven ステートメントだけです。いくつかの依存関係があるだけで、Spring Boot は自動的に適応できます。
上記の実行メソッドでは、キャッシュが適用されます。 CachePutRequest は CacheAspectSupport 内部クラスです。private class CachePutRequest {
private final CacheAspectSupport.CacheOperationContext context;
private final Object key;
public CachePutRequest(CacheAspectSupport.CacheOperationContext context, Object key) {
this.context = context;
this.key = key;
}
public void apply(Object result) {
if (this.context.canPutToCache(result)) {
//从context中获取cache实例,然后执行放入缓存的操作
Iterator var2 = this.context.getCaches().iterator();
while(var2.hasNext()) {
Cache cache = (Cache)var2.next();
CacheAspectSupport.this.doPut(cache, this.key, result);
}
}
}
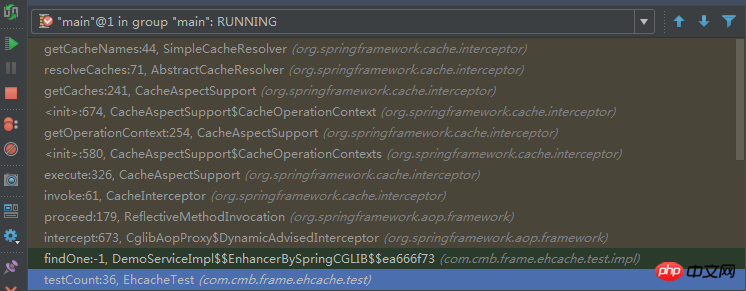
}Cache は標準インターフェイスであり、その中の EhCacheCache は EhCache の実装クラスです。これは SpringBoot と Ehcache の間の接続ですが、コンテキスト内のキャッシュ リストはいつ生成されるのでしょうか?答えは CacheAspectSupport
protected Collection extends Cache> getCaches(CacheOperationInvocationContext<cacheoperation> context, CacheResolver cacheResolver) {
        Collection extends Cache> caches = cacheResolver.resolveCaches(context);
        if (caches.isEmpty()) {
            throw new IllegalStateException("No cache could be resolved for '" + context.getOperation() + "' using resolver '" + cacheResolver + "'. At least one cache should be provided per cache operation.");
        } else {
            return caches;
        }
    }</cacheoperation>
の getCaches メソッドで、キャッシュ操作が実行されるたびにキャッシュの取得が実行されます。コールスタックを見てみましょう
#少し話が逸れたようですが、話を戻します... spring-boot-autoconfigure パッケージには、次のものがすべてあります。自動アセンブリ関連のクラス。ここには、次のような EhcacheCacheConfiguration クラスがあります。
@Configuration
@ConditionalOnClass({Cache.class, EhCacheCacheManager.class})
@ConditionalOnMissingBean({CacheManager.class})
@Conditional({CacheCondition.class, EhCacheCacheConfiguration.ConfigAvailableCondition.class})
class EhCacheCacheConfiguration {
 ......
 static class ConfigAvailableCondition extends ResourceCondition {
        ConfigAvailableCondition() {
            super("EhCache", "spring.cache.ehcache", "config", new String[]{"classpath:/ehcache.xml"});
        }
    }
}
これにより、クラス パスに ehcache.xml ファイルがあるかどうかが直接判断されます
以上がSpring Boot キャッシュのソース コードを理解するの詳細内容です。詳細については、PHP 中国語 Web サイトの他の関連記事を参照してください。

