ホームページ >ウェブフロントエンド >jsチュートリアル >ES6 の非同期関数の詳細な紹介 (例付き)
ES6 の非同期関数の詳細な紹介 (例付き)
- 不言転載
- 2018-10-24 10:33:492843ブラウズ
この記事では、ES6 の非同期機能について詳しく説明します (例を示します)。必要な方は参考にしていただければ幸いです。
async
ES2017 標準では async 関数が導入され、非同期操作がより便利になります。
非同期処理の観点から見ると、async 関数は Generator 関数の糖衣構文です。
例:
// 使用 generator
var fetch = require('node-fetch');
var co = require('co');

function* gen() {
    var r1 = yield fetch('https://api.github.com/users/github');
    var json1 = yield r1.json();
    console.log(json1.bio);
}

co(gen);
async を使用する場合:
// 使用 async
var fetch = require('node-fetch');

var fetchData = async function () {
    var r1 = await fetch('https://api.github.com/users/github');
    var json1 = await r1.json();
    console.log(json1.bio);
};

fetchData();
実際、async 関数の実装原則は、ジェネレーター関数と自動エグゼキューターを 1 つの関数でラップすることです。内部の機能。
async function fn(args) {
  // ...
}

// 等同于

function fn(args) {
  return spawn(function* () {
    // ...
  });
}
spawn 関数は、co などの自動実行プログラムを指します。
さらに、async 関数は Promise オブジェクトを返します。async 関数は Promise と Generator に基づくカプセル化の層であることも理解できます。
async と Promise
厳密に言えば、async は構文であり、Promise は組み込みオブジェクトであり、async 関数も Promise オブジェクトを返すことは言うまでもありません。 ..
ここでは主に、async を使用すると、Promise を使用するよりも非同期プロセスがよりエレガントに処理されます。
1. コードはより簡潔です
/**
 * 示例一
 */
function fetch() {
  return (
    fetchData()
    .then(() => {
      return "done"
    });
  )
}

async function fetch() {
  await fetchData()
  return "done"
};
/**
 * 示例二
 */
function fetch() {
  return fetchData()
  .then(data => {
    if (data.moreData) {
        return fetchAnotherData(data)
        .then(moreData => {
          return moreData
        })
    } else {
      return data
    }
  });
}

async function fetch() {
  const data = await fetchData()
  if (data.moreData) {
    const moreData = await fetchAnotherData(data);
    return moreData
  } else {
    return data
  }
};
/**
 * 示例三
 */
function fetch() {
  return (
    fetchData()
    .then(value1 => {
      return fetchMoreData(value1)
    })
    .then(value2 => {
      return fetchMoreData2(value2)
    })
  )
}

async function fetch() {
  const value1 = await fetchData()
  const value2 = await fetchMoreData(value1)
  return fetchMoreData2(value2)
};
2. エラー処理
function fetch() {
  try {
    fetchData()
      .then(result => {
        const data = JSON.parse(result)
      })
      .catch((err) => {
        console.log(err)
      })
  } catch (err) {
    console.log(err)
  }
}
このコードでは、try/catch は fetchData() の一部の Promise 構築エラーをキャプチャできます。 、JSON.parse によってスローされた例外はキャッチできません。JSON.parse によってスローされた例外を処理したい場合は、例外処理ロジックを繰り返すための catch 関数を追加する必要があります。
実際のプロジェクトでは、エラー処理ロジックが複雑になる可能性があり、コードが冗長になる可能性があります。
async function fetch() {
  try {
    const data = JSON.parse(await fetchData())
  } catch (err) {
    console.log(err)
  }
};
async/await の登場により、try/catch で同期エラーと非同期エラーをキャプチャできるようになります。
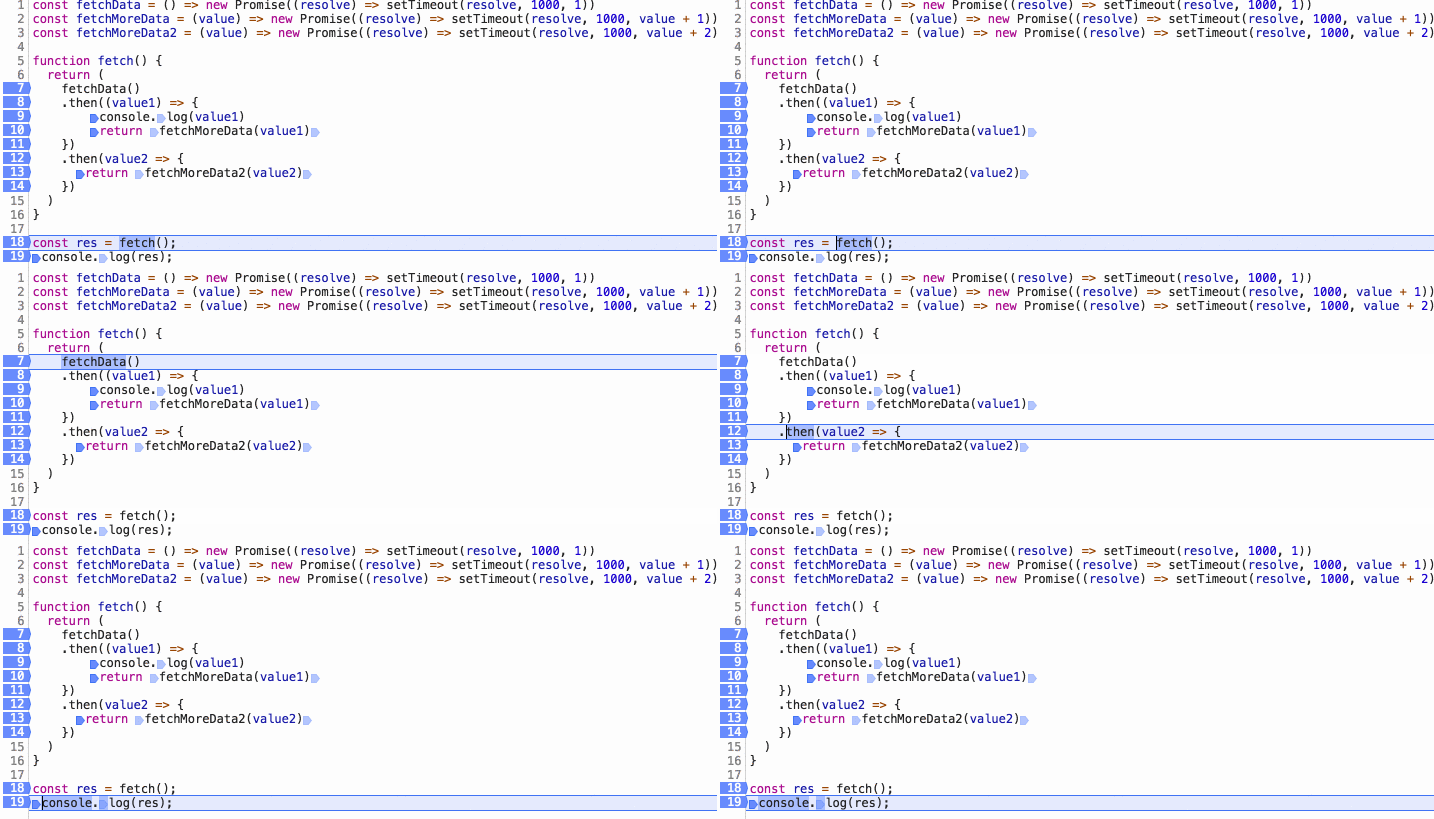
3. デバッグ
const fetchData = () => new Promise((resolve) => setTimeout(resolve, 1000, 1))
const fetchMoreData = (value) => new Promise((resolve) => setTimeout(resolve, 1000, value + 1))
const fetchMoreData2 = (value) => new Promise((resolve) => setTimeout(resolve, 1000, value + 2))

function fetch() {
  return (
    fetchData()
    .then((value1) => {
      console.log(value1)
      return fetchMoreData(value1)
    })
    .then(value2 => {
      return fetchMoreData2(value2)
    })
  )
}

const res = fetch();
console.log(res);

その後のコードは非同期で実行されるため、ポイントを中断するとコードが実行されます。特にステップオーバーを使用する場合、then 関数は次の then 関数に直接入ります。
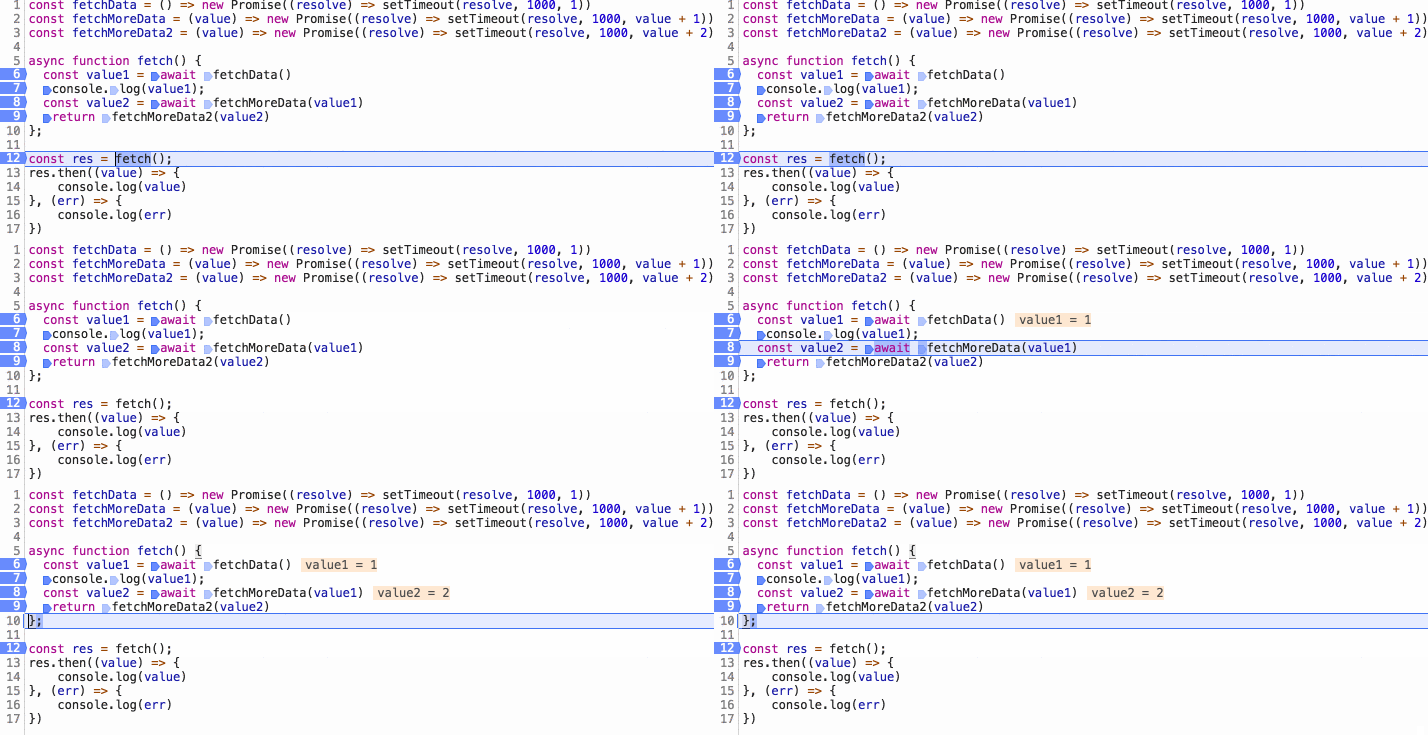
const fetchData = () => new Promise((resolve) => setTimeout(resolve, 1000, 1))
const fetchMoreData = () => new Promise((resolve) => setTimeout(resolve, 1000, 2))
const fetchMoreData2 = () => new Promise((resolve) => setTimeout(resolve, 1000, 3))

async function fetch() {
  const value1 = await fetchData()
  const value2 = await fetchMoreData(value1)
  return fetchMoreData2(value2)
};

const res = fetch();
console.log(res);

非同期を使用する場合は、同期コードをデバッグするのと同じようにデバッグできます。
非同期地獄
非同期地獄とは主に、開発者が文法の簡素化に貪欲で、並列実行できるコンテンツを順次実行に変えてしまい、パフォーマンスに影響を与えるという事実を指しますが、地獄を説明するために使用します。それは少し誇張されています...
例 1
例:
(async () => {
  const getList = await getList();
  const getAnotherList = await getAnotherList();
})();
getList() と getAnotherList() には実際には依存関係はありませんが、現在の方法では単純ではありますが、getList() が返された後にのみ getAnotherList() が実行されるため、リクエスト時間が 2 倍になります。
この問題を解決するには、次のように変更します:
(async () => {
  const listPromise = getList();
  const anotherListPromise = getAnotherList();
  await listPromise;
  await anotherListPromise;
})();
Promise.all() を使用することもできます:
(async () => {
  Promise.all([getList(), getAnotherList()]).then(...);
})();
例 2
もちろん上記の例です。この例は比較的単純です。もう一度拡張してみましょう。
(async () => {
  const listPromise = await getList();
  const anotherListPromise = await getAnotherList();

  // do something

  await submit(listData);
  await submit(anotherListData);

})();
await の特性により、例全体には明らかなシーケンスがあります。ただし、getList() と getAnotherList() には実際にはシーケンスがあります。 submit(listData) と submit( anotherListData) には依存関係がないので、この例をどのように書き直せばよいでしょうか?
基本的に 3 つのステップに分かれています:
1. 依存関係を確認します
ここでは、 submit(listData) が getList() の後にある必要があります。 submit(anotherListData) は anotherListPromise() の後に置く必要があります。
2. 相互依存するステートメントを非同期関数でラップする
async function handleList() {
  const listPromise = await getList();
  // ...
  await submit(listData);
}

async function handleAnotherList() {
  const anotherListPromise = await getAnotherList()
  // ...
  await submit(anotherListData)
}
3. 非同期関数を同時に実行する
async function handleList() {
  const listPromise = await getList();
  // ...
  await submit(listData);
}

async function handleAnotherList() {
  const anotherListPromise = await getAnotherList()
  // ...
  await submit(anotherListData)
}

// 方法一
(async () => {
  const handleListPromise = handleList()
  const handleAnotherListPromise = handleAnotherList()
  await handleListPromise
  await handleAnotherListPromise
})()

// 方法二
(async () => {
  Promise.all([handleList(), handleAnotherList()]).then()
})()
継承と同時実行
質問: URL 配列が与えられた場合、インターフェースの継承と同時実行をどのように実装すればよいでしょうか?
async 後続の実装:
// 继发一
async function loadData() {
  var res1 = await fetch(url1);
  var res2 = await fetch(url2);
  var res3 = await fetch(url3);
  return "whew all done";
}
// 继发二
async function loadData(urls) {
  for (const url of urls) {
    const response = await fetch(url);
    console.log(await response.text());
  }
}
async 同時実装:
// 并发一
async function loadData() {
  var res = await Promise.all([fetch(url1), fetch(url2), fetch(url3)]);
  return "whew all done";
}
// 并发二
async function loadData(urls) {
  // 并发读取 url
  const textPromises = urls.map(async url => {
    const response = await fetch(url);
    return response.text();
  });

  // 按次序输出
  for (const textPromise of textPromises) {
    console.log(await textPromise);
  }
}
async エラー キャプチャ
try catch を使用してエラーをキャプチャできますが、しかし、複数のエラーをキャッチして異なる処理を実行する必要がある場合、try catch はすぐに次のような乱雑なコードにつながります。
async function asyncTask(cb) {
    try {
       const user = await UserModel.findById(1);
       if(!user) return cb('No user found');
    } catch(e) {
        return cb('Unexpected error occurred');
    }

    try {
       const savedTask = await TaskModel({userId: user.id, name: 'Demo Task'});
    } catch(e) {
        return cb('Error occurred while saving task');
    }

    if(user.notificationsEnabled) {
        try {
            await NotificationService.sendNotification(user.id, 'Task Created');
        } catch(e) {
            return cb('Error while sending notification');
        }
    }

    if(savedTask.assignedUser.id !== user.id) {
        try {
            await NotificationService.sendNotification(savedTask.assignedUser.id, 'Task was created for you');
        } catch(e) {
            return cb('Error while sending notification');
        }
    }

    cb(null, savedTask);
}
この種のエラーのキャプチャを簡略化するために、await の後に Promise を与えることができます。オブジェクトは catch 関数を追加します。この関数にはヘルパーを記述する必要があります:
// to.js
export default function to(promise) {
   return promise.then(data => {
      return [null, data];
   })
   .catch(err => [err]);
}
エラー キャッチ コード全体は次のように簡略化できます:
import to from './to.js';

async function asyncTask() {
     let err, user, savedTask;

     [err, user] = await to(UserModel.findById(1));
     if(!user) throw new CustomerError('No user found');

     [err, savedTask] = await to(TaskModel({userId: user.id, name: 'Demo Task'}));
     if(err) throw new CustomError('Error occurred while saving task');

    if(user.notificationsEnabled) {
       const [err] = await to(NotificationService.sendNotification(user.id, 'Task Created'));
       if (err) console.error('Just log the error and continue flow');
    }
}
async に関するいくつかのディスカッション
async発電機を置き換えますか?
Generator は本来ジェネレーターとして使用されます。Generator を使用して非同期リクエストを処理するのは単なるハックです。非同期という点では、async は Generator の代わりに使用できますが、async と Generator の 2 つの構文は異なる問題を解決するために使用されます。の。
async は Promise を置き換えますか?
async 関数は Promise オブジェクトを返します
-
複雑な非同期プロセスに直面する場合、Promise が提供する all と Race の方が便利です。
Promise 自体はオブジェクトなので、コード内で任意に渡すことができます。
async のサポート率はまだ非常に低いです。 Babelでもコンパイル後に1000行ほど追加する必要があります。
以上がES6 の非同期関数の詳細な紹介 (例付き)の詳細内容です。詳細については、PHP 中国語 Web サイトの他の関連記事を参照してください。

