ホームページ >ウェブフロントエンド >CSSチュートリアル >CSS と Vanilla.js を使用して Apple デバイスを表示するインタラクティブなアニメーションを実装する方法 (ソース コードを添付)
CSS と Vanilla.js を使用して Apple デバイスを表示するインタラクティブなアニメーションを実装する方法 (ソース コードを添付)
- 不言転載
- 2018-10-22 13:43:262724ブラウズ
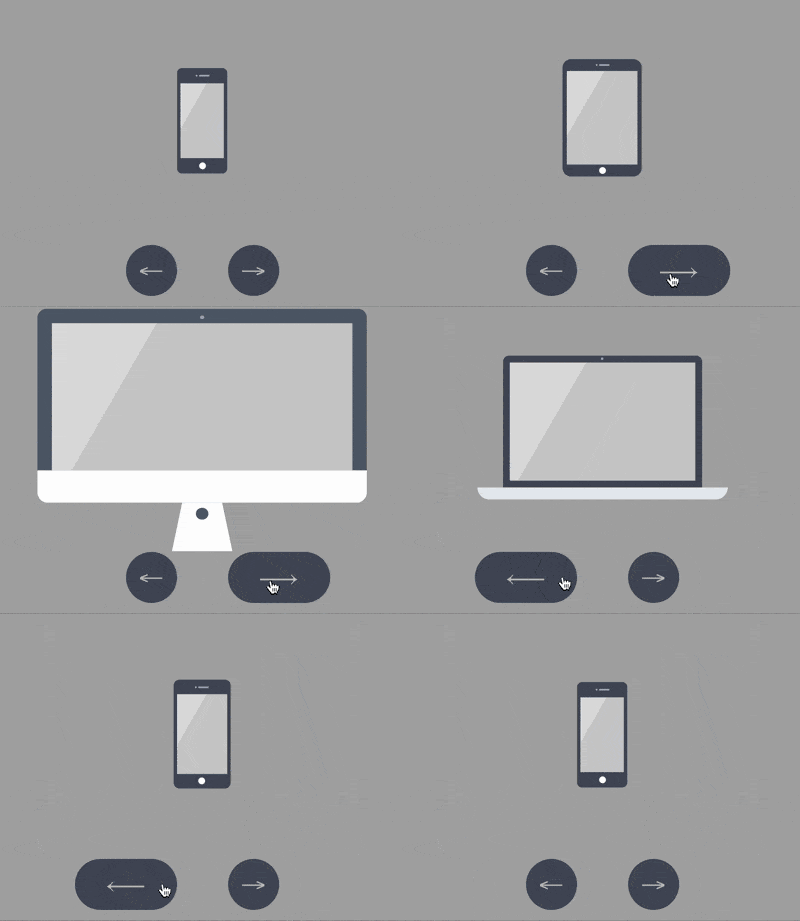
この記事の内容は、CSS と Vanilla.js を使用して Apple デバイスを表示するためのインタラクティブなアニメーションを実装する方法に関するものです (ソースコードが添付されています)。必要な方は参考にしていただければと思います。助けになる。
エフェクトのプレビュー

ソース コードのダウンロード
https://github.com/comehope/front-end-daily -challenges
コード解釈
iphone、mini、ipad、macbook、imacの5つのデバイスを表す5つのサブ要素を含むdomを定義します:
<div>
    <div></div>
    <div></div>
    <div></div>
    <div></div>
    <div></div>
</div>
中央表示:
body {
    margin: 0;
    height: 100vh;
    display: flex;
    align-items: center;
    justify-content: center;
    background-color: #aaa;
}
コンテナ内の子要素のレイアウトを設定します:
.container {
    position: relative;
    display: flex;
    flex-direction: column;
    align-items: center;
}
デバイスの共通プロパティを設定します。線形グラデーション パターンが画面の背景として使用されます:
.device {
    box-sizing: border-box;
    position: relative;
    display: flex;
    justify-content: center;
    background: linear-gradient(120deg, #ddd 30%, #ccc 30%);
}

.device::before,
.device::after {
    content: '';
    position: absolute;
}
iphone、mini、ipad 上部のカメラ、センサー開口部、下部のボタンを備えた形状は似ているため、これらの共通の属性を一緒に設定できます。上部の詳細を描画するには ::before 擬似要素を使用します。 ::疑似要素の後、一番下のボタンを描画します:
.iphone::before,
.mini::before,
.ipad::before {
    width: 2px;
    height: 2px;
    border-style: solid;
    border-color: #a5adbe;
    border-width: 0 12px 0 2px;
}

.iphone::after,
.mini::after,
.ipad::after {
    width: 8px;
    height: 8px;
    background-color: white;
    border-radius: 50%;
}
次にデバイスを 1 つずつ描画します。最初に iPhone の輪郭を描画します:
.iphone {
    width: 59px;
    height: 124px;
    border: #484f5e solid;
    border-width: 18px 4px;
    border-radius: 6px;
}
iPhone の上部と下部の詳細を配置します:
.iphone::before {
    top: -10px;
}

.iphone::after {
    bottom: -13px;
}
同様に、ミニを描画します:
.mini {
    width: 93px;
    height: 138px;
    border: #484f5e solid;
    border-width: 14px 5px;
    border-radius: 10px;
}

.mini::before {
    top: -8px;
}

.mini::after {
    bottom: -11px;
}
次に iPad を描画します:
.ipad {
    width: 134px;
    height: 176px;
    border: #484f5e solid;
    border-width: 18px 13px;
    border-radius: 12px;
}

.ipad::before {
    top: -10px;
}

.ipad::after {
    bottom: -13px;
}
次に MacBook を描画し、最初に画面を描画します:
.macbook {
    width: 234px;
    height: 155px;
    border: 8px solid #484f5e;
    border-radius: 7px 7px 0 0;
}
Use ::before 疑似要素を使用してカメラを描画します:
.macbook::before {
    width: 294px;
    height: 14px;
    background-color: #e8ebf0;
    top: calc(100% + 8px);
    border-radius: 0 0 14px 14px;
}
Use : :疑似要素の後 ホストを描画します:
.macbook::after {
    width: 3px;
    height: 3px;
    background-color: #a5adbe;
    top: -6px;
    border-radius: 50%;
}
次に imac を描画します。まず画面を描画します。境界線が残るため、画面の左、上、右の黒い境界線は描画されません。端点にベベルがあるので変更します。 box-shadow を使用して次のことを実現します。
.imac {
    width: 360px;
    height: 215px;
    border-radius: 10px;
    box-shadow:
        inset 0 14px #484f5e,
        inset 14px 0 #484f5e,
        inset -14px 0 #484f5e;
    border-bottom: 33px solid #e8ebf1;
    transform: translateY(14px);
}
Use ::before pseudo-element を使用して台形の底面を描画します。
.imac::before {
    width: 90px;
    height: 0;
    top: calc(100% + 33px);
    border: solid transparent;
    border-bottom-color: #e2e4e8;
    border-width: 0 10px 47px 10px;
}
Use ::after pseudo -要素を使用して、画面の上部にカメラを、下部にボタンを描画します。 注: ボタンは box-shadow を使用して実装されています:
.imac::after {
    width: 4px;
    height: 4px;
    background-color: #a5adbe;
    top: 5px;
    border-radius: 50%;
    box-shadow: 0 191px 0 4px #464e5d;
}
この時点で、デバイスは完全に描画されています。
iPhone 以外の他のデバイスの dom 要素を削除し、1 つの dom 要素だけを残します。これ以降のすべてのアニメーション効果は、この dom 要素で変更されます。
<div>
        <div></div>
        <!-- <div class="device mini"></div>
        <div class="device ipad"></div>
        <div class="device macbook"></div>
        <div class="device imac"></div> -->
    </div>
コンテナのサイズを設定すると、子要素が垂直方向の中央に配置されます。デバイスの高さはコンテナの高さの 75% を占めます:
.container {
    width: 360px;
    height: 350px;
    justify-content: center;
}

.device {
    transform: translateY(-25%);
}
それぞれ .left と .right で表される 2 つのボタン要素を dom に追加します:
<div>
    <div></div>
    <div>
        <span></span>
        <span></span>
    </div>
</div>
ボタン:
.buttons {
    position: absolute;
    width: inherit;
    font-size: 30px;
    height: 2em;
    bottom: 0;
    display: flex;
    justify-content: space-around;
}

.buttons > * {
    position: relative;
    width: 4em;
}
ボタンは左右の矢印です:
.buttons > *::before {
    position: absolute;
}

.buttons .left::before {
    content: '←';
    right: 0;
}

.buttons .right::before {
    content: '→';
}
ボタンのスタイルを円形に設定します:
.buttons > *t::before {
    position: absolute;
    width: 2em;
    height: 2em;
    background-color: #484f5e;
    color: silver;
    text-align: center;
    line-height: 2em;
    border-radius: 1em;
    cursor: pointer;
}
マウス ホバー効果を追加します:
.buttons > *::before {
    transition: 0.2s;
}

.buttons .left:hover::before {
    width: 4em;
    content: '⟵';
}

.buttons .right:hover::before {
    width: 4em;
    content: '⟶';
}
追加ボタンのクリック効果:
.buttons > *:active {
    transform: scale(0.9);
    filter: brightness(0.8);
}
この時点で、ボタンが作成され、対話型スクリプトが作成されます。
要素を取得する関数を定義$:
const $ = (className) => document.getElementsByClassName(className)[0]
デバイス名を格納する配列を定義:
let devices = ['iphone', 'mini', 'ipad', 'macbook', 'imac']
クリック動作のデータ処理方法を定義、左のボタンをクリックすると、配列の左端の要素が右端に移動します。逆に、右のボタンをクリックすると、配列の右端の要素が左端に移動します。そのため、2 方向がループします。配列:
let loop = {
    'left': () => devices.unshift(devices.pop()),
    'right': () => devices.push(devices.shift())
}
クリック イベントを定義し、配列の変更に従ってデバイスを切り替えます:
Array.from($('buttons').children).forEach(element =>
    element.addEventListener('click', function(e) {
        loop[e.target.className]()
        $('device').className = 'device ' + devices[0]
    })
)
最後に、デバイス切り替えのイージング効果を設定します:
.device,
.device::before,
.device::after {
    transition: 0.4s cubic-bezier(0.5, 1.7, 0.5, 1.2);
}
終わり!
以上がCSS と Vanilla.js を使用して Apple デバイスを表示するインタラクティブなアニメーションを実装する方法 (ソース コードを添付)の詳細内容です。詳細については、PHP 中国語 Web サイトの他の関連記事を参照してください。

