ホームページ >バックエンド開発 >PHPチュートリアル >XHProf を使用して PHP パフォーマンスのボトルネックを分析する方法 1
XHProf を使用して PHP パフォーマンスのボトルネックを分析する方法 1
- 不言オリジナル
- 2018-07-07 15:34:531452ブラウズ
xhprof 拡張機能のインストール
wget http://pecl.php.net/get/xhprof-0.9.4.tgz
tar zxf xhprof-0.9.4.tgz
cd xhprof-0.9.4/extension/
sudo phpize
./configure
sudo make
sudo make install
cd ../
php.ini の設定
[xhprof]
extension=xhprof.so
xhprof.output_dir=/tmp
注: xhprof は長い間更新されていません。現時点では、php7 はサポートされていません。php7 は https を使用できます。 ://github.com/pacility/…。
xhprof 環境の構成
xhprof 圧縮パッケージ内の 2 つのディレクトリを指定されたディレクトリにコピーする必要があります (/work/xhprof/ に定義されていると仮定します)。
mkdir /work/xhprof/
cp -a xhprof_html/ /work/xhprof/
cp -a xhprof_lib/ /work/xhprof/
次に、プロジェクト フレームワークのエントリ ファイルを追加します。
xhprof_enable(XHPROF_FLAGS_MEMORY | XHPROF_FLAGS_CPU);
register_shutdown_function(function() {
    $xhprof_data = xhprof_disable();
    if (function_exists('fastcgi_finish_request')){
        fastcgi_finish_request();
    }
    include_once "/work/xhprof/xhprof_lib/utils/xhprof_lib.php";
    include_once "/work/xhprof/xhprof_lib/utils/xhprof_runs.php";
    $xhprof_runs = new XHProfRuns_Default();
    $run_id = $xhprof_runs->save_run($xhprof_data, 'xhprof');
});
コード分析: $xhprof_data プログラム中のすべての関数呼び出し時間と CPU メモリ消費量を記録します。実行中です。特定の記録されたインジケーターは、xhprof_enable のパラメーターを通じて制御できます。現在サポートされているパラメーターは次のとおりです:
HPROF_FLAGS_NO_BUILTINS
すべての組み込み (内部) 関数をスキップします。XHPROF_FLAGS_CPU
CPU データを出力パフォーマンス データに追加します。XHPROF_FLAGS_MEMORY
出力パフォーマンス データにメモリ データを追加します。
XHProfRuns_Default を記述し、$xhprof_data をシリアル化し、特定のディレクトリに保存すると、XHProfRuns_Default(__DIR__) を通じて結果を現在のディレクトリに出力できます。指定しない場合は、php.ini## の xhprof.output_dir## を使用します。 # 設定ファイルが読み込まれます。 # まだ指定されていない場合は、/tmp に出力されます。 xhprof_enable
xhprof_disable はペアで表示され、1 つは実行中のコードの先頭にあり、もう 1 つは最後にあります。中央には分析対象のコードがあります。 上記の設定後、引き続きプロジェクト インターフェイスをリクエストすると、xhprof はリクエスト プロセス中に CPU、メモリ、消費時間などを分析します。ログは xhprof.output_dir
Web の設定
server {
    listen       80;
    server_name  xhprof.test.com;

    root /work/xhprof/xhprof_html;
    index  index.html index.php;


    location ~ \.php$ {
        fastcgi_pass   127.0.0.1:9000;
        fastcgi_index  index.php;
        fastcgi_param  SCRIPT_FILENAME  $document_root$fastcgi_script_name;
        include        fastcgi_params;
    }
}
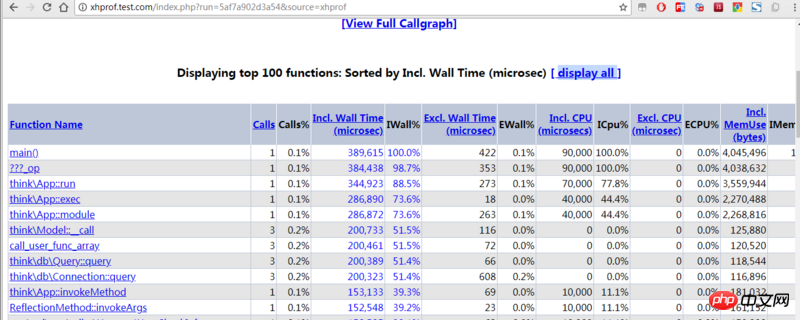
を構築し、仮想ホスト xhprof.test.com を構成します。 nginx を再起動し、xhprof.test.com を開いて効果を確認します。

はデフォルトの UI にリストされています :
- calls: コール数
- ウォールタイムを含む (マイクロ秒) ): 関数の実行時間 (サブ関数を含む)
#IWall%: 関数の実行時間 (サブ関数を含む) 割合
Excl 。 Wall Time (microsec): 関数の実行時間 (サブ関数を除く)
EWall%: 関数の実行時間 (サブ関数を除く)
-
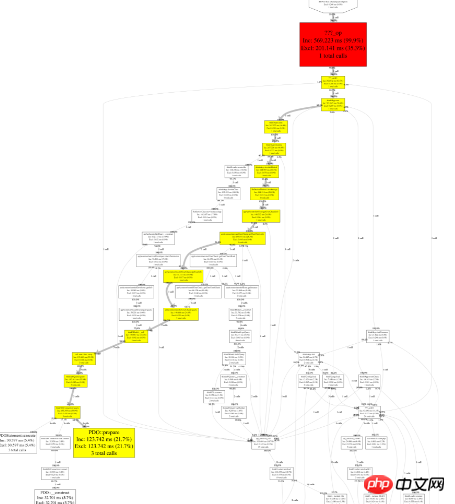
Web 上には [View Full Callgraph] リンクも表示されます。クリックすると、視覚的なパフォーマンス分析グラフを描画できます。クリック後にエラーが報告される場合は、graphviz への依存関係がないことが原因である可能性があります。 Graphviz は、パフォーマンスのボトルネックをより直感的に表示できるグラフ描画ツールです。必要に応じてインストールできます:
yum install -y libpng
yum install -y graphviz
効果:
xhprof の非侵入的な導入
# 以前は、コードを追加して分析を実装しました。プロジェクトエントリーファイル機能へ。より洗練された方法は、追加ファイル xhprof.inc.php を作成し、 /work/xhprof/
xhprof_enable(XHPROF_FLAGS_MEMORY | XHPROF_FLAGS_CPU);
register_shutdown_function(function() {
    $xhprof_data = xhprof_disable();
    if (function_exists('fastcgi_finish_request')){
        fastcgi_finish_request();
    }
    include_once "/work/xhprof/xhprof_lib/utils/xhprof_lib.php";
    include_once "/work/xhprof/xhprof_lib/utils/xhprof_runs.php";
    $xhprof_runs = new XHProfRuns_Default();
    $run_id = $xhprof_runs->save_run($xhprof_data, 'xhprof');
});
コード このファイルを挿入し、php.ini:
auto_prepend_file = /work/xhprof/xhprof.inc.php
を編集して、PHP サービスを再起動します。これは、この PHP 環境を使用するすべてのユーザーに有効になります。 または、指定したプロジェクトの nginx 構成にこれを書き込むこともできます: jifen.cc.conf
location ~ \.php$ {

        fastcgi_pass   127.0.0.1:9000;
        fastcgi_index  index.php;
        fastcgi_param  SCRIPT_FILENAME  $document_root$fastcgi_script_name;
    fastcgi_param PHP_VALUE "auto_prepend_file=/work/xhprof/xhprof.inc.php";
        include        fastcgi_params;
    }
次に、nginx サービスを再起動します。これはこのプロジェクトに対してのみ有効です。
auto_prepend_file および auto_append_file によって組み込まれたファイルはこのモードで解析されますが、関数を呼び出す前に定義する必要があるなど、いくつかの制限があります。
<?php $profiling = !(mt_rand()%9);
if($profiling) xhprof_enable(XHPROF_FLAGS_MEMORY | XHPROF_FLAGS_CPU);
register_shutdown_function(function() use($profiling) {
if($profiling){
$xhprof_data = xhprof_disable();
if (function_exists('fastcgi_finish_request')){
fastcgi_finish_request();
}
include_once "/work/xhprof/xhprof_lib/utils/xhprof_lib.php";
include_once "/work/xhprof/xhprof_lib/utils/xhprof_runs.php";
$xhprof_runs = new XHProfRuns_Default();
$xhprof_runs->save_run($xhprof_data, 'xhprof');
}
});
概要この記事では、xhprof 拡張子に基づいて PHP のパフォーマンスを分析し、ログに記録し、最終的に使用する方法を紹介しました。 xhprof 拡張機能に付属する UI が Web 上に表示されます。主な知識ポイント:
xhprof 拡張機能のインストール
- xhprof をアプリケーションに挿入
- ベースnginx の表示解析結果
- 以上がこの記事の全内容です。皆様の学習に少しでもお役に立てれば幸いです。その他の関連コンテンツについては、PHP 中国語 Web サイトをご覧ください。 関連する推奨事項:
php7 の php-fpm パラメータ設定に関する注意事項
laravel-adminのselectがフォーム編集時に現在の値を自動的に選択できない問題を解決します
以上がXHProf を使用して PHP パフォーマンスのボトルネックを分析する方法 1の詳細内容です。詳細については、PHP 中国語 Web サイトの他の関連記事を参照してください。

