ホームページ >ウェブフロントエンド >jsチュートリアル >プロジェクトにスワイパーを適用する方法
プロジェクトにスワイパーを適用する方法
- php中世界最好的语言オリジナル
- 2018-06-15 11:15:092035ブラウズ
今回はプロジェクトにスワイパーを適用する方法と、プロジェクトにスワイパーを適用する際の注意点について説明します。以下は実際のケースです。見てみましょう。
まず、単純な反応ネイティブプロジェクトを作成し、フォルダーを作成します。次に、コマンド ラインを使用して
react-native init swiper
と入力します。プロジェクトを作成した後、vs

を使用してコンソールを開き、スワイパーの依存関係をインストールします。
インストール: npm i act-native-swiper --save
表示: npm view act-native-swiper
削除: npm rm reverse-native-swiper --save
npm i でローカルの依存関係ライブラリを更新する必要もあります
アプリプロジェクトを開始します
ios:react-native run-ios
android:react-native run-android
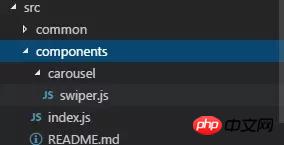
コーディングを開始し、srcにコンポーネントフォルダーを作成し、その下にswiper.jsファイルを作成し、index.js 、ドキュメントも追加

import PropTypes from 'prop-types';
import React, { Component } from 'react';
import { StyleSheet, TouchableWithoutFeedback, View } from 'react-native';
import RNSwiper from 'react-native-swiper';
const styles = StyleSheet.create({
activeDotWrapperStyle: {
//圆点样式
},
activeDotStyle: {
//圆点样式
},
dotStyle: {
//圆点样式
}
});
const activeDot = (
<View style={styles.activeDotWrapperStyle}>
<View style={styles.activeDotStyle} />
</View>
);
const dot = <View style={styles.dotStyle} />;
export class Carousel extends Component {
// Define component prop list
static propTypes = {
data: PropTypes.array,
height: PropTypes.number,
onPressItem: PropTypes.func,
renderItem: PropTypes.func.isRequired,
autoplay: PropTypes.bool,
autoplayTimeout: PropTypes.number
};
// Define props default value
static defaultProps = {
data: [],
height: 150,
autoplay: true,
autoplayTimeout: 2.5,
onPressItem: () => {},
renderItem: () => {}
};
// Define inner state
state = {
showSwiper: false
};
constructor(props) {
super(props);
this.handleItemPress = this.handleItemPress.bind(this);
}
componentDidMount() {
setTimeout(() => {
this.setState({ showSwiper: true });
});
}
handleItemPress(item) {
this.props.onPressItem(item);
}
_renderSwiperItem(item, index) {
return (
<TouchableWithoutFeedback key={index} onPress={() => this.handleItemPress(item)}>
<View style={[{ flex: 1 }]}>{this.props.renderItem(item)}</View>
</TouchableWithoutFeedback>
);
}
render() {
return this.props.data.length === 0 || !this.state.showSwiper ? null : (
<RNSwiper
height={this.props.height} //图片高度
activeDot={activeDot}
dot={dot}
style={{ backgroundColor: '#fff' }}
autoplay={this.props.autoplay} //是否自动轮播
autoplayTimeout={this.props.autoplayTimeout} //轮播秒数
>
{this.props.data.map((item, idx) => this._renderSwiperItem(item, idx))} //如果数据是个对象里面的数组加一个循环
</RNSwiper>
);
}
}
これはindex.jsファイルです
import { Carousel } from './carousel/Carousel';
export { Carousel };
パブリックコンポーネントライブラリ
これは、ビジネスに関係のないパブリックコンポーネントを配置するために使用されます。コンポーネントの実装では柔軟性と拡張性を考慮する必要があり、特定のビジネス ロジックを含めることはできません。
コンポーネントには、TryCarousel.js などのビジネス名をプレフィックスとして付ける必要があります。各コンポーネントは別のディレクトリに配置する必要があり、ディレクトリは carousel/TryCarousel.js のようにすべて小文字 (ダッシュで区切る) にする必要があります。
基本的なコンポーネント構造:
import PropTypes from 'prop-types';
import React, { Component } from 'react';
export class TryCarousel extends Component {
 // Define component prop list
 static propTypes = {};
 // Define props default value
 static defaultProps = {};
 // Define inner state
 state = {};
 constructor(props) {
  super(props);
 }
 // LifeCycle Hooks
 // Prototype Functions
 // Ensure the latest function is render
 render() {}
}
コンポーネントリスト
carousel (カルーセルコンポーネント)
は、主に一般的な画像カルーセルに使用され、クリックイベント応答を提供できます。
使用法:
プロパティ:
| プロパティ | 説明 | タイプ | デフォルト値 |
|---|---|---|---|
| データ | カルーセルデータソース | Arレイ | - |
| 高さ | カルーセル | number | 150 |
| onPressItem | の高さは、カルーセルアイテムがクリックされたときにトリガーされます | fn | - |
| renderItem | アイテムをレンダリングする具体的な方法については、「Flat」を参照してください。リスト | fn | - |
| autoplay | 自動切り替えするかどうか | bool | true |
| autoplayTimeout | アイテム自動切り替え時間間隔(単位s) | 数値 | 2.5 |
どこへimport
import { HigoCarousel } from '../../components';
<Carousel
      data={} //接受的数据
      onPressItem={} //点击事件
      height={} //图片高度
      autoplay={} //是否自动播放
      autoplayTimeout={} //过渡时间
      renderItem={item => {
       return <Image source={{ uri: item.imageSource }} style={{ flex: 1 }} />;
      }} //图片
/>
この記事の事例を読んだ後は、この方法を習得したと思います。さらに興味深い情報については、php 中国語 Web サイトの他の関連記事に注目してください。
推奨読書:
vue-routerでクエリの動的パラメータ転送を処理する方法
以上がプロジェクトにスワイパーを適用する方法の詳細内容です。詳細については、PHP 中国語 Web サイトの他の関連記事を参照してください。

