
ホームページ >ウェブフロントエンド >jsチュートリアル >WeChatミニプログラムでスイッチコンポーネントを使用する方法
WeChatミニプログラムでスイッチコンポーネントを使用する方法
- 亚连オリジナル
- 2018-06-08 17:33:484101ブラウズ
この記事では主にWeChatアプレットのスイッチコンポーネントの実装方法を詳しく紹介しますので、興味のある方は参考にしてください
この記事の例はWeChatアプレットのスイッチコンポーネントの実装コードを共有しています。ご参考までに、具体的な内容は次のとおりです
 HTML
HTML
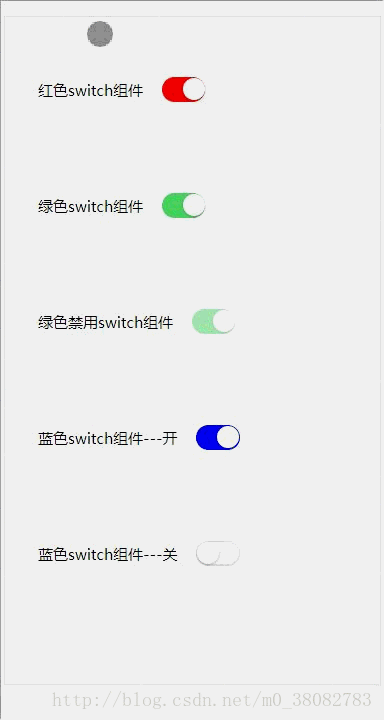
<p class="switch-list">
 <span class="fui-fr">红色switch组件</span>
 <input class="fui-switch" style="color:rgb(255, 0, 0);" type="checkbox" checked>
</p>
<p class="switch-list">
 <span class="fui-fr">绿色switch组件</span>
 <input class="fui-switch" style="color:rgb(76, 216, 100);" type="checkbox" checked>
</p>
<p class="switch-list">
 <span class="fui-fr">绿色禁用switch组件</span>
 <input class="fui-switch" style="color:rgb(76, 216, 100);" type="checkbox" checked disabled>
</p>
<p class="switch-list">
 <span class="fui-fr">蓝色switch组件---开</span>
 <input class="fui-switch" style="color:blue" type="checkbox" checked>
</p>
<p class="switch-list">
 <span class="fui-fr">蓝色switch组件---关</span>
 <input class="fui-switch" style="color:blue" type="checkbox">
</p>
CSS
.switch-list{
 padding: .5rem;
}
.fui-switch{
 position: relative;
 width: .87rem;
 height: .5rem;
 z-index: 10;
 display: inline-block;
 outline: medium;
 border: 1px solid #dfdfdf;
 border-radius: .25rem;
 background-color: #dfdfdf;
 -webkit-appearance: none;
 -moz-appearance: none;
 vertical-align: middle;
}
.fui-switch:checked{
 border-color: currentColor;
 background-color: currentColor;
}
.fui-switch::after,.fui-switch::before{
 content: "";
 position: absolute;
 height: .44rem;
 top: 0;
 left: 0;
 border-radius: .25rem;
 -webkit-transition: -webkit-transform .3s;
 transition: -webkit-transform .3s;
 transition: transform .3s;
 transition: transform .3s,-webkit-transform .3s;
}
.fui-switch:before {
 width: .84rem;
 background-color: #fdfdfd;
}
.fui-switch:checked:before {
 -webkit-transform: scale(0);
 transform: scale(0);
}
.fui-switch:after {
 width: .44rem;
 background-color: #fff;
 box-shadow: 0 1px 3px rgba(0,0,0,.4);
}
.fui-switch:checked:after {
 -webkit-transform: translateX(.4rem);
 transform: translateX(.4rem);
}
.fui-switch[disabled] {
 opacity: .5;
}
.fui-fr{font-size: .3rem;vertical-align: middle;}JSでrem(function(win,factory){
factory(win);
window.addEventListener('resize',function(){factory(win)},false);
}(window,function(win){
var width = document.documentElement.clientWidth;
width = width > 750 ? 750 : width;
document.documentElement.style.fontSize = width / 7.5 + 'px';
}));を実装しますここで、1remは750 psdデザイン図面00pxを表します。切り替えスイッチのアニメーションはCSS3のtransition属性で実現します主にスイッチ後の動きと前のズームイン・ズームアウトアニメーションを制御します。
上記は私があなたのためにまとめたものです。
関連記事:
ネイティブjsを使って都道府県と市区町村の3段階連携を実現する
以上がWeChatミニプログラムでスイッチコンポーネントを使用する方法の詳細内容です。詳細については、PHP 中国語 Web サイトの他の関連記事を参照してください。
声明:
この記事の内容はネチズンが自主的に寄稿したものであり、著作権は原著者に帰属します。このサイトは、それに相当する法的責任を負いません。盗作または侵害の疑いのあるコンテンツを見つけた場合は、admin@php.cn までご連絡ください。