ホームページ >ウェブフロントエンド >jsチュートリアル >Vue バインディングの問題の分析
Vue バインディングの問題の分析
- php中世界最好的语言オリジナル
- 2018-06-07 10:40:281606ブラウズ
今回は、Vue バインディングの問題の分析と、Vue バインディングの注意点について説明します。以下は実際のケースです。見てみましょう。
1. 原則
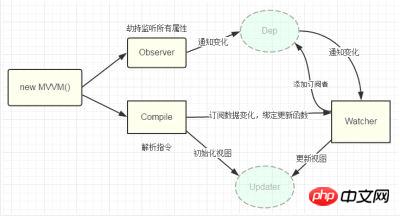
Vue の双方向データ バインディングの原則は、主に Object オブジェクトの defineProperty プロパティを通じて実装され、データの set 関数と get 関数をオーバーライドします。は導入部分です。原理についてはあまり説明しませんが、主に実装例を説明します。コードをわかりやすくするために、ここでは最も基本的な内容のみを実装します。主に v-model、v-bind、v-click の 3 つのコマンドを実装します。他のコマンドは自分で補足することもできます。
インターネットから画像を追加します

2.
のページ構造の実装は、次のように非常に簡単です:
<p id="app">
 <form>
  <input type="text" v-model="number">
  <button type="button" v-click="increment">增加</button>
 </form>
 <h3 v-bind="number"></h3>
 </p>
1. v-modelコマンドを使用した入力
2. ボタン、v-click コマンドを使用します 3. h3、v-bind コマンドを使用します。
最終的には、vue と同様の方法で双方向データ バインディングを使用し、データ構造と組み合わせたアノテーションを追加します
var app = new myVue({
  el:'#app',
  data: {
  number: 0
  },
  methods: {
  increment: function() {
   this.number ++;
  },
  }
 })
まず、myVue コンストラクターを定義する必要があります:
function myVue(options) {
}
このコンストラクターを初期化するには、それに与えます_init 属性を追加します
function myVue(options) {
 this._init(options);
}
myVue.prototype._init = function (options) {
 this.$options = options; // options 为上面使用时传入的结构体,包括el,data,methods
 this.$el = document.querySelector(options.el); // el是 #app, this.$el是id为app的Element元素
 this.$data = options.data; // this.$data = {number: 0}
 this.$methods = options.methods; // this.$methods = {increment: function(){}}
 }
次に、_obverse 関数を実装し、データを処理し、データの set 関数と get 関数を書き換えます
そして、_init 関数を変換します
myVue.prototype._obverse = function (obj) { // obj = {number: 0}
 var value;
 for (key in obj) { //遍历obj对象
  if (obj.hasOwnProperty(key)) {
  value = obj[key];
  if (typeof value === 'object') { //如果值还是对象,则遍历处理
   this._obverse(value);
  }
  Object.defineProperty(this.$data, key, { //关键
   enumerable: true,
   configurable: true,
   get: function () {
   console.log(`获取${value}`);
   return value;
   },
   set: function (newVal) {
   console.log(`更新${newVal}`);
   if (value !== newVal) {
    value = newVal;
   }
   }
  })
  }
 }
 }
 myVue.prototype._init = function (options) {
 this.$options = options;
 this.$el = document.querySelector(options.el);
 this.$data = options.data;
 this.$methods = options.methods;
 this._obverse(this.$data);
 }
次に、バインドする命令クラス Watcher を作成します 更新関数を定義しますDOM 要素を更新します
function Watcher(name, el, vm, exp, attr) {
 this.name = name;   //指令名称,例如文本节点,该值设为"text"
 this.el = el;    //指令对应的DOM元素
 this.vm = vm;    //指令所属myVue实例
 this.exp = exp;   //指令对应的值,本例如"number"
 this.attr = attr;   //绑定的属性值,本例为"innerHTML"
 this.update();
 }
 Watcher.prototype.update = function () {
 this.el[this.attr] = this.vm.$data[this.exp]; //比如 H3.innerHTML = this.data.number; 当number改变时,会触发这个update函数,保证对应的DOM内容进行了更新。
 }
_init 関数と _obverse 関数を更新します
myVue.prototype._init = function (options) {
 //...
 this._binding = {}; //_binding保存着model与view的映射关系,也就是我们前面定义的Watcher的实例。当model改变时,我们会触发其中的指令类更新,保证view也能实时更新
 //...
 }
 myVue.prototype._obverse = function (obj) {
 //...
  if (obj.hasOwnProperty(key)) {
  this._binding[key] = { // 按照前面的数据,_binding = {number: _directives: []}
   _directives: []
  };
  //...
  var binding = this._binding[key];
  Object.defineProperty(this.$data, key, {
   //...
   set: function (newVal) {
   console.log(`更新${newVal}`);
   if (value !== newVal) {
    value = newVal;
    binding._directives.forEach(function (item) { // 当number改变时,触发_binding[number]._directives 中的绑定的Watcher类的更新
    item.update();
    })
   }
   }
  })
  }
 }
 }
それでは、ビューをモデルにバインドするにはどうすればよいでしょうか?次に、命令 (v-bind、v-model、v-clickde) などを解析する _compile 関数を定義し、プロセス内でビューとモデルをバインドします。
myVue.prototype._init = function (options) {
//...
this._complie(this.$el);
}
myVue.prototype._complie = function (root) { root 为 id为app的Element元素,也就是我们的根元素
var _this = this;
var nodes = root.children;
for (var i = 0; i < nodes.length; i++) {
var node = nodes[i];
if (node.children.length) { // 对所有元素进行遍历,并进行处理
this._complie(node);
}
if (node.hasAttribute('v-click')) { // 如果有v-click属性,我们监听它的onclick事件,触发increment事件,即number++
node.onclick = (function () {
var attrVal = nodes[i].getAttribute('v-click');
return _this.$methods[attrVal].bind(_this.$data); //bind是使data的作用域与method函数的作用域保持一致
})();
}
if (node.hasAttribute('v-model') && (node.tagName == 'INPUT' || node.tagName == 'TEXTAREA')) { // 如果有v-model属性,并且元素是INPUT或者TEXTAREA,我们监听它的input事件
node.addEventListener('input', (function(key) {
var attrVal = node.getAttribute('v-model');
//_this._binding['number']._directives = [一个Watcher实例]
// 其中Watcher.prototype.update = function () {
// node['vaule'] = _this.$data['number']; 这就将node的值保持与number一致
// }
_this._binding[attrVal]._directives.push(new Watcher(
'input',
node,
_this,
attrVal,
'value'
))
return function() {
_this.$data[attrVal] = nodes[key].value; // 使number 的值与 node的value保持一致,已经实现了双向绑定
}
})(i));
}
if (node.hasAttribute('v-bind')) { // 如果有v-bind属性,我们只要使node的值及时更新为data中number的值即可
var attrVal = node.getAttribute('v-bind');
_this._binding[attrVal]._directives.push(new Watcher(
'text',
node,
_this,
attrVal,
'innerHTML'
))
}
}
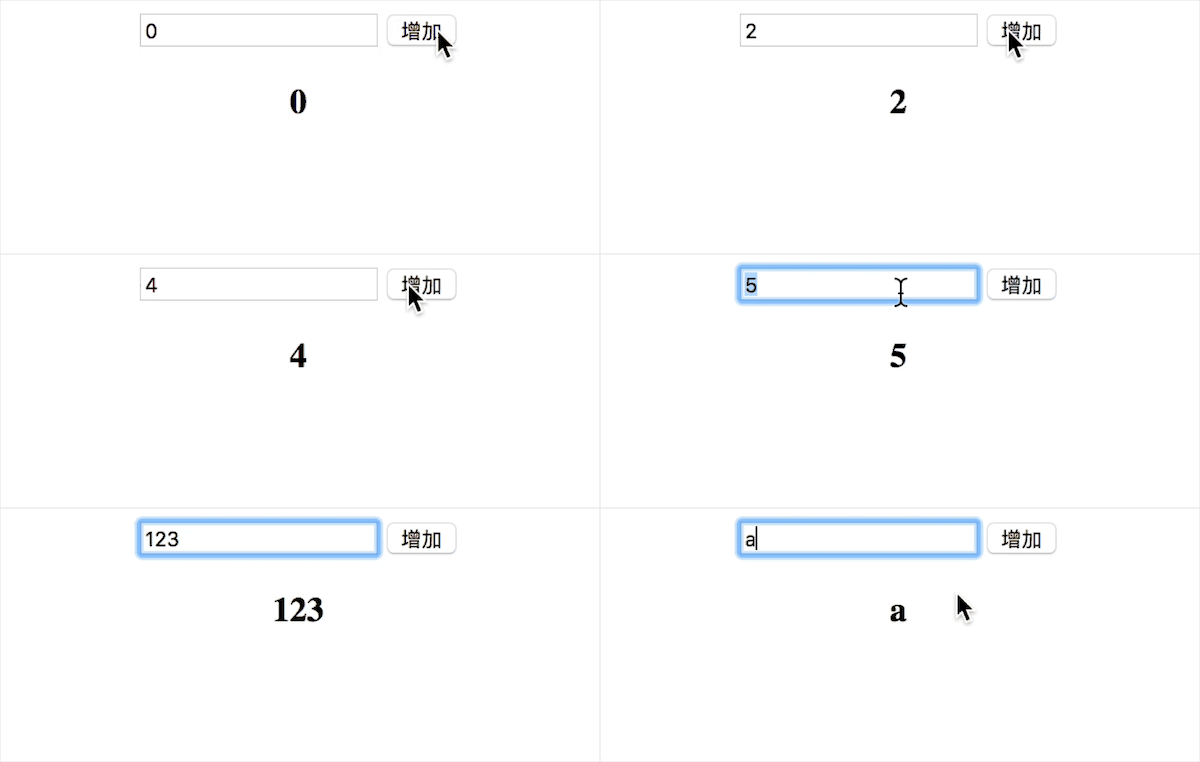
}これまで、v-bind、v-model、v-click の 3 つの命令を含む、vue の単純な双方向バインディング関数を実装しました。効果は以下の通りです
 150 行未満の完全なコードを添付します
myVue <p id="app"> <form> <input type="text" v-model="number"> <button type="button" v-click="increment">增加</button> </form> <h3 v-bind="number"></h3> </p> <script> function myVue(options) { this._init(options); } myVue.prototype._init = function (options) { this.$options = options; this.$el = document.querySelector(options.el); this.$data = options.data; this.$methods = options.methods; this._binding = {}; this._obverse(this.$data); this._complie(this.$el); } myVue.prototype._obverse = function (obj) { var value; for (key in obj) { if (obj.hasOwnProperty(key)) { this._binding[key] = { _directives: [] }; value = obj[key]; if (typeof value === 'object') { this._obverse(value); } var binding = this._binding[key]; Object.defineProperty(this.$data, key, { enumerable: true, configurable: true, get: function () { console.log(`获取${value}`); return value; }, set: function (newVal) { console.log(`更新${newVal}`); if (value !== newVal) { value = newVal; binding._directives.forEach(function (item) { item.update(); }) } } }) } } } myVue.prototype._complie = function (root) { var _this = this; var nodes = root.children; for (var i = 0; i < nodes.length; i++) { var node = nodes[i]; if (node.children.length) { this._complie(node); } if (node.hasAttribute('v-click')) { node.onclick = (function () { var attrVal = nodes[i].getAttribute('v-click'); return _this.$methods[attrVal].bind(_this.$data); })(); } if (node.hasAttribute('v-model') && (node.tagName == 'INPUT' || node.tagName == 'TEXTAREA')) { node.addEventListener('input', (function(key) { var attrVal = node.getAttribute('v-model'); _this._binding[attrVal]._directives.push(new Watcher( 'input', node, _this, attrVal, 'value' )) return function() { _this.$data[attrVal] = nodes[key].value; } })(i)); } if (node.hasAttribute('v-bind')) { var attrVal = node.getAttribute('v-bind'); _this._binding[attrVal]._directives.push(new Watcher( 'text', node, _this, attrVal, 'innerHTML' )) } } } function Watcher(name, el, vm, exp, attr) { this.name = name; //指令名称,例如文本节点,该值设为"text" this.el = el; //指令对应的DOM元素 this.vm = vm; //指令所属myVue实例 this.exp = exp; //指令对应的值,本例如"number" this.attr = attr; //绑定的属性值,本例为"innerHTML" this.update(); } Watcher.prototype.update = function () { this.el[this.attr] = this.vm.$data[this.exp]; } window.onload = function() { var app = new myVue({ el:'#app', data: { number: 0 }, methods: { increment: function() { this.number ++; }, } }) } </script>
この記事の事例を読んだ後は、この方法を習得したと思います。さらに興味深い情報については、他の関連情報に注目してください。 PHP 中国語 Web サイトの記事をご覧ください。
推奨読書:
JS を使用してユーザーの都市と地理的位置を取得する方法 ES6 クラスを使用して Vue を模倣し、双方向バインディングを作成する以上がVue バインディングの問題の分析の詳細内容です。詳細については、PHP 中国語 Web サイトの他の関連記事を参照してください。

