ホームページ >バックエンド開発 >PHPチュートリアル >PHPでのユーザー登録・ログイン機能の実装方法
PHPでのユーザー登録・ログイン機能の実装方法
- 墨辰丷オリジナル
- 2018-05-31 17:33:373825ブラウズ
このコースは、PHPとWebフロントエンド技術を使用して、Webサイトの登録とログイン入力ページの実装、PHPプログラミングの学習と実践などを行います。興味のある学生は参照できます。
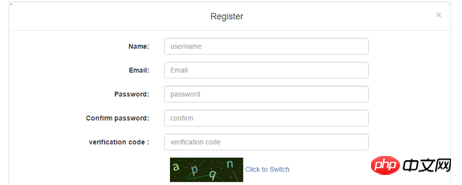
この記事では、PHPをベースとしたユーザー登録・ログイン機能を紹介します。このプロジェクトは、1.フロントエンドページの作成、2.認証コードの作成、3.登録とログインの実装、4.機能改善の4つのパートに分かれています。詳細は以下をご覧ください。
検証コードの作成
1. 実験の導入
この実験では、オブジェクト指向の考え方を使用して検証コード クラスをカプセル化します。そして、登録およびログインインターフェイスに表示されます。この実験を学ぶことで、PHP の OOP の考え方、GD ライブラリの使用法、検証コードの生成について理解できるようになります。
1.1 関連する知識ポイント
PHP
GDライブラリ
OOPプログラミング

<?php
/**
* Captcha class
*/
class Captcha
{

  function __construct()
  {
    # code...
  }
}
クラスのプライベートプロパティとコンストラクターを追加します: <?php
/**
* Captcha class
*/
class Captcha
{
private $codeNum; //验证码位数
private $width; //验证码图片宽度
private $height; //验证码图片高度
private $img; //图像资源句柄
private $lineFlag; //是否生成干扰线条
private $piexFlag; //是否生成干扰点
private $fontSize; //字体大小
private $code; //验证码字符
private $string; //生成验证码的字符集
private $font; //字体
function __construct($codeNum = 4,$height = 50,$width = 150,$fontSize = 20,$lineFlag = true,$piexFlag = true)
{
$this->string = 'qwertyupmkjnhbgvfcdsxa123456789'; //去除一些相近的字符
$this->codeNum = $codeNum;
$this->height = $height;
$this->width = $width;
$this->lineFlag = $lineFlag;
$this->piexFlag = $piexFlag;
$this->font = dirname(__FILE__).'/fonts/consola.ttf';
$this->fontSize = $fontSize;
}
}
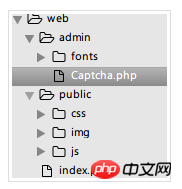
フォントファイルはアクセスされる次のコマンドを使用して、フォント ディレクトリにダウンロードします: $ wget http://labfile.oss.aliyuncs.com/courses/587/consola.ttf//创建图像资源
public function createImage(){
$this->img = imagecreate($this->width, $this->height); //创建图像资源
imagecolorallocate($this->img,mt_rand(0,100),mt_rand(0,100),mt_rand(0,100)); //填充图像背景(使用浅色)
}
使用される関連関数
- imagecreate: 新しいパレットベースの画像を作成します
- imagecolorallocate: 画像に色を割り当てます
- mt_rand: より良い乱数を生成します
//创建验证码
public function createCode(){
$strlen = strlen($this->string)-1;
for ($i=0; $i < $this->codeNum; $i++) {
$this->code .= $this->string[mt_rand(0,$strlen)]; //从字符集中随机取出四个字符拼接
}
$_SESSION['code'] = $this->code; //加入 session 中
//计算每个字符间距
$diff = $this->width/$this->codeNum;
for ($i=0; $i < $this->codeNum; $i++) {
//为每个字符生成颜色(使用深色)
$txtColor = imagecolorallocate($this->img,mt_rand(100,255),mt_rand(100,255),mt_rand(100,255));
//写入图像
imagettftext($this->img, $this->fontSize, mt_rand(-30,30), $diff*$i+mt_rand(3,8), mt_rand(20,$this->height-10), $txtColor, $this->font, $this->code[$i]);
}
}
使用される関連関数
- imagecreate: 新しいパレットベースの画像を作成します
- imagecolorallocate: 画像に色を割り当てます
- mt_rand : より良い乱数を生成します
//创建验证码
public function createCode(){
$strlen = strlen($this->string)-1;
for ($i=0; $i < $this->codeNum; $i++) {
$this->code .= $this->string[mt_rand(0,$strlen)]; //从字符集中随机取出四个字符拼接
}
$_SESSION['code'] = $this->code; //加入 session 中
//计算每个字符间距
$diff = $this->width/$this->codeNum;
for ($i=0; $i < $this->codeNum; $i++) {
//为每个字符生成颜色(使用深色)
$txtColor = imagecolorallocate($this->img,mt_rand(100,255),mt_rand(100,255),mt_rand(100,255));
//写入图像
imagettftext($this->img, $this->fontSize, mt_rand(-30,30), $diff*$i+mt_rand(3,8), mt_rand(20,$this->height-10), $txtColor, $this->font, $this->code[$i]);
}
}
使用される関連関数:
- imagettftext: TrueType フォントを使用して画像に書き込みます Text
//创建干扰线条(默认四条)
public function createLines(){
    for ($i=0; $i < 4; $i++) {
      $color = imagecolorallocate($this->img,mt_rand(0,155),mt_rand(0,155),mt_rand(0,155));  //使用浅色
      imageline($this->img,mt_rand(0,$this->width),mt_rand(0,$this->height),mt_rand(0,$this->width),mt_rand(0,$this->height),$color);
    }
  }
使用関連機能:
- imageline: 線分の描画
//创建干扰点 (默认一百个点)
public function createPiex(){
    for ($i=0; $i < 100; $i++) {
      $color = imagecolorallocate($this->img,mt_rand(0,255),mt_rand(0,255),mt_rand(0,255));
      imagesetpixel($this->img,mt_rand(0,$this->width),mt_rand(0,$this->height),$color);
    }
  }
使用関連機能:
- 画像セットピクセル:単一ピクセルを描画します
 public function show()
  {
    $this->createImage();
    $this->createCode();
    if ($this->lineFlag) {  //是否创建干扰线条
      $this->createLines();
    }
    if ($this->piexFlag) {  //是否创建干扰点
      $this->createPiex();
    }
    header('Content-type:image/png');  //请求页面的内容是png格式的图像
    imagepng($this->img);  //以png格式输出图像
    imagedestroy($this->img);  //清除图像资源,释放内存
  }
使用される関連関数:
- imagepng: 画像をブラウザまたは PNG 形式のファイルに出力します
- imagedestroy: 画像を破棄します
public function getCode(){
return $this->code;
}
完整代码如下:
<?php
/**
* Captcha class
*/
class Captcha
{
private $codeNum;
private $width;
private $height;
private $img;
private $lineFlag;
private $piexFlag;
private $fontSize;
private $code;
private $string;
private $font;
function __construct($codeNum = 4,$height = 50,$width = 150,$fontSize = 20,$lineFlag = true,$piexFlag = true)
{
$this->string = 'qwertyupmkjnhbgvfcdsxa123456789';
$this->codeNum = $codeNum;
$this->height = $height;
$this->width = $width;
$this->lineFlag = $lineFlag;
$this->piexFlag = $piexFlag;
$this->font = dirname(__FILE__).'/fonts/consola.ttf';
$this->fontSize = $fontSize;
}
public function createImage(){
$this->img = imagecreate($this->width, $this->height);
imagecolorallocate($this->img,mt_rand(0,100),mt_rand(0,100),mt_rand(0,100));
}
public function createCode(){
$strlen = strlen($this->string)-1;
for ($i=0; $i < $this->codeNum; $i++) {
$this->code .= $this->string[mt_rand(0,$strlen)];
}
$_SESSION['code'] = $this->code;
$diff = $this->width/$this->codeNum;
for ($i=0; $i < $this->codeNum; $i++) {
$txtColor = imagecolorallocate($this->img,mt_rand(100,255),mt_rand(100,255),mt_rand(100,255));
imagettftext($this->img, $this->fontSize, mt_rand(-30,30), $diff*$i+mt_rand(3,8), mt_rand(20,$this->height-10), $txtColor, $this->font, $this->code[$i]);
}
}
public function createLines(){
for ($i=0; $i < 4; $i++) {
$color = imagecolorallocate($this->img,mt_rand(0,155),mt_rand(0,155),mt_rand(0,155));
imageline($this->img,mt_rand(0,$this->width),mt_rand(0,$this->height),mt_rand(0,$this->width),mt_rand(0,$this->height),$color);
}
}
public function createPiexs(){
for ($i=0; $i < 100; $i++) {
$color = imagecolorallocate($this->img,mt_rand(0,255),mt_rand(0,255),mt_rand(0,255));
imagesetpixel($this->img,mt_rand(0,$this->width),mt_rand(0,$this->height),$color);
}
}
public function show()
{
$this->createImage();
$this->createCode();
if ($this->lineFlag) {
$this->createLines();
}
if ($this->piexFlag) {
$this->createPiexs();
}
header('Content-type:image/png');
imagepng($this->img);
imagedestroy($this->img);
}
public function getCode(){
return $this->code;
}
}
上記は検証コードクラスのコードのすべてです。非常にシンプルに見えますが、多くの画像処理機能が使用されており、上記の関連機能に必要なリンクと使用方法も作成しました。これらの関数を丸暗記する必要はありません。不明な点があれば、いつでも PHP の公式ドキュメントを参照してください。最も重要なことは、中国語のドキュメントがあることです。 session_start(); //开启session $captcha = new Captcha(); //实例化验证码类(可自定义参数) $captcha->show(); //调用输出3. フロントエンドの表示
<p class="form-group"> <p class="col-sm-12"> <img src="admin/Captcha.php" alt="" id="codeimg" onclick="javascript:this.src = 'admin/Captcha.php?'+Math.random();"> <span>Click to Switch</span> </p> </p>img タグにクリックイベントの JS コードを追加し、クリックして認証コードを変更する機能を実現します。

要約: 以上がこの記事の全内容です。皆さんの学習に役立つことを願っています。
関連する推奨事項:
PHP は Curl を使用して、シミュレートされたログインとデータ キャプチャ関数の例を実装します
php Cookie を使用して、ユーザー名とパスワードを記憶する Web ページの機能を実装します
phpポストテストで見つかった文字化けに対して Apache Solution に接続します
以上がPHPでのユーザー登録・ログイン機能の実装方法の詳細内容です。詳細については、PHP 中国語 Web サイトの他の関連記事を参照してください。
声明:
この記事の内容はネチズンが自主的に寄稿したものであり、著作権は原著者に帰属します。このサイトは、それに相当する法的責任を負いません。盗作または侵害の疑いのあるコンテンツを見つけた場合は、admin@php.cn までご連絡ください。

