
ホームページ >バックエンド開発 >PHPチュートリアル >PHPで検証コードアプレットを実装する方法
PHPで検証コードアプレットを実装する方法
- 墨辰丷オリジナル
- 2018-05-29 15:35:313101ブラウズ
この記事では主にPHPベースの認証コードアプレットの具体的な実装方法を紹介し、詳細なコメントをしていますので、必要な友達は一緒に見てみてください
認証コード機能(個人的な理解です。 ):
サーバーへの負荷を軽減します (12306 の認証コード機能など)
暴力的な登録を防止します
個人的なアイデア: a-z、A-Z、1- の n 桁の乱数を生成します。 9 をクリックして新しい確認コードを作成します。
検証コードを生成するためのいくつかの小さな関数
range() //配列を出力する範囲を指定します
a) 例: range(1,9)
array_merge()//Merge arrays
a) Array_merge(array 1, array 2….)
array_rand(array, amount)
a) 配列からランダムにいくつかの添え字を取り出し、配列を返します
shuffle(array) //もう一度行われます 配列内の要素をスクランブルします
mt_rand (範囲を指定します) //より良い乱数を生成します
-
例: mt_rand(1,5) //1-5 の間の任意の数値を生成します
検証コードコードを生成します
<?php
$arr1=range('a', 'z');//指定范围输出一个数组
$arr2=range('A', 'Z');
$arr3=range(1,9);
$arr=array_merge($arr1,$arr2,$arr3); //合并数组
$index = array_rand($arr,5); //在$arr中随机取5个数,返回值是$arr的下标
Shuffle($index);
$code = '';//定义一个空的字符串来存储生成的验证码用'点'来进行拼接
foreach ($index as $key => $value) {//遍历数组
$code.= $arr[$value];//根据下标取数组中的值
}
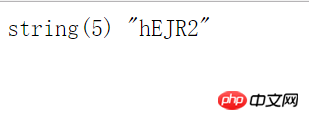
var_dump($code);
?>実行結果のスクリーンショット
完璧: 検証コードが現実的になるように、画像に検証コードを追加する必要があります
改善する前に、画像の作成を紹介します 画像を作成する一般的な手順
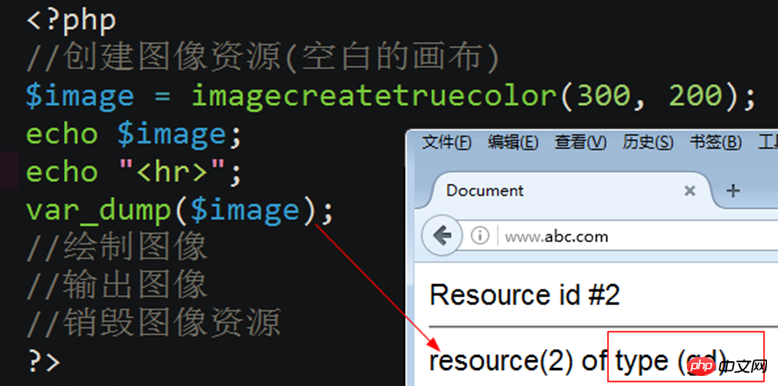
方法 1: True Color イメージを作成する (空のキャンバス)
imagecreatetruecolor(width, height) // True Color イメージを作成する code>
imagecreatetruecolor(width, height) //创建一个真彩色图像
说明:
width : 画布的宽度(像素)
height: 画布的高度(像素)
返回值为图像资源
注意:

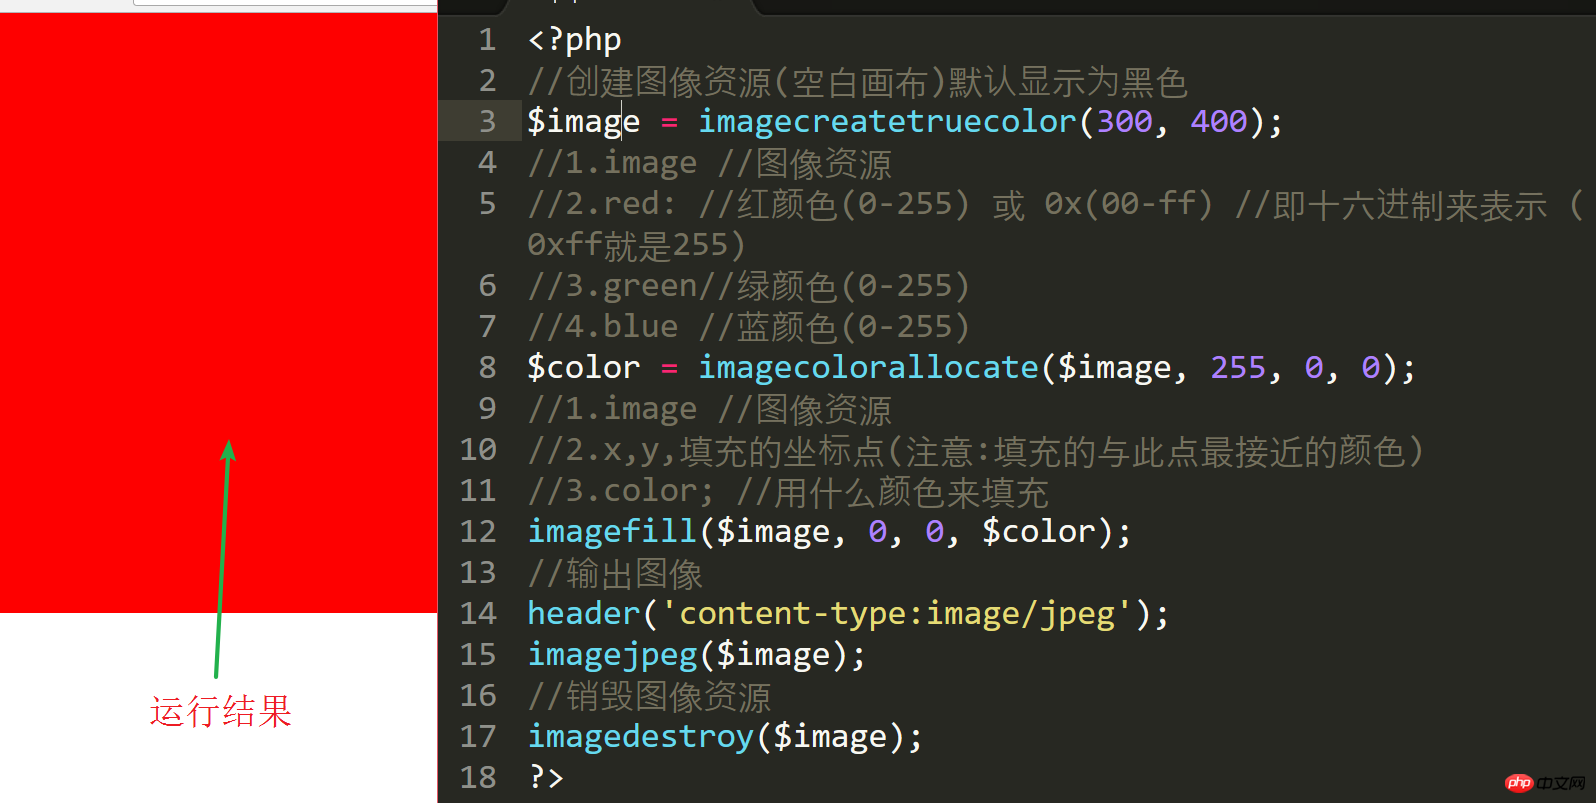
为真彩色图像: 填充颜色
imagefill(image, x, y, color) //为图像资源填充颜色
说明:
image //图像资源
x,y,填充的坐标点(注意:填充的与此点最接近的颜色)
color; //用什么颜色来填充
为真彩色图像: 分配颜色
imagecolorallocate(image, red, green, blue)
说明:
image //图像资源
red: //红颜色(0-255) 或 0x(00-ff) //即十六进制来表示 (0xff就是255)
green//绿颜色(0-255)
blue //蓝颜色(0-255)
imagefill和imagecolorallocate的代码演示
在没有给画布填充颜色时的效果

给画布填充颜色时的效果和代码
<?php //创建图像资源(空白画布)默认显示为黑色 $image = imagecreatetruecolor(300, 400); //1.image //图像资源 //2.red: //红颜色(0-255) 或 0x(00-ff) //即十六进制来表示 (0xff就是255) //3.green//绿颜色(0-255) //4.blue //蓝颜色(0-255) $color = imagecolorallocate($image, 255, 0, 0); //1.image //图像资源 //2.x,y,填充的坐标点(注意:填充的与此点最接近的颜色) //3.color; //用什么颜色来填充 imagefill($image, 0, 0, $color); //输出图像 header('content-type:image/jpeg'); imagejpeg($image); //销毁图像资源 imagedestroy($image); ?>
结果截图;
输出图像(以jpeg为例)
输出图像到浏览器
a) header('content-type:image/jpeg'); //设置将图像通过浏览来查看
b) imagejpeg(图像资源)
按文件进行输出图像
a) imagejpeg(图像资源,'图像路径',图像的质量) //质量取值0-100
b) 注意:

注意:只能jpeg格式才有质量这个参数.
销毁图像
imagedestroy($image); //销毁图像,释放内存资源.
注意: 当前生成几个图像资源,就销毁几个.
验证码的整个代码:
<?php
//实例:让文本居于图像的正中
//创建图像资源(空白的画布)
$image = imagecreatetruecolor(100, 50);
$color = imagecolorallocate($image, mt_rand(20,200), mt_rand(20,200), mt_rand(20,200));
//为图像资源填充颜色
imagefill($image, 0, 0, $color);
//绘制图像
$font = 5;
//验证码的开始
$arr1 = range('a','z');
$arr3 = range('A','Z');
$arr2 = range(1,9);
//array_merge — 合并一个或多个数组
$arr = array_merge($arr1,$arr2,$arr3);
$index = array_rand($arr,5); //随机从原数组中找出5个下标
$string = '';
foreach ($index as $value) { //$value 两个功能,即是$index中的值,又是$arr中的下标
$string .= $arr[$value]; //将得到字符进行连接
}
//验证码的结束
//mt_rand — 生成更好的随机数
//echo mt_rand(1,5);die;
//加入点干扰
$pointcolor = imagecolorallocate($image, mt_rand(20,200), mt_rand(20,200), mt_rand(20,200));
//循环创建1000个干扰点
for ($i=0; $i <1000 ; $i++) {
imagesetpixel($image, mt_rand(0,imagesx($image)), mt_rand(0,imagesy($image)), $pointcolor);
}
//加入线的干扰
$lintecolor = imagecolorallocate($image, mt_rand(20,200), mt_rand(20,200), mt_rand(20,200));
// 循环创建50个线干扰
for ($i=0; $i <50 ; $i++) {
imageline($image, mt_rand(0,imagesx($image)), mt_rand(0,imagesy($image)), mt_rand(0,imagesx($image)), mt_rand(0,imagesy($image)) ,$lintecolor);
}
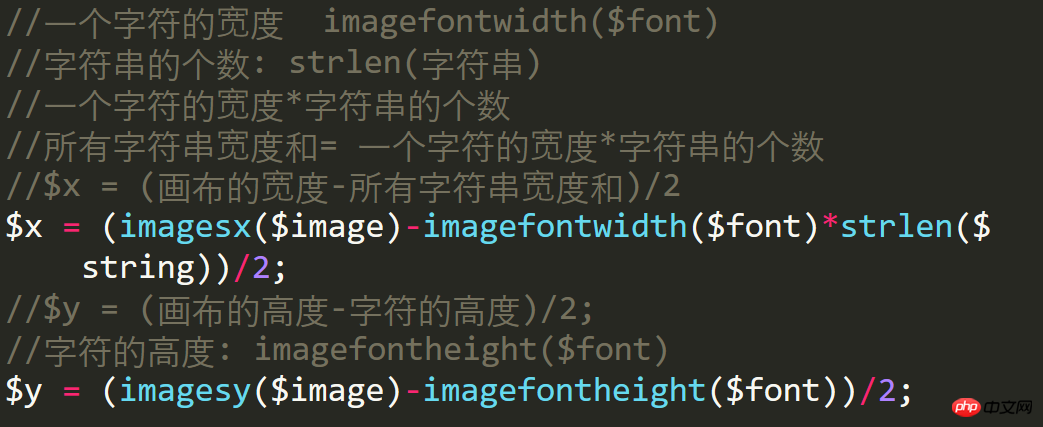
//一个字符的宽度 imagefontwidth($font)
//字符串的个数: strlen(字符串)
//一个字符的宽度*字符串的个数
//所有字符串宽度和= 一个字符的宽度*字符串的个数
//$x = (画布的宽度-所有字符串宽度和)/2
$x = (imagesx($image)-imagefontwidth($font)*strlen($string))/2;
//$y = (画布的高度-字符的高度)/2;
//字符的高度: imagefontheight($font)
$y = (imagesy($image)-imagefontheight($font))/2;
$stringcolor = imagecolorallocate($image, mt_rand(20,200), mt_rand(20,200), mt_rand(20,200));
imagestring($image, $font, $x, $y, $string, $stringcolor);
//输出图像
header('content-type:image/jpeg'); //设置将图像通过浏览来查看
imagejpeg($image,'',100); //将图像资源输出
//销毁图像资源
imagedestroy($image); //销毁图像理解代码中的一些函数
加入干扰的点
imagesetpixel(image, x, y, color)
width: キャンバスの幅 (ピクセル)

戻り値は画像リソースです
🎜🎜🎜🎜注: 🎜🎜🎜🎜🎜🎜 は True Color 画像です: 塗りつぶし色🎜🎜🎜🎜imagefill( image, x, y, color) // 画像リソースの色を塗りつぶします🎜🎜命令: 🎜🎜🎜🎜image // 画像リソース 🎜🎜🎜🎜x,y、塗りつぶされた座標点 (注: 色で塗りつぶされます)この点に最も近い)🎜🎜🎜 🎜color; //トゥルーカラー画像の塗りつぶしに使用する色 🎜🎜🎜🎜imagecolorallocate(image, red, green, blue) 🎜🎜Description: 🎜🎜 🎜🎜image //画像リソース🎜🎜🎜🎜red: //赤色 (0-255) または 0x(00-ff) //つまり 16 進数表現 (0xff は 255 )🎜🎜🎜🎜green//緑色(0-255)🎜🎜🎜🎜blue//青色(0-255)🎜🎜🎜🎜imagefillとimagecolorallocateのコードデモ🎜🎜キャンバスが塗りつぶされていない場合の効果color🎜🎜🎜🎜キャンバスを埋めるときのエフェクトとコードカラー付き🎜🎜🎜🎜imagefontheight(font)获取字体的高度: imagefontwidth(font)获取字体的宽度: strlen(字符串)//获取字符串的长度 imagesx(image) //获取画布的宽度 imagesy(image) //获取画布的高度🎜🎜🎜 🎜結果のスクリーンショット 🎜🎜
 🎜🎜画像を出力(例:jpeg)🎜🎜🎜画像をブラウザに出力🎜🎜🎜a) header('content-type:image/jpeg'); // 画像を表示するように設定しますブラウジング🎜🎜b) imagejpeg (画像リソース)🎜🎜🎜 ファイルで画像を出力🎜🎜🎜a) imagejpeg (画像リソース、'画像パス'、画質) //品質値 0-100🎜🎜b) 注:🎜🎜 🎜🎜注: 品質パラメーターがあるのは jpeg 形式のみです。🎜 🎜🎜画像を破棄します🎜🎜🎜imagedestroy($image); //画像を破棄し、メモリ リソースを解放します。🎜🎜🎜🎜注: 現在生成されている画像リソースのいくつかを破棄します。 🎜検証コードのコード全体:🎜 🎜🎜🎜
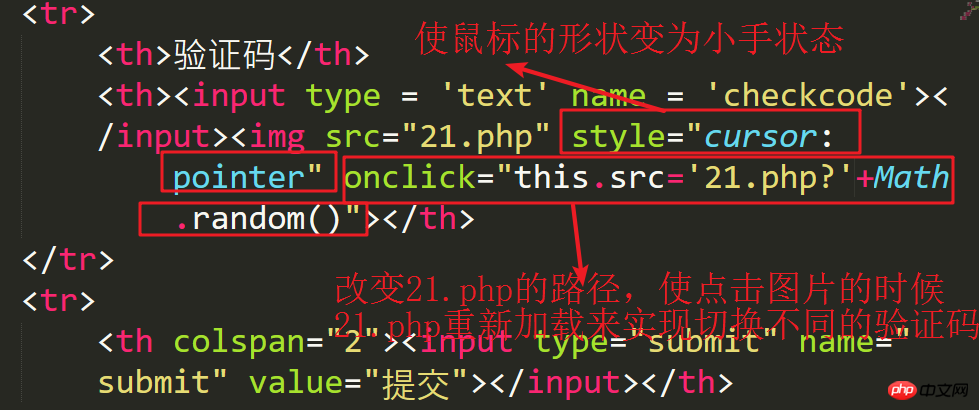
<!DOCTYPE html> <html lang="en"> <head> <meta charset="UTF-8"> <title>Document</title> </head> <body> <form name='frm' method='post' action=''> <table width="30%" border="2" align="center" rules="all" cellpadding="10"> <tr> <th colspan="2">请输入信息</th> </tr> <tr> <th>姓名:</th> <th><input type="text" name="username"></input></th> </tr> <tr> <th>密码:</th> <th><input type="password" name="userpwd"></input></th> </tr> <tr> 555556 <th>验证码</th> <th><input type = 'text' name = 'checkcode'></input><img src="21.php" style="cursor:pointer" onclick="this.src='21.php'?+Math.random()"></th> </tr> <tr> <th colspan="2"><input type="submit" name="submit" value="提交"></input></th> </tr> </table> </form> </body> </html>🎜🎜🎜🎜🎜 コード内のいくつかの機能を理解する🎜🎜🎜🎜🎜干渉点を追加する🎜🎜🎜🎜
imagesetpixel(image, x, y, color) 🎜🎜手順: x 、 y は点の座標です🎜🎜🎜🎜🎜🎜🎜干渉線を追加します🎜🎜🎜imageline(image, x1, y1, x2, y2, color)
说明: x1,y1是线的一个端点坐标; x2,y2是线的另一个端口的坐标; 由两点画一条线

让验证码居于图像的正中
imagefontheight(font)获取字体的高度:
imagefontwidth(font)获取字体的宽度:
strlen(字符串)//获取字符串的长度
imagesx(image) //获取画布的宽度
imagesy(image) //获取画布的高度
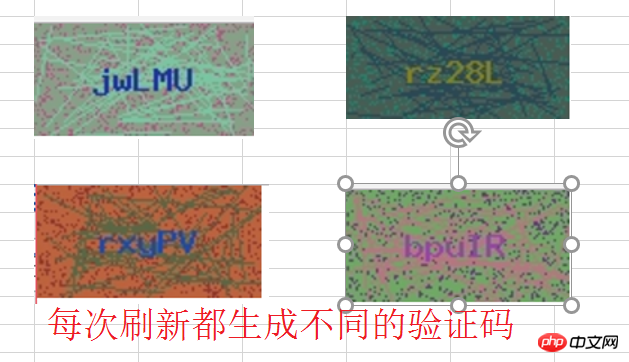
最后运行结果
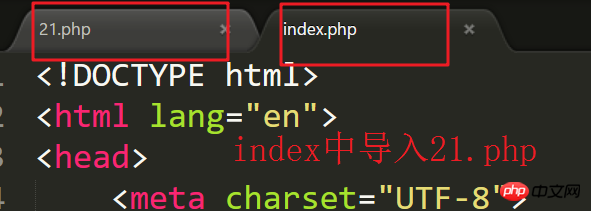
再次完善(和html代码结合起来)
Html代码
<!DOCTYPE html> <html lang="en"> <head> <meta charset="UTF-8"> <title>Document</title> </head> <body> <form name='frm' method='post' action=''> <table width="30%" border="2" align="center" rules="all" cellpadding="10"> <tr> <th colspan="2">请输入信息</th> </tr> <tr> <th>姓名:</th> <th><input type="text" name="username"></input></th> </tr> <tr> <th>密码:</th> <th><input type="password" name="userpwd"></input></th> </tr> <tr> 555556 <th>验证码</th> <th><input type = 'text' name = 'checkcode'></input><img src="21.php" style="cursor:pointer" onclick="this.src='21.php'?+Math.random()"></th> </tr> <tr> <th colspan="2"><input type="submit" name="submit" value="提交"></input></th> </tr> </table> </form> </body> </html>
理解;
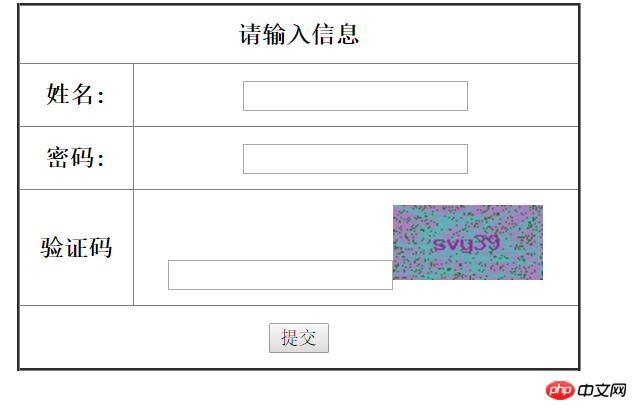
最后结果截图
以上就是本文的全部内容,希望对大家的学习有所帮助。
相关推荐:
以上がPHPで検証コードアプレットを実装する方法の詳細内容です。詳細については、PHP 中国語 Web サイトの他の関連記事を参照してください。