


この記事では、vue-video-playerをベースにしたプレーヤーのカスタマイズ方法、主にvideo.jsをベースに開発されたvue-video-playerの使い方と、video.jsでのAPIの操作方法を紹介します。困っている友達はそれを参照
して、まずその効果を見てください。
写真 1 - サイドバーを表示します

写真 2 - サイドバーを折りたたむ

写真 3: 全画面。

前に書きました
このプロジェクトでは、iview の ui フレームワークを使用する必要がありますが、ここでのフォーカスは ui フレームワークに基づいています。 js で開発した vue-video-player の使い方と、video.js での API の操作方法について説明します。 vue-video-player プロジェクトのアドレス: https://github.com/surmon-china/vue-video-player。 video.js ドキュメントのアドレス: http://docs.videojs.com/docs/api/player.html。 プロジェクト ディレクトリ: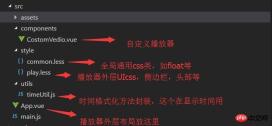
1. 外側の UI レイアウト
図 1 からわかるように、このプロジェクトは 2 列のアダプティブ レイアウトを使用しており、右側は固定されたプレイリストです。幅は 500px です。プレイリスト ボックスはハンドルのクリックに応じて拡大または縮小でき、プレイリスト ボックスもプレイリストの拡大/縮小に応じて幅を調整します。 (録画したアニメーションはアップロードするには大きすぎるため、私のプログラムを複製して実行して見ることができます)。 HTML コードの構造は次のとおりです:
.transition{
       transition: all 1s ease;
       -moz-transition: all 1s ease;
       -webkit-transition: all 1s ease;
       -o-transition: all 1s ease;
   }
.toLeft{
.transition;
margin-right: 540px !important;
}
.toRight{
.transition;
margin-right: 40px !important;
}
.toHide{
.transition;
right: -500px !important;
}
.toShow{
.transition;
right: 0px !important;
}rree// 播放区
.player-box{
margin-right: 540px;
height: 100%;
position: relative;
}//侧边信息区
.info-box{
width: 520px;
height: 100%;
background: transparent;
position: relative;
overflow: hidden;
}
2 番目に、プレーヤー ui
全体がカスタマイズされました。 player ui はコンポーネント - CostomVedio.vue にカプセル化されています。再生領域は vue-video-player プレーヤーを使用しますが、下部のコントロール バーはカスタマイズされており、プレーヤーに付属の controlBar は使用されません。デザインブラザーの要件を満たしているため、プレーヤーの UI をカスタマイズする必要があります。 HTML 構造コードは次のとおりです: // 内容区
.content{
background: #292929;
position: relative;
padding: 20px 0 20px 20px;
} 具体的なアイデアは、プレーヤーを使用して再生領域を埋め、位置配置を使用して再生領域の下部にあるカスタム controlBar を固定することです。 controlBar のインデックスは十分な大きさでなければなりません。そうしないと、全画面表示のときに最上位レイヤーに表示されません。 CSS スタイル:
<template>
    <p class="custom-video-outer-box" @mouseover="videoMouseOver">
      <video-player  class="video-player-box"
                 ref="videoPlayer"
                 :options="playerOptions"
                 :playsinline="true"
                 customEventName="customstatechangedeventname"
                 @play="onPlayerPlay($event)"
                 @pause="onPlayerPause($event)"
                 @ended="onPlayerEnded($event)"
                 @waiting="onPlayerWaiting($event)"
                 @playing="onPlayerPlaying($event)"
                 @loadeddata="onPlayerLoadeddata($event)"
                 @timeupdate="onPlayerTimeupdate($event)"
                 @statechanged="playerStateChanged($event)"
                 @ready="playerReadied"
                 >

                  <!-- @canplay="onPlayerCanplay($event)" -->
                   <!-- @canplaythrough="onPlayerCanplaythrough($event)" -->

       </video-player>
       <!-- 底部进度条 start -->
         <transition name="fade">
                <p class="bottomCtrl" v-show="isBottomCtrlShow" id="bottomCtrl">
                    <!--  -->
                    <!-- <p class="bottomCtrl" v-show="false"> -->
                <!-- <p class="bottomCtrl"  > -->

                    <Slider v-model="playerCtrl.currentTimeInt" class="progress-slider" :max="playerCtrl.durationInt" :tip-format="progressTipFormat" @on-change="progressChange"></Slider>
                    <p class="clearfix" >
                        <p class="left">
                                <!-- 暂停 -->
                                <span v-on:click="play" v-if="!playerCtrl.isPlay" class="icon">
                                    <Icon type="play"></Icon>
                                </span>
                                <!-- 播放 -->
                                <span v-else v-on:click="pause" class="icon">
                                     <Icon type="stop"></Icon>
                                </span>

                                <!-- 下一曲 -->
                                <span class="icon" v-on:click="nextClick">
                                    <Icon type="skip-forward"></Icon>
                                </span>

                            <span class="time">
                                {{playerCtrl.currentTime}}/{{playerCtrl.duration}}
                            </span>
                        </p>
                        <p class="right clearfix">
                                <p class="voice-box clearfix left">
                                    <!-- 音量 -->
                                    <Icon type="volume-medium" class="left icon"></Icon>
                                    <Slider v-model="playerCtrl.voiceSlider" class="voice-slider left " max=100 @on-change="volumeChange"></Slider>
                                </p>
                                 <!-- 全屏 -->
                                 <span class="icon left" @click="fullScreenHandle">
                                    <Icon type="crop" class="full-screen" ></Icon>
                                 </span>
                        </p>
                    </p>
                </p>
         </transition>
       </p>
  </template>
3. カスタム controlBar 関数を実装します
次のステップは、再生、一時停止、次の曲、再生の進行状況、残り時間、全画面表示などのカスタム controlBar 関数を実装することです。音量調整はお待ちください。 ここではまず、video.jsの対応するAPIを確認する必要があります。英語ですが、非常に明確に書かれており、理解しやすいです。 video.js APIドキュメントアドレス: http://docs.videojs.com/docs/api/player.html1. 再生、一時停止、次の曲、全画面表示は主に追加したカスタムボタンのクリックイベントを監視します、その後、プレーヤー API を呼び出して、対応する操作を実行し、状態を変更します。 <style lang="less">
.video-player-box{
height: 100% !important;
width: 100% !important;
}
//底部进度条
.bottomCtrl{
line-height: 60px;
height: 60px;
overflow: visible;
position: absolute;
bottom: 0;
left: 0;
background-color: rgba(45, 45, 45, .92);
width: 100%;
padding: 0 50px;
color: #fff;
z-index: 999999999999999;
.icon{
font-size: 16px;
line-height: 60px;
cursor: pointer;
}
.icon+.icon{
margin-left: 20px;
}
}
.custom-video-outer-box{
position: relative;
height: 100%;
width: 100%;
}
.progress-slider{
position: absolute;
width: 100%;
top: 0;
left: 0;
height: 18px;
line-height: 18px;
.ivu-slider-wrap{
margin: 0 !important;
border-radius: 0 !important;
}
.ivu-slider-button-wrap{
line-height: normal !important;
}
.ivu-slider-button{
height: 8px !important;
width: 8px !important;
}
}
.voice-box{
.voice-slider{
width: 100px;
margin-left: 20px;
}
.ivu-slider-wrap{
margin: 27px 0 !important;
}
}
.time{
margin-left: 25px;
}
.full-screen{
margin-left: 25px;
line-height: 60px;
}
.ivu-progress-outer{
padding: 0 10px !important;
}
.vjs-big-play-button{
height: 80px !important;
width: 80px !important;
line-height: 80px !important;
text-align: center;
background:rgba(0, 0, 0, 0.8) !important;
border-radius: 50% !important;
top: 50% !important;
left: 50% !important;
margin-left: -40px !important;
margin-top: -40px !important;
}
#vjs_video_3{
max-height: 100% !important;
width: 100% !important;
height: 100% !important;
}
.video-player-box>p{
height: 100% !important;
width: 100% !important;
}
.video-js .vjs-big-play-button{
font-size: 5em !important;
}
video{
max-height: 100% !important;
}
</style>もちろん、vue-video-player のプレーヤーはコールバック メソッドの状態変化を監視します: // 播放
play(){
this.player.play();
},
// 暂停
pause(){
this.player.pause();
},
//下一曲
nextClick(){
console.log("自定义","下一曲点击");
},
//全屏
fullScreenHandle(){
console.log("全屏");
if(!this.player.isFullscreen()){
this.player.requestFullscreen();
this.player.isFullscreen(true);
}else{
this.player.exitFullscreen();
this.player.isFullscreen(false);
}
},これらの状態の変化に基づいて、再生ボタンの表示中に「一時停止」を表示するなど、UI を適宜変更できます。一時停止時の「再生」などの機能。 2. 再生の進行状況、残り時間、音量の調整 再生の進行状況は、プレーヤーの onPlayerTimeupdate() コールバック メソッドの currentTime メソッドに基づいています。ここでは Slider を使用し、進行状況は両方とも整数の計算であるため、単位は S です。ここに保存するには 2 つの変数が必要です。1 つは整数形式で、もう 1 つは表示用に時、分、秒をフォーマットした後の文字列形式です。 <video-player class="video-player-box"
ref="videoPlayer"
:options="playerOptions"
:playsinline="true"
customEventName="customstatechangedeventname"
@play="onPlayerPlay($event)"
@pause="onPlayerPause($event)"
@ended="onPlayerEnded($event)"
@waiting="onPlayerWaiting($event)"
@playing="onPlayerPlaying($event)"
@loadeddata="onPlayerLoadeddata($event)"
@timeupdate="onPlayerTimeupdate($event)"
@statechanged="playerStateChanged($event)"
@ready="playerReadied"
>
<!-- @canplay="onPlayerCanplay($event)" -->
<!-- @canplaythrough="onPlayerCanplaythrough($event)" -->
</video-player> 固定点再生、つまり、ユーザーがプログレスバーの特定の場所をクリックすると、スライダーの //时间更新
onPlayerTimeupdate(player){
this.playerCtrl.currentTime=timeUtil.secondToDate(player.currentTime());
this.playerCtrl.currentTimeInt=Math.floor(player.currentTime());
console.log("当前音量",player.volume());
}, が使用されます。このメソッドは、スライダーの固定点を監視します。固定小数点の値を取得し、プレーヤーに渡します。 currentTime 設定は、再生のために固定小数点にジャンプします。 音量調整方法は再生の進行状況と同様です:
初期化時にサウンドをオンにするために
@on-change="progressChange"を設定することを忘れないでください。そうしないと、ミュート状態でのサウンド調整は無効になります。
player.volume(val) API を使用して音量を設定します。val=0 はサウンドがオフであることを意味し、val=1 はサウンドが最大であることを意味し、0.5 はサウンドが半分に設定されていることを意味します。
Ajaxのループスキーム
jQueryでのAjaxの4つの一般的なリクエストメソッドの紹介
以上がvue-video-player に基づいてプレーヤーをカスタマイズする方法の詳細内容です。詳細については、PHP 中国語 Web サイトの他の関連記事を参照してください。

 JavaScript in Action:実際の例とプロジェクトApr 19, 2025 am 12:13 AM
現実世界でのJavaScriptのアプリケーションには、フロントエンドとバックエンドの開発が含まれます。 1)DOM操作とイベント処理を含むTODOリストアプリケーションを構築して、フロントエンドアプリケーションを表示します。 2)node.jsを介してRestfulapiを構築し、バックエンドアプリケーションをデモンストレーションします。
 JavaScriptとWeb:コア機能とユースケースApr 18, 2025 am 12:19 AM
Web開発におけるJavaScriptの主な用途には、クライアントの相互作用、フォーム検証、非同期通信が含まれます。 1)DOM操作による動的なコンテンツの更新とユーザーインタラクション。 2)ユーザーエクスペリエンスを改善するためにデータを提出する前に、クライアントの検証が実行されます。 3)サーバーとのリフレッシュレス通信は、AJAXテクノロジーを通じて達成されます。
 JavaScriptエンジンの理解:実装の詳細Apr 17, 2025 am 12:05 AM
JavaScriptエンジンが内部的にどのように機能するかを理解することは、開発者にとってより効率的なコードの作成とパフォーマンスのボトルネックと最適化戦略の理解に役立つためです。 1)エンジンのワークフローには、3つの段階が含まれます。解析、コンパイル、実行。 2)実行プロセス中、エンジンはインラインキャッシュや非表示クラスなどの動的最適化を実行します。 3)ベストプラクティスには、グローバル変数の避け、ループの最適化、constとletsの使用、閉鎖の過度の使用の回避が含まれます。
 Python vs. JavaScript:学習曲線と使いやすさApr 16, 2025 am 12:12 AM
Pythonは、スムーズな学習曲線と簡潔な構文を備えた初心者により適しています。 JavaScriptは、急な学習曲線と柔軟な構文を備えたフロントエンド開発に適しています。 1。Python構文は直感的で、データサイエンスやバックエンド開発に適しています。 2。JavaScriptは柔軟で、フロントエンドおよびサーバー側のプログラミングで広く使用されています。
 Python vs. JavaScript:コミュニティ、ライブラリ、リソースApr 15, 2025 am 12:16 AM
PythonとJavaScriptには、コミュニティ、ライブラリ、リソースの観点から、独自の利点と短所があります。 1)Pythonコミュニティはフレンドリーで初心者に適していますが、フロントエンドの開発リソースはJavaScriptほど豊富ではありません。 2)Pythonはデータサイエンスおよび機械学習ライブラリで強力ですが、JavaScriptはフロントエンド開発ライブラリとフレームワークで優れています。 3)どちらも豊富な学習リソースを持っていますが、Pythonは公式文書から始めるのに適していますが、JavaScriptはMDNWebDocsにより優れています。選択は、プロジェクトのニーズと個人的な関心に基づいている必要があります。
 C/CからJavaScriptへ:すべてがどのように機能するかApr 14, 2025 am 12:05 AM
C/CからJavaScriptへのシフトには、動的なタイピング、ゴミ収集、非同期プログラミングへの適応が必要です。 1)C/Cは、手動メモリ管理を必要とする静的に型付けられた言語であり、JavaScriptは動的に型付けされ、ごみ収集が自動的に処理されます。 2)C/Cはマシンコードにコンパイルする必要がありますが、JavaScriptは解釈言語です。 3)JavaScriptは、閉鎖、プロトタイプチェーン、約束などの概念を導入します。これにより、柔軟性と非同期プログラミング機能が向上します。
 JavaScriptエンジン:実装の比較Apr 13, 2025 am 12:05 AM
さまざまなJavaScriptエンジンは、各エンジンの実装原則と最適化戦略が異なるため、JavaScriptコードを解析および実行するときに異なる効果をもたらします。 1。語彙分析:ソースコードを語彙ユニットに変換します。 2。文法分析:抽象的な構文ツリーを生成します。 3。最適化とコンパイル:JITコンパイラを介してマシンコードを生成します。 4。実行:マシンコードを実行します。 V8エンジンはインスタントコンピレーションと非表示クラスを通じて最適化され、Spidermonkeyはタイプ推論システムを使用して、同じコードで異なるパフォーマンスパフォーマンスをもたらします。
 ブラウザを超えて:現実世界のJavaScriptApr 12, 2025 am 12:06 AM
現実世界におけるJavaScriptのアプリケーションには、サーバー側のプログラミング、モバイルアプリケーション開発、モノのインターネット制御が含まれます。 2。モバイルアプリケーションの開発は、ReactNativeを通じて実行され、クロスプラットフォームの展開をサポートします。 3.ハードウェアの相互作用に適したJohnny-Fiveライブラリを介したIoTデバイス制御に使用されます。


ホットAIツール

Undresser.AI Undress
リアルなヌード写真を作成する AI 搭載アプリ

AI Clothes Remover
写真から衣服を削除するオンライン AI ツール。

Undress AI Tool
脱衣画像を無料で

Clothoff.io
AI衣類リムーバー

AI Hentai Generator
AIヘンタイを無料で生成します。

人気の記事
ホットツール

PhpStorm Mac バージョン
最新(2018.2.1)のプロフェッショナル向けPHP統合開発ツール

WebStorm Mac版
便利なJavaScript開発ツール

SublimeText3 Mac版
神レベルのコード編集ソフト(SublimeText3)

SublimeText3 Linux 新バージョン
SublimeText3 Linux 最新バージョン

SAP NetWeaver Server Adapter for Eclipse
Eclipse を SAP NetWeaver アプリケーション サーバーと統合します。

