
ホームページ >ウェブフロントエンド >jsチュートリアル >React Router の基本的な使用法 (グラフィック チュートリアル)
React Router の基本的な使用法 (グラフィック チュートリアル)
- 亚连オリジナル
- 2018-05-19 13:40:121910ブラウズ
この記事ではReact Routerの基礎知識を中心に紹介しますので、興味のある方はぜひご覧ください。
React はテクノロジースタックです。React だけを使用して複雑な Web アプリケーションを構築するのは困難です。多くの場合、他の関連テクノロジーを導入する必要があります。
React Router は、関連するページコンポーネント間の接続を維持する React のルーティング ライブラリです。同期
以下は、その基本的な使い方の簡単な紹介と、より包括的なリファレンスガイドです
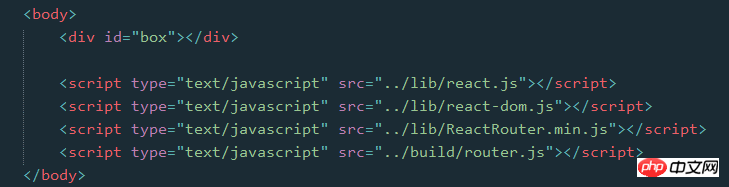
ページファイル内

 2. ライブラリの導入
React Router ライブラリを導入するには 2 つの方法があります
2.1 ブラウザを介した直接導入ここでブラウザのバージョンを引用できます。またはダウンロード後にインポートします
その後、ReactRouter オブジェクトを直接使用できますlet {Router, Route, IndexRoute, Redirect, IndexRedirect, Link, IndexLink, hashHistory, browserHistory} = ReactRouter;
2.2 npm のインストール、コンパイル、ビルド ツールによる導入
ルーティング ライブラリをインストールします。その後、関連する属性をスクリプト ファイルに導入しますnpm install --save react-router
import {Router, Route, IndexRoute, Redirect, IndexRedirect, Link, IndexLink, hashHistory, browserHistory} from 'react-router';
現在、ブラウザはインポートおよびエクスポート コマンドをサポートしておらず、babel ツールは require コマンドをコンパイルしないため、引き続きコンパイルおよびWebpackなどのビルドツールで導入しますライブラリを導入したら、ReactDOMのrenderメソッドで関連コンポーネントを使用できます
3. ルーティングの使い方は簡単です
最も基本的なのは、どのページを決定するかです(コンポーネント) URL から入ります

class First extends Component {
 constructor(props) {
 super(props);
 }
 render() {
 return <p>First</p>
 }
}
class Second extends Component {
 constructor(props) {
 super(props);
 }
 render() {
 return <p>Second</p>
 }
}
class App extends Component {
 constructor(props) {
 super(props);
 }
 render() {
 return <p></p>
 }
}
render((
<Router history={hashHistory}>
<Route path="/" component={App} />
<Route path="first" component={First} />
<Route path="second" component={Second} />
</Router>
),
document.getElementById('box')
);
まず第一に、Routerはコンテナであり、history属性はページのURLを処理する方法を定義します 3 つのタイプがあります:
browserHistory
- : URL 変更によるルートの変更が推奨される方法ですが、サーバー側で何らかの設定が必要です (設定方法はまだわかりません)
-
hashHistory
: #/ を通して、実際にはシングルページアプリケーションの一般的なハッシュバンメソッドと同様に、example.com/#/path/path.. (使いやすいので、このメソッドは今のところここで使用されます) -
createMemoryHistory
: メモリ履歴はアドレス バーの操作または読み取りから取得されません。サーバー側のレンダリングを完了するのに役立ちます。履歴オブジェクトを手動で作成する必要があります 次に、次の Route コンポーネントを使用します。コンテナーで各ルートを定義し、パスを介してパスを指定します (ご覧のとおり、大文字と小文字の区別はありません)。コンポーネントを介してパスで使用されるコンポーネントを指定します
また、routes 属性を直接使用して各ルートを定義することもできますRouter コンテナ上に直接 (
let routes =
<p>
<Route path="/" component={App} />
<Route path="first" component={First} />
<Route path="second" component={Second} />
</p>;
render(<Router routes={routes} history={hashHistory}></Router>, document.getElementById('box'));
) {routes} 親には 1 つしか存在できないことに注意してください。したがって、ここに e388a4556c0f65e1904146cc1a846bee タグが追加されます
さらに、ルーティング Route も使用できます。上記の例では、ネストは実際の状況により一致している可能性があります
ここでのアプリは親レベルにあることに注意してください。子の最初と二番目のコンポーネントを取得するには、以下を行う必要があります。 add
this.props.children
Get class App extends Component {
constructor(props) {
super(props);
}
render() {
return <p>{this.props.children}</p>
}
}
render((
<Router history={hashHistory}>
<Route path="/" component={App}>
<Route path="first" component={First} />
<Route path="second" component={Second} />
</Route>
</Router>
),
document.getElementById('box')
);
同様に、Router の Routes 属性を直接使用してルート
let routes =
<Route path="/" component={App}>
<Route path="first" component={First} />
<Route path="second" component={Second} />
</Route>;
render(<Router routes={routes} history={hashHistory}></Router>, document.getElementById('box'));
4 を定義できます。 基本的な Route、IndexRoute、Redirect、IndexRedirect、Link、IndexLink などに加えて、名前が示すように
IndexRoute:
は、前の例のようにメイン ページのパスの下で使用されます。 /" 空白のページが表示されます。ナビゲーション用のデフォルトのページコンポーネントを追加できます
リンク: これは、React の 3499910bf9dac5ae3c52d5ede7383485 タグの実装と考えることができ、属性定義パスを使用して、次のことができます。また、activeClass または activeStyle を通じてアクティブなスタイルを定義します
IndexLink: Link と同様に、メインページへのリンクを定義することも推奨します
Redirect: 从from路径重定向到to路径
IndexRedirect: 在主页面,直接重定向到to路径

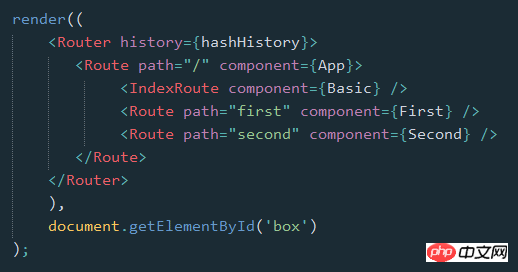
render((
<Router history={hashHistory}>
<Route path="/" component={App}>
<IndexRoute component={Basic} />
<IndexRedirect to="first" />
<Redirect from="second" to="first" />
<Route path="first" component={First} />
<Route path="second" component={Second} />
</Route>
</Router>
),
document.getElementById('box')
);
5. 路由的path规则
path定义的路由的路径,在hashHistory中,它的主页路径是 #/
自定义Route路由通过与父Route的path进行合并,在与主页路径合并,得到最终的路径
path的语法:
:paramName 匹配 URL 的一个部分,直到遇到下一个/、?、#
() 表示URL的这个部分是可选的
* 匹配任意字符(非贪婪模式),直到模式里面的下一个字符为止
** 匹配任意字符(贪婪模式),直到下一个/、?、#为止
<Route path="/hello/:name"> // 匹配 /hello/michael 和 /hello/ryan
<Route path="/hello(/:name)"> // 匹配 /hello, /hello/michael, 和 /hello/ryan
<Route path="/files/*.*"> // 匹配 /files/hello.jpg 和 /files/hello.html
<Route path="/**/*.jpg"> // 匹配 /files/hello.jpg 和 /files/path/to/file.jpg
而:name可以通过 this.props.params 中取到
class First extends Component {
constructor(props) {
super(props);
}
render() {
return (
<p>First {this.props.params.name}
<IndexLink to="/" activeStyle={{color: 'red'}}>Basic</IndexLink>
</p>
)
}
}
.
.
<Route path="/:name" component={First} />

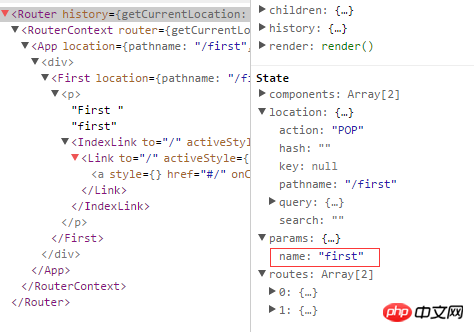
通过React Dev Tool也可以看到组件的相关数据
6. 路由的onEnter、onLeave钩子
在路由的跳转中,我们可能需要在进入页面或离开页面的时候做一些特殊操作,Route 通过 onEnter 与 onLeave 定义了这两个行为

<Route path="first" component={First} onEnter={(nextState, replace) => {
console.log(nextState);
alert('onEnter');
// replace('second');
}} onLeave={() => {
alert('onLeave');
}}/>
如上,带两个参数,通过 replace 可以更新路径,把注释去掉后,进入"/first"时立马跳转值"/second",这在检测登录时应该比较有用
上面是我整理给大家的,希望今后会对大家有帮助。
相关文章:
React native ListView在移动端中添加顶部下拉刷新与底部点击刷新案例详解
以上がReact Router の基本的な使用法 (グラフィック チュートリアル)の詳細内容です。詳細については、PHP 中国語 Web サイトの他の関連記事を参照してください。