ホームページ >ウェブフロントエンド >jsチュートリアル >Babel変換es6メソッドの実装
Babel変換es6メソッドの実装
- php中世界最好的语言オリジナル
- 2018-05-02 11:50:441986ブラウズ
今回はbabelをes6に変換する方法をお届けします。babelをes6に変換するための注意事項は何ですか。実際のケースを見てみましょう。
私たちのプロジェクトでは、プラグインやプリセット (複数のプラグインのコレクション) を構成することで、env、stage-0 などの特定のコードを変換します。
実際、Babel はカスタム プラグインを通じてあらゆるコードを変換できます。次に、「es6 の class を es5 に変換する」例を通して Babel について学びましょう。 class 转换为es5”的例子来了解一下babel。
内容如下:
webpack环境配置
大家应该都配置过babel-core这个loader,它的作用是提供babel的核心Api,实际上我们的代码转换都是通过插件来实现的。
接下来我们不用第三方的插件,自己实现一个es6类转换插件。先执行以下几步初始化一个项目:
npm install webpack webpack-cli babel-core -D
新建一个webpack.config.js
配置webpack.config.js
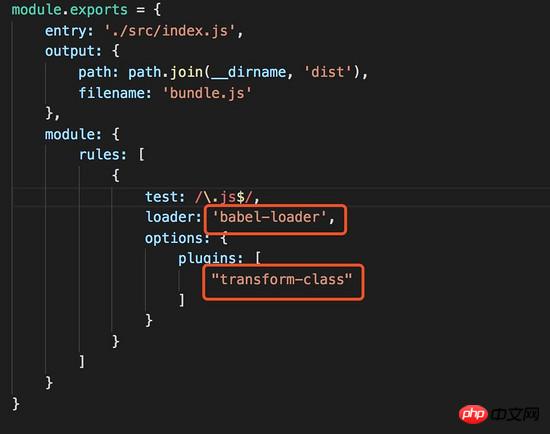
如果我们的插件名字想叫transform-class,需要在webpack配置中做如下配置:

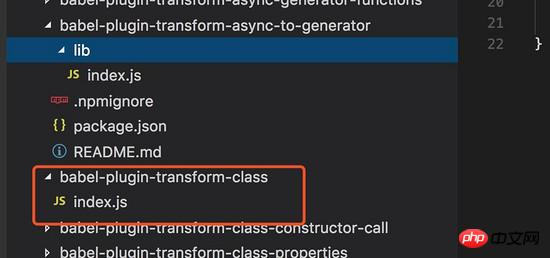
接下来我们在node_modules中新建一个babel-plugin-transform-class的文件夹来写插件的逻辑(如果是真实项目,你需要编写这个插件并发布到npm仓库),如下图:

红色区域是我新建的文件夹,它上面的是一个标准的插件的项目结构,为了方便我只写了核心的index.js文件。
如何编写bable插件
babel插件其实是通过AST(抽象语法树)实现的。
babel帮助我们把js代码转换为AST,然后允许我们修改,最后再把它转换成js代码。
那么就涉及到两个问题:js代码和AST之间的映射关系是什么?如何替换或者新增AST?
好,先介绍一个工具:astexplorer.net:
这个工具可以把一段代码转换为AST:

如图,我们写了一个es6的类,然后网页的右边帮我们生成了一个AST,其实就是把每一行代码变成了一个对象,这样我们就实现了一个映射。
再介绍一个文档: babel-types :
这是创建AST节点的api文档。
比如,我们想创建一个类,先到astexplorer.net中转换,发现类对应的AST类型是 ClassDeclaration 。好,我们去文档中搜索,发现调用下面的api就可以了:

创建其他语句也是一样的道理,有了上面这两个东西,我们可以做任何转换了。
下面我们开始真正编写一个插件,分为以下几步:
在index.js中export一个函数
函数中返回一个对象,对象有一个visitor参数(必须叫visitor)
通过astexplorer.net查询出
class对应的AST节点为ClassDeclaration在vistor中设置一个捕获函数
ClassDeclaration,意思是我要捕获js代码中所有ClassDeclaration节点编写逻辑代码,完成转换
module.exports = function ({ types: t }) {
 return {
  visitor: {
   ClassDeclaration(path) {
    //在这里完成转换
   }
  }
 };
}
代码中有两个参数,第一个 {types:t}内容は次のとおりです:
- 🎜npm install webpack webpack-cli babel-core -D🎜
- 🎜新規作成webpack.config.js🎜
- 🎜webpack.config.js を設定します🎜
 🎜🎜次に、 node_モジュール🎜s に babel-plugin-transform-class の新しいフォルダーを作成してロジックを記述します以下に示すように、プラグインの内容 (実際のプロジェクトの場合は、このプラグインを作成して npm ウェアハウスに公開する必要があります): 🎜🎜
 🎜🎜赤い部分が私が作成したフォルダーです。その上に標準的なプラグインプロジェクト構造があります。便宜上、私は単に書いたコアのindex.jsファイル。 🎜🎜babel プラグインの書き方🎜🎜babel プラグインは実際には AST (抽象構文ツリー) を通じて実装されます。 🎜🎜babel は、js コードを AST に変換するのに役立ち、それを変更して、最後に js コードに変換することを可能にします。 🎜🎜それでは 2 つの質問が関係しています: js コードと AST の間のマッピング関係は何ですか?新しい AST を交換または追加するにはどうすればよいですか? 🎜🎜それでは、まずツールを紹介しましょう: astexplorer.net:🎜🎜このツールは、コードの一部を AST:🎜🎜
 🎜🎜図に示すように、es6 クラスを作成し、Web ページの右側で AST を生成しました。このようにして、マッピングを実装します。 🎜🎜別のドキュメントの紹介: babel-types:🎜🎜これは、AST ノードを作成するための API ドキュメントです。 🎜🎜たとえば、クラスを作成したい場合、まずそれを astexplorer.net で変換し、そのクラスに対応する AST タイプが
 ClassDeclaration であることを確認します。さて、ドキュメントを検索して、次の API を呼び出すだけでよいことがわかります: 🎜🎜 🎜🎜他のステートメントを作成する場合も同様です。上記の 2 つがあれば、任意の変換を行うことができます。 🎜🎜ここで実際にプラグインを書き始めます。これは次のステップに分かれています: 🎜
- 🎜index.js で関数をエクスポートします🎜
- 🎜 この関数はオブジェクトを返し、そのオブジェクトには訪問者パラメーター (visitor と呼ばれる必要があります) があります🎜
- 🎜 astexplorer.net
classをクエリ 🎜 し、対応する AST ノードはClassDeclarationです🎜 - 🎜vistor
ClassDeclarationにキャプチャ関数を設定します。これは、js コード内のすべてのClassDeclarationノードをキャプチャしたいことを意味します🎜 - 🎜ロジック コードを記述して、変換🎜
module.exports = function ({ types: t }) {
return {
visitor: {
ClassDeclaration(path) {
//拿到老的AST节点
let node = path.node
let className = node.id.name
let classInner = node.body.body
//创建一个数组用来成盛放新生成AST
let es5Fns = []
//初始化默认的constructor节点
let newConstructorId = t.identifier(className)
let constructorFn = t.functionDeclaration(newConstructorId, [t.identifier('')], t.blockStatement([]), false, false)
//循环老节点的AST对象
for (let i = 0; i < classInner.length; i++) {
let item = classInner[i]
//判断函数的类型是不是constructor
if (item.kind == 'constructor') {
let constructorParams = item.params.length ? item.params[0].name : []
let newConstructorParams = t.identifier(constructorParams)
let constructorBody = classInner[i].body
constructorFn = t.functionDeclaration(newConstructorId, [newConstructorParams], constructorBody, false, false)
}
//处理其余不是constructor的节点
else {
let protoTypeObj = t.memberExpression(t.identifier(className), t.identifier('prototype'), false)
let left = t.memberExpression(protoTypeObj, t.identifier(item.key.name), false)
//定义等号右边
let prototypeParams = classInner[i].params.length ? classInner[i].params[i].name : []
let newPrototypeParams = t.identifier(prototypeParams)
let prototypeBody = classInner[i].body
let right = t.functionExpression(null, [newPrototypeParams], prototypeBody, false, false)
let protoTypeExpression = t.assignmentExpression("=", left, right)
es5Fns.push(protoTypeExpression)
}
}
//循环结束,把constructor节点也放到es5Fns中
es5Fns.push(constructorFn)
//判断es5Fns的长度是否大于1
if (es5Fns.length > 1) {
path.replaceWithMultiple(es5Fns)
} else {
path.replaceWith(constructorFn)
}
}
}
};
}🎜 コードには 2 つのパラメーターがあります。最初の {types:t} はパラメーターから 🎜変数🎜t を分解します。これは実際には の t です。ノードの作成に使用される babel-types ドキュメント (下の図、赤いボックス): 🎜
第二个参数 path ,它是捕获到的节点对应的信息,我们可以通过 path.node 获得这个节点的AST,在这个基础上进行修改就能完成了我们的目标。
如何把es6的class转换为es5的类
上面都是预备工作,真正的逻辑从现在才开始,我们先考虑两个问题:
我们要做如下转换,首先把es6的类,转换为es5的类写法(也就是普通函数),我们观察到,很多代码是可以复用的,包括函数名字、函数内部的代码块等。

如果不定义class中的 constructor 方法,JavaScript引擎会自动为它添加一个空的 constructor() 方法,这需要我们做兼容处理。
接下来我们开始写代码,思路是:
拿到老的AST节点
创建一个数组用来盛放新的AST节点(虽然原class只是一个节点,但是替换后它会被若干个函数节点取代) 初始化默认的
constructor节点(上文提到,class中有可能没有定义constructor)循环老节点的AST对象(会循环出若干个函数节点)
判断函数的类型是不是
constructor,如果是,通过取到数据创建一个普通函数节点,并更新默认constructor节点处理其余不是
constructor的节点,通过数据创建prototype类型的函数,并放到es5Fns中循环结束,把
constructor节点也放到es5Fns中判断es5Fns的长度是否大于1,如果大于1使用
replaceWithMultiple这个API更新AST
module.exports = function ({ types: t }) {
return {
visitor: {
ClassDeclaration(path) {
//拿到老的AST节点
let node = path.node
let className = node.id.name
let classInner = node.body.body
//创建一个数组用来成盛放新生成AST
let es5Fns = []
//初始化默认的constructor节点
let newConstructorId = t.identifier(className)
let constructorFn = t.functionDeclaration(newConstructorId, [t.identifier('')], t.blockStatement([]), false, false)
//循环老节点的AST对象
for (let i = 0; i < classInner.length; i++) {
let item = classInner[i]
//判断函数的类型是不是constructor
if (item.kind == 'constructor') {
let constructorParams = item.params.length ? item.params[0].name : []
let newConstructorParams = t.identifier(constructorParams)
let constructorBody = classInner[i].body
constructorFn = t.functionDeclaration(newConstructorId, [newConstructorParams], constructorBody, false, false)
}
//处理其余不是constructor的节点
else {
let protoTypeObj = t.memberExpression(t.identifier(className), t.identifier('prototype'), false)
let left = t.memberExpression(protoTypeObj, t.identifier(item.key.name), false)
//定义等号右边
let prototypeParams = classInner[i].params.length ? classInner[i].params[i].name : []
let newPrototypeParams = t.identifier(prototypeParams)
let prototypeBody = classInner[i].body
let right = t.functionExpression(null, [newPrototypeParams], prototypeBody, false, false)
let protoTypeExpression = t.assignmentExpression("=", left, right)
es5Fns.push(protoTypeExpression)
}
}
//循环结束,把constructor节点也放到es5Fns中
es5Fns.push(constructorFn)
//判断es5Fns的长度是否大于1
if (es5Fns.length > 1) {
path.replaceWithMultiple(es5Fns)
} else {
path.replaceWith(constructorFn)
}
}
}
};
}
优化继承
其实,类还涉及到继承,思路也不复杂,就是判断AST中没有 superClass 属性,如果有的话,我们需要多添加一行代码 Bird.prototype = <a href="http://www.php.cn/wiki/60.html" target="_blank">Object</a>.create(Parent) ,当然别忘了处理 super 关键字。
打包后代码

运行 npm start 打包后,我们看到打包后的文件里 class
语法已经成功转换为一个个的es5函数。
相信看了本文案例你已经掌握了方法,更多精彩请关注php中文网其它相关文章!
推荐阅读:
以上がBabel変換es6メソッドの実装の詳細内容です。詳細については、PHP 中国語 Web サイトの他の関連記事を参照してください。

