
ホームページ >バックエンド開発 >PHPチュートリアル >lnmp ビルド (Nginx1.12.1; mysql5.7.20; php7.2.0)
lnmp ビルド (Nginx1.12.1; mysql5.7.20; php7.2.0)

- 不言オリジナル
- 2018-04-21 16:29:391682ブラウズ
この記事では、特定の参考値を持つ lnmp 構築 (Nginx1.12.1; mysql5.7.20; php7.2.0) の内容を紹介します。必要な友達はそれを参照できるようにします。
依存関係パッケージをインストールします。
#yum install gcc bison bison-devel zlib-devel libmcrypt-devel mcrypt mhash-devel openssl-devel libxml2-devel libcurl-devel bzip2-devel readline-devel libedit-devel sqlite-devel libpng-devel libjpeg-devel freetype freetype-devel
- 1
#groupadd www#useradd -g www -s /sbin/nologin -M www
- 1
- 2
#yum install -y nginx #/etc/init.d/nginx start
- 1
- 2 2. mysql5.7.20 をインストールします:
#wget
#rpm -Uvh mysql57-community-release-el6-9.noarch.rpm
#yum install mysql-community-server
#service mysqld start
#grep 'temporary password' /var/log/mysqld.log  | awk '{print $NF}'
#mysql -uroot -p
mysql>set global validate_password_policy=0;
mysql>set global validate_password_length=6;
mysql>SET PASSWORD FOR 'root'@'localhost' =PASSWORD('******');
3. PHP7.2.0
3.1 のソースコードのコンパイルとインストール#wget rm -php-7.2.0.tar.xz #tar xvJf php-7.2.0.tar -C /usr/local/ #cd /usr/local/php-7.2.0 #./configure --prefix=/usr/local/php --with-config-file-path=/usr/local/php/etc --enable-fpm --with-fpm-user=www --with-fpm-group=www --with-mysqli --with-pdo-mysql --with-iconv-dir --with-freetype-dir --with-jpeg-dir --with-png-dir --with-zlib --with-libxml-dir=/usr --enable-xml --disable-rpath --enable-bcmath --enable-shmop --enable-sysvsem --enable-inline-optimization --with-curl --enable-mbregex --enable-mbstring --enable-ftp --with-openssl --with-mhash --enable-pcntl --enable-sockets --with-xmlrpc --enable-zip --enable-soap --without-pear --with-gettext --disable-fileinfo --enable-maintainer-zts --with-libdir=lib64 # make # make install
をインストールします。このマシンに他のパッケージがインストールされていると、エラーが報告されます。コンパイル時のエラー メッセージに従って、コンパイル後に依存パッケージを見つけてインストールしてください。完了しました。エラーは発生しません。 ! ! make install が完了し、エラーがなければ、次のステップに進むことができます。
3.2 PHP の設定
#cp /usr/local/php-7.2.0/php.ini-development /usr/local/php/etc/php.ini1
<p style="margin-bottom: 7px;">#cp /usr/local/php/etc/php-fpm.conf.default /usr/local/php/etc/php-fpm.conf<br/></p>
#cp /usr/local/php-7.2.0/sapi/fpm/init.d.php-fpm /etc/init.d/php-fpm
#chmod +x /etc/init.d/php-fpm
#cp /usr/local/php/etc/php-fpm.d/www.conf.default/usr/local/php/etc/php-fpm.d/www.conf
- 3.3 phpを起動-fpm
# /etc/init.d/php-fpm startStarting php-fpm done1
- 2
- 3.4 PHP コマンドを環境変数
vim ~/.bash_profile
cat ~/.bash_profile# .bash_profile# Get the aliases and functionsif [ -f ~/.bashrc ]; then
    . ~/.bashrcfi# User specific environment and startup programsPATH=$PATH:$HOME/bin:/usr/local/php/binexport PATH
に追加して有効にします。 .5 PH P バージョンを表示: #. ~/.bash_profile3.6 テスト結果:
# php -vPHP 7.2.0 (cli) (built: Dec 17 2017 19:58:31) ( ZTS )
Copyright (c) 1997-2017 The PHP Group
Zend Engine v3.2.0, Copyright (c) 1998-2017 Zend Technologies
vim /etc/nginx/conf.d/default.confcat /etc/nginx/conf.d/default.confserver {
    listen       80;
    server_name  localhost;

    #charset koi8-r;
    #access_log  /var/log/nginx/host.access.log  main;

    location / {
        root   /usr/share/nginx/html;
        index index.php index.html index.htm;
    }
    location ~ \.php$ {
        root           html;
        fastcgi_pass   127.0.0.1:9000;
        fastcgi_index  index.php;
        fastcgi_param  SCRIPT_FILENAME  /usr/share/nginx/html$fastcgi_script_name;
        include        fastcgi_params;
    }    #error_page  404              /404.html;

    # redirect server error pages to the static page /50x.html
    #
    error_page   500 502 503 504  /50x.html;
    location = /50x.html {
        root   /usr/share/nginx/html;
    }    # proxy the PHP scripts to Apache listening on 127.0.0.1:80
    #
    #location ~ \.php$ {
    #    proxy_pass   http://127.0.0.1;
    #}

    # pass the PHP scripts to FastCGI server listening on 127.0.0.1:9000
    #
    #location ~ \.php$ {
    #    root           html;
    #    fastcgi_pass   127.0.0.1:9000;
    #    fastcgi_index  index.php;
    #    fastcgi_param  SCRIPT_FILENAME  /scripts$fastcgi_script_name;
    #    include        fastcgi_params;
    #}

    # deny access to .htaccess files, if Apache's document root
    # concurs with nginx's one
    #
    #location ~ /\.ht {
    #    deny  all;
    #}}
Nginx配置文件修改的地方(在server里面添加 index.php格式的文件。增加一个location模块)
重新加载Nginx,重启php-fpm# /etc/init.d/nginx restartStopping nginx: [ OK ] Starting nginx: [ OK ] # /etc/init.d/php-fpm restartGracefully shutting down php-fpm . doneStarting php-fpm done
测试:
# curl 192.168.1.185/a.php
1
或者直接到网页上访问。
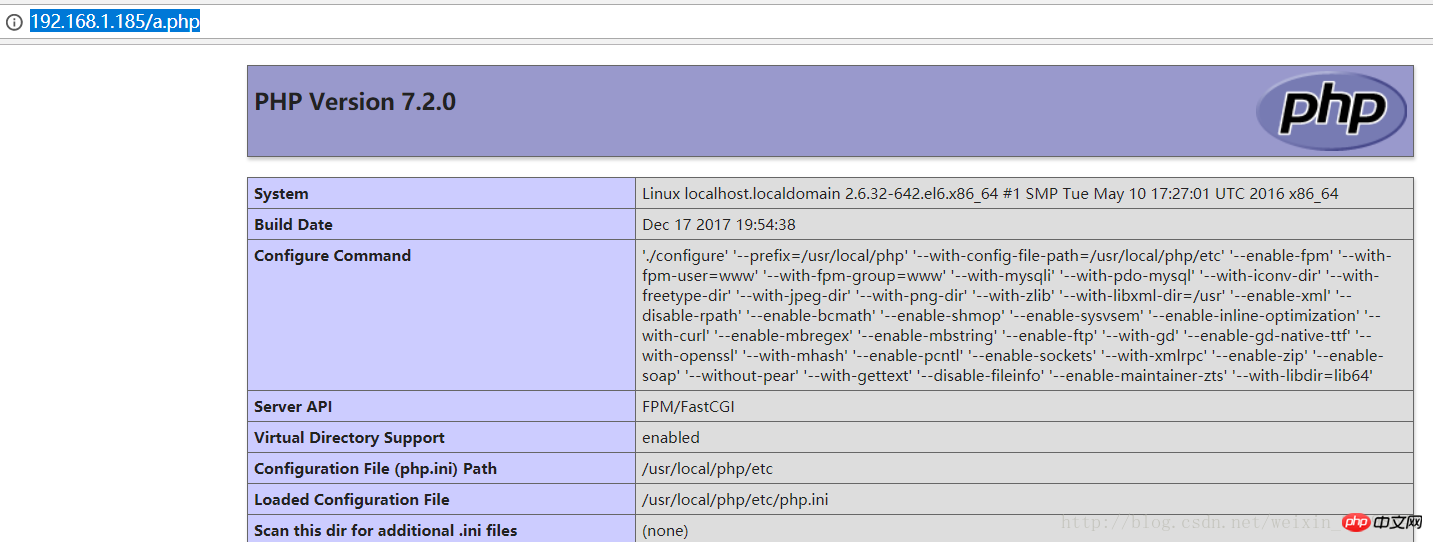
至此,lnmp环境搭建成功
相关推荐:
以上がlnmp ビルド (Nginx1.12.1; mysql5.7.20; php7.2.0)の詳細内容です。詳細については、PHP 中国語 Web サイトの他の関連記事を参照してください。
声明:
この記事の内容はネチズンが自主的に寄稿したものであり、著作権は原著者に帰属します。このサイトは、それに相当する法的責任を負いません。盗作または侵害の疑いのあるコンテンツを見つけた場合は、admin@php.cn までご連絡ください。
前の記事:PHP 組み込みメソッドの完全なリスト次の記事:PHP 組み込みメソッドの完全なリスト