
ホームページ >ウェブフロントエンド >jsチュートリアル >Webpack でスキャフォールディングの最適化を実装する方法
Webpack でスキャフォールディングの最適化を実装する方法
- php中世界最好的语言オリジナル
- 2018-04-08 14:38:291885ブラウズ
今回は、Webpack でスキャフォールディングの最適化を実装する方法について説明します。 前回の記事で webpack v4 の機能について学びました。今度はその知識を実践して、以前に書いた React scaffold のパッケージ化パフォーマンスを最適化します。
最適化カテゴリ
- スタイルの分離
- サードパーティリソースの分離
- 開発環境の差別化
- ホットアップデート
- パブリックコードの抽出
npm install extract-text-webpack-plugin -D
webpack.config.js
css、less、sassファイルをパッケージファイルから個別に分離
+ let cssExtract = new ExtractTextWebpackPlugin({
+ filename: 'css.css',
+ allChunks: true
+ });
+ let sassExtract = new ExtractTextWebpackPlugin('sass.css')
+ let lessExtract = new ExtractTextWebpackPlugin('less.css')
webpack.config.jsにルールを個別に追加
- test:
- 処理されたファイルの拡張子と一致するinclude/excludeは、処理する必要のあるフォルダーを手動で指定するか、処理する必要のないフォルダーをブロックします
-
{
 test: /\.css$/,
 use: cssExtract.extract({
 fallback: "style-loader",
 use: ['css-loader?minimize','postcss-loader'],
 publicPath: "/dist"
 }),
 include:path.join(dirname,'./src'),
 exclude:/node_modules/
},
{
 test: /\.scss$/,
 use: sassExtract.extract({
 fallback: "style-loader",
 use: ["css-loader?minimize","sass-loader"],
 publicPath: "/dist"
 }),
 include:path.join(dirname,'./src'),
 exclude:/node_modules/
},
{
 test: /\.less$/,
 loader: lessExtract.extract({
 use: ["css-loader?minimize", "less-loader"]
 }),
 include:path.join(dirname,'./src'),
 exclude:/node_modules/
},
その後、webpackコマンドを実行すると、エラー
コンパイルが報告されます。 mainTemplate.applyPluginsWaterfall は関数ではありません
代わりに Chunks.groupsIterable を使用し、instanceof Entrypoint でフィルターしてください解決策: 指定されたバージョンの依存関係をインストールします調査では、webpack は v4 にアップグレードされたが、対応するプラグインはアップグレードされていないと結論付けられました。
"html-webpack-plugin": "^3.0.4"
"extract-text-webpack-plugin": "^4.0.0-beta.0"
resolve
拡張子を指定した後は、require または import するときにファイル拡張子を追加する必要はありません。一致する拡張子を順番に追加しようとします。
resolve: {
 //引入模块的时候,可以不用扩展名
 extensions: [".js", ".less", ".json"],
 alias: {//别名
 "bootstrap": "bootstrap/dist/css/bootstrap.css"
 }
}
ファイルの変更を監視
webpackモードで使用され、webpack-dev-serverモードでは使用されず、watchをfalseに変更できます
watchOptions: {
 ignored: /node_modules/,
 aggregateTimeout: 300, //监听到变化发生后等300ms再去执行动作,防止文件更新太快导致编译频率太高
 poll: 1000 //通过不停的询问文件是否改变来判断文件是否发生变化,默认每秒询问1000次
}
パブリックコードを抽出
optimization: {
 splitChunks: {
 cacheGroups: {
 commons: {
  chunks: "initial",
  minChunks: 2,
  maxInitialRequests: 5, // The default limit is too small to showcase the effect
  minSize: 0 // This is example is too small to create commons chunks
 },
 vendor: {
  test: /node_modules/,
  chunks: "initial",
  name: "vendor",
  priority: 10,
  enforce: true
 }
 }
 }
 }
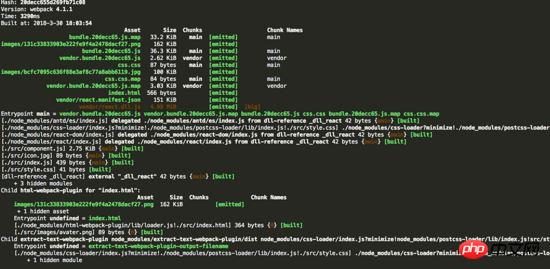
reactreact-domとpublicを分離コード方法 1: 外部 サードパーティのリソース ライブラリをページに導入し、外部を使用して、特定のインポートされたパッケージがバンドルにパッケージ化されないようにします。代わりに、実行時に外部からこれらの外部依存関係を取得します。
<script src="https://cdn.bootcss.com/react/16.4.0-alpha.0911da3/cjs/react.production.min.js"></script>
<script src="https://cdn.bootcss.com/react-dom/16.4.0-alpha.0911da3/cjs/react-dom-server.browser.production.min.js"></script>
externals: { 'react': 'React', 'react-dom': 'ReactDOM', // 提出ant design的公共资源, }
方法2:DLL
DLLは前の記事で書いたのですが、パッケージ化しても出続けてしまいました
ページ内でリソースが紹介されていないことが後で判明しました。 。 。 。 (ずっとwebpackがページ上に自動生成してくれるものだとばかり思っていました…)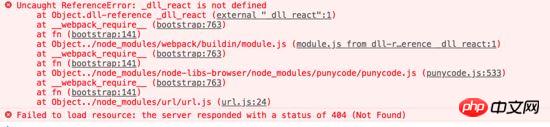 index.htmlファイルに
<script src="./vendor/react.dll.js"></script>
を導入して分離成功しました!コードをアップロードします
webpack.base.js
var path = require('path');
var webpack = require('webpack');
var ExtractTextWebpackPlugin = require("extract-text-webpack-plugin");
const HtmlWebpackPlugin = require("html-webpack-plugin");
const CleanWebpackPlugin = require('clean-webpack-plugin');
const CopyWebpackPlugin = require('copy-webpack-plugin')
let cssExtract = new ExtractTextWebpackPlugin({
 filename: 'css.css',
 allChunks: true
});
let sassExtract = new ExtractTextWebpackPlugin('sass.css')
let lessExtract = new ExtractTextWebpackPlugin('less.css')
module.exports = {
 entry:'./src/index.js',
 output: {
 path: path.resolve(dirname, './dist'),
 filename: 'bundle.[hash:8].js',
 publicPath: ''
 },
 resolve: {
 //引入模块的时候,可以不用扩展名
 extensions: [".js", ".less", ".json"],
 alias: {//别名
 "bootstrap": "bootstrap/dist/css/bootstrap.css"
 },
 modules: [path.resolve(dirname, 'node_modules')]
 },
/* externals: {
 'react': 'React',
 'react-dom': 'ReactDOM',
 // 提出ant design的公共资源
 //'antd': 'antd',
 },*/
 devtool: 'source-map',
 devServer: {
 contentBase:path.resolve(dirname,'dist'),
 publicPath: '/',
 port: 8080,
 hot:true,
 compress:true,
 historyApiFallback: true,
 inline: true
 },
 watch: false, //只有在开启监听模式时,watchOptions才有意义
 watchOptions: {
 ignored: /node_modules/,
 aggregateTimeout: 300, //监听到变化发生后等300ms再去执行动作,防止文件更新太快导致编译频率太高
 poll: 1000 //通过不停的询问文件是否改变来判断文件是否发生变化,默认每秒询问1000次
 },
 optimization: {
 splitChunks: {
 cacheGroups: {
 commons: {
  chunks: "initial",
  minChunks: 2,
  maxInitialRequests: 5, // The default limit is too small to showcase the effect
  minSize: 0 // This is example is too small to create commons chunks
 },
 vendor: {
  test: /node_modules/,
  chunks: "initial",
  name: "vendor",
  priority: 10,
  enforce: true
 }
 }
 }
 },
 module: {
 rules:[
 {
 test: /\.js$/,
 use: {
  loader:'babel-loader',
  options: {
  presets: ['env','es2015', 'react'],
  }
 },
 include:path.join(dirname,'./src'),
 exclude:/node_modules/
 },
 {
 test: /\.css$/,
 use: cssExtract.extract({
  fallback: "style-loader",
  use: ['css-loader?minimize','postcss-loader'],
  publicPath: "/dist"
 }),
 include:path.join(dirname,'./src'),
 exclude:/node_modules/
 },
 {
 test: /\.scss$/,
 use: sassExtract.extract({
  fallback: "style-loader",
  use: ["css-loader?minimize","sass-loader"],
  publicPath: "/dist"
 }),
 include:path.join(dirname,'./src'),
 exclude:/node_modules/
 },
 {
 test: /\.less$/,
 loader: lessExtract.extract({
  use: ["css-loader?minimize", "less-loader"]
 }),
 include:path.join(dirname,'./src'),
 exclude:/node_modules/
 },
 {
 test: /\.(html|htm)/,
 use: 'html-withimg-loader'
 },
 {
 test: /\.(png|jpg|gif|svg|bmp|eot|woff|woff2|ttf)/,
 use: {
  loader:'url-loader',
  options:{
  limit: 5 * 1024,
  //指定拷贝文件的输出目录
  outputPath: 'images/'
  }
 }
 }
 ]
 },
 plugins: [
 //定义环境变量
 new webpack.DefinePlugin({
 development: JSON.stringify(process.env.NODE_ENV)
 }),
 new CleanWebpackPlugin(['dist']),
 cssExtract,
 lessExtract,
 sassExtract,
 new HtmlWebpackPlugin({
 title: 'React Biolerplate by YuanYuan',
 template: './src/index.html',
 filename: `index.html`,
 hash: true
 }),
 new webpack.DllReferencePlugin({
 manifest: path.join(dirname, 'vendor', 'react.manifest.json')
 }),
 new CopyWebpackPlugin([{
 from: path.join(dirname,'vendor'),//静态资源目录源地址
 to:'./vendor' //目标地址,相对于output的path目录
 }]),
/* new webpack.optimize.CommonsChunkPlugin({
 name: 'common' // 指定公共 bundle 的名称。
 + })*/
 new webpack.HotModuleReplacementPlugin(), // 热替换插件
 new webpack.NamedModulesPlugin() // 执行热替换时打印模块名字
 ]
};
webpack.config.js
const path = require('path');
const webpack = require('webpack');
const merge = require('webpack-merge');//用来合并配置文件
const base = require('./webpack.base');
let other = '';
//console.log(process.env.NODE_ENV )
if (process.env.NODE_ENV == 'development') {
 other = require('./webpack.dev.config');
} else {
 other = require('./webpack.prod.config');
}
//console.log(merge(base, other));
module.exports = merge(base, other);
webpack.prod.config.js
const path = require('path');
const webpack = require('webpack');
const UglifyJSPlugin = require('uglifyjs-webpack-plugin')
module.exports = {
 output: {
 filename: 'bundle.min.js',
 },
 plugins: [
 new UglifyJSPlugin({sourceMap: true})
 ]
}
元のスキャフォールディングアドレス
最適化されたスキャフォールディングアドレス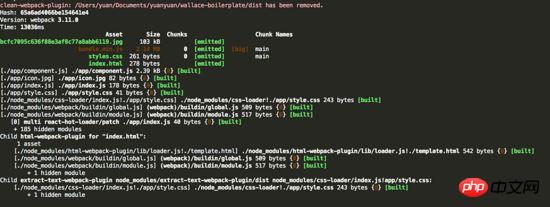
 この記事の事例を読んだ後は、その方法を習得したと思います。さらに興味深い情報については、php 中国語 Web サイトの他の関連記事に注目してください。
推奨読書:
Vue プロジェクトを環境ごとにパッケージ化する方法以上がWebpack でスキャフォールディングの最適化を実装する方法の詳細内容です。詳細については、PHP 中国語 Web サイトの他の関連記事を参照してください。