ホームページ >ウェブフロントエンド >jsチュートリアル >VUE と Element UI によるテーブルのインライン編集
VUE と Element UI によるテーブルのインライン編集
- php中世界最好的语言オリジナル
- 2018-03-12 11:27:068945ブラウズ
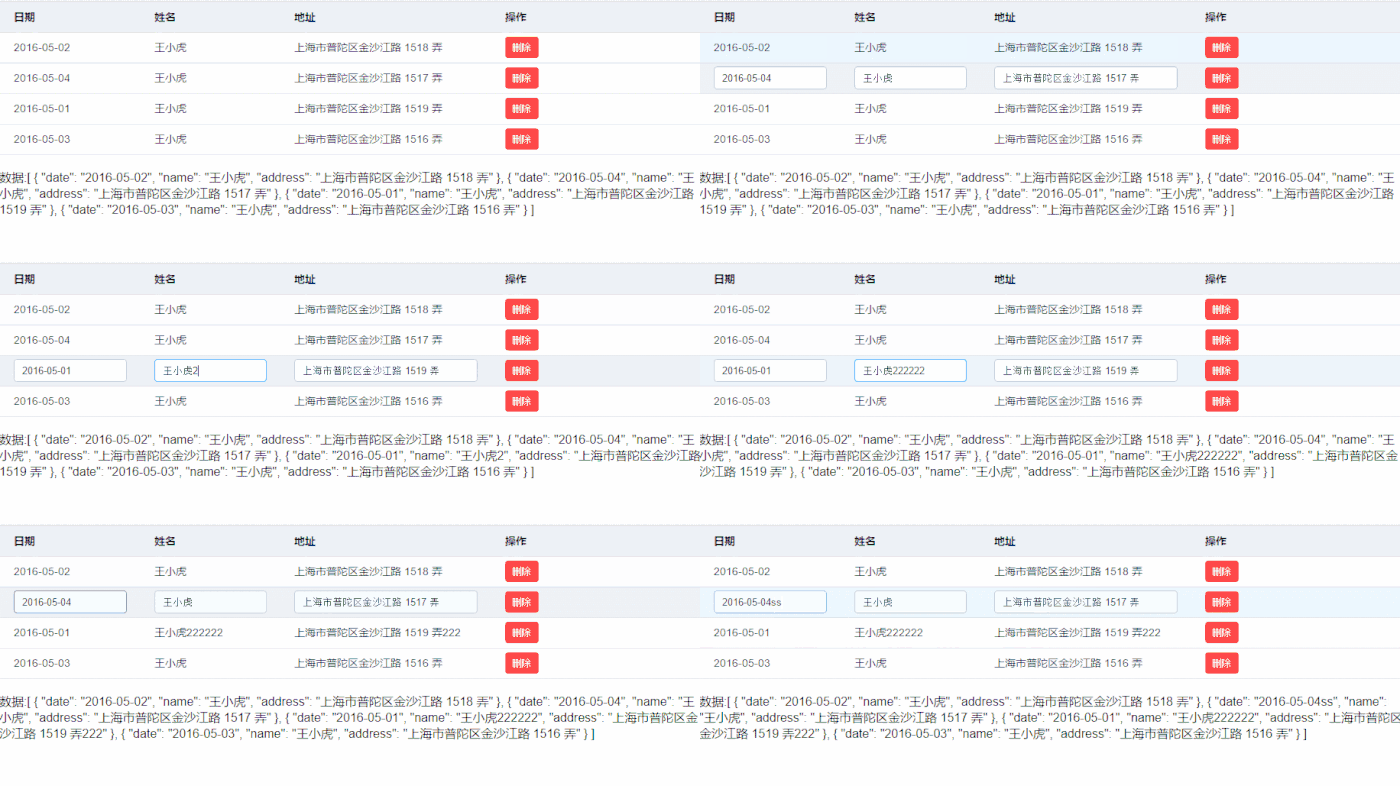
今回は、テーブルの行内編集のための VUE と Element UI について説明します。テーブルの行内編集に VUE と Element UI を使用する場合の 注意事項 について、実際のケースを見てみましょう。

<!DOCTYPE html><html><head>
<meta charset="UTF-8">
<!-- 引入样式 -->
<link rel="stylesheet" href="https://unpkg.com/element-ui/lib/theme-default/index.css">
<style>
* { margin: 0; padding: 0}body { font-family: Helvetica Neue, Helvetica, PingFang SC, Hiragino Sans GB, Microsoft YaHei, SimSun, sans-serif; overflow: auto; font-weight: 400; -webkit-font-smoothing: antialiased;
}.tb-edit .el-input { display: none
}.tb-edit .current-row .el-input { display: block
}.tb-edit .current-row .el-input+span { display: none
} </style></head><body>
<div id="app">
<el-table :data="tableData" class="tb-edit" style="width: 100%" highlight-current-row @row-click="handleCurrentChange">
<el-table-column label="日期" width="180">
<template scope="scope">
<el-input size="small" v-model="scope.row.date" placeholder="请输入内容" @change="handleEdit(scope.$index, scope.row)"></el-input> <span>{{scope.row.date}}</span>
</template>
</el-table-column>
<el-table-column label="姓名" width="180">
<template scope="scope">
<el-input size="small" v-model="scope.row.name" placeholder="请输入内容" @change="handleEdit(scope.$index, scope.row)"></el-input> <span>{{scope.row.name}}</span>
</template>
</el-table-column>
<el-table-column prop="address" label="地址">
<template scope="scope">
<el-input size="small" v-model="scope.row.address" placeholder="请输入内容" @change="handleEdit(scope.$index, scope.row)"></el-input> <span>{{scope.row.address}}</span>
</template>
</el-table-column>
<el-table-column label="操作">
<template scope="scope">
<!--<el-button size="small" @click="handleEdit(scope.$index, scope.row)">编辑</el-button>-->
<el-button size="small" type="danger" @click="handleDelete(scope.$index, scope.row)">删除</el-button>
</template>
</el-table-column>
</el-table>
<br>数据:{{tableData}}</div></body><script src="https://unpkg.com/vue/dist/vue.js"></script><script src="https://unpkg.com/element-ui/lib/index.js"></script><script>
var app = new Vue({ el: '#app', data: { tableData: [{ date: '2016-05-02', name: '王小虎', address: '上海市普陀区金沙江路 1518 弄'
}, { date: '2016-05-04', name: '王小虎', address: '上海市普陀区金沙江路 1517 弄'
}, { date: '2016-05-01', name: '王小虎', address: '上海市普陀区金沙江路 1519 弄'
}, { date: '2016-05-03', name: '王小虎', address: '上海市普陀区金沙江路 1516 弄'
}]
}, methods: {
handleCurrentChange(row, event, column) { console.log(row, event, column, event.currentTarget)
},
handleEdit(index, row) { console.log(index, row);
},
handleDelete(index, row) { console.log(index, row);
}
}
})</script> </html>このケースを読んだ後、あなたは方法をマスターしたと思いますphp 中国語 Web サイトの他の関連記事にも注目してください。 関連書籍:
Python3 が QQ メールボックスを介してメールを送信する方法
Golang+Nodejs のフロントエンドとバックエンドの開発の分離についての詳細な説明
以上がVUE と Element UI によるテーブルのインライン編集の詳細内容です。詳細については、PHP 中国語 Web サイトの他の関連記事を参照してください。
声明:
この記事の内容はネチズンが自主的に寄稿したものであり、著作権は原著者に帰属します。このサイトは、それに相当する法的責任を負いません。盗作または侵害の疑いのあるコンテンツを見つけた場合は、admin@php.cn までご連絡ください。

