ホームページ >ウェブフロントエンド >jsチュートリアル >Angular がブログ コメントの再帰表示を実装し、返信コメントのデータを取得する方法の詳細な例
Angular がブログ コメントの再帰表示を実装し、返信コメントのデータを取得する方法の詳細な例
- 小云云オリジナル
- 2017-12-26 13:55:072509ブラウズ
この記事では、Angular がブログのコメントに似た再帰的な表示を実装し、コメントに返信するためのデータを取得する方法について、サンプル コードを通じて詳細に紹介します。この記事は、あらゆる人の学習や作業に一定の参考学習価値をもたらします。必要です。お友達は、編集者をフォローして一緒に学びましょう。
前書き
一部の技術ブログでは再帰的なコメントがよく見られます。つまり、ブロガーのコメントに返信でき、インターフェイスは非常に美しく、グラデーション表示形式になっています。私は最近、予備で同様のデモを書きました。したがって、記録しておくと、必要な人に何らかの参考になる可能性があります。
さて、ナンセンスな話はこれくらいにして、本題に入りましょう。 。 。
考え方
バックグラウンド プログラムを作成するとき、ツリー状のデータを生成するデータ構造に遭遇することがよくあります。私たちの直感では、それを実現するために再帰的メソッドを使用するというものでした。 Angular4 では、以下のコードのように、文字列を形成してインターフェイスに表示します
@Component({
 selector: "comment",
 template: '{{ comments }}'
})
export class CommentComponent {

 public comments: string = "";

 generateComment(Comment comment) {
 this.comments = this.comments + "<p>" + comment.content + "</p>";
 if (comment.pComment != null) {
  generateComment(comment.pComment);
 }
 }
}
これで大丈夫だと素朴に思ったのですが、試してみるとラベルが解析されず、そのプロセスを思い出しました。ラベルの解析はすでに終了していました。 。 。
そこで考えたのですが、今日のフロントエンド フレームワークはすべてコンポーネント ベースであると主張しており、Angular4 も例外ではありません。したがって、コンポーネントを任意のコンポーネントに埋め込むことができる場合、それ自体を埋め込むことは間違いなく可能であり、同様の概念があります。これを思いついて早速試してみました。 。 。
具体的な実装
アイデアは次のように定義しました。各コメントには親コメントがあるのではなく、子コメントの配列が存在します。データ形式は次のとおりです。このコンポーネントには Comment モジュールが実装されていますが、再帰コメントはこのコンポーネントではなくサブコンポーネント CommentViewComponent に実装されています。これは、CommentComponent にはコメントを 1 つずつ入力するためのテキスト ボックスも含まれているためです。
コメント合計モジュールComponentコンポーネントコード:
comment.component.ts
"comments":
  [
  {
   "id": 1,
   "username": "James1",
   "time": "2017-07-09 21:02:21",
   "content": "哈哈哈1<h1>哈哈哈</h1>",
   "status": 1,
   "email": "1xxxx@xx.com",
   "cComments": [
    {
    "id": 2,
    "username": "James2",
    "time": "2017-07-09 21:02:22",
    "content": "哈哈哈2",
    "status": 1,
    "email": "2xxxx@xx.com",
    "cComments": null
   }
   ]
  }
  ]
comment.component.html
@Component({
 selector: 'comment',
 templateUrl: './comment.component.html',
 styleUrls: ['./comment.component.css']
})
export class CommentComponent implements OnInit {

 @Input()
 public comments: Comment[];

 ngOnInit(): void {
 }
}
comment.component.css
<p class="container font-small">
 <p class="row">
 <p class="col-lg-8 offset-lg-2 col-md-10 offset-md-1">

  <comment-view [comments]="comments"></comment-view>

  <p class="well" id="comment">
  <h4>{{ 'comment.leaveComment' | translate }}</h4>
  <form role="form">
   <p class="form-group">
   <input type="hidden" [(ngModel)]="id" name="id">
   <textarea [(ngModel)]="content" name="content" class="form-control" rows="5"></textarea>
   </p>
   <button type="submit" class="btn btn-primary">Submit</button>
  </form>
  </p>
 </p>
 </p>
</p>
サブモジュールComponentViewコンポーネントコード:
component-view.component.ts
.media {
 font-size: 14px;
}

.media-object {
 padding-left: 10px;
}
component-view.component.html
@Component({
 selector: 'comment-view',
 templateUrl: './comment-view.component.html',
 styleUrls: ['./comment-view.component.css']
})
export class CommentViewComponent implements OnInit {
 @Input()
 public comments: Comment[];

 constructor(private router: Router,
    private activateRoute: ActivatedRoute ) {
 }

 ngOnInit(): void {
 }
}
comonent-view.component.css
<p *ngFor="let comment of comments">
 <p class="media">
 <p class="pull-left">
  <span class="media-object"></span>
 </p>
 <p class="media-body">
  <h4 class="media-heading">{{ comment.username }}
  <small class="pull-right">{{ comment.time }} | <a href="#" rel="external nofollow" >{{ 'comment.reply' | translate }}</a></small>
  </h4>
  {{ comment.content }}
  <hr>
  <comment-view *ngIf="comment.cComments != null" [comments]="comment.cComments"></comment-view>
 </p>
 </p>
</p>
Result
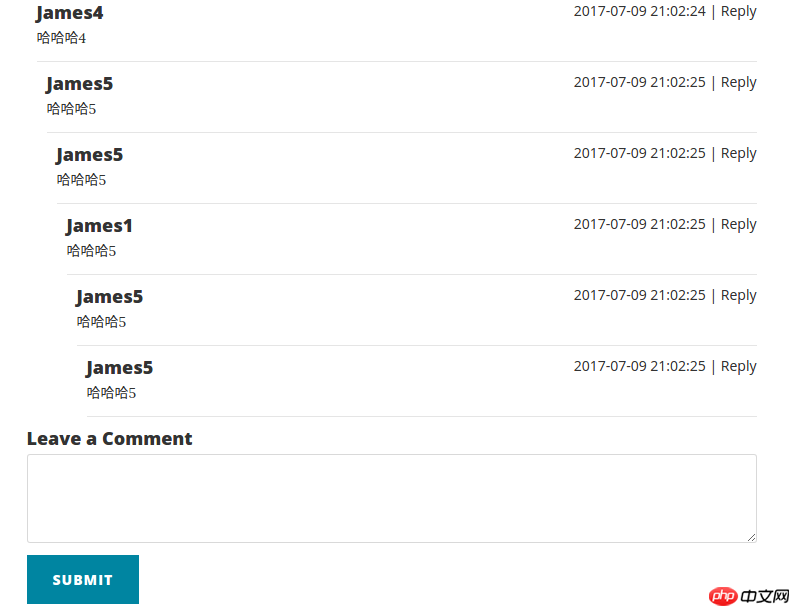
この時の表示結果は以下の通りです
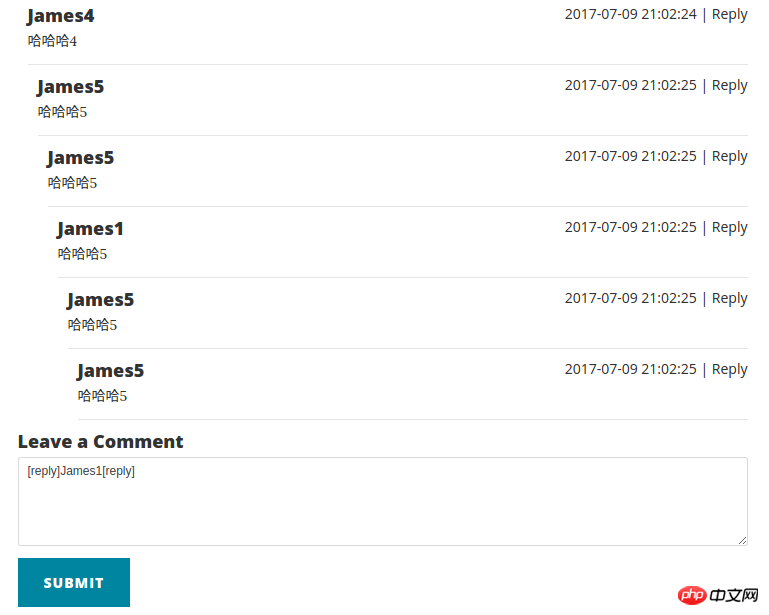
 上記はコメントラダーの実装方法を説明しただけですブログのコメントで、特定のコメントに返信できることがよくありますが、この記事では、特定のコメントの返信ボタンをクリックした後にコメントの内容を取得して入力ボックスに表示する方法について説明します。 CSDN ブログのコメントと同様に、返信をクリックすると、入力ボックスに [reply]u011642663[/reply] が自動的に追加されます
思考
前の記事のコメント台形表示によると、返信をクリックした後、画面が自動的に入力ボックスの位置に到達し、クリックして返信したコメントの情報を取得します。まず、この関数ポイントを詳しく見てみましょう。この関数ポイントには 2 つの小さなポイントがあります。まず、各コメントに [返信] ボタンを追加し、返信をクリックして入力ボックスに移動します。位置; 次に、クリックして返信した後、クリックして返信したコメントの情報を取得します。以下で一つずつ解決していきましょう。
入力ボックスにジャンプします
前のセクションで最初に触れた言語は HTML です。HTML には # の位置指定があることがわかっています。次のコードを簡単に説明します。
この HTML コード ファイルがindex.html
.media {
 font-size: 14px;
}

.media-object {
 padding-left: 10px;
} であるとします。上記のコードの Click me to pointer リンクをクリックする限り、ページは id="pointer" の p の位置にジャンプします。したがって、このクリック応答を実装するときにこのメソッドを使用して、入力ボックスにジャンプできます。
comment-component.html のコメント入力ボックスに id="comment" を追加します。次のステップは、Angular のルーターの URL を通じてこのページのパスを取得し、追加します。このパスに #comment を追加することでジャンプできます。このジャンプ機能を実装するコードは次のとおりです
id="comment"
comment-component.html
<html>
 <head>
 </head>
 <body>
 <a href="index.html#pointer" rel="external nofollow" >Click me to pointer</a>
 <p id="pointer">
  <h1>哈哈哈哈</h1>
 </p>
 </body>
</html>
を追加して、ルーティングを通じて現在のページの URL を取得します。
comment-view .component.ts
<!-- Comment -->
<p class="container font-small">
 <p class="row">
 <p class="col-lg-8 offset-lg-2 col-md-10 offset-md-1">

  <comment-view [comments]="comments" (contentEvent)="getReplyComment($event)" ></comment-view>

  <p class="well" id="comment">
  <h4>{{ 'comment.leaveComment' | translate }}</h4>
  <form role="form">
   <p class="form-group">
   <input type="hidden" [(ngModel)]="id" name="id">
   <textarea [(ngModel)]="content" name="content" class="form-control" rows="5"></textarea>
   </p>
   <button type="submit" class="btn btn-primary">Submit</button>
  </form>
  </p>
 </p>
 </p>
</p>
Add link href=""
comment-view.component.html
@Component({
 selector: 'comment-view',
 templateUrl: './comment-view.component.html',
 styleUrls: ['./comment-view.component.css']
})
export class CommentViewComponent implements OnInit {
 @Input()
 public comments: Comment[];

 // 用于跳转到回复输入框的url拼接
 public url: string = "";

 constructor(private router: Router,
    private activateRoute: ActivatedRoute ) {
 }

 ngOnInit(): void {
 this.url = this.router.url;
 this.url = this.url.split("#")[0];
 this.url = this.url + "#comment";
 }
}
これにより、ページジャンプの機能点が実現され、その後、返信コメントの情報の取得が実現されます。
返信コメント情報を取得する
有人会说获取回复的评论信息,这不简单么?加个 click 事件不就行了。还记得上一篇文章咱们是如何实现梯形展示评论的么?咱们是通过递归来实现的,怎么添加 click 事件让一个不知道嵌了多少层的组件能够把评论信息传给父组件?首先不具体想怎么实现,我们这个思路是不是对的:把子组件的信息传给父组件?答案是肯定的,我们就是要把不管嵌了多少层的子组件的信息传给 comment.component.ts 这个评论模块的主组件。
Angular 提供了 @Output 来实现子组件向父组件传递信息,我们在 comment-view.component.ts 模块中添加 @Output 向每个调用它的父组件传信息,我们是嵌套的,这样一层一层传出来,直到传给 comment-component.ts 组件。我们看代码怎么实现。
实现代码
comment-view.component.ts
@Component({
 selector: 'comment-view',
 templateUrl: './comment-view.component.html',
 styleUrls: ['./comment-view.component.css']
})
export class CommentViewComponent implements OnInit {
 @Input()
 public comments: Comment[];
 // 点击回复时返回数据
 @Output()
 public contentEvent: EventEmitter<Comment> = new EventEmitter<Comment>();
 // 用于跳转到回复输入框的url拼接
 public url: string = "";

 constructor(private router: Router,
    private activateRoute: ActivatedRoute ) {
 }

 ngOnInit(): void {
 this.url = this.router.url;
 this.url = this.url.split("#")[0];
 this.url = this.url + "#comment";
 }

 reply(comment: Comment) {
 this.contentEvent.emit(comment);
 }

 transferToParent(event) {
 this.contentEvent.emit(event);
 }
}
comment-view.component.html
<p *ngFor="let comment of comments">
 <p class="media">
 <p class="pull-left">
  <span class="media-object"></span>
 </p>
 <p class="media-body">
  <h4 class="media-heading">{{ comment.username }}
  <small class="pull-right">{{ comment.time }} | <a href="{{url}}" rel="external nofollow" rel="external nofollow" (click)="reply(comment)" >{{ 'comment.reply' | translate }}</a></small>
  </h4>
  {{ comment.content }}
  <hr>
  <comment-view *ngIf="comment.cComments != null" [comments]="comment.cComments" (contentEvent)="transferToParent($event)"></comment-view>
 </p>
 </p>
</p>
comment.component.ts
@Component({
 selector: 'comment',
 templateUrl: './comment.component.html',
 styleUrls: ['./comment.component.css']
})
export class CommentComponent implements OnInit {

 @Input()
 public comments: Comment[];

 // 要回复的评论
 public replyComment: Comment = new Comment();

 public id: number = 0;
 public content: string = "";

 ngOnInit(): void {
 }

 getReplyComment(event) {
 this.replyComment = event;
 this.id = this.replyComment.id;
 this.content = "[reply]" + this.replyComment.username + "[reply]\n";
 }
}
comment.component.html
<!-- Comment -->
<p class="container font-small">
 <p class="row">
 <p class="col-lg-8 offset-lg-2 col-md-10 offset-md-1">

  <comment-view [comments]="comments" (contentEvent)="getReplyComment($event)" ></comment-view>

  <p class="well" id="comment">
  <h4>{{ 'comment.leaveComment' | translate }}</h4>
  <form role="form">
   <p class="form-group">
   <input type="hidden" [(ngModel)]="id" name="id">
   <textarea [(ngModel)]="content" name="content" class="form-control" rows="5"></textarea>
   </p>
   <button type="submit" class="btn btn-primary">Submit</button>
  </form>
  </p>
 </p>
 </p>
</p>
解释一下代码逻辑:
我们在 comment-view.component.ts 添加以下几点:
定义了@Output() contentEvent
添加了reply(comment: Comment) 事件在点击回复的时候触发的,触发的时候 contentEvent 将 comment 传到父模块
添加 transferToParent(event) 是接受子组件传来的 event, 并且继续将 event 传到父组件
在 comment.component.ts 中定义了 getReplyComment(event) 方法,该方法接收子组件传递来的评论信息,并将信息显示在页面上。大功告成。。。
效果图

相关推荐:
如何PHP制作简易博客
以上がAngular がブログ コメントの再帰表示を実装し、返信コメントのデータを取得する方法の詳細な例の詳細内容です。詳細については、PHP 中国語 Web サイトの他の関連記事を参照してください。

