
ホームページ >ウェブフロントエンド >jsチュートリアル >jQuery を使用して虫眼鏡効果を実現する方法
jQuery を使用して虫眼鏡効果を実現する方法
- 一个新手オリジナル
- 2017-10-11 10:09:022267ブラウズ
実装原理
まず、虫眼鏡効果を実装する方法を説明しましょう:
方法 1: 大きな高ピクセル画像を準備し、元の画像上にマウスを置くと、対応する画像を読み込んで表示します。大きな画像の位置。
方法 2: 元の画像を拡大します。つまり、元の画像の長さと幅を調整します。
上記では、虫眼鏡効果を実現する 2 つの方法を紹介しました。次に、上記の 2 つの方法を jQuery プラグインに適用します。
まず、元の画像オブジェクトを表示するための img 要素が必要です。また、表示ボックスとしてのコンテナが必要です。大きな画像オブジェクトは表示ボックスに保存されます。元の画像上にマウスを移動すると、大きな画像の絶対位置に対応する部分が表示され、虫眼鏡のような効果が得られます。
次に、Index.html ページを定義しましょう。具体的な実装は次のとおりです:
<!doctype html>
<html lang="en-US">
<head>
  <meta http-equiv="Content-Type" content="text/html;charset=utf-8">
  <title>jQuery Image Zoom Demo</title>
  <meta name="author" content="Jackson Huang">
</head>
<body>
<p class="magnify">
<p class="large"></p>
<img  class="small" src="./img/1.jpg"    style="max-width:90%" / alt="jQuery を使用して虫眼鏡効果を実現する方法" >
</p>
</body>
</html>
上記では、元の画像を表示する小さなオブジェクトと、対応する位置を表示する表示ボックスとして大きなオブジェクトを定義しました。大きな画像の。
mousemoveイベント
次に、jQueryプラグインを使用して虫眼鏡効果を実現します。マウスが小さなオブジェクト上に移動すると、大きな画像の対応する位置が大きなオブジェクト内に表示されます。これには、mousemove イベントが関係するため、mousemove イベントの監視メソッドを実装する必要があります (jQuery プラグインの定義方法については、「jQuery プラグインのカスタマイズ手順」を参照してください) byステップ》)。
それでは、jquery.imagezoom.js プラグインを実装してみましょう。
(function ($) {

    $.fn.imageZoom = function (options) {

    // The native width and height of the image.
    var native_width = 0,
        native_height = 0,
        current_width = 0,
        current_height = 0,
        $small = $(".small"),
        $large = $(".large");

    $(".magnify").mousemove(function (e) {
        /* Act on the event */
        if (!native_width && !native_height) {
            var image_object = new Image();
            image_object.src = $small.attr('src');

            // Gets the image native height and width.
            native_height = image_object.height;
            native_width = image_object.width;

            // Gets the image current height and width.
            current_height = $small.height();
            current_width = $small.width();

        } else {

            // Gets .maginfy offset coordinates.
            var magnify_offset = $(this).offset(),

                // Gets coordinates within .maginfy.
                mx = e.pageX - magnify_offset.left,
                my = e.pageY - magnify_offset.top;

            // Checks the mouse within .maginfy or not.
            if (mx < $(this).width() && my < $(this).height() && mx > 0 && my > 0) {
                $large.fadeIn(100);
            } else {
                $large.fadeOut(100);
            } if ($large.is(":visible")) {
                /* Gets the large image coordinate by ratio
                   small.x / small.width = large.x / large.width
                   small.y / small.height = large.y / large.height
                   then we need to keep pointer in the centre,
                   so deduct the half of .large width and height.
                */
                var rx = Math.round(mx / $small.width() * native_width - $large.width() / 2) * -1,
                    ry = Math.round(my / $small.height() * native_height - $large.height() / 2) * -1,
                    bgp = rx + "px " + ry + "px",
                    px = mx - $large.width() / 2,
                    py = my - $large.height() / 2;
                $large.css({
                    left: px,
                    top: py,
                    backgroundPosition: bgp
                });
            }

        }
    });
});
上記では、mousemoveイベントのlistenメソッドを実装しました。マウスが拡大オブジェクトに移動したときに、現在のマウスの相対座標位置を取得する方法を図を使用して説明します。マウスの座標位置。
図 1 マウスの相対座標位置
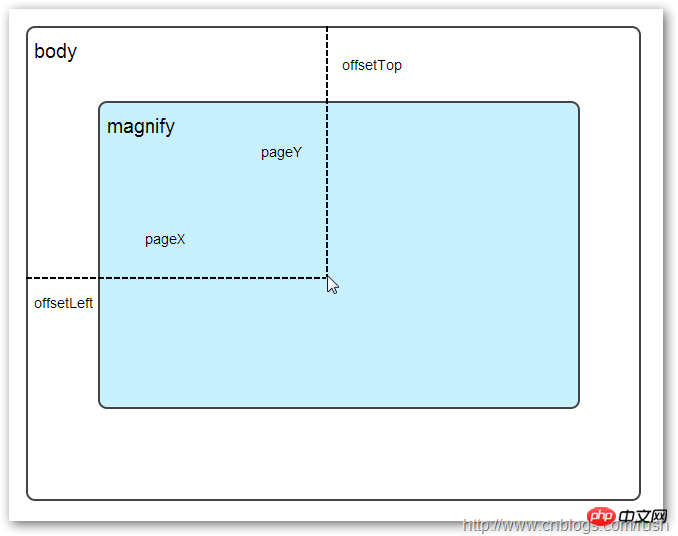
マウスが拡大オブジェクトに移動するとき、拡大相対座標位置を取得する必要があります。相対座標は (mx,my) となります。上の図から、相対座標は (pageX - offsetLeft、pageY - offsetTop) に等しいことがわかります。
さて、拡大オブジェクト内のマウスの座標値を取得しました。次に、対応する大きな画像の対応する座標を取得する必要があります。ここでは、大きな画像の対応する座標を (rx, ry) として定義します。 (rx,ry) の値は比例関係から得られます。
my / small.height (元の画像の長さ) = ry /native_height (大きい画像の長さ)
上記の比例関係により、大きな画像の座標 (rx, ry) は (mx/small.width*native_width, my/small.height*native_height) に等しいことがわかります。 上記の式を通じて、大きな画像の対応する座標位置を取得できます。マウスが拡大オブジェクトに移動すると、大きな画像の対応する部分が表示されます。次に、大きな画像の読み込みを実装する必要があります。画像。 background-position 属性 大きな画像の読み込みと表示を実装する前に、まず CSS での背景の位置決め、background-position の知識を紹介します。 ️ CSS 背景位置上には、4 つの色で構成される 100x100 ピクセルの画像があり、各色は 50 x 50 ピクセルを占めます。 次に、画像のさまざまな位置を変更して表示します。画像CSSのbackground-positionプロパティ値。
大きな正方形の下に 2 つの小さな正方形があり、異なる色の位置が表示されていることがわかります。ここでは、各 p 要素 CSS の background-position 属性値を変更することでこれを実現しています。 
例如:第一行的蓝色方形,我们设置CSS的background-position属性为:0px -50px;这相当于原图往上移动50px,第一行的其他方形也通过左右和上下移动实现的。
但第二行的方形就显得更加奇怪了,因为它们都由四种颜色组成,而且颜色的位置都不一样,这究竟是怎样实现的呢?
例如:第二行的第一个方形,我们设置CSS的background-position属性为:25px 25px;这相当于原图向下和向右移动了25px,由于image wrap的作用它会填充剩余位置的颜色。
现在,我们已经了解到了CSS的background-position属性的作用,所以我们通过修改large对象的background-position属性来显示对应的图像部分,具体实现如下:
$large.css({
    left: px,
    top: py,
    backgroundPosition: bgp
});
上面,我们通过加载大图的方式来实现放大镜效果,接下来,我们将介绍通过调整原图的长和宽来实现放大镜效果。
mousewheel事件
前面,我们通过mousemove事件来放大图片,这里我们将通过鼠标的滚轮事件实现图片放大效果。
由于,不同的浏览器有不同的滚轮事件。主要是有三种:onmousewheel(IE 6/7/8)、mousewheel(IE9,Chrome,Safari和Opera)和DOMMouseScroll(只有Firefox支持),关于这三个事件这里不做详细的介绍了。
由于不同浏览器之间存在着差异,为了实现浏览器之间的兼容,所以,我们需要监听以上三种滚轮事件(onmousewheel,mousewheel和DOMMouseScroll),具体实现如下:
$(".magnify").bind('DOMMouseScroll mousewheel onmousewheel', function(e) {
});
上面,我们实现了兼容不同浏览器的滚轮事件监听方法,接下来,判断滚轮向上或向下也要考虑不同浏览器的兼容性,主流的览器(IE、Opera、Safari、Firefox、Chrome)中Firefox 使用detail,其余四类使用wheelDelta;两者只在取值上不一致,代表含义一致,detail与wheelDelta只各取两个值,detail只取±3,wheelDelta只取±120,其中正数表示为向上,负数表示向下。
由于detail和wheelDelta都有两个值表示向上或向下滚动,所以不同浏览器间可以通过以下方式实现兼容,具体实现如下:
$(".magnify").bind('DOMMouseScroll mousewheel onmousewheel', function(e) {

    // cross-browser wheel delta
    var e = window.event || e; // old IE support.
    var delta = Math.max(-1, Math.min(1, (e.wheelDelta || -e.detail)));
});
上面,我们已经处理了不同浏览器滚轮监听方法,当用户滚动滚轮时需要动态地修改原图的尺寸,这里我们定义缩放比scaling为0.3,也就是说每当用户滚动一下滚轮原图就按0.3的比例进行缩放,具体实现如下:
// Gets the image scaling height and width.
native_height += (native_height * scaling * delta);
native_width += (native_width * scaling * delta);

// Update backgroud image size.
$large.css('background-size', native_width + "px " + native_height + "px");
现在,我们已经实现了通过滚轮对图片进行缩放查看的效果,完整的实现如下:
(function($) {
$.fn.imageZoom = function(options) {
// The native width and height of the image.
var defaults = {
scaling: 0.3
};
// Combines object defaults and options.
options = $.extend(defaults, options),
native_width = 0,
native_height = 0,
current_width = 0,
current_height = 0,
$small = $(".small"),
$large = $(".large");
$(".magnify").mousemove(function(e) {
/* Act on the event */
if (!native_width && !native_height) {
var image_object = new Image();
image_object.src = $small.attr('src');
// Gets the image native height and width.
native_height = image_object.height;
native_width = image_object.width;
// Gets the image current height and width.
current_height = $small.height();
current_width = $small.width();
} else {
// Gets .maginfy offset coordinates.
var magnify_offset = $(this).offset(),
// Gets coordinates within .maginfy.
mx = e.pageX - magnify_offset.left,
my = e.pageY - magnify_offset.top;
// Checks the mouse within .maginfy or not.
if (mx < $(this).width() && my < $(this).height() && mx > 0 && my > 0) {
$large.fadeIn(100);
} else {
$large.fadeOut(100);
}
if ($large.is(":visible")) {
/* Gets the large image coordinate by ratio
small.x / small.width = large.x / large.width
small.y / small.height = large.y / large.height
then we need to keep pointer in the centre,
so deduct the half of .large width and height.
*/
var rx = Math.round(mx / $small.width() * native_width - $large.width() / 2) * -1,
ry = Math.round(my / $small.height() * native_height - $large.height() / 2) * -1,
bgp = rx + "px " + ry + "px",
px = mx - $large.width() / 2,
py = my - $large.height() / 2;
$large.css({
left: px,
top: py,
backgroundPosition: bgp
});
}
}
});
$(".magnify").bind('DOMMouseScroll mousewheel onmousewheel', function(e) {
var image_object = new Image();
image_object.src = $large.attr('src');
// cross-browser wheel delta
e = window.event || e; // old IE support.
var delta = Math.max(-1, Math.min(1, (e.wheelDelta || -e.detail)));
// Gets the image scaling height and width.
native_height += (native_height * defaults.scaling * delta);
native_width += (native_width * defaults.scaling * delta);
// The image can't smaller than the original.
if (native_height < current_height) {
native_height = current_height;
}
if (native_width < current_width) {
native_width = current_width;
}
// console.log("native_height: " + native_height + " native_width: " + native_width);
// Gets .maginfy offset coordinates.
var magnify_offset = $(this).offset(),
mx = e.pageX - magnify_offset.left,
my = e.pageY - magnify_offset.top;
// Update backgroud image size.
$large.css('background-size', native_width + "px " + native_height + "px");
/* Gets the large image coordinate by ratio
small.x / small.width = large.x / large.width
small.y / small.height = large.y / large.height
then we need to keep pointer in the centre,
so deduct the half of .large width and height.
*/
var rx = Math.round(mx / $small.width() * native_width - $large.width() / 2) * -1,
ry = Math.round(my / $small.height() * native_height - $large.height() / 2) * -1,
bgp = rx + "px " + ry + "px",
px = mx - $large.width() / 2,
py = my - $large.height() / 2;
$large.css({
left: px,
top: py,
backgroundPosition: bgp
});
});
};
})(jQuery);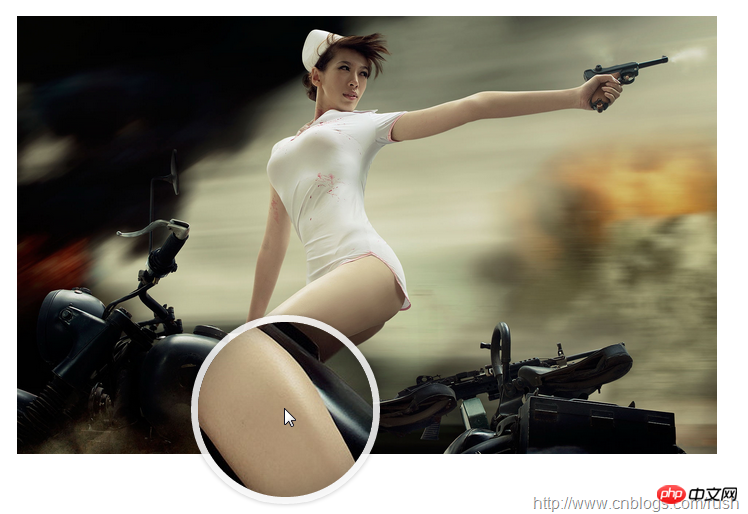
上面,我们实现了放大镜效果,当我们鼠标停留在图片上方会自动放大图片的相应部位,当然我们可以通过滚轮调整放大的比例。
以上がjQuery を使用して虫眼鏡効果を実現する方法の詳細内容です。詳細については、PHP 中国語 Web サイトの他の関連記事を参照してください。