
ホームページ >バックエンド開発 >C#.Net チュートリアル >ASP.NET MVC書き換えのサンプルチュートリアル
ASP.NET MVC書き換えのサンプルチュートリアル

- 零下一度オリジナル
- 2017-07-02 10:35:072193ブラウズ
この記事では、主に ASP.NET MVC が RazorViewEngine を書き換えてマルチテーマの切り替えを実現する方法を詳しく紹介します。興味のある方は参考にしてください。 1 つはスキンの css 参照と js 参照を切り替えることによるもの、もう 1 つはビュー エンジンを書き換えることによるものです。ビュー エンジンを書き直すことで、より柔軟になります。異なるテーマで異なるレイアウトやスタイルを使用できるだけでなく、異なるテーマで表示されるデータ項目に一貫性を持たせることもできます。これは、特定のテーマでパーソナライズされたコンテンツを追加できることを意味します。
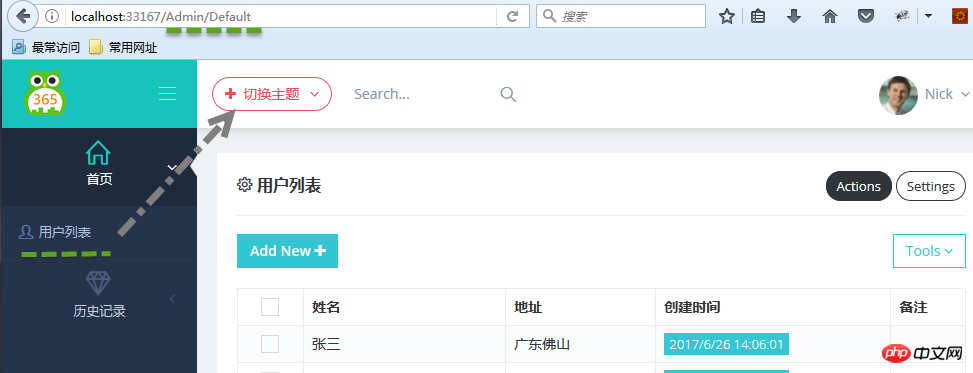
この記事では、ビュー エンジンを書き換えることによって説明します。これを行う前に、MVC の基本をすでに理解していることを前提としています。まず、その効果を見てみましょう:
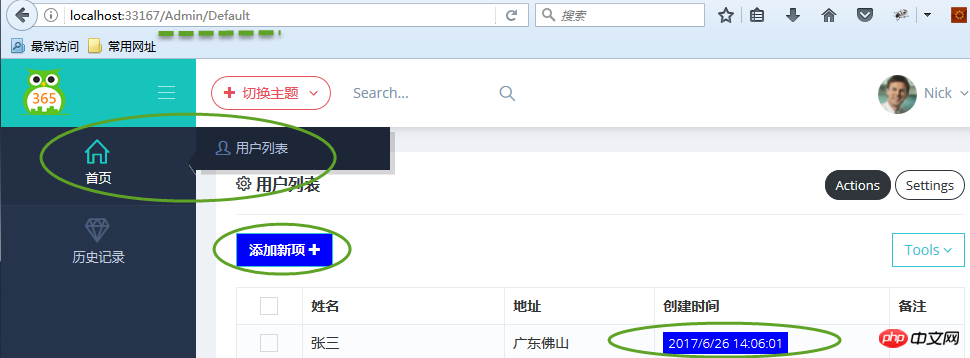
ログイン後、システムは次のようになります。デフォルトのテーマをクリックしてテーマを切り替えると、左側のメニュー バーのレイアウトが変更され、右側のコンテンツのスタイルも変更されますが、アドレス バーは変更されません。インターフェイスUIにはMetronicが使用されていますが、公式Webサイトは有料ですが、中国では常に無料で見つけることができます。公式アドレス: http://keenthemes.com/preview/metronic/
 ここでは、リージョンとモジュールに分割する方法を使用します(モジュールは独立したビジネス機能に応じて分割されます)。 , ここでは、Secom.Emx.Admin と Secom.Emx.History は 2 つの独立したモジュールであり、それぞれ Admin と History の領域が作成されます。
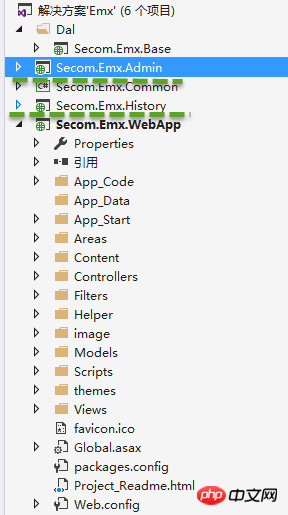
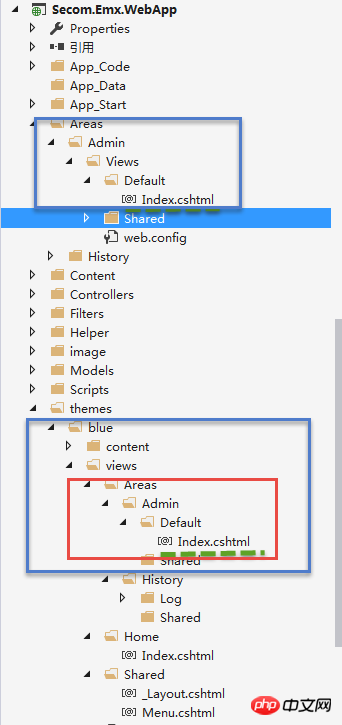
 Secom.Emx.Admin モデルの下の Areas ディレクトリが Secom.Emx.WebApp のディレクトリとまったく同じであることがわかります。実際、最初はモジュールにビューを追加するつもりはありませんでした。プロジェクトですが、独立した展開の便宜のためにまだ追加されています。
プロジェクト Secom.Emx.Admin を右クリックし、[プロパティ] - [イベントの生成] を選択し、次のコードを追加します:
xcopy /e/r/y $(ProjectDir)Areas\Admin\Views
$(SolutionDir)Secom.Emx.WebApp\Areas\Admin\Views
実際、プロジェクト Secom.Emx をコンパイルするときのこのコマンドは非常に簡単です。 .Admin、プロジェクト内のビューを Secom.Emx.WebApp プロジェクトの指定されたディレクトリにコピーします。
 リージョン
リージョン
私はこれを Secom.Emx.WebApp に配置しました。実際、リージョン ルートを登録した後、プロジェクトは最終的にすべての継承されたファイルを検索するため、これをクラス ライブラリ プロジェクトに独立して配置できます。 bin ディレクトリ AreaRegistration クラスの下に、WebApp がこのクラス ライブラリ プロジェクトを参照できるようにします。Secom.Emx.WebApp プロジェクトは、Secom.Emx.Admin および Secom.Emx.History への参照を追加します。
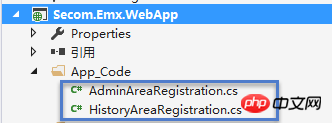 AdminAreaRegistration コードは次のとおりです:
using System.Web.Mvc;

namespace Secom.Emx.WebApp
{
 public class AdminAreaRegistration : AreaRegistration
 {
  public override string AreaName
  {
   get
   {
    return "Admin";
   }
  }

  public override void RegisterArea(AreaRegistrationContext context)
  {
   context.MapRoute(
    "Admin_default",
    "Admin/{controller}/{action}/{id}",
    new { action = "Index", id = UrlParameter.Optional },
    namespaces:new string[1] { "Secom.Emx.Admin.Areas.Admin.Controllers" }
   );
  }
 }
}
名前空間
と後で追加された名前空間に注意してください:新しい文字列[1] { "Secom.Emx.Admin.Areas.Admin.コントローラー" }、この名前空間は、独立モジュール Secom.Emx.Admin の下にあるコントローラーが配置される名前空間です。 HistoryAreaRegistration コードは次のとおりです:
using System.Web.Mvc;

namespace Secom.Emx.WebApp
{
 public class HistoryAreaRegistration : AreaRegistration
 {
  public override string AreaName
  {
   get
   {
    return "History";
   }
  }

  public override void RegisterArea(AreaRegistrationContext context)
  {
   context.MapRoute(
    "History_default",
    "History/{controller}/{action}/{id}",
    new { action = "Index", id = UrlParameter.Optional },
    namespaces:new string[1] { "Secom.Emx.History.Areas.History.Controllers" }
   );
  }
 }
}
まず、次のように RazorViewEngine の元の コンストラクター
public RazorViewEngine(IViewPageActivator viewPageActivator)
  : base(viewPageActivator)
 {
  AreaViewLocationFormats = new[]
  {
   "~/Areas/{2}/Views/{1}/{0}.cshtml",
   "~/Areas/{2}/Views/{1}/{0}.vbhtml",
   "~/Areas/{2}/Views/Shared/{0}.cshtml",
   "~/Areas/{2}/Views/Shared/{0}.vbhtml"
  };
  AreaMasterLocationFormats = new[]
  {
   "~/Areas/{2}/Views/{1}/{0}.cshtml",
   "~/Areas/{2}/Views/{1}/{0}.vbhtml",
   "~/Areas/{2}/Views/Shared/{0}.cshtml",
   "~/Areas/{2}/Views/Shared/{0}.vbhtml"
  };
  AreaPartialViewLocationFormats = new[]
  {
   "~/Areas/{2}/Views/{1}/{0}.cshtml",
   "~/Areas/{2}/Views/{1}/{0}.vbhtml",
   "~/Areas/{2}/Views/Shared/{0}.cshtml",
   "~/Areas/{2}/Views/Shared/{0}.vbhtml"
  };

  ViewLocationFormats = new[]
  {
   "~/Views/{1}/{0}.cshtml",
   "~/Views/{1}/{0}.vbhtml",
   "~/Views/Shared/{0}.cshtml",
   "~/Views/Shared/{0}.vbhtml"
  };
  MasterLocationFormats = new[]
  {
   "~/Views/{1}/{0}.cshtml",
   "~/Views/{1}/{0}.vbhtml",
   "~/Views/Shared/{0}.cshtml",
   "~/Views/Shared/{0}.vbhtml"
  };
  PartialViewLocationFormats = new[]
  {
   "~/Views/{1}/{0}.cshtml",
   "~/Views/{1}/{0}.vbhtml",
   "~/Views/Shared/{0}.cshtml",
   "~/Views/Shared/{0}.vbhtml"
  };

  FileExtensions = new[]
  {
   "cshtml",
   "vbhtml",
  };
 }
次に、RazorViewEngine を継承する新しい CustomRazorViewEngine を作成し、 View のルーティング ルールを書き込みますルーティング ルールを書き換えることは、任意のルールを定義し、そのルールに従うことができることを意味します。ビューを検索するときは、ルーティング配列内の順序に注意する必要があります。ビューが見つかると、そのビューはすぐに返され、後続のルーティング ルールには一致しません。プロジェクト全体で C# 言語を使用しているため、ルート検索の効率を向上させるために、ここでは vbhtml ルーティング ルールをすべて削除しました。
using System.Web.Mvc;

namespace Secom.Emx.WebApp.Helper
{
 public class CustomRazorViewEngine : RazorViewEngine
 {
  public CustomRazorViewEngine(string theme)
  {
   if (!string.IsNullOrEmpty(theme))
   {
    AreaViewLocationFormats = new[]
    {
      //themes
      "~/themes/"+theme+"/views/Areas/{2}/{1}/{0}.cshtml",
      "~/themes/"+theme+"/Shared/{0}.cshtml"

  "~/Areas/{2}/Views/{1}/{0}.cshtml",
  "~/Areas/{2}/Views/Shared/{0}.cshtml"
 };
    AreaMasterLocationFormats = new[]
    {
        //themes
    "~/themes/"+theme+"/views/Areas/{2}/{1}/{0}.cshtml",
    "~/themes/"+theme+"/views/Areas/{2}/Shared/{0}.cshtml",
    "~/themes/"+theme+"/views/Shared/{0}.cshtml",

  "~/Areas/{2}/Views/{1}/{0}.cshtml",
  "~/Areas/{2}/Views/Shared/{0}.cshtml"
 };
    AreaPartialViewLocationFormats = new[]
    {
       //themes
   "~/themes/"+theme+"/views/Shared/{0}.cshtml",

  "~/Areas/{2}/Views/{1}/{0}.cshtml",
  "~/Areas/{2}/Views/Shared/{0}.cshtml"
 };

    ViewLocationFormats = new[]
    {
       //themes
   "~/themes/"+theme+"/views/{1}/{0}.cshtml",

  "~/Views/{1}/{0}.cshtml",
  "~/Views/Shared/{0}.cshtml"
 };
    MasterLocationFormats = new[]
    {
       //themes
   "~/themes/"+theme+"/views/Shared/{0}.cshtml",

  "~/Views/{1}/{0}.cshtml",
  "~/Views/Shared/{0}.cshtml"
 };
    PartialViewLocationFormats = new[]
    {
       //themes
  "~/themes/"+theme+"/views/Shared/{0}.cshtml",

  "~/Views/{1}/{0}.cshtml",
  "~/Views/Shared/{0}.cshtml"
 };

    FileExtensions = new[]{"cshtml"};
   }

  }
 }
}
書き換え後のルーティング ルールは次のようになります。トピックが選択されていない場合は元のルーティング ルールが使用され、トピックが選択されている場合は書き換えられたルーティング ルールが使用されます。
新しいルーティング ルール: テーマが選択されている場合、まずテーマ/テーマ名/ビュー/エリア/エリア名/コントローラー名/ビュー名.cshtml を検索します。見つからない場合は、デフォルトのルーティング ルール、つまりエリアに従います。 /エリア名/Views/コントローラー名/ビュー名.cshtml
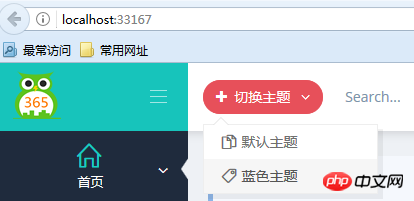
切换主题View代码:
<p class="btn-group">
<button type="button" class="btn btn-circle btn-outline red dropdown-toggle" data-toggle="dropdown">
<i class="fa fa-plus"></i>
<span class="hidden-sm hidden-xs">切换主题 </span>
<i class="fa fa-angle-down"></i>
</button>
<ul class="dropdown-menu" role="menu">
<li>
<a href="javascript:setTheme('default')">
<i class="icon-docs"></i> 默认主题
</a>
</li>
<li>
<a href="javascript:setTheme('Blue')">
<i class="icon-tag"></i> 蓝色主题
</a>
</li>
</ul>
</p>
<script type="text/javascript">
function setTheme(themeName)
{
window.location.href = "/Home/SetTheme?themeName=" + themeName + "&href=" + window.location.href;
}
</script>当用户登录成功的时候,从Cookie中读取所选主题信息,当Cookie中没有读取到主题记录时,则从Web.config配置文件中读取配置的主题名称,如果都没有读取到,则说明是默认主题,沿用原有的视图引擎规则。
在后台管理界面,每次选择了主题,我都将主题名称存储到Cookie中,默认保存一年,这样当下次再登录的时候,就能够记住所选的主题信息了。
using System;
using System.Web.Mvc;
using Secom.Emx.WebApp.Helper;
using System.Web;
using Secom.Emx.Common.Controllers;

namespace Secom.Emx.WebApp.Controllers
{
 public class HomeController : BaseController
 {
  string themeCookieName = "Theme";
  public ActionResult Index()
  {
   ViewData["Menu"] = GetMenus();
   return View();
  }
  public ActionResult SetTheme(string themeName,string href)
  {
   if (!string.IsNullOrEmpty(themeName))
   {
    Response.Cookies.Set(new HttpCookie(themeCookieName, themeName) { Expires = DateTime.Now.AddYears(1) });
   }
   else
   {
    themeName = Request.Cookies[themeCookieName].Value ?? "".Trim();
   }
   Utils.ResetRazorViewEngine(themeName);
   return string.IsNullOrEmpty(href)? Redirect("~/Home/Index"):Redirect(href);
  }
  public ActionResult Login()
  {
   string themeName = Request.Cookies[themeCookieName].Value ?? "".Trim();
   if (!string.IsNullOrEmpty(themeName))
   {
    Utils.ResetRazorViewEngine(themeName);
   }
   return View();
  }
 }
}
Utils类:
using System.Configuration;
using System.Web.Mvc;

namespace Secom.Emx.WebApp.Helper
{
 public class Utils
 {
  private static string _themeName;

  public static string ThemeName
  {
   get
   {
    if (!string.IsNullOrEmpty(_themeName))
    {
     return _themeName;
    }
    //模板风格
    _themeName =string.IsNullOrEmpty(ConfigurationManager.AppSettings["Theme"])? "" : ConfigurationManager.AppSettings["Theme"];
    return _themeName;
   }
  }
  public static void ResetRazorViewEngine(string themeName)
  {
   themeName = string.IsNullOrEmpty(themeName) ? Utils.ThemeName : themeName;
   if (!string.IsNullOrEmpty(themeName))
   {
    ViewEngines.Engines.Clear();
    ViewEngines.Engines.Add(new CustomRazorViewEngine(themeName));
   }
  }
 }
}实现方式实在是太简单,简单得我不知道如何表述才好,我还是记下来,方便有需要的人可以查阅,希望可以帮到你们。由于项目引入了庞大的各种相关文件以致文件比较大,网速原因无法上传源码还望见谅!
以上がASP.NET MVC書き換えのサンプルチュートリアルの詳細内容です。詳細については、PHP 中国語 Web サイトの他の関連記事を参照してください。