
ホームページ >Java >&#&チュートリアル >Spring Boot から JAVA への詳しい説明 (web+freemarker)
Spring Boot から JAVA への詳しい説明 (web+freemarker)

- 怪我咯オリジナル
- 2017-06-30 10:49:481225ブラウズ
この記事では、Spring Boot (web+freemarker) の使用開始に関する関連情報を主に紹介します。必要な方は参照してください。1. maven ファイルを設定します
<?xml version="1.0" encoding="UTF-8"?>
<project xmlns="http://maven.apache.org/POM/4.0.0"
     xmlns:xsi="http://www.w3.org/2001/XMLSchema-instance"
     xsi:schemaLocation="http://maven.apache.org/POM/4.0.0 http://maven.apache.org/xsd/maven-4.0.0.xsd">
  <modelVersion>4.0.0</modelVersion>
  <groupId>com.hdwang</groupId>
  <artifactId>spring-boot-test</artifactId>
  <version>1.0-SNAPSHOT</version>
  <name>spring-boot-test</name>
  <description>project for test Spring Boot</description>
  <properties>
    <project.build.sourceEncoding>UTF-8</project.build.sourceEncoding>
    <java.version>1.8</java.version>
  </properties>
  <!-- Inherit defaults from Spring Boot -->
  <parent>
    <groupId>org.springframework.boot</groupId>
    <artifactId>spring-boot-starter-parent</artifactId>
    <version>1.5.4.RELEASE</version>
    <relativePath/>
  </parent>
  <dependencies>
    <!-- Add typical dependencies for a web application -->
    <dependency>
      <groupId>org.springframework.boot</groupId>
      <artifactId>spring-boot-starter-web</artifactId>
    </dependency>
    <dependency>
      <groupId>org.springframework.boot</groupId>
      <artifactId>spring-boot-starter-freemarker</artifactId>
    </dependency>
    <!-- auto redeploy -->
    <dependency>
      <groupId>org.springframework.boot</groupId>
      <artifactId>spring-boot-devtools</artifactId>
      <optional>true</optional>
    </dependency>
  <!-- Package as an executable jar -->
  <build>
    <plugins>
      <plugin>
        <groupId>org.springframework.boot</groupId>
        <artifactId>spring-boot-maven-plugin</artifactId>
      </plugin>
    </plugins>
  </build>
</project>
2.構造体 (static
/templates/application.properties/logback.xml の名前はすべて合意されており、特定の名前のみを使用できます。詳細については、Spring Boot の公式ドキュメントを参照してください。次の名前は構成の 1 つです。メソッド)
@SpringBootApplication
public class Application {
/**
* main function
* @param args params
*/
public static void main(String[] args){
SpringApplication.run(Application.class,args);
}
}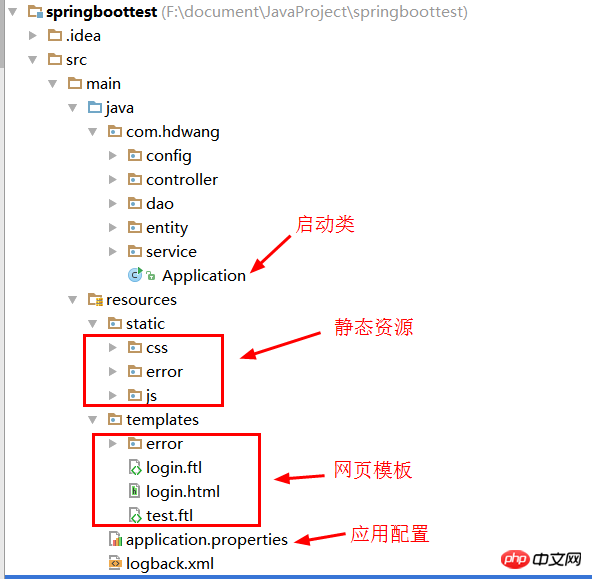 4. コントローラーを作成します ( Application クラスの下位ディレクトリ)
@Controller
@RequestMapping("/common")
public class Common {
  @Value("${msg:Welcome!}")
  private String msg;
  /**
   * get a page
   * @return a page with name called return value
   */
  @RequestMapping("login")
  public String getLoginPage(ModelMap map){
    map.put("welcomeMsg",this.msg);
    return "login";
  }
}
5. Web ページ テンプレートのログイン .ftl を作成します (freemark は ftl サフィックスを使用する必要がありますが、私は長い間これに騙されてきました!js/css などは/static はアクセス パスに含まれていないことに注意してください。私は長い間これに騙されてきました!)
<!DOCTYPE html>
<html>
<head>
  <meta charset="UTF-8" />
  <title>login</title>
  <link href="/css/home.css" rel="external nofollow" rel="stylesheet" type="text/css" />
  <script type="text/javascript" src="/js/jquery-2.0.3.min.js"></script>
  <script type="text/javascript" src="/js/home.js"></script>
</head>
<body>
<h1>login page</h1>
<h2>${welcomeMsg}</h2>
<form>
  <p>
   <label>用户名:<input type="text" id="username"/></label>
  </p>
  <p>
   <label>密码:<input type="password"/></label>
  </p>
  <p>
    <input type="submit" value="提交"/>
    <input type="reset" value="重置" />
  </p>
</form>
</body>
</html>
6. アプリケーション
設定ファイルを書き込みます
新しい application.properties を作成します。ファイルを作成し、次の内容を追加します7. 起動して実行します
ブラウザでアクセスします: http://localhost:8080/common/login
8. デプロイ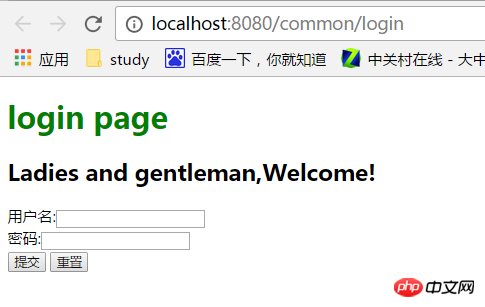 mvn パッケージを作成します
-jar xxx.jar を実行し、このパッケージを実行します
以上がSpring Boot から JAVA への詳しい説明 (web+freemarker)の詳細内容です。詳細については、PHP 中国語 Web サイトの他の関連記事を参照してください。
声明:
この記事の内容はネチズンが自主的に寄稿したものであり、著作権は原著者に帰属します。このサイトは、それに相当する法的責任を負いません。盗作または侵害の疑いのあるコンテンツを見つけた場合は、admin@php.cn までご連絡ください。