
ホームページ >Java >&#&チュートリアル >JPAによるJavaデータベース操作例を詳しく解説
JPAによるJavaデータベース操作例を詳しく解説

- Y2Jオリジナル
- 2017-05-06 13:19:153077ブラウズ
今日は、SpringBoot で Mysql データベースに接続し、JPA を使用してデータベース関連の操作を実行する方法を紹介します。
今日は、SpringBoot で Mysql データベースに接続し、JPA を使用してデータベース関連の操作を実行する方法を紹介します。
ステップ 1: MYSQl と JPA の関連する Jar パッケージの依存関係を pom.xml ファイルに追加します。 具体的な追加場所は次のとおりです。
<!--数据库相关配置-->
    <dependency>
      <groupId>org.springframework.boot</groupId>
      <artifactId>spring-boot-starter-web</artifactId>
    </dependency>
    <dependency>
      <groupId>org.springframework.boot</groupId>
      <artifactId>spring-boot-starter-data-jpa</artifactId>
    </dependency>
    <dependency>
      <groupId>mysql</groupId>
      <artifactId>mysql-connector-java</artifactId>
    </dependency>
    <dependency>
      <groupId>org.apache.poi</groupId>
      <artifactId>poi</artifactId>
      <version>3.11</version>
    </dependency>
ステップ 2: データベースの関連構成を application.properties 構成ファイルに追加します。構成情報は次のとおりです。
spring.datasource.url = jdbc:mysql://localhost:3306/webtest
spring.datasource.username = root
spring.datasource.password = 220316
spring.datasource.driverClassName = com.mysql.jdbc.Driver
# Specify the DBMS
spring.jpa.database = MYSQL
# Show or not log for each sql query
spring.jpa.show-sql = true
# Hibernate ddl auto (create, create-drop, update)
spring.jpa.hibernate.ddl-auto = update
# Naming strategy
spring.jpa.hibernate.naming-strategy = org.hibernate.cfg.ImprovedNamingStrategy
# stripped before adding them to the entity manager)
spring.jpa.properties.hibernate.dialect = org.hibernate.dialect.MySQL5Dialect
説明は次のとおりです: webtest はデータベース名、root はユーザー名、220316 はパスワードを表します
ステップ 3: データベース操作のエンティティ クラスを作成します。
package example.entity;
import javax.persistence.*;
import javax.validation.constraints.NotNull;
import java.math.BigDecimal;
import java.util.Date;
@Entity
@Table(name = "user")
public class User {
@Id
@GeneratedValue(strategy = GenerationType.AUTO)
private int id;
@Column(name = "name", nullable = true, length = 30)
private String name;
@Column(name = "height", nullable = true, length = 10)
private int height;
@Column(name = "sex", nullable = true, length = 2)
private char sex;
@Temporal(TemporalType.DATE)
private Date birthday;
@Temporal(TemporalType.TIMESTAMP)
private Date sendtime; // 日期类型,格式:yyyy-MM-dd HH:mm:ss
@Column(name = "price", nullable = true, length = 10)
private BigDecimal price;
@Column(name = "floatprice", nullable = true, length = 10)
private float floatprice;
@Column(name = "doubleprice", nullable = true, length = 10)
private double doubleprice;
public Date getSendtime() {
return sendtime;
}
public void setSendtime(Date sendtime) {
this.sendtime = sendtime;
}
public BigDecimal getPrice() {
return price;
}
public void setPrice(BigDecimal price) {
this.price = price;
}
public float getFloatprice() {
return floatprice;
}
public void setFloatprice(float floatprice) {
this.floatprice = floatprice;
}
public double getDoubleprice() {
return doubleprice;
}
public void setDoubleprice(double doubleprice) {
this.doubleprice = doubleprice;
}
public User() { }
public char getSex() {
return sex;
}
public void setSex(char sex) {
this.sex = sex;
}
public Date getBirthday() {
return birthday;
}
public void setBirthday(Date birthday) {
this.birthday = birthday;
}
public User(int id) {
this.id = id;
}
public int getId() {
return id;
}
public void setId(int id) {
this.id = id;
}
public String getName() {
return name;
}
public void setName(String name) {
this.name = name;
}
public int getHeight() {
return height;
}
public void setHeight(int height) {
this.height = height;
}
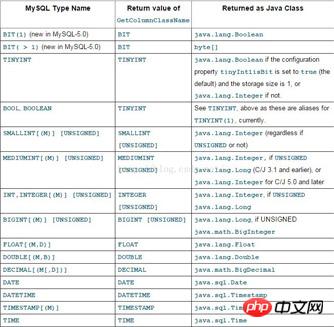
} ここで誰もが注意する必要があるのは、エンティティ クラスのクラス名とフィールド attributes がデータベースのテーブルとフィールドに対応している必要があるということです。以下は、MYSQL-JAVA のさまざまな属性の対応図です。
ステップ 4: dao 層のデータ操作クラスを作成します。 dao データ操作クラスは次のとおりです:
package example.dao;
import example.entity.User;
import org.springframework.data.repository.CrudRepository;
import javax.transaction.Transactional;
import java.math.BigDecimal;
import java.util.Date;
import java.util.List;

@Transactional
public interface UserDao extends CrudRepository<User, Integer> {
  public List<User> findByName(String name);
  public List<User> findBySex(char sex);
  public List<User> findByBirthday(Date birthday);
  public List<User> findBySendtime(Date sendtime);
  public List<User> findByPrice(BigDecimal price);
  public List<User> findByFloatprice(float floatprice);
  public List<User> findByDoubleprice(double doubleprice);
}
ここで質問です。なぜ CrudRepository0e4b54218c9a07445335f10bb61dc1ba を継承する必要があるのですか?また、その具体的な機能は何ですか?
JPA での一般的な使用法と使用ガイドラインを簡単に紹介します。
1. 最初に行うことは、CrudRepository メソッドを継承することです。これに含まれる 2 つのパラメーターの具体的な意味は次のとおりです。操作対象のエンティティ クラスの名前を意味します。2 番目のパラメータは、エンティティ クラスの主キーのタイプを表します。
2. 継承後、親クラスから継承したいくつかのメソッドを使用できます。たとえば、上記のように、findBy + "クエリしたいフィールド名" を使用することができます。 SQLクエリ機能を実装します。
ここでまだ少し混乱しているかもしれませんが、理解するために例を示しましょう:
ステップ 5:
コントロール クラス コントローラーを作成します。 コントロール クラスの具体的な情報は次のとおりです:
package example.controller;
import example.dao.UserDao;
import example.entity.User;
import org.springframework.beans.factory.annotation.Autowired;
import org.springframework.stereotype.Controller;
import org.springframework.web.bind.annotation.RequestMapping;
import org.springframework.web.bind.annotation.ResponseBody;
import java.math.BigDecimal;
import java.text.ParseException;
import java.text.SimpleDateFormat;
import java.util.Date;
import java.util.List;
@Controller
public class UserController {
  @Autowired
  private UserDao userDao;
  @RequestMapping("/getName")
  @ResponseBody
  public String getByName(String name) {
    List<User> userList = userDao.findByName(name);
    if (userList != null && userList.size()!=0) {
      return "The user length is: " + userList.size();
    }
    return "user " + name + " is not exist.";
  }

  @RequestMapping("/getSex")
  @ResponseBody
  public String getBySex(char sex) {
    List<User> userList = userDao.findBySex(sex);
    if (userList != null && userList.size()!=0) {
      return "The user length is: " + userList.size();
    }
    return "user " + sex + " is not exist.";
  }

  @RequestMapping("/getBirthday")
  @ResponseBody
  public String findByBirthday(String birthday) {
    System.out.println("birthday:"+birthday);
    SimpleDateFormat formate=new SimpleDateFormat("yyyy-MM-dd");
    List<User> userList = null;
    try {
      userList = userDao.findByBirthday(formate.parse(birthday));
    } catch (ParseException e) {
      e.printStackTrace();
    }
    if (userList != null && userList.size()!=0) {
      return "The user length is: " + userList.size();
    }
    return "user " + birthday + " is not exist.";
  }

  @RequestMapping("/getSendtime")
  @ResponseBody
  public String findBySendtime(String sendtime) {
    System.out.println("sendtime:"+sendtime);
    SimpleDateFormat formate=new SimpleDateFormat("yyyy-MM-dd HH:mm:ss");
    List<User> userList = null;
    try {
      userList = userDao.findBySendtime(formate.parse(sendtime));
    } catch (ParseException e) {
      e.printStackTrace();
    }
    if (userList != null && userList.size()!=0) {
      return "The user length is: " + userList.size();
    }
    return "user " + sendtime + " is not exist.";
  }

  @RequestMapping("/getPrice")
  @ResponseBody
  public String findByPrice(BigDecimal price) {
    List<User> userList = null;
    userList = userDao.findByPrice(price);
    if (userList != null && userList.size()!=0) {
      return "The user length is: " + userList.size();
    }
    return "user " + price + " is not exist.";
  }

  @RequestMapping("/getFloatprice")
  @ResponseBody
  public String findFloatprice(float floatprice) {
    List<User> userList = null;
    userList = userDao.findByFloatprice(floatprice);
    if (userList != null && userList.size()!=0) {
      return "The user length is: " + userList.size();
    }
    return "user " + floatprice + " is not exist.";
  }

  @RequestMapping("/getDoubleprice")
  @ResponseBody
  public String findByPrice(double doubleprice) {
    List<User> userList = null;
    userList = userDao.findByDoubleprice(doubleprice);
    if (userList != null && userList.size()!=0) {
      return "The user length is: " + userList.size();
    }
    return "user " + doubleprice + " is not exist.";
  }
}
ここで大きな疑問があるかもしれませんが、私も最初はこの問題を深く無視していました。 userDaoはインスタンス化せずに直接使用できますか?
それでは、なぜこれが当てはまるのか説明します:
。 userDao の上に @Autowired 属性を追加するだけで、
の自動インスタンス化を実現できます。これまでのように userDaoImp などの実装クラスを記述する必要はありません。これにより、コードが単純になり、開発速度が大幅に向上します。 まだこの質問をする人もいると思います: それは自動インスタンス化ですが、インスタンス化は dao クラスが実装する必要がある追加、削除、変更、チェック機能をどのようにして知るのでしょうか? それは dao にはまったく記載されていません。コード?実際、興味のある人は、前のステップで findBy+「フィールド名」 の具体的な関数を説明しましたが、これがこの質問に対する答えです。実際、dao 層のさまざまなメソッドは、daoimp のさまざまな実装クラスの SQl コマンドです。それらがどのように対応するかについては、次のセクションで詳しく説明しますが、ここでは簡単に説明します。 。
ステップ 6:
データベースのテーブル名とフィールド情報は次のとおりです:
【関連推奨事項】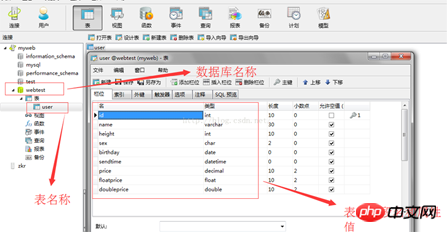
1.
2. Geek Academy Java ビデオ。チュートリアル
3.以上がJPAによるJavaデータベース操作例を詳しく解説の詳細内容です。詳細については、PHP 中国語 Web サイトの他の関連記事を参照してください。