
ホームページ >Java >&#&チュートリアル >JVM徹底学習 - Java解析クラスファイル処理のサンプルコード
JVM徹底学習 - Java解析クラスファイル処理のサンプルコード

- 黄舟オリジナル
- 2017-03-18 10:47:351921ブラウズ
前書き:
Javaプログラマーとして、JVM を理解できないわけはありません。JVM を学びたいなら、魚が水に関係するのと同じように、クラスは仮想マシンに関係するものであることを理解する必要があります。仮想マシンはクラスによって有効になります。 「徹底理解 Java 仮想マシン」では 1 章を費やして Class ファイルについて説明していますが、読み終えてもまだ混乱しており、理解も中途半端です。私は少し前に、「Write Your Own Java Virtual Machine」という非常に優れた本を読みました。著者は go 言語を使用して単純な JVM を実装しましたが、JVM のすべての機能を完全には実装していませんでした。 JVM に少し興味がある人向けですが、それでも可読性は非常に高いです。著者が詳しく解説しており、各プロセスは1章に分かれており、その一部ではClassファイルの解析方法が説明されています。 この本は厚すぎず、すぐに読めてしまいました。しかし、紙に書いて覚えるのは時間の問題で、自分でやるしかないと思ったので、自分で Class ファイルを解析してみました。 Go 言語は優れていますが、特に変数の後に型を置く構文に慣れていない場合は、結局のところ習熟していないので、Java を使用する方が良いでしょう。
Java がクロスプラットフォームを実現できる理由は、そのコンパイル段階でコードがプラットフォーム関連の機械語に直接コンパイルされず、まず Java バイトコードのバイナリ形式にコンパイルされ、それが Class ファイルに置かれ、次に仮想マシン クラス ファイルをロードし、プログラムの実行に必要なコンテンツを解析します。各クラスは個別のクラス ファイルにコンパイルされ、内部クラスも独自のクラスを生成するための独立したクラスとして使用されます。
基本構造
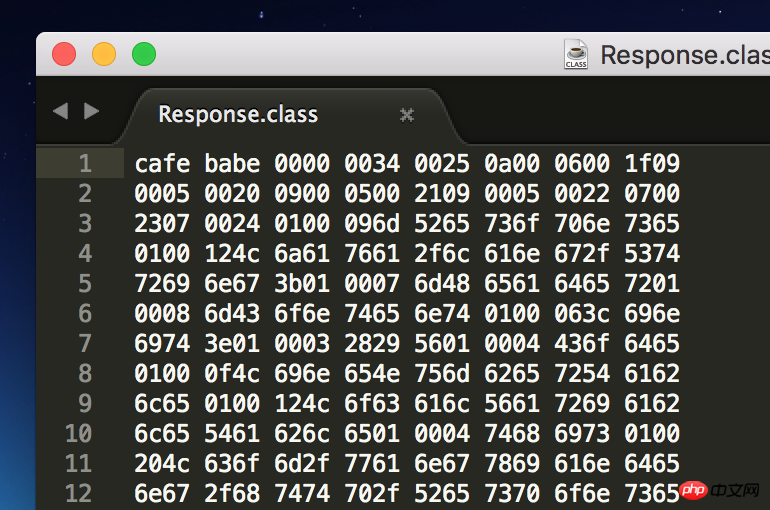
次のようにクラスファイルを見つけてSublime Textで開くだけです:
ただし、クラスファイルの基本的な形式はJava仮想マシン仕様に記載されていますので、これに従ってください。形式を解析します:ClassFile {
u4 magic;
u2 minor_version;
u2 major_version;
u2 constant_pool_count;
cp_info constant_pool[constant_pool_count-1];
u2 access_flags;
u2 this_class;
u2 super_class;
u2 interfaces_count;
u2 interfaces[interfaces_count];
u2 fields_count;
field_info fields[fields_count];
u2 methods_count;
method_info methods[methods_count];
u2 attributes_count;
attribute_info attributes[attributes_count];
} ClassFile のフィールドの型は u1、u2、および u4 です。これらはどのような型ですか?実際には非常に単純で、それぞれ 1 バイト、2 バイト、4 バイトを意味します。
の最初の 4 バイトは、ファイル形式を一意に識別するために使用される
Magicで、仮想マシンがロードされたファイルがクラス形式であるかどうかを識別できるようにするため、一般にマジック ナンバー (マジック ナンバー) と呼ばれます。 、およびクラス ファイル マジックナンバーは、cafebabe です。クラスファイルに限らず、基本的にほとんどのファイルには形式を識別するためのマジックナンバーがあります。
次の部分では主に、定数プール、クラスアクセスフラグ、親クラス、インターフェース情報、フィールド、メソッドなどのクラスファイルの一部の情報について説明します。具体的な情報については、「Java 仮想マシン仕様」を参照してください。 。 分析
フィールド型
上で述べたように、ClassFile のフィールド型は u1、u2、u4 で、それぞれ 1 バイト、2 バイト、4 バイトの符号なし整数を表します。 Java では、short、int、long はそれぞれ 2、4、および 8 バイトの符号付き整数であり、符号ビットがなければ、u1、u2、および u4 を表すために使用できます。
public class U1 {
    public static short read(InputStream inputStream) {
        byte[] bytes = new byte[1];
        try {
            inputStream.read(bytes);
        } catch (IOException e) {
            e.printStackTrace();
        }
        short value = (short) (bytes[0] & 0xFF);
        return value;
    }
}

public class U2 {
    public static int read(InputStream inputStream) {
        byte[] bytes = new byte[2];
        try {
            inputStream.read(bytes);
        } catch (IOException e) {
            e.printStackTrace();
        }
        int num = 0;
        for (int i= 0; i < bytes.length; i++) {
            num <<= 8;
            num |= (bytes[i] & 0xff);
        }
        return num;
    }
}

public class U4 {
    public static long read(InputStream inputStream) {
        byte[] bytes = new byte[4];
        try {
            inputStream.read(bytes);
        } catch (IOException e) {
            e.printStackTrace();
        }
        long num = 0;
        for (int i= 0; i < bytes.length; i++) {
            num <<= 8;
            num |= (bytes[i] & 0xff);
        }
        return num;
    }
}
定数プール
フィールドタイプを定義した後、最初に、マジックナンバーなどの基本情報を読み込みます。この部分は非常に簡単です:
FileInputStream inputStream = new FileInputStream(file);
ClassFile classFile = new ClassFile();
classFile.magic = U4.read(inputStream);
classFile.minorVersion = U2.read(inputStream);
classFile.majorVersion = U2.read(inputStream);
この部分は単なるウォームアップです。次へ その大部分は定数プールにあります。コンスタントプールを分析する前に、まずコンスタントプールとは何かについて説明します。
定数プールは、その名前が示すように、定数を格納するリソース プールです。ここでの定数とは、リテラルとシンボリック参照を指します。リテラルはいくつかの
stringリソースを参照し、シンボル参照はクラス シンボル参照、メソッド シンボル参照、フィールド シンボル参照の 3 つのカテゴリに分類されます。リソースを定数プールに配置することで、他の項目を定数プール内のインデックスとして直接定義でき、クラス ファイルだけでなく
Android 実行可能ファイル dex なども同様です。 DexData に配置される他のアイテムは、インデックスを通じてリソースを見つけます。 Java 仮想マシンの仕様では、定数プール内の各項目の形式が指定されています。 cp_info {
u1 tag;
u1 info[];
} 上記の形式は、実際に定数プールに含まれるデータの形式が 14 種類あります。それぞれの形式には、次のように異なるタグ値があります。以下に示します:
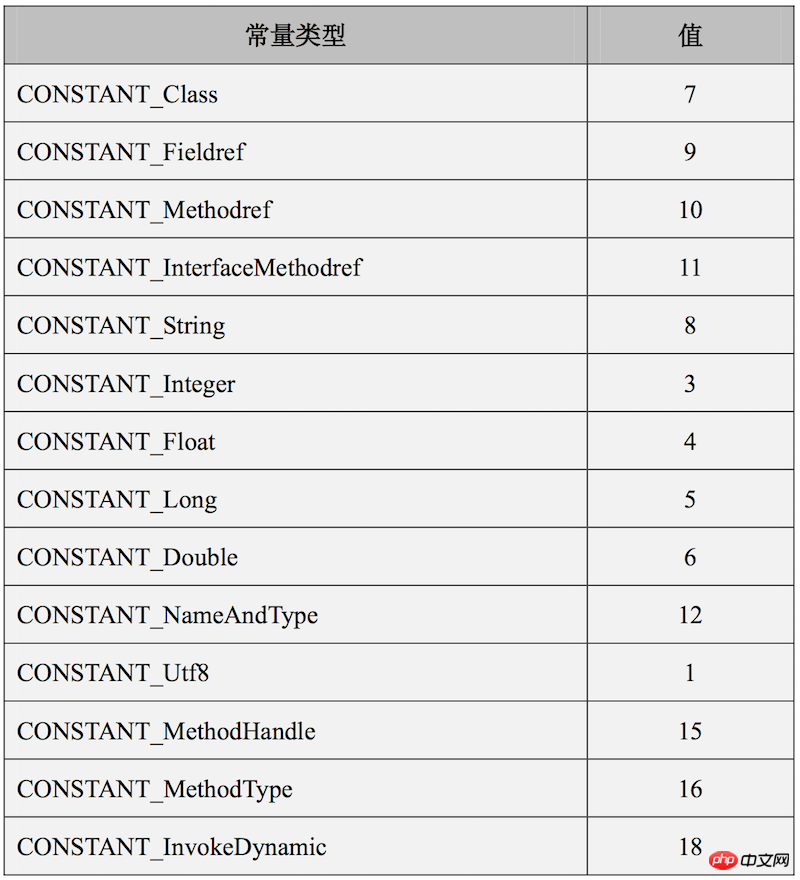 ここでは、最初に定数プールのサイズを読み取り、定数プールを初期化します:
//解析常量池
int constant_pool_count = U2.read(inputStream);
ConstantPool constantPool = new ConstantPool(constant_pool_count);
constantPool.read(inputStream);
その後、読み取りますここで注意すべき点は、cpInfo[] 添字が 1 から始まり、0 は無効であり、実際の定数プールのサイズは constant_pool_count-1 であるということです。
public class ConstantPool {
    public int constant_pool_count;
    public ConstantInfo[] cpInfo;

    public ConstantPool(int count) {
        constant_pool_count = count;
        cpInfo = new ConstantInfo[constant_pool_count];
    }

    public void read(InputStream inputStream) {
        for (int i = 1; i < constant_pool_count; i++) {
            short tag = U1.read(inputStream);
            ConstantInfo constantInfo = ConstantInfo.getConstantInfo(tag);
            constantInfo.read(inputStream);
            cpInfo[i] = constantInfo;
            if (tag == ConstantInfo.CONSTANT_Double || tag == ConstantInfo.CONSTANT_Long) {
                i++;
            }
        }
    }
}
まず、CONSTANT_Utf8 形式を見てみましょう。この項目には MUTF-8 でエンコードされた文字列が格納されています。
public class ConstantUtf8 extends ConstantInfo {
    public String value;

    @Override
    public void read(InputStream inputStream) {
        int length = U2.read(inputStream);
        byte[] bytes = new byte[length];
        try {
            inputStream.read(bytes);
        } catch (IOException e) {
            e.printStackTrace();
        }
        try {
            value = readUtf8(bytes);
        } catch (UTFDataFormatException e) {
            e.printStackTrace();
        }
    }

    private String readUtf8(byte[] bytearr) throws UTFDataFormatException {
        //copy from java.io.DataInputStream.readUTF()
    }
}
很简单,首先读取这一项的字节数组长度,接着调用readUtf8(),将字节数组转化为String字符串。
再来看看CONSTANT_Class这一项,这一项存储的是类或者接口的符号引用:
CONSTANT_Class_info {
    u1 tag;
    u2 name_index;
}
注意这里的name_index并不是直接的字符串,而是指向常量池中cpInfo数组的name_index项,且cpInfo[name_index]一定是CONSTANT_Utf8格式。
public class ConstantClass extends ConstantInfo {
    public int nameIndex;

    @Override
    public void read(InputStream inputStream) {
        nameIndex = U2.read(inputStream);
    }
}
常量池解析完毕后,就可以供后面的数据使用了,比方说ClassFile中的this_class指向的就是常量池中格式为CONSTANT_Class的某一项,那么我们就可以读取出类名:
int classIndex = U2.read(inputStream);
ConstantClass clazz = (ConstantClass) constantPool.cpInfo[classIndex];
ConstantUtf8 className = (ConstantUtf8) constantPool.cpInfo[clazz.nameIndex];
classFile.className = className.value;
System.out.print("classname:" + classFile.className + "\n");
字节码指令
解析常量池之后还需要接着解析一些类信息,如父类、接口类、字段等,但是相信大家最好奇的还是java指令的存储,大家都知道,我们平时写的java代码会被编译成java字节码,那么这些字节码到底存储在哪呢?别急,讲解指令之前,我们先来了解下ClassFile中的method_info,其格式如下:
method_info {
    u2 access_flags;
    u2 name_index;
    u2 descriptor_index;
    u2 attributes_count;
    attribute_info attributes[attributes_count];
}method_info里主要是一些方法信息:如访问标志、方法名索引、方法描述符索引及属性数组。这里要强调的是属性数组,因为字节码指令就存储在这个属性数组里。属性有很多种,比如说异常表就是一个属性,而存储字节码指令的属性为CODE属性,看这名字也知道是用来存储代码的了。属性的通用格式为:
attribute_info {
    u2 attribute_name_index;
    u4 attribute_length;
    u1 info[attribute_length];
}
根据attribute_name_index可以从常量池中拿到属性名,再根据属性名就可以判断属性种类了。
Code属性的具体格式为:
Code_attribute {
    u2 attribute_name_index; u4 attribute_length;
    u2 max_stack;
    u2 max_locals;
    u4 code_length;
    u1 code[code_length];
    u2 exception_table_length;
    {
        u2 start_pc;
        u2 end_pc;
        u2 handler_pc;
        u2 catch_type;
    } exception_table[exception_table_length];
    u2 attributes_count;
    attribute_info attributes[attributes_count];
}其中code数组里存储就是字节码指令,那么如何解析呢?每条指令在code[]中都是一个字节,我们平时javap命令反编译看到的指令其实是助记符,只是方便阅读字节码使用的,jvm有一张字节码与助记符的对照表,根据对照表,就可以将指令翻译为可读的助记符了。这里我也是在网上随便找了一个对照表,保存到本地txt文件中,并在使用时解析成HashMap。代码很简单,就不贴了,可以参考我代码中InstructionTable.java。
接下来我们就可以解析字节码了:
for (int j = 0; j < methodInfo.attributesCount; j++) {
    if (methodInfo.attributes[j] instanceof CodeAttribute) {
        CodeAttribute codeAttribute = (CodeAttribute) methodInfo.attributes[j];
        for (int m = 0; m < codeAttribute.codeLength; m++) {
            short code = codeAttribute.code[m];
            System.out.print(InstructionTable.getInstruction(code) + "\n");
        }
    }
}
运行
整个项目终于写完了,接下来就来看看效果如何,随便找一个class文件解析运行:
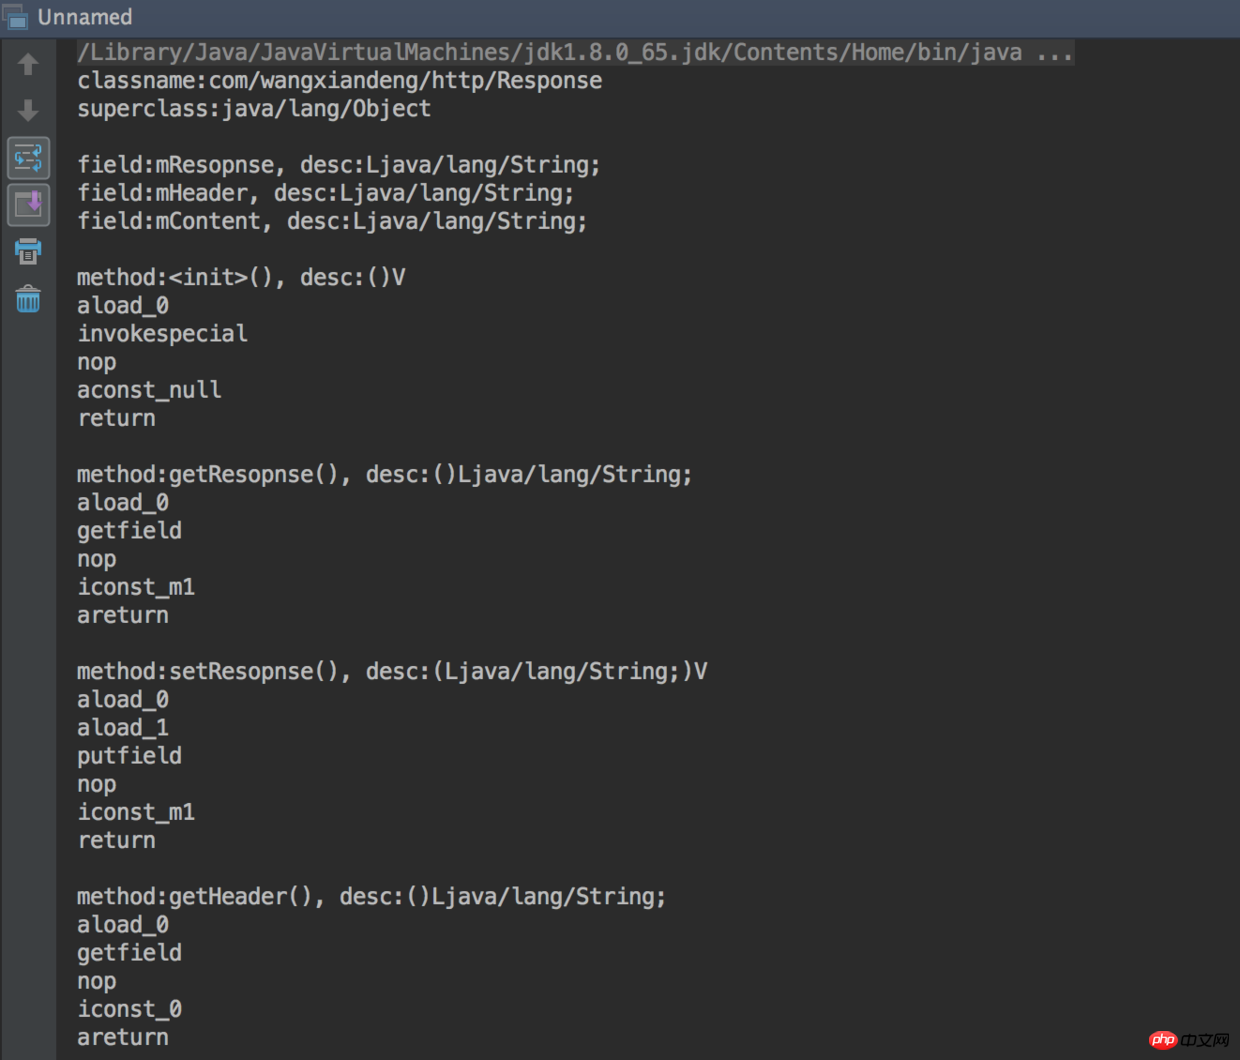
哈哈,是不是很赞!
以上がJVM徹底学習 - Java解析クラスファイル処理のサンプルコードの詳細内容です。詳細については、PHP 中国語 Web サイトの他の関連記事を参照してください。