


beginPath() - 新しいパスを開始します。
closePath() - 線を描いて最後の線を接続して、既存のパスを閉じてみます。初期座標は true;
lineTo(x,y)—指定された座標にサブパスを描画します。
moveTo(x,y)—サブパスを描画せずに指定された座標に移動します。 ;
rect (x,y,w,h)—左上隅が (x,y) に位置し、幅が w、高さが h の長方形を描画します。サブパス Line で記述された形状のアウトライン
<style type="text/css">
        canvas{
            border:thin solid black;
            margin: 4px;
        }
        body > *{
            float: left;
        }
    </style>
<canvas id="canvas1" width="500" height="140">
您的浏览器不支持<code>canvas</code>!
</canvas> <script>
//由直线创建路径
var ctx=document.getElementById("canvas1").getContext("2d");
ctx.fillStyle="#136455";
ctx.strokeStyle="blue";
ctx.lineWidth=4;
ctx.beginPath();
ctx.moveTo(10,10);
ctx.lineTo(110,10);
ctx.lineTo(110,120);
ctx.closePath();
ctx.fill();
ctx.beginPath();
ctx.moveTo(150,10);
ctx.lineTo(200,10);
ctx.lineTo(200,120);
ctx.lineTo(190,120);
ctx.fill();
ctx.stroke();
ctx.beginPath();
ctx.moveTo(250,10);
ctx.lineTo(250,120);
ctx.stroke();
</script>
lineCap - 線または閉じた形状を描画する際の線の終端のスタイルを設定します。
    <canvas id="canvas2" width="500" height="140">
        您的浏览器不支持<code>canvas</code>!
    </canvas>
rrree
    <script>
        //设置lineCap属性
        var ctx2=document.getElementById("canvas2").getContext("2d");
        ctx2.strokeStyle="red";
        ctx2.lineWidth=2;

        ctx2.beginPath();
        ctx2.moveTo(0,50);
        ctx2.lineTo(200,50);
        ctx2.stroke();

        ctx2.strokeStyle="black";
        ctx2.lineWidth=40;

        var xpos=50;
        var styles=["butt","round","square"];
        for(var i=0;i<styles.length;i++){
            ctx2.beginPath();
            ctx2.lineCap=styles[i];
            ctx2.moveTo(xpos,50);
            ctx2.lineTo(xpos,150);
            ctx2.stroke();
            xpos+=50;
        }
    </script>
rrree
2) 円弧を描く: 
arc(x,y,rad,startAngle,
Angle,
direction)——(x,y)に円弧を描く、半径はrad、開始角度はstartAngle、終了角度はendAngleです。オプションのパラメーター
direction は、円弧の方向を指定します
;

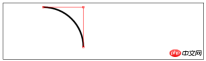
arcTo(x1,y1,x2,y2,rad) - (x1, y1) を通過する、半径 rad の断面を描画します ( x2, y2) 円弧
    <canvas id="canvas3" width="500" height="140">
        您的浏览器不支持<code>canvas</code>!
    </canvas>
rreee <script>
//用Rect方法绘制矩形
var ctx3=document.getElementById("canvas3").getContext("2d");
ctx3.fillStyle="yellow";
ctx3.strokeStyle="black";
ctx3.lineWidth=4;
ctx3.beginPath();
ctx3.moveTo(110,10);
ctx3.lineTo(110,100);
ctx3.lineTo(10,10);
ctx3.closePath();
ctx3.rect(110,10,100,90);
ctx3.rect(110,100,130,30);
ctx3.fill();
ctx3.stroke();
</script> <canvas id="canvas4" width="500" height="140">
您的浏览器不支持<code>canvas</code>!
</canvas>
    <script>
        //使用arcTo方法
        var ctx4=document.getElementById("canvas4").getContext("2d");
        var point1=[100,10];
        var point2=[200,10];
        var point3=[200,110];

        ctx4.fillStyle="yellow";
        ctx4.strokeStyle="black";
        ctx4.lineWidth=4;

        ctx4.beginPath();
        ctx4.moveTo(point1[0],point1[1]);
        ctx4.arcTo(point2[0],point2[1],point3[0],point3[1],100);
        ctx4.stroke();

        drawPoint(point1[0],point1[1]);
        drawPoint(point2[0],point2[1]);
        drawPoint(point3[0],point3[1]);

        ctx4.beginPath();
        ctx4.moveTo(point1[0],point1[1]);
        ctx4.lineTo(point2[0],point2[1]);
        ctx4.lineTo(point3[0],point3[1]);
        ctx4.stroke();

        function drawPoint(x,y){
            ctx4.lineWidth=1;
            ctx4.strokeStyle="red";
            ctx4.strokeRect(x-2,y-2,4,4);
        }
    </script>
<canvas id="canvas5" width="500" height="140">
您的浏览器不支持<code>canvas</code>!
</canvas>
3) ベジェ曲線を描く
bezierCur veTo(cx 1,cy1,cx2,cy2,x,y) — — 点 (x, y) にベジェ曲線を描きます。制御点は (cx1, cy1) と (cx2, cy2) です。quadraticCurveTo(cx,xy,x,y)—二次曲線を描きます。点 (x, y) へのベジェ曲線、制御点は (cx, cy) です。 () ——新しいトリミング領域を作成します

    <script>
        //响应鼠标移动绘制圆弧
        var canvasElem = document.getElementById("canvas5");
        var ctx5 = canvasElem.getContext("2d");

        var point1 = [100, 10];
        var point2 = [200, 10];
        var point3 = [200, 110];

        draw();

        canvasElem.onmousemove = function (e) {
            if (e.ctrlKey) {
                point1 = [e.clientX, e.clientY];
            } else if(e.shiftKey) {
                point2 = [e.clientX, e.clientY];
            } else {
                point3 = [e.clientX, e.clientY];
            }
            ctx5.clearRect(0, 0, 540, 140);
            draw();
        }

        function draw() {

            ctx5.fillStyle = "yellow";
            ctx5.strokeStyle = "black";
            ctx5.lineWidth = 4;

            ctx5.beginPath();
            ctx5.moveTo(point1[0], point1[1]);
            ctx5.arcTo(point2[0], point2[1], point3[0], point3[1], 50);
            ctx5.stroke();

            drawPoint(point1[0], point1[1]);
            drawPoint(point2[0], point2[1]);
            drawPoint(point3[0], point3[1]);

            ctx5.beginPath();
            ctx5.moveTo(point1[0], point1[1]);
            ctx5.lineTo(point2[0], point2[1]);
            ctx5.lineTo(point3[0], point3[1]);
            ctx5.stroke();
        }

        function drawPoint(x, y) {
            ctx5.lineWidth = 1;
            ctx5.strokeStyle = "red";
            ctx5.strokeRect(x -2, y-2, 4, 4);
        }
    </script>
<canvas id="canvas6" width="500" height="140">
您的浏览器不支持<code>canvas</code>!
</canvas>
 5) テキストを描画します:
fillText(
strokeText(
font——设置绘制文本时使用的字体;
textAlign——设置文本的对齐方式:start、end、left、right、center;
textBaseline——设置文本的基线:top、hanging、middle、alphabetic、ideographic、bottom;
6)使用特效和转换:
6.1)使用阴影:
shadowBlur——设置阴影的模糊程度;
shadowColor——设置阴影的颜色;
shadowOffsetX——设置阴影的水平偏移量;
shadowOffsetY——设置阴影的垂直偏移量;
   <canvas id="canvas8" width="500" height="140">
        您的浏览器不支持<code>canvas</code>!
    </canvas>
<script>
//给图形和文本应用阴影
var ctx8=document.getElementById("canvas8").getContext("2d");
ctx8.fillStyle="lightgrey";
ctx8.strokeStyle="black";
ctx8.lineWidth=3;
ctx8.shadowOffsetX=5;
ctx8.shadowOffsetY=5;
ctx8.shadowBlur=5;
ctx8.shadowColor="grey";
ctx8.beginPath();
ctx8.arc(420,70,50,0,Math.PI,true);
ctx8.stroke();
ctx8.beginPath();
ctx8.arc(420,80,40,0,Math.PI,false);
ctx8.fill();
ctx8.font="100px sans-serif";
ctx8.fillText("hello",50,100);
ctx8.strokeText("hello",50,100);
</script>
6.2)使用透明度:
globalAlpha——给文本和图形设置透明度(从0到1);
    <canvas id="canvas9" width="300" height="120">
        您的浏览器不支持<code>canvas</code>!
    </canvas>
<script>
//使用globalAlpha属性,设置透明度
var ctx9=document.getElementById("canvas9").getContext("2d");
ctx9.fillStyle="lightgrey";
ctx9.strokeStyle="black";
ctx9.lineWidth=3;
ctx9.font="100px sans-serif";
ctx9.fillText("hello",10,100);
ctx9.strokeText("hello",10,100);
ctx9.fillStyle="red";
ctx9.globalAlpha=0.5;
ctx9.fillRect(10,10,240,100);
</script>
6.3)使用合成:
globalCompositeOperation——与透明度属性结合使用,来控制图形和文本在画布上绘制的方式;
globalCompositeOperation允许的值:
=copy——将来源绘制于目标之上,忽略一切透明度设置;
=source-atop——在两个图像都不透明处显示来源图像,
目标图像不透明但来源图像透明处显示目标图像,其它位置显示为透明;
=source-in——来源图像和目标图像都不透明处显示来源图像。其它位置显示为透明;
=source-out——来源图像不透明但目标图像透明处显示来源图像。其它位置显示为透明;
=source-over——来源图像不透明处显示来源图像。其它位置显示目标图像;
=destination-atop——与source-atop相同,但用目标图像替代来源图像,反之亦然;
=destination-in——与source-in相同,但用目标图像替代来源图像,反之亦然;
=destination-over——与source-over相同,但用目标图像替代来源图像,反之亦然;
=destination-out——与source-out相同,但用目标图像替代来源图像,反之亦然;
=lighter——显示来源图像与目标图像的总和,颜色值限制最高255(100%);
=xor——对来源图像和目标图像执行异或运算;
    <canvas id="canvas10" width="300" height="120">
        您的浏览器不支持<code>canvas</code>!
    </canvas>
    <label>Comosition Value:</label>
    <select id="list">
        <option>copy</option>
        <option>destination-atop</option>
        <option>destination-in</option>
        <option>destination-over</option>
        <option>destination-out</option>
        <option>lighter</option>
        <option>source-atop</option>
        <option>source-in</option>
        <option>source-out</option>
        <option>source-over</option>
        <option>xor</option>
    </select>
<script>
//使用globalCompositeOperation属性
var ctx10=document.getElementById("canvas10").getContext("2d");
ctx10.fillStyle="lightgrey";
ctx10.strokeStyle="black";
ctx10.lineWidth=3;
var compVal="copy";
document.getElementById("list").onchange=function(e){
compVal= e.target.value;
draw();
}
draw();
function draw(){
ctx10.clearRect(0,0,300,120);
ctx10.globalAlpha=1.0;
ctx10.font="100px sans-serif";
ctx10.fillText("hello",10,100);
ctx10.strokeText("hello",10,100);
ctx10.globalCompositeOperation=compVal;
ctx10.fillStyle="red";
ctx10.globalAlpha=0.5;
ctx10.fillRect(100,10,150,100);
}
</script>
6.4)使用变换:
scale(
rotate(
translate(
transform(a,b,c,d,e,f)——合并现有的变换和a-f值所指定的矩阵;
setTansform(a,b,c,d,e,f)——用a-f值所指定的矩阵替换现有的变换;
    <canvas id="canvas11" width="400" height="200">
        您的浏览器不支持<code>canvas</code>!
    </canvas>
<script>
//使用变换
var ctx11=document.getElementById("canvas11").getContext("2d");
ctx11.fillStyle="lightgrey";
ctx11.strokeStyle="black";
ctx11.lineWidth=3;
ctx11.clearRect(0,0,300,120);
ctx11.globalAlpha=1.0;
ctx11.font="100px sans-serif";
ctx11.fillText("hello",10,100);
ctx11.strokeText("hello",10,100);
ctx11.scale(1.3,1.3);
ctx11.translate(100,-50);
ctx11.rotate(0.5);
ctx11.fillStyle="red";
ctx11.globalAlpha=0.5;
ctx11.fillRect(100,10,150,100);
ctx11.strokeRect(0,0,300,200);
</script>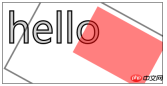
以上がHTML5キャンバスアドバンストコードの詳細コード説明(写真)の詳細内容です。詳細については、PHP 中国語 Web サイトの他の関連記事を参照してください。

 H5コードの理解:HTML5の基礎Apr 17, 2025 am 12:08 AM
HTML5は、最新のWebページを構築するための重要なテクノロジーであり、多くの新しい要素と機能を提供します。 1。HTML5は、Webページの構造とSEOを強化するなどのセマンティック要素を導入します。 2。プラグインなしのマルチメディア要素と埋め込みメディアをサポートします。 3.フォームは、新しい入力タイプと検証プロパティを強化し、検証プロセスを簡素化します。 4.オフラインおよびローカルストレージ機能を提供して、Webページのパフォーマンスとユーザーエクスペリエンスを向上させます。
 H5コード:Web開発者向けのベストプラクティスApr 16, 2025 am 12:14 AM
H5コードのベストプラクティスには以下が含まれます。1。正しいDoctype宣言と文字エンコーディングを使用します。 2。セマンティックタグを使用します。 3。HTTPリクエストを削減します。 4.非同期負荷を使用します。 5。画像を最適化します。これらのプラクティスは、Webページの効率、保守性、ユーザーエクスペリエンスを向上させることができます。
 H5:Web標準とテクノロジーの進化Apr 15, 2025 am 12:12 AM
Web標準とテクノロジーは、これまでにHTML4、CSS2、および単純なJavaScriptから進化し、重要な開発を受けてきました。 1)HTML5は、CanvasやWebstorageなどのAPIを導入し、Webアプリケーションの複雑さと互換性を高めます。 2)CSS3はアニメーション関数とトランジション関数を追加して、ページをより効果的にします。 3)JavaScriptは、矢印関数やクラスなど、node.jsおよびES6の最新の構文を通じて開発効率とコードの読みやすさを向上させます。これらの変更により、パフォーマンスの最適化とWebアプリケーションのベストプラクティスの開発が促進されました。
 H5はHTML5の速記ですか?詳細の調査Apr 14, 2025 am 12:05 AM
H5はHTML5の略語だけでなく、より広い最新のWeb開発テクノロジーエコシステムを表しています。1。H5にはHTML5、CSS3、JavaScript、および関連するAPIおよびテクノロジーが含まれます。 2.より豊かでインタラクティブでスムーズなユーザーエクスペリエンスを提供し、複数のデバイスでシームレスに実行できます。 3. H5テクノロジースタックを使用して、レスポンシブWebページと複雑なインタラクティブ機能を作成できます。
 H5およびHTML5:Web開発で一般的に使用される用語Apr 13, 2025 am 12:01 AM
H5とHTML5は、同じこと、つまりHTML5を参照します。 HTML5はHTMLの5番目のバージョンであり、セマンティックタグ、マルチメディアサポート、キャンバスとグラフィックス、オフラインストレージ、ローカルストレージなどの新しい機能をもたらし、Webページの表現力と互換性を向上させます。
 H5は何を参照していますか?コンテキストの探索Apr 12, 2025 am 12:03 AM
H5ReferStoHtml5、apivotaltechnologyinwebdevelopment.1)html5introduceSnewelementsandapisforrich、dynamicwebapplications.2)Itupp ortsmultimediawithoutplugins、endancingurexperiencecrossdevices.3)semanticelementsimprovecontentstructurendseo.4)H5'srespo
 H5:ツール、フレームワーク、およびベストプラクティスApr 11, 2025 am 12:11 AM
H5開発で習得する必要があるツールとフレームワークには、Vue.JS、React、Webpackが含まれます。 1.Vue.jsは、ユーザーインターフェイスの構築に適しており、コンポーネント開発をサポートします。 2.複雑なアプリケーションに適した仮想DOMを介したページレンダリングを最適化します。 3.Webpackは、モジュールのパッケージングに使用され、リソースの読み込みを最適化します。
 HTML5の遺産:現在のH5の理解Apr 10, 2025 am 09:28 AM
html5hassificlytransformdedwebdeveverment byintroducingsingingelements、endincemultimediasupport、およびrequrovingperformance.1)itmadewebsitesmoreaccessibleandseo-frendlywithsemantelementslike、and.2)


ホットAIツール

Undresser.AI Undress
リアルなヌード写真を作成する AI 搭載アプリ

AI Clothes Remover
写真から衣服を削除するオンライン AI ツール。

Undress AI Tool
脱衣画像を無料で

Clothoff.io
AI衣類リムーバー

AI Hentai Generator
AIヘンタイを無料で生成します。

人気の記事
ホットツール

EditPlus 中国語クラック版
サイズが小さく、構文の強調表示、コード プロンプト機能はサポートされていません

mPDF
mPDF は、UTF-8 でエンコードされた HTML から PDF ファイルを生成できる PHP ライブラリです。オリジナルの作者である Ian Back は、Web サイトから「オンザフライ」で PDF ファイルを出力し、さまざまな言語を処理するために mPDF を作成しました。 HTML2FPDF などのオリジナルのスクリプトよりも遅く、Unicode フォントを使用すると生成されるファイルが大きくなりますが、CSS スタイルなどをサポートし、多くの機能強化が施されています。 RTL (アラビア語とヘブライ語) や CJK (中国語、日本語、韓国語) を含むほぼすべての言語をサポートします。ネストされたブロックレベル要素 (P、DIV など) をサポートします。

SublimeText3 中国語版
中国語版、とても使いやすい

ゼンドスタジオ 13.0.1
強力な PHP 統合開発環境

Dreamweaver Mac版
ビジュアル Web 開発ツール

