ホームページ >Java >&#&チュートリアル >Android でのカスタマイズされたビューで横方向のスライド効果を実現
Android でのカスタマイズされたビューで横方向のスライド効果を実現
- 高洛峰オリジナル
- 2017-01-13 10:34:551302ブラウズ
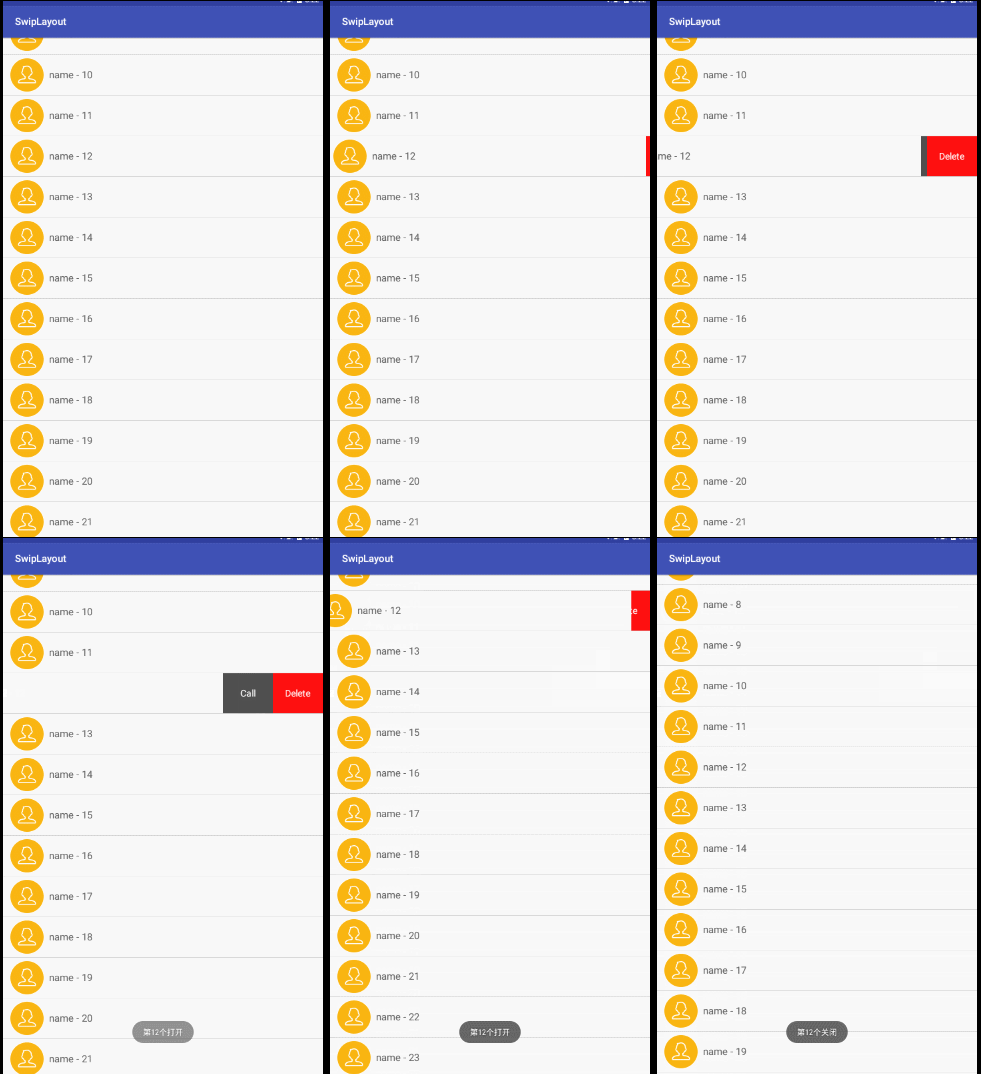
レンダリング:

インターネット上では、2 つのビューが結合されています。デフォルトでは、右側のビューは表示されません。水平方向に移動すると、右側のビューが表示されます。ただし、QQの最新バージョンの効果はこのようなものではありませんが、非常に良い感じなので、高い模造品を使用する方が良いです。
知識ポイント:
1. ViewDragHelper の使用法2. カスタマイズされたビューグループ。
ViewDragHelper は以前から存在しており、誰もがよく知っていると思います。詳しくない場合は、次の簡単な使用方法を参照してください。 tryCaptureView(View child, int pointerId): どの子ビューが使用できるかを決定します。 スライド
2. getViewhorizontalDragRange(View child): 私の下手な英語で翻訳すると、「0 の場合、水平方向に移動できる子ビューのサイズをピクセル単位で返します。」 '
int dx, int dy): ビューがキャプチャされ、ドラッグまたは設定によって位置が変更された場合のコールバック
その基本的な使用法は次のとおりです:
1)、コンストラクターで作成
2)、onInterceptTouchEvent でインターセプトするかどうかを決定
3)、onTouchEvent でイベントが出てきます
さて、一番分かりにくかった問題は解決しました。次に、具体的な実装を見てみましょう:
まず、レイアウトを見てください:
public SwipeLayout(Context context, AttributeSet attrs, int defStyle) {
    super(context, attrs, defStyle);
    init();
  }
  private void init() {
    viewDragHelper = ViewDragHelper.create(this, callback);
  }
   public boolean onInterceptTouchEvent(MotionEvent ev) {
    boolean result = viewDragHelper.shouldInterceptTouchEvent(ev);
   }
   public boolean onTouchEvent(MotionEvent event) {
    viewDragHelper.processTouchEvent(event);
    return true;
  }
これについては、特に言うことはありません。カスタム ビューグループには 2 つのサブコントロールが含まれています。
次に、SwipeLayout がどのように実装されるかを見てみましょう:
<LinearLayout xmlns:android="http://schemas.android.com/apk/res/android"
  android:layout_width="match_parent"
  android:layout_height="wrap_content"
  android:orientation="vertical" >
  <scrollviewgroup.lly.com.swiplayout.SwipeLayout
    android:id="@+id/swipeLayout"
    android:layout_width="match_parent"
    android:layout_height="wrap_content" >
    <!-- delete区域的布局 -->
    <include layout="@layout/layout_delete" />
    <!-- item内容的布局 -->
    <include layout="@layout/layout_content" />
  </scrollviewgroup.lly.com.swiplayout.SwipeLayout>
</LinearLayout>
ここでは、最初に deleteView を描画し、それを右側に配置して、いくつかの初期化操作を実行します。上に contentView のレイヤーを追加して、表示時に contentView のみが表示されるようにします。
次に、ontouch メソッドを見てみましょう
@Override
  protected void onFinishInflate() {
    super.onFinishInflate();
    deleteView = getChildAt(0);
    contentView = getChildAt(1);
  }
  @Override
  protected void onSizeChanged(int w, int h, int oldw, int oldh) {
    super.onSizeChanged(w, h, oldw, oldh);
    deleteHeight = deleteView.getMeasuredHeight();
    deleteWidth = deleteView.getMeasuredWidth();
    contentWidth = contentView.getMeasuredWidth();
    screenWidth = getWidth();
  }
  @Override
  protected void onLayout(boolean changed, int left, int top, int right,
              int bottom) {
    // super.onLayout(changed, left, top, right, bottom);
    deleteView.layout(screenWidth - deleteWidth, 0, (screenWidth - deleteWidth)
        + deleteWidth, deleteHeight);
    contentView.layout(0, 0, contentWidth, deleteHeight);
  }
上記は主に、イベントの競合の処理に関するもので、水平方向に移動するときに、親ビューにそれを横取りしないよう要求します。
ここからが重要なポイントです
public boolean onTouchEvent(MotionEvent event) {
    //如果当前有打开的,则下面的逻辑不能执行
    if(!SwipeLayoutManager.getInstance().isShouldSwipe(this)){
      requestDisallowInterceptTouchEvent(true);
      return true;
    }
    switch (event.getAction()) {
      case MotionEvent.ACTION_DOWN:
        downX = event.getX();
        downY = event.getY();
        break;
      case MotionEvent.ACTION_MOVE:
        //1.获取x和y方向移动的距离
        float moveX = event.getX();
        float moveY = event.getY();
        float delatX = moveX - downX;//x方向移动的距离
        float delatY = moveY - downY;//y方向移动的距离
        if(Math.abs(delatX)>Math.abs(delatY)){
          //表示移动是偏向于水平方向,那么应该SwipeLayout应该处理,请求父view不要拦截
          requestDisallowInterceptTouchEvent(true);
        }
        //更新downX,downY
        downX = moveX;
        downY = moveY;
        break;
      case MotionEvent.ACTION_UP:
        break;
    }
    viewDragHelper.processTouchEvent(event);
    return true;
}上記のコードのメソッドについては冒頭で説明しましたが、getViewhorizontalDragRange でスライド範囲を制限しています。
private ViewDragHelper.Callback callback = new ViewDragHelper.Callback() {
    @Override
    public boolean tryCaptureView(View child, int pointerId) {
      return child==contentView;
    }
    @Override
    public int getViewHorizontalDragRange(View child) {
      return deleteWidth;
    }
    @Override
    public int clampViewPositionHorizontal(View child, int left, int dx) {
      if(child==contentView){
        if(left>0)left = 0;
        if(left<-deleteWidth)left = -deleteWidth;
      }
      return left;
    }
    @Override
    public void onViewPositionChanged(View changedView, int left, int top,
                     int dx, int dy) {
      super.onViewPositionChanged(changedView, left, top, dx, dy);
      //判断开和关闭的逻辑
      if(contentView.getLeft()==0 && currentState!=SwipeState.Close){
        //说明应该将state更改为关闭
        currentState = SwipeState.Close;
        //回调接口关闭的方法
        if(listener!=null){
          listener.onClose(getTag());
        }
        //说明当前的SwipeLayout已经关闭,需要让Manager清空一下
        SwipeLayoutManager.getInstance().clearCurrentLayout();
      }else if (contentView.getLeft()==-deleteWidth && currentState!=SwipeState.Open) {
        //说明应该将state更改为开
        currentState = SwipeState.Open;
        //回调接口打开的方法
        if(listener!=null){
          listener.onOpen(getTag());
        }
        //当前的Swipelayout已经打开,需要让Manager记录一下下
        SwipeLayoutManager.getInstance().setSwipeLayout(SwipeLayout.this);
      }
    }
    @Override
    public void onViewReleased(View releasedChild, float xvel, float yvel) {
      super.onViewReleased(releasedChild, xvel, yvel);
      if(contentView.getLeft()<-deleteWidth/2){
        //应该打开
        open();
      }else {
        //应该关闭
        close();
      }
    }
  };
ここで、computeScroll メソッドを書き直す必要があることに注意してください。そうしないと、移動した場合にスライド効果が機能しません。
これでカスタムフレームレイアウトが完成しました
しかし、スライドアウトしたビューで上下にスライドすると、このビューのdeleteViewが表示されたままになるため、アクティビティで対処する必要があります。 :
/**
  * 打开的方法
  */
 public void open() {
   viewDragHelper.smoothSlideViewTo(contentView,-deleteWidth,contentView.getTop());
   ViewCompat.postInvalidateOnAnimation(SwipeLayout.this);
 }
 /**
  * 关闭的方法
  */
 public void close() {
   viewDragHelper.smoothSlideViewTo(contentView,0,contentView.getTop());
   ViewCompat.postInvalidateOnAnimation(SwipeLayout.this);
 };
 public void computeScroll() {
   if(viewDragHelper.continueSettling(true)){
     ViewCompat.postInvalidateOnAnimation(this);
   }
 }
この RecyclerView は、上下にスライドするとサブビューをリセットします。
これで完了です。 追記: 元々はEclipseのlistviewで実装していましたが、GoogleがEclipseをサポートしなくなったことと、listviewがRecyclerViewに置き換えられようとしていることを考慮して、最終的にAndroid Studioに切り替えてRecyclerViewを使用して実装しました。 上記は、横スライド効果を実現するための編集者の紹介です。ご質問がございましたら、メッセージを残してください。編集者がすぐに返信します。 。また、PHP 中国語 Web サイトをサポートしていただきありがとうございます。
横方向のスライド効果を実現するための Android でのビューのカスタマイズに関連するその他の記事については、PHP 中国語 Web サイトに注目してください。

