ホームページ >ウェブフロントエンド >jsチュートリアル >Vue.js コンポーネントを数分で説明します
Vue.js コンポーネントを数分で説明します
- 高洛峰オリジナル
- 2017-03-25 11:18:132108ブラウズ
コンポーネントの紹介
コンポーネント システムは、Vue.js の重要な概念の 1 つであり、独立した再利用可能な小さなコンポーネントを使用して大規模なアプリケーションを構築できるようにする抽象化を提供します。コンポーネント ツリー:
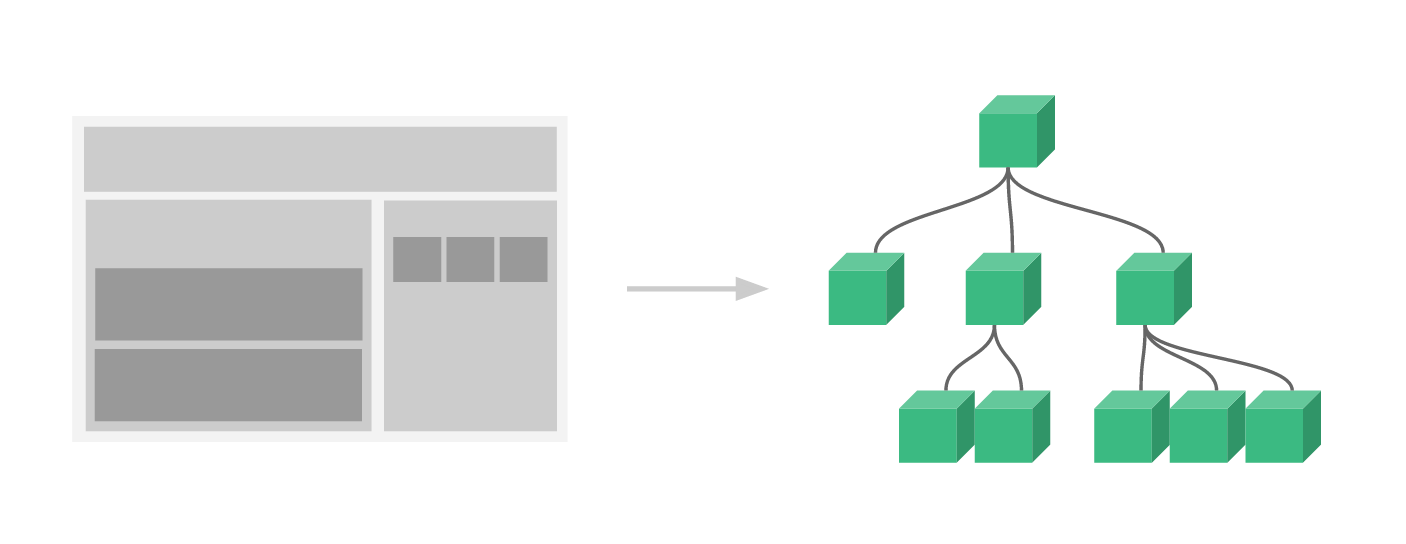
それでは、コンポーネントとは何でしょうか?
コンポーネントは HTML 要素を拡張し、再利用可能な HTML コードをカプセル化できます。コンポーネントはカスタム HTML 要素と考えることができます。
コンポーネントの作成と登録
基本手順
Vue.js コンポーネントを使用するには、コンポーネント コンストラクターの作成、コンポーネントの登録、コンポーネントの使用の 3 つの手順があります。
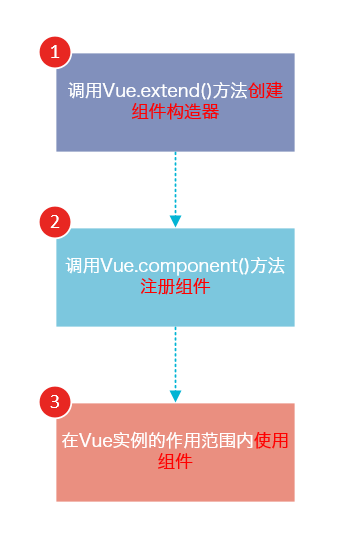
次のコードは、これら 3 つのステップを示しています:
<!DOCTYPE html>
<html>
<body>
<p id="app">
<!-- 3. #app是Vue实例挂载的元素,应该在挂载元素范围内使用组件-->
<my-component></my-component>
</p>
</body>
<script src="js/vue.js"></script>
<script>
// 1.创建一个组件构造器
var myComponent = Vue.extend({
template: '<p>This is my first component!</p>'
})
// 2.注册组件,并指定组件的标签,组件的HTML标签为<my-component>
Vue.component('my-component', myComponent)
new Vue({
el: '#app'
});
</script>
</html>実行結果は次のとおりです:

ご覧のとおり、コンポーネントを使用する場合と通常の HTML 要素を使用する場合に違いはありません。
コンポーネントの作成と登録を理解する
コンポーネントの作成と登録を理解するには、次の手順を使用します。
1. Vue.extend() は、Vue コンストラクターの拡張機能です。Vue.extend() を呼び出すと、具体的なコンポーネント インスタンスではなく、コンポーネント コンストラクター。
2. Vue.extend() コンストラクターにはオプション オブジェクトがあり、オプション オブジェクトのテンプレート属性はコンポーネントによってレンダリングされる HTML を定義するために使用されます。
3. Vue.component() を使用してコンポーネントを登録する場合、最初のパラメーターはコンポーネントのラベル、2 番目のパラメーターはコンポーネントのコンストラクターを指定する必要があります。
4. Vue.component() メソッドは内部でコンポーネント コンストラクターを呼び出し、コンポーネント インスタンスを作成します。
5. コンポーネントは Vue インスタンスにマウントされる必要があります。そうしないと有効になりません。
ポイント 5 に注意してください。次のコードでは 3 か所で my-component タグが使用されていますが、#app1 と #app2 の下の my-component タグのみが機能します。
<!DOCTYPE html>
<html>
<body>
<p id="app1">
<my-component></my-component>
</p>
<p id="app2">
<my-component></my-component>
</p>
<!--该组件不会被渲染-->
<my-component></my-component>
</body>
<script src="js/vue.js"></script>
<script>
var myComponent = Vue.extend({
template: '<p>This is a component!</p>'
})
Vue.component('my-component', myComponent)
var app1 = new Vue({
el: '#app1'
});
var app2 = new Vue({
el: '#app2'
})
</script>
</html>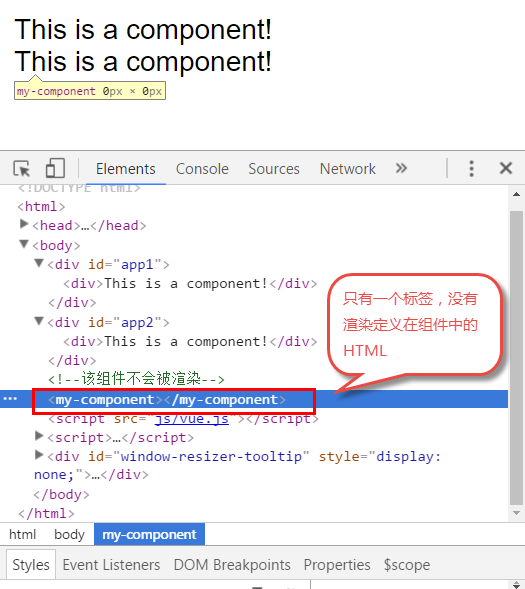
グローバル登録とローカル登録
Vue.component() を呼び出してコンポーネントを登録する場合、コンポーネントの登録はグローバルです。つまり、コンポーネントは任意の Vue サンプルで使用できます。
グローバル登録が必要ない場合、またはコンポーネントを他のコンポーネントで使用したい場合は、オプション オブジェクトのコンポーネント属性を使用してローカル登録を実装できます。
上記の例はローカル登録に変更できます:
<!DOCTYPE html>
<html>
<body>
<p id="app">
<!-- 3. my-component只能在#app下使用-->
<my-component></my-component>
</p>
</body>
<script src="js/vue.js"></script>
<script>
// 1.创建一个组件构造器
var myComponent = Vue.extend({
template: '<p>This is my first component!</p>'
})
new Vue({
el: '#app',
components: {
// 2. 将myComponent组件注册到Vue实例下
'my-component' : myComponent
}
});
</script>
</html>
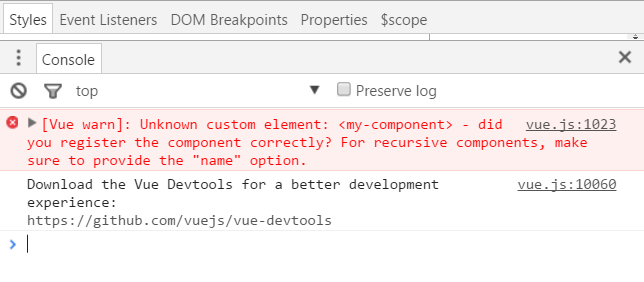
由于my-component组件是注册在#app元素对应的Vue实例下的,所以它不能在其它Vue实例下使用。
<p id="app2">
<!-- 不能使用my-component组件,因为my-component是一个局部组件,它属于#app-->
<my-component></my-component>
</p>
<script>
new Vue({
el: '#app2'
});
</script>これを行うと、ブラウザはエラーを表示します:
親コンポーネントと子コンポーネント
コンポーネント内で他のコンポーネントを定義して使用できます。親コンポーネントと子コンポーネント間の関係を構成します。
<!DOCTYPE html>
<html>
<body>
<p id="app">
<parent-component>
</parent-component>
</p>
</body>
<script src="js/vue.js"></script>
<script>
var Child = Vue.extend({
template: '<p>This is a child component!</p>'
})
var Parent = Vue.extend({
// 在Parent组件内使用<child-component>标签
template :'<p>This is a Parent component</p><child-component></child-component>',
components: {
// 局部注册Child组件,该组件只能在Parent组件内使用
'child-component': Child
}
})
// 全局注册Parent组件
Vue.component('parent-component', Parent)
new Vue({
el: '#app'
})
</script>
</html>このコードの実行結果は次のとおりです:
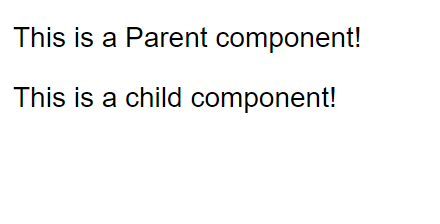
このコードを理解するためにいくつかの手順を実行します:
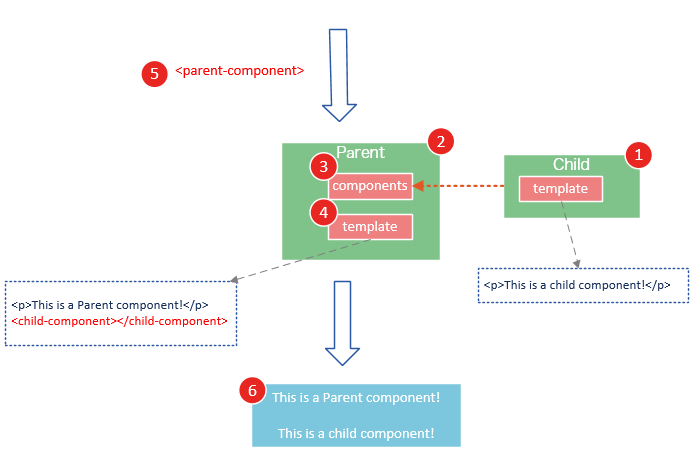
このコードを理解するためにいくつかの手順を実行します:
var Child = Vue.extend(…)定义一了个Child组件构造器
var Parent = Vue.extend(…)定义一个Parent组件构造器
components: { ‘child-component': Child },将Child组件注册到Parent组件,
并将Child组件的标签设置为child-component。
template :'<p>This is a Parent component</p>
<child-component></child-component>',在Parent组件内以标签的形式使用Child组件。
Vue.component(‘parent-component', Parent) 全局注册Parent组件ページ内で親をレンダリングするためにタグを使用します。コンポーネントのコンテンツと同時に、子コンポーネントのコンテンツもレンダリングされます
子コンポーネントは親コンポーネントに登録され、親コンポーネントでのみ使用できます。正確には、子コンポーネントはのみ使用できます。テンプレートで使用される親コンポーネントで使用されます。
次の 2 つのサブコンポーネントの使用方法は間違っていることに注意してください:
1.
<p id="app">
 <parent-component>
 <child-component></child-component>
 </parent-component>
</p>
を子タグとして親コンポーネントで使用する
なぜこのメソッドは無効なのでしょうか?子コンポーネントが親コンポーネントに登録されると、Vue.js は親コンポーネントのテンプレートをコンパイルし、テンプレートのコンテンツによって親コンポーネントがレンダリングする HTML がすでに決定されているためです。
parent-component はランタイムと同等であり、その子タグの一部は通常の HTML タグとしてのみ実行されるため、ブラウザーによって直接無視されます。
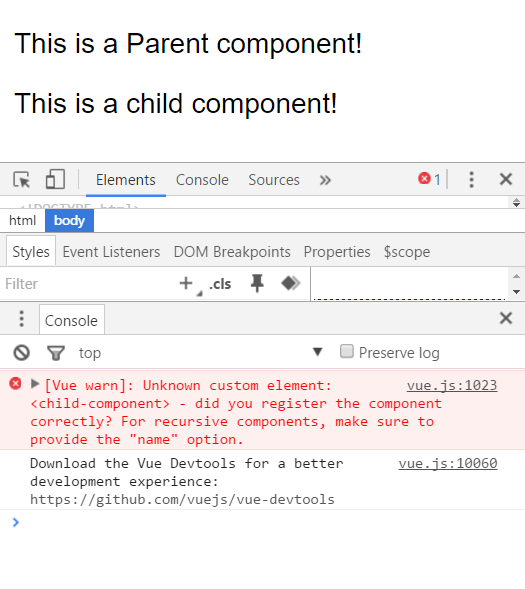
2. このコードを実行するには、親コンポーネント タグの外側で子コンポーネント
<p id="app">
 <parent-component>
 </parent-component>
 <child-component>
 </child-component>
</p>
を使用します。ブラウザは次のエラーを表示します
コンポーネント登録の構文シュガー
上記のコンポーネント登録方法は少し面倒です。 Vue.js はそれを簡素化します。このプロセスは登録構文の糖衣を提供します。
コンポーネントを直接作成して登録するには、Vue.component() を使用します。
// 全局注册,my-component1是标签名称
Vue.component('my-component1',{
template: '<p>This is the first component!</p>'
})
var vm1 = new Vue({
el: '#app1'
}) Vue.component() の最初のパラメーターはラベル名で、2 番目のパラメーターはオプション オブジェクトのテンプレート属性を使用します。コンポーネント テンプレートを定義します。
このメソッドを使用すると、Vue はバックグラウンドで自動的に Vue.extend() を呼び出します。
オプションオブジェクトのコンポーネント属性にローカル登録を実装します:
var vm2 = new Vue({
el: '#app2',
components: {
// 局部注册,my-component2是标签名称
'my-component2': {
template: '<p>This is the second component!</p>'
},
// 局部注册,my-component3是标签名称
'my-component3': {
template: '<p>This is the third component!</p>'
}
}
})スクリプトまたはテンプレートタグを使用します
尽管语法糖简化了组件注册,但在template选项中拼接HTML元素比较麻烦,这也导致了HTML和JavaScript的高耦合性。
庆幸的是,Vue.js提供了两种方式将定义在JavaScript中的HTML模板分离出来
使用script标签
<!DOCTYPE html>
<html>
<body>
<p id="app">
<my-component></my-component>
</p>
<script type="text/x-template" id="myComponent">
<p>This is a component!</p>
</script>
</body>
<script src="js/vue.js"></script>
<script>
Vue.component('my-component',{
template: '#myComponent'
})
new Vue({
el: '#app'
})
</script>
</html>template选项现在不再是HTML元素,而是一个id,Vue.js根据这个id查找对应的元素,然后将这个元素内的HTML作为模板进行编译。
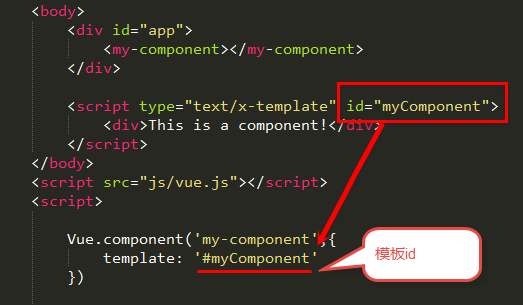
注意:使用script标签时,type指定为text/x-template,意在告诉浏览器这不是一段js脚本,浏览器在解析HTML文档时会忽略script标签内定义的内容。

使用template标签
如果使用template>标签,则不需要指定type属性。
<!DOCTYPE html>
<html>
<head>
<meta charset="UTF-8">
<title></title>
</head>
<body>
<p id="app">
<my-component></my-component>
</p>
<template id="myComponent">
<p>This is a component!</p>
</template>
</body>
<script src="js/vue.js"></script>
<script>
Vue.component('my-component',{
template: '#myComponent'
})
new Vue({
el: '#app'
})
</script>
</html>在理解了组件的创建和注册过程后,我建议使用script>或template>标签来定义组件的HTML模板。
这使得HTML代码和JavaScript代码是分离的,便于阅读和维护。
另外,在Vue.js中,可创建.vue后缀的文件,在.vue文件中定义组件,这个内容我会在后面的文章介绍
组件的el和data选项
传入Vue构造器的多数选项也可以用在 Vue.extend() 或Vue.component()中,不过有两个特例: data 和el。
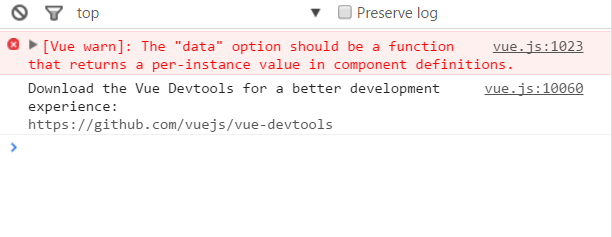
Vue.js规定:在定义组件的选项时,data和el选项必须使用函数。
下面的代码在执行时,浏览器会提出一个错误
Vue.component('my-component', {
 data: {
 a: 1
 }
}) 
另外,如果data选项指向某个对象,这意味着所有的组件实例共用一个data。
我们应当使用一个函数作为 data 选项,让这个函数返回一个新对象:
Vue.component('my-component', {
 data: function(){
 return {a : 1}
 }
})
使用props
组件实例的作用域是孤立的。这意味着不能并且不应该在子组件的模板内直接引用父组件的数据。可以使用 props 把数据传给子组件。
props基础示例
下面的代码定义了一个子组件my-component,在Vue实例中定义了data选项。
var vm = new Vue({
 el: '#app',
 data: {
 name: 'keepfool',
 age: 28
 },
 components: {
 'my-component': {
  template: '#myComponent',
  props: ['myName', 'myAge']
 }
 }
})
为了便于理解,你可以将这个Vue实例看作my-component的父组件。
如果我们想使用父组件的数据,则必须先在子组件中定义props属性,也就是props: [‘myName', ‘myAge']这行代码。
定义子组件的HTML模板:
 <template id="myComponent">
 <table>
 <tr>
  <th colspan="2">
  子组件数据
  </th>
 </tr>
 <tr>
  <td>my name</td>
  <td>{{ myName }}</td>
 </tr>
 <tr>
  <td>my age</td>
  <td>{{ myAge }}</td>
 </tr>
 </table>
</template>
将父组件数据通过已定义好的props属性传递给子组件:
<p id="app">
 <my-component v-bind:my-name="name" v-bind:my-age="age"></my-component>
</p>
注意:在子组件中定义prop时,使用了camelCase命名法。由于HTML特性不区分大小写,camelCase的prop用于特性时,需要转为 kebab-case(短横线隔开)。例如,在prop中定义的myName,在用作特性时需要转换为my-name。
这段程序的运行结果如下:

父组件是如何将数据传给子组件的呢?相信看了下面这图,也许你就能很好地理解了。
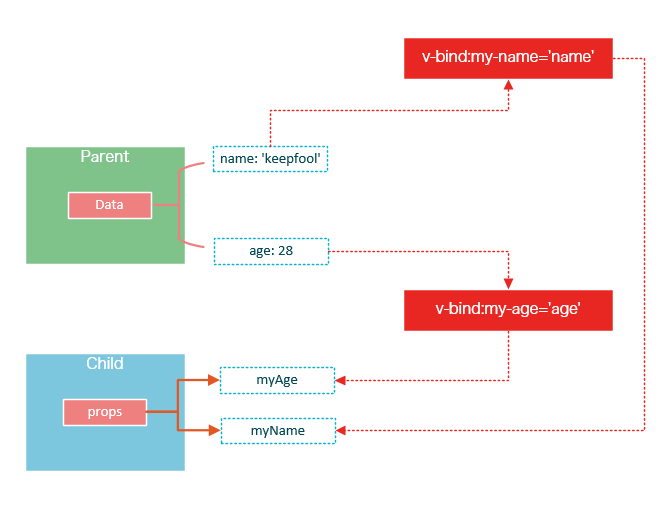
在父组件中使用子组件时,通过以下语法将数据传递给子组件:
<child-component v-bind:子组件prop="父组件数据属性"></child-component>
prop的绑定类型
单向绑定
既然父组件将数据传递给了子组件,那么如果子组件修改了数据,对父组件是否会有所影响呢?
我们将子组件模板和页面HTML稍作更改:
<p id="app">

 <table>
  <tr>
   <th colspan="3">父组件数据</td>
  </tr>
  <tr>
   <td>name</td>
   <td>{{ name }}</td>
   <td><input type="text" v-model="name" /></td>
  </tr>
  <tr>
   <td>age</td>
   <td>{{ age }}</td>
   <td><input type="text" v-model="age" /></td>
  </tr>
 </table>

 <my-component v-bind:my-name="name" v-bind:my-age="age"></my-component>
</p>

<template id="myComponent">
 <table>
  <tr>
   <th colspan="3">子组件数据</td>
  </tr>
  <tr>
   <td>my name</td>
   <td>{{ myName }}</td>
   <td><input type="text" v-model="myName" /></td>
  </tr>
  <tr>
   <td>my age</td>
   <td>{{ myAge }}</td>
   <td><input type="text" v-model="myAge" /></td>
  </tr>
 </table>
</template>
运行这个页面,我们做两个小试验:
1. 在页面上修改子组件的数据
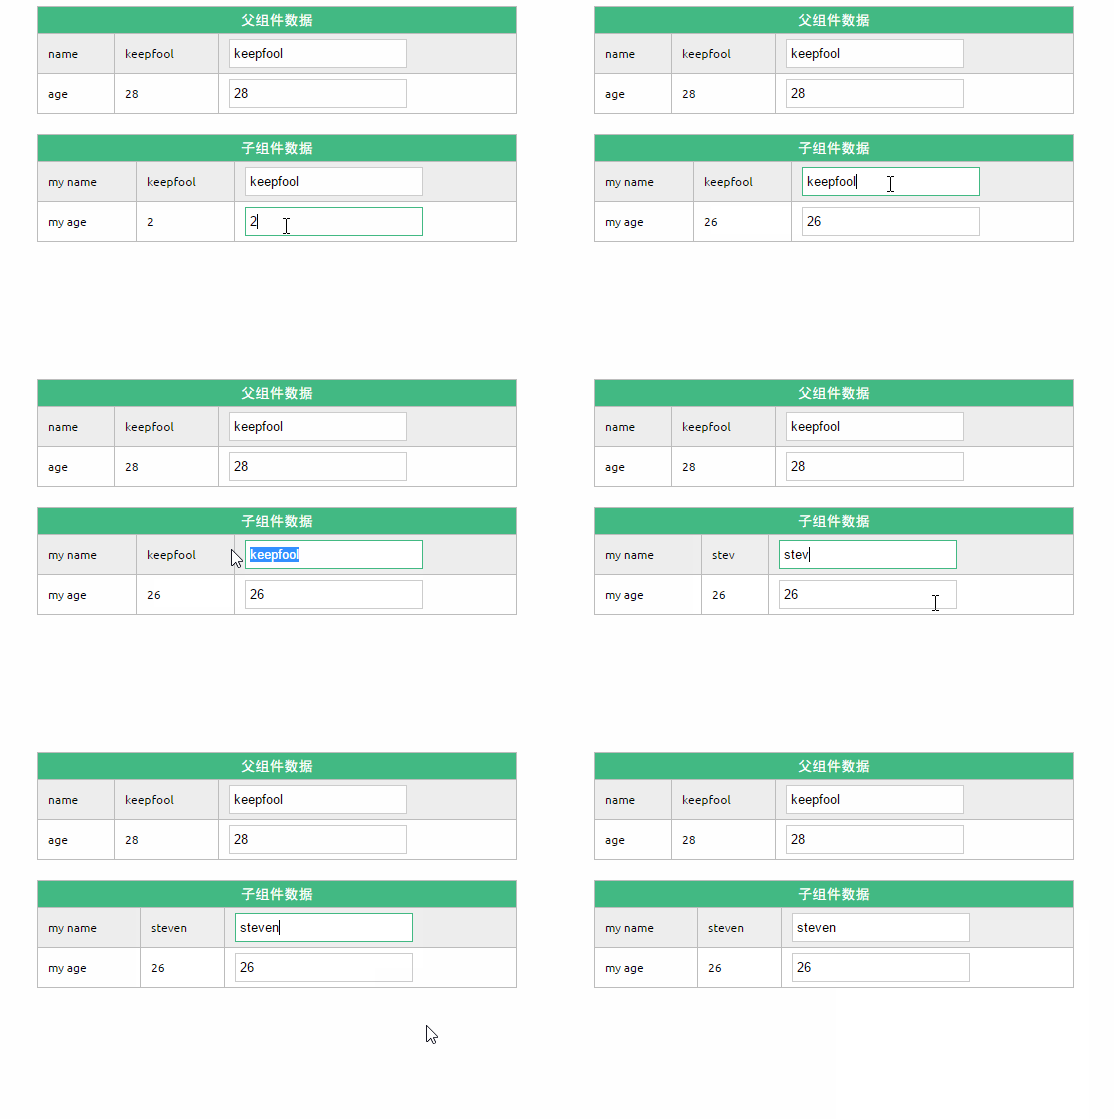
修改了子组件的数据,没有影响父组件的数据。
2. 在页面上修改父组件的数据
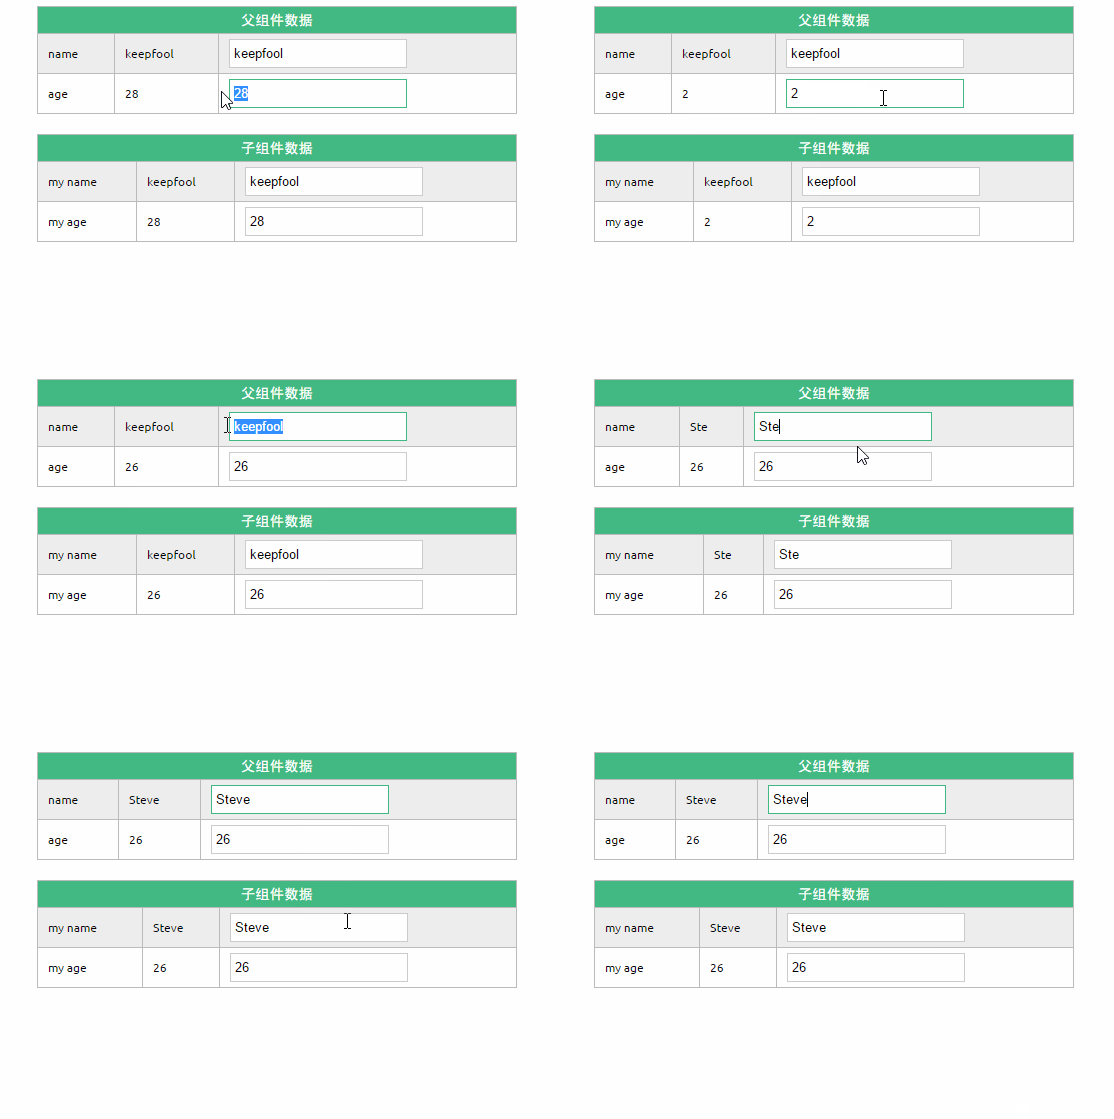
修改了父组件的数据,同时影响了子组件。
prop默认是单向绑定:当父组件的属性变化时,将传导给子组件,但是反过来不会。这是为了防止子组件无意修改了父组件的状态
双向绑定
可以使用.sync显式地指定双向绑定,这使得子组件的数据修改会回传给父组件。
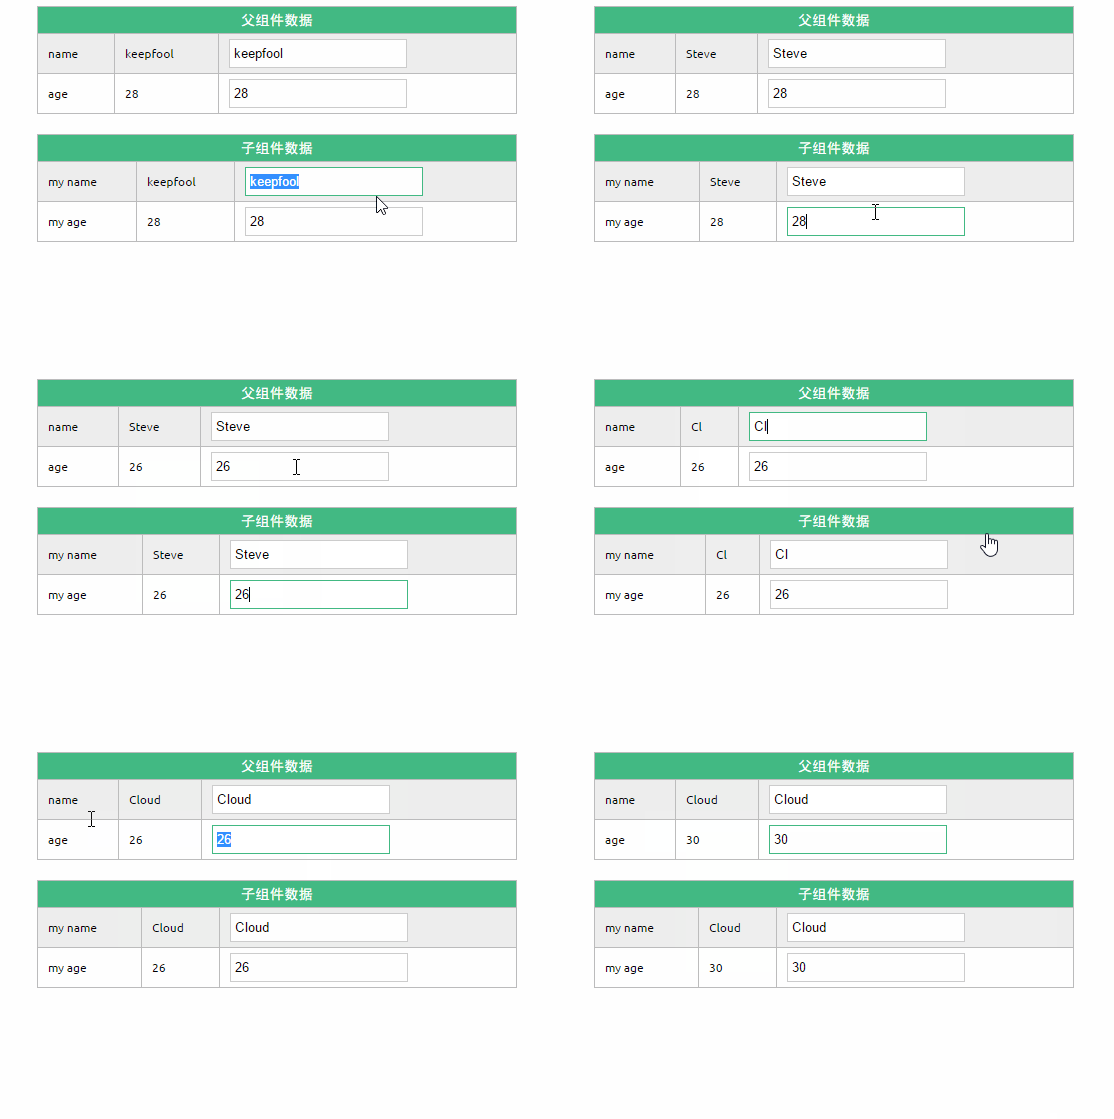
单次绑定
可以使用.once显式地指定单次绑定,单次绑定在建立之后不会同步之后的变化,这意味着即使父组件修改了数据,也不会传导给子组件。
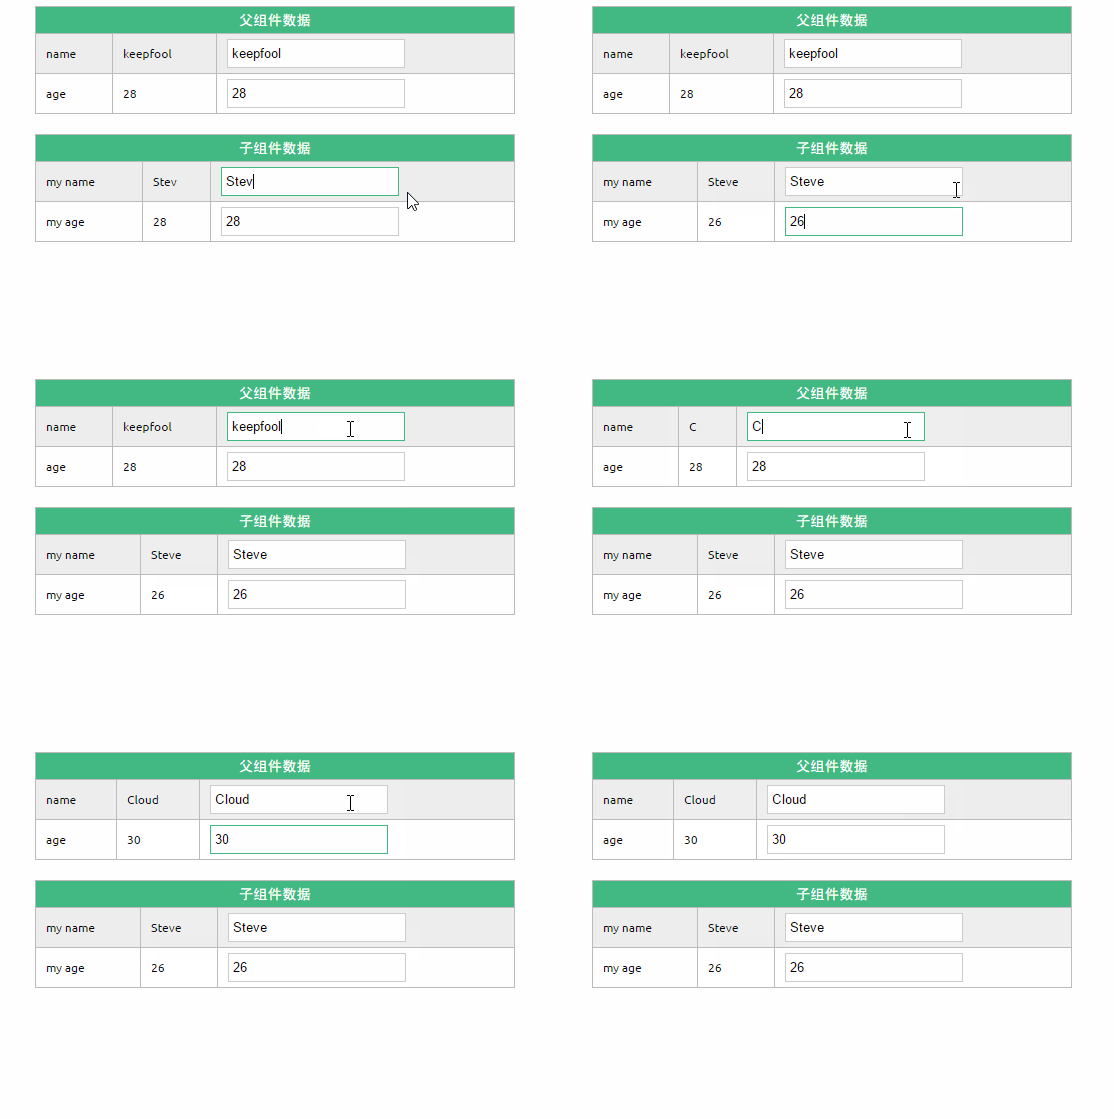
示例
为了尽快消化这些知识,我们来做一个小示例吧。
<!DOCTYPE html>
<html>
<head>
<meta charset="UTF-8">
<title></title>
<link rel="stylesheet" href="styles/demo.css" />
</head>
<body>
<p id="app">
<p id="searchBar">
Search <input type="text" v-model="searchQuery" />
</p>
<simple-grid :data="gridData" :columns="gridColumns" :filter-key="searchQuery">
</simple-grid>
</p>
<template id="grid-template">
<table>
<thead>
<tr>
<th v-for="col in columns">
{{ col | capitalize}}
</th>
</tr>
</thead>
<tbody>
<tr v-for="entry in data | filterBy filterKey">
<td v-for="col in columns">
{{entry[col]}}
</td>
</tr>
</tbody>
</table>
</template>
</body>
<script src="js/vue.js"></script>
<script>
Vue.component('simple-grid', {
template: '#grid-template',
props: {
 data: Array,
 columns: Array,
 filterKey: String
}
})
var demo = new Vue({
el: '#app',
data: {
searchQuery: '',
gridColumns: ['name', 'age', 'sex'],
gridData: [{
name: 'Jack',
age: 30,
sex: 'Male'
}, {
name: 'Bill',
age: 26,
sex: 'Male'
}, {
name: 'Tracy',
age: 22,
sex: 'Female'
}, {
name: 'Chris',
age: 36,
sex: 'Male'
}]
}
})
</script>
</html>
除了以上介绍的知识点,这个示例还用到了两个知识点:
1. prop验证
props: {
data: Array,
columns: Array,
filterKey: String
}
这段代码表示:父组件传递过来的data和columns必须是Array类型,filterKey必须是字符串类型。
更多prop验证的介绍,请参考:官方文档prop验证
2. filterBy过滤器
可以根据指定的字符串过滤数据。
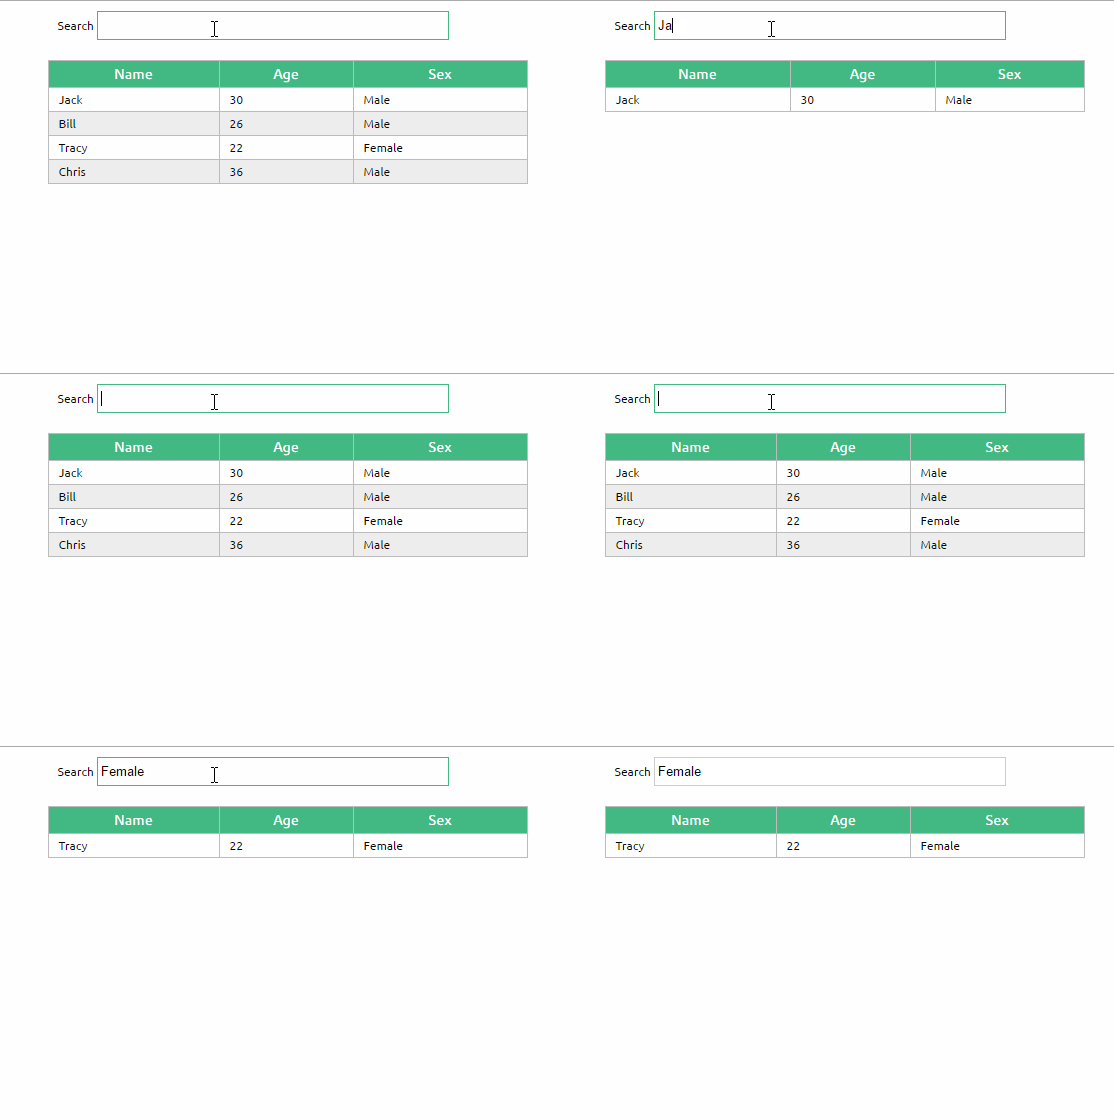
总结
使用组件的前提是创建并注册组件,本篇文章详细介绍了组件从创建到使用的步骤,并介绍了几种不同的方式去创建和注册组件;然后介绍了组件的props选项,它用于将父组件的数据传递给子组件,最后我们用一个小的示例演示了这些知识点。
相关文章:

