ホームページ >ウェブフロントエンド >jsチュートリアル >jQuery で実装された指紋スキャン効果の例 (デモとデモ ソース コードのダウンロード付き)_jquery
jQuery で実装された指紋スキャン効果の例 (デモとデモ ソース コードのダウンロード付き)_jquery
- WBOYWBOYWBOYWBOYWBOYWBOYWBOYWBOYWBOYWBOYWBOYWBOYWBオリジナル
- 2016-05-16 15:18:131479ブラウズ
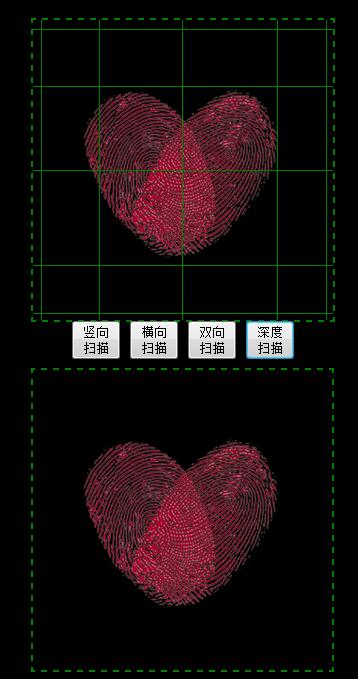
この記事の例では、jQuery によって実装された指紋スキャン効果について説明します。参考のために皆さんと共有してください。詳細は次のとおりです:
実行中のエフェクトのスクリーンショットは次のとおりです:

ここをクリックしてオンラインデモをご覧ください。
具体的なコードは次のとおりです:
<!DOCTYPE html>
<html>
<head>
<meta charset="UTF-8" />
<title>demo</title>
<style type="text/css">
body {
background:black;
}
.dialog {
width:300px; height:300px; position:fixed; left:50%; margin-left:-150px; border:2px dashed green;
top:50px;
}
.dialog .shape {
background:black; width:300px; height:300px; z-index:1;
}
.dialog .eye {
width:200px; height:200px; position:absolute; left:50px; top:50px;
z-index:2;
}
#container {
position:relative;
}
.line {
position:absolute; left:0px; top:0px; font-size:0px; z-index:10;
background:green;
}
.btnGroup {
text-align:center;
}
.btnGroup button {
width:50px; height:40px;
}
.dialog.output {
top:400px; display:none;
}
#power {
border:1px solid green; position:fixed; right:20px; bottom:20px;
color:green; line-height:50px; font-size:30px;
}
.title {
line-height:50px; font-size:25px; color:#8F8383; text-shadow:0px 0px 3px green;
text-align:center;
}
</style>
</head>
<body>
<div class="dialog">
<div id="container">
<div class="shape"></div>
<img src="finger.png" class="eye" />
</div>
<div class="btnGroup">
<button id="vSee">竖向扫描</button>
<button id="hSee">横向扫描</button>
<button id="bSee">双向扫描</button>
<button id="dSee">深度扫描</button>
</div>
</div>
<div class="dialog output" id="outputContainer">
<img src="finger.png" class="eye" />
</div>
</body>
<script type="text/javascript" src="jquery.js"></script>
<script type="text/javascript">
var container = $("#container");
var outputContainer = $("#outputContainer");
function Line(type) {
var self = this;
self.type = type || "V";
var body = $("<div class='line'></div>");
switch(this.type) {
case "V": // 竖直
body.css({
"width": "1px",
"height": "300px"
});
break;
case "H": // 水平
body.css({
"width": "300px",
"height": "1px"
});
break;
}
container.append(body);
self.body = body;
self.direct = self.type === "V" ? "R" : "B";
self.run = function() {
switch(self.direct) {
case "L":
self.body.animate({"left":0}, 1000, null, function() {
self.direct = "R";
self.run();
});
break;
case "R":
self.body.animate({"left":300}, 1000, null, function() {
self.direct = "L";
self.run();
});
break;
case "T":
self.body.animate({"top":0}, 1000, null, function() {
self.direct = "B";
self.run();
});
break;
case "B":
self.body.animate({"top":300}, 1000, null, function() {
self.direct = "T";
self.run();
});
break;
}
}
self.run();
}
var lineArray = [];
function output(type, time, opactiy) {
time = time || 2000;
var initHeight = type === "H" ? 0 : 300;
var initWidth = type === "H" ? 300 : 0;
type === "B" && (initHeight = initWidth = 0);
outputContainer.css({
"height": initHeight,
"width": initWidth,
"display": "block",
"opacity": opactiy || 1
});
outputContainer.animate({"height":300, "width":300}, time, null);
}
function clear() {
for(var i=0, len=lineArray.length; i<len; i++) {
var line = lineArray[i];
line.body.stop().remove();
}
container.find(".line").remove();
outputContainer.stop().css({"display": "none", "opacity": 0});
}
$("#hSee").click(function() {
clear();
lineArray.push(new Line("H"));
output("H", null, 0.5);
});
$("#vSee").click(function() {
clear();
lineArray.push(new Line("V"));
output("V", null, 0.5);
});
$("#bSee").click(function() {
clear();
lineArray.push(new Line("H"), new Line("V"));
output("B", 3500, 0.8);
});
$("#dSee").click(function() {
clear();
for(var i=0; i<5; i++) {
(function(index) {
setTimeout(function() {
lineArray.push(new Line("H"), new Line("V"));
}, index*200);
})(i);
}
output("B", 5000, 1.0);
});
</script>
</html>
完全なサンプルコードについては、ここをクリックしてくださいこのサイトからダウンロードしてください。
jQuery 特殊効果に関連するさらなるコンテンツに興味のある読者は、このサイトの特別トピック「jQuery アニメーションと特殊効果の使用法の概要」および「一般的な古典の概要」をチェックしてください。 jQuery 特殊効果"
この記事が jQuery プログラミングのすべての人に役立つことを願っています。
声明:
この記事の内容はネチズンが自主的に寄稿したものであり、著作権は原著者に帰属します。このサイトは、それに相当する法的責任を負いません。盗作または侵害の疑いのあるコンテンツを見つけた場合は、admin@php.cn までご連絡ください。

