ホームページ >バックエンド開発 >PHPチュートリアル >PHP(三): Smarty の使用を開始する
PHP(三): Smarty の使用を開始する
- WBOYWBOYWBOYWBOYWBOYWBOYWBOYWBOYWBOYWBOYWBOYWBOYWBオリジナル
- 2016-06-13 12:56:141149ブラウズ
PHP(3): Smarty
1 の使用を開始します。スマーティについて
PHP を使用して Web プログラミングを行う場合、問題の 1 つは、php ファイルが html コードと同じくらい長い php コードと混在する可能性があることです。ある時点で、それはあまりきれいではなく、安全でもありません。そして、その作業をバックエンドプログラマーとフロントエンドに分離することはできません。 プログラマー。したがって、開発プロセスを適切に整理し、維持するために、HTML コードから PHP ロジックを分離するツールが必要です。そこで、Smarty が登場します。
Smarty は Web テンプレートです システム PHP で書かれています。 Smarty は主に 分離のためのツールとして宣伝されています [1] Smarty の区画化を簡素化することを目的としており、 Web ページのプレゼンテーションをバックエンドとは別に変更します。理想的には、これにより ソフトウェアに関連するコストと労力が軽減されます。 メンテナンス。
Smarty は、ドキュメント内に特別な Smarty タグを配置することによって Web コンテンツを生成します。これらのタグは処理され、 置換 されます。 他のコード。タグは、 テンプレート区切り文字で囲まれた Smarty のディレクティブです。これらのディレクティブは、 ドル記号 ($) で示される 変数、関数、 論理 または ループ ステートメント。 Smarty を使用すると、PHP プログラマーは Smarty タグを使用してアクセスできるカスタム関数を定義できます。
2. Smarty をセットアップする
ステップ 1: Smarty をダウンロードし、libs フォルダーの名前を変更して、PHP プロジェクトにインポートします。

ステップ 2: Smarty に接続するための PHP ファイルを作成する (SmartyCon.php)
<?php
/*
 * Created on Jan 10, 2013
 * Author: Nick
 * Function: Connecting to Smarty
 */
 include_once("smarty/Smarty.class.php");
 $smarty = new Smarty();		  //new an instance of smarty
 $smarty->config_dir = "smarty/"; 	  //smarty's config info
 $smarty->caching = false;		  //use cache or not
 $smarty->template_dir = "./templates";   //set the folder for keeping the templates
 /**
  * smarty can automatically compile the templates and php contents to an mixed file
  * and be stored in templates_C folder
  */
 $smarty->compile_dir = "./templates_c";  //the folder that store compiled files
 $smarty->cache_dir = "./smarty_cache";   //store cache files

 $smarty->left_delimiter = "{";
 $smarty->right_delimiter = "}";

 ?>
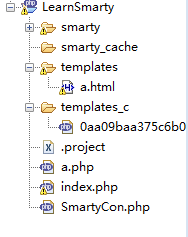
コードによれば、対応するファイルを保存するために使用される 3 つのフォルダーも作成する必要があります。 templates フォルダーは、フォルダーの名前が示すように、html ファイルを保存するために使用されます。これらはテンプレートであり、表示するために "$smarty->display()" によって呼び出されます。 プロジェクトのさまざまなスタイル。 tempates_c は、コンパイルされたファイルを保存するために使用されます。 php ファイルとテンプレートは別のファイルに記述されますが、php コンパイラーはテンプレートと php コンテンツを混合ファイルにコンパイルし、templates_c フォルダーに保存できます。 Smarty_cache はキャッシュ ファイルを保存するために使用されます。

ステップ 3: PHP コンテンツ (a.php) を作成します
<?php
/*
 * Created on Jan 10, 2013
 * Author: Nick
 * Function:
 */
 include("SmartyCon.php");
 $name = "php100";
 //$smarty->assign("title",$name); //assign php variabel to the tab in templates
 //$smarty->display("a.html");	 //show the template

 $nameTwo[] = array("name"=>"jimmy","city"=>"Montreal");
 $nameTwo[] = array("name"=>"tim","city"=>"wuxi");
 $nameTwo[] = array("name"=>"sam","city"=>"newyork");
 $nameTwo[] = array("name"=>"john","city"=>"sanfran");
 $nameTwo[] = array("name"=>"lily","city"=>"loyola");

 $title= array("a"=>"name","b"=>"News","c"=>"date","d"=>"now()");

 $smarty->assign("title",$nameTwo); //assign php variabel to the tab in templates
 $smarty->assign("ab",$title);

 $smarty->display("a.html");	 //show the template
?>
ステップ 4: テンプレート ファイル (a.html) を作成します
<html>
<h1>{$ab["b"]}</h1>
<hr>
<b>{$title}</b>

{section name=list loop=$title}
<b>
	{$title[list].name} - {$title[list].city}
</b><br>
{/section}
</html>
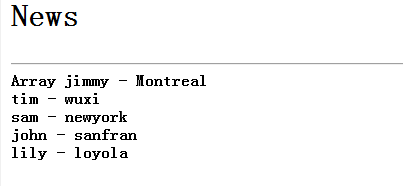
結果は次のようになります:

2 次元テーブルの値を出力するには、{section name=''loop=$..}{/section}

