


One good screenshot is worth a thousand words. Whether you want to quickly capture a sample of your work, send a reference visual, highlight a mistake or inconsistency, taking a screenshot is essential for efficient work.
You can opt to capture your screen or a portion of it with macOS built-in tools or you can explore screenshotting options that offer additional tools like creating a GIF, making a scrolling capture, or editing out sections of your screenshot for privacy.
If you want a screenshotting tool that offers that and more, CleanShot X is our choice. The app allows you to capture your screen in a variety of ways fit for most purposes — scrolling screenshot to capture those long presentations or web pages, easy GIF creation if you need to make an illustration for your landing page, product demo, or a blog post, and our favorite blurring feature to edit out personal information from screenshots.

Best screen recording tool
With CleanShot X, you can capture the entire chat history, a report, or any scrollable content from websites or apps.
Try freeAnd if your desktop icons keep getting in the way of the perfect screenshots, don’t worry, CleanShot X can easily hide them. Just click the respective option in the app’s menu and you are good to go!
Now, let’s dive into how you can use these and more CleanShot X tools.
Capture your Mac’s screen like a pro
The most important part of taking a good screenshot is being versed enough in it that you can do it quickly and not missing a beat. Sometimes you just need to capture something without wasting a moment before it vanishes, so here’s how to best leverage CleanShot X for quick and/or perfect screenshots.
Setting up CleanShot X
First things first, how do you take a screenshot with CleanShot X? You can simply click the app icon in your Mac’s menu bar and pick the screenshot you want to take from there.

But that’s not always the best option if you want to take your screenshot instantly, before whatever it is that you are capturing is gone. Use keyboard shortcuts for quicker screenshot taking.
To set them up, click Settings in the CleanShot X menu bar drop-down menu and go to Shortcuts.

Here, you can record your preferred shortcuts for various screenshot types or you can choose to use system default shortcuts for your CleanShot X screenshots — just click the Use System Default Shortcuts button at the bottom of the menu.
The app will prompt you to set it as the system default screenshot tool.

Take the screenshot you need
With CleanShot X, you can take all the popular screenshot types — capturing a single window, your whole screen, an area on your screen, a scrolling capture, or a video capture.
To pick the type of screenshot you need, click the menu bar icon of the app and select the screenshot type.

Record video and GIFs
You can record a video of your screen with CleanShot X just as easily. Simply pick the Record Screen option in the menu and select the area you want to capture.
Video recording options will appear on your screen.

Decide if you want to create a video file with your screen recording or a GIF, and select the respective option.
Additionally, CleanShot X allows you to record your mic or computer audio, your webcam, show keystrokes and highlight clicks. These are wonderful tools for times when you are creating product demos, walkthroughs, or presentations. You can also choose to show recording time as you record to help you keep track of the length of your video.
And lastly, but not in the least less importantly, you can choose to set Do Not Disturb on in CleanShot video recording settings. Now unwanted notifications won’t ruin your whole recording!
Worried about video files or GIFs of your screen recording getting too large? Just set the quality restrictions in the settings.

Self-timer
If you need some time to set up your screenshot before you capture, use the self-timer option in CleanShot X.
Click on the app’s menu bar icon, select Self-Timer, and select the area you want to capture. The 5-second timer will start automatically.
Remove background distractions
We’ve all been there — your desktop is as cluttered as it can be, filled to the brim with private files or sensitive information, or just looking like a mess, and that’s exactly when you need a nice clean screenshot of something you’ve been working on.
Before you waste your time trying to clean up your desktop in a time crunch, take a beat. CleanShot X can hide your desktop icons in a click. Go to the app’s menu in your Mac’s menu bar and click Hide Desktop Icons. And voila, your desktop is pristine!
Easily access quick actions
Once you’ve captured your screenshot, you can perform quick actions with the file. Copy it to clipboard, save in your desired location, drag and drop onto your desktop to save, save to cloud storage, or make further edits — CleanShot X makes it easier than ever.
Draw on screenshots
Highlighting something in your screenshot is the action that’s probably most used when it comes to editing screenshots.
CleanShot X makes it easy to add arrows, lines, text, emoji, and even other screenshots to your screenshot.

Pick what you need from the editing panel at the top and make your screenshots more functional than ever! You can even add a counter for easy illustration.
Annotate your screenshots and hide sensitive content
With CleanShot X advanced editing tools designed specifically for screenshots, you can annotate your images, combine multiple screenshots in one explainer, and blur out sensitive information.

Add custom wallpaper
Clean up your screenshots with CleanShot X background tool. Set the scene with beautiful backgrounds and make your captures look stunning.
Pick a background while editing your screenshot — an image or a plain color — and instantly add it to your capture.

Capture text from images
There’s nothing more tedious than retyping all the text in your screenshot or PDF. Whether it’s some old image files or a screenshot you saved for later, CleanShot X can capture text from it with its handy Capture Text (OCR) tool.
Simply pick this option in the app’s drop-down menu bar menu and select the text you need captured. CleanShot X will take a second to process and then you’ll be able to simply paste your copied text where you need it!

Grab and save to the cloud
Use CleanShot Cloud to store your screenshots if you want to save some precious hard disk space. The app helps you declutter your desktop and free up valuable hard drive memory for things more important than random screenshots.
Here’s how to store your screenshots in CleanShot Cloud.
- Make your capture.
- On the overlay menu of your screen capture, click the Cloud button. You’ll be prompted to log into CleanShot Cloud, use sign in with Setapp if you are a Setapp user.
- Once your one-time cloud setup is complete, just click the cloud icon in the top right corner of your screenshot miniature overlay to save your item to cloud.
- You can adjust expiry time for your screenshot or get the sharing link on cleanshot.cloud > Your media.

Download and share screenshots from the cloud
Access CleanShot Cloud via CleanShot X menu bar menu by clicking on View All Uploads. Find all your screen captures neatly stored on the cloud. You can also copy the link to your most recent capture from the app’s menu.
From the cloud, you can download your screenshots and recordings, tag them, or get a link for sharing.

Note that the default expiry date is just 7 days. You can adjust it to 1 day, 30, 90, 365 days, or even never.
Pick destinations instantly
If you vary the location of where your screenshots are saved, this feature in CleanShot X is a must for you. Open the app’s Settings from the menu bar drop-down menu and go to Quick Access.
Find Save button behavior at the bottom of the window and set it to Ask for destination. This way, CleanShot X will give you a chance to pick your screenshot saving destination when you click the Save button on the screenshot miniature.

Screenshot with CleanShot X
Screenshots with CleanShot X can be as easy or as advanced as you want them to get. From basic capturing tools to quickly save a portion of your screen or record a screencast, to more advanced screenshot edits like blurring out sensitive information, adding a background, or creating an explainer, CleanShot X can do it all.
We hope this guide will help you make amazing screenshots and save time with this tool. Get CleanShot X on Setapp along with 240+ more apps for your daily tasks on Mac and iOS.
Not on Setapp yet? Get started with an easy 7-day free trial and try the apps, including CleanShot X now!
以上がCleanShot Xチュートリアル:Macでキャプチャしていないクラッター画面の詳細内容です。詳細については、PHP 中国語 Web サイトの他の関連記事を参照してください。

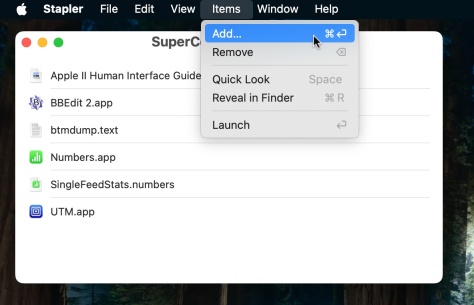 Mac用のStaplerを使用したプロジェクトに関連するすべてのアプリとドキュメントを起動しますMay 13, 2025 am 10:37 AM
長年のMacユーザーは、Staplerと呼ばれる古典的なMacintoshの便利な古いシェアウェアアプリケーションを思い出すかもしれません。これは、一連のアプリとドキュメントを単一のドキュメントにグループ化することでプロジェクトを管理するのに基本的に役立ちました。
 iPhone、iPad、またはMacでApple Intelligenceを入手する方法May 13, 2025 am 10:32 AM
Apple Intelligenceは、Appleがベータ版で展開しているAI機能のセットであり、秋にAppleデバイス所有者のより大きなセットにデビューします。 Apple Intelligenceは、テキストや電子メールの作成と作成、アクションの取得まで、多くの機能を提供しています。
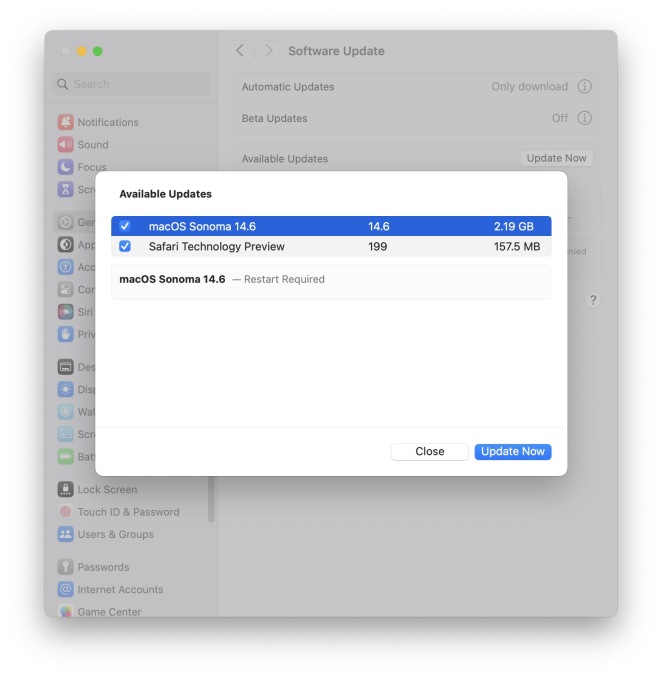
 Macos Sonoma 14.6.1&Ventura 13.6.9バグ修正でリリースMay 13, 2025 am 10:25 AM
最近、Appleデバイスにシステムソフトウェアを更新するのにかなりの時間を費やしていると感じている場合は、おもしろいです。システムソフトウェアの更新の別のラウンド!今回、AppleはMacos Sonoma 14.6.1 Alonをリリースしました
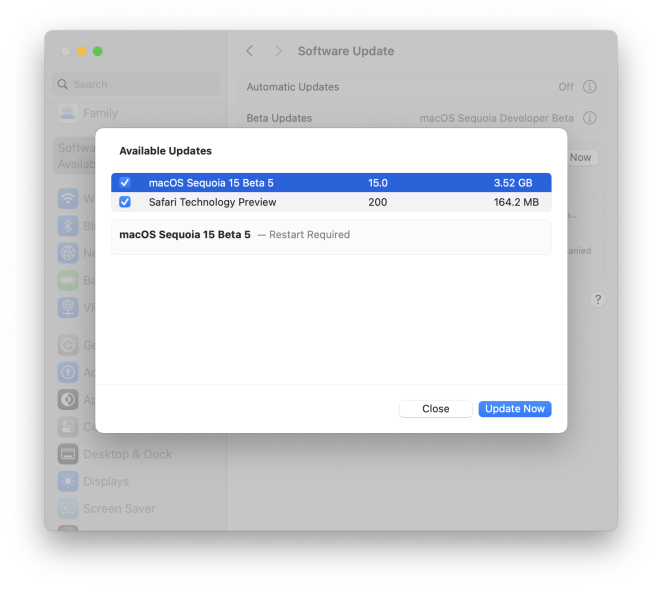
 MacOS Sequoia 15ベータ6テストに利用できますMay 13, 2025 am 10:23 AM
Appleは、開発者ベータテストプログラムに登録されているユーザー向けに、MacOS Sequoiaの6番目のベータ版を発行しました。通常、一致するパブリックベータビルドがすぐに到着します。この場合、Dev Beta 6はパブリックベータ4としてバージョンされます。 MacOS Secoia
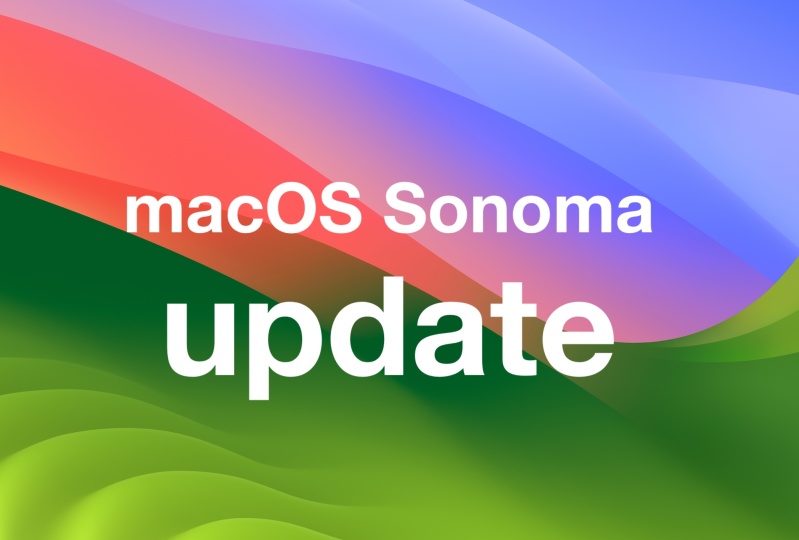
 MacOSSonoma14.6バグ修正とセキュリティの更新でリリースされたアップデートMay 13, 2025 am 10:20 AM
Appleは、ソノマオペレーティングシステムを実行しているMacユーザー向けにMacOS Sonoma 14.6をリリースしました。 MacOS Sonoma 14.6ソフトウェアアップデートは、主にほとんどのMacのバグ修正とセキュリティの更新に焦点を当てていますが、特に素晴らしい新機能が含まれています
 MacOS Sequoia 15ベータ5ダウンロード可能May 13, 2025 am 10:06 AM
MacOS Sequoia Beta 5は、開発者ベータテストプログラムに登録されているユーザーがMacをダウンロードしてインストールできるようになりました。 MacOS Sequoia Beta 5には24A5309Eのビルドがあり、通常、新しい開発者ベータビルドの後にMが続きます。
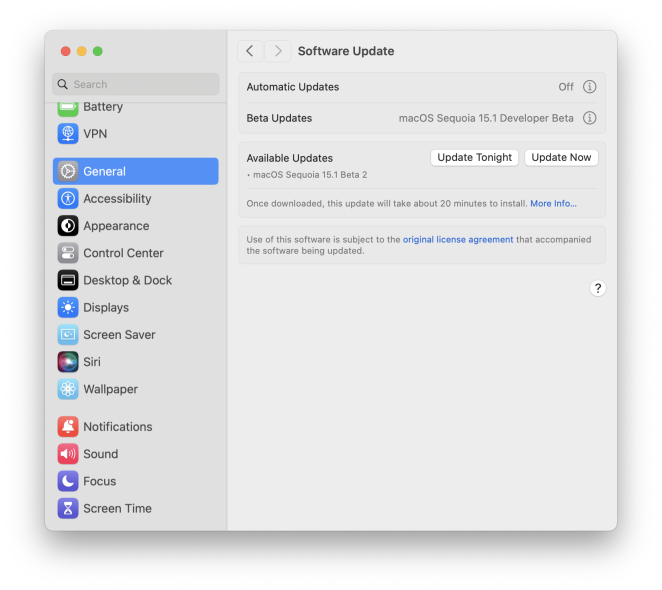 IOS 18.1、Macos Sequoia 15.1、およびiPados 18.1のベータ2はApple IntelligenceでリリースされましたMay 13, 2025 am 09:49 AM
Appleは、iOS 18.1、iPados 18.1、およびMacos Sequoia 15.1の2番目のベータ版をリリースしました。これらの新しいベータアップデートのリリースは、それらが同時にウィットであるという点で珍しいです
 MacでVMware Fusionをアンインストールする方法May 13, 2025 am 09:44 AM
VMware Fusion Proは自由にダウンロードしてインストールできることに気付くかもしれません。おそらく、Macにインストールして仮想マシンをテストしたり、遊んだりすることで、MacにVMwareが必要ないと判断しました。 しかし、VMware Fusion p


ホットAIツール

Undresser.AI Undress
リアルなヌード写真を作成する AI 搭載アプリ

AI Clothes Remover
写真から衣服を削除するオンライン AI ツール。

Undress AI Tool
脱衣画像を無料で

Clothoff.io
AI衣類リムーバー

Video Face Swap
完全無料の AI 顔交換ツールを使用して、あらゆるビデオの顔を簡単に交換できます。

人気の記事
ホットツール

mPDF
mPDF は、UTF-8 でエンコードされた HTML から PDF ファイルを生成できる PHP ライブラリです。オリジナルの作者である Ian Back は、Web サイトから「オンザフライ」で PDF ファイルを出力し、さまざまな言語を処理するために mPDF を作成しました。 HTML2FPDF などのオリジナルのスクリプトよりも遅く、Unicode フォントを使用すると生成されるファイルが大きくなりますが、CSS スタイルなどをサポートし、多くの機能強化が施されています。 RTL (アラビア語とヘブライ語) や CJK (中国語、日本語、韓国語) を含むほぼすべての言語をサポートします。ネストされたブロックレベル要素 (P、DIV など) をサポートします。

SublimeText3 中国語版
中国語版、とても使いやすい

WebStorm Mac版
便利なJavaScript開発ツール

ゼンドスタジオ 13.0.1
強力な PHP 統合開発環境

Dreamweaver Mac版
ビジュアル Web 開発ツール

