


このガイドでは、facenet-pytorch を使用した顔の類似性検出ツールを説明します。このツールは、FaceNet モデルの高品質の顔埋め込みを利用して、ターゲット画像を複数の候補と比較して、最も近いものを特定します。 実装を見てみましょう。
必須のツールとライブラリ
- PyTorch: 深層学習操作の基盤。
- FaceNet-PyTorch: 顔検出と埋め込み生成用の事前トレーニング済みモデルを提供します。
- 枕 (PIL): 画像操作タスクを処理します。
- Matplotlib: 結果の視覚化に使用されます。
2 つのコア モデルが採用されています:
- MTCNN: 画像内の顔を検出します。
- InceptionResnetV1: 顔の埋め込みを抽出します。
初期化
import torch
from facenet_pytorch import MTCNN, InceptionResnetV1
from PIL import Image
import requests
from io import BytesIO
import matplotlib.pyplot as plt

# Initialize face detection (MTCNN) and embedding extraction (InceptionResnetV1) modules.
mtcnn = MTCNN(image_size=160, keep_all=True)
resnet = InceptionResnetV1(pretrained='vggface2').eval()
関数の定義
1.画像の読み込みと埋め込み抽出:
この関数は、URL から画像を取得し、顔を検出し、埋め込みを計算します。
def get_embedding_and_face(image_path):
    """Loads an image, detects faces, and returns the embedding and detected face."""
    try:
        response = requests.get(image_path)
        response.raise_for_status()
        content_type = response.headers.get('Content-Type')
        if 'image' not in content_type:
            raise ValueError(f"Invalid image URL: {content_type}")
        image = Image.open(BytesIO(response.content)).convert("RGB")
    except Exception as e:
        print(f"Image loading error from {image_path}: {e}")
        return None, None

    faces, probs = mtcnn(image, return_prob=True)
    if faces is None or len(faces) == 0:
        return None, None

    embedding = resnet(faces[0].unsqueeze(0))
    return embedding, faces[0]
2.テンソルから画像への変換:
表示用にテンソルを準備します。
def tensor_to_image(tensor):
    """Converts a normalized tensor to a displayable image array."""
    image = tensor.permute(1, 2, 0).detach().numpy()
    image = (image - image.min()) / (image.max() - image.min())
    image = (image * 255).astype('uint8')
    return image
3.最も似ている顔の識別:
ターゲット画像の埋め込みを候補の埋め込みと比較します。
def find_most_similar(target_image_path, candidate_image_paths):
"""Identifies the most similar image to the target from a list of candidates."""
target_emb, target_face = get_embedding_and_face(target_image_path)
if target_emb is None:
raise ValueError("No face detected in the target image.")
highest_similarity = float('-inf')
most_similar_face = None
most_similar_image_path = None
candidate_faces = []
similarities = []
for candidate_image_path in candidate_image_paths:
candidate_emb, candidate_face = get_embedding_and_face(candidate_image_path)
if candidate_emb is None:
similarities.append(None)
candidate_faces.append(None)
continue
similarity = torch.nn.functional.cosine_similarity(target_emb, candidate_emb).item()
similarities.append(similarity)
candidate_faces.append(candidate_face)
if similarity > highest_similarity:
highest_similarity = similarity
most_similar_face = candidate_face
most_similar_image_path = candidate_image_path
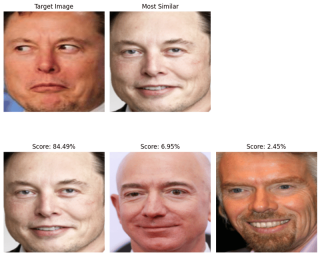
# Visualization
plt.figure(figsize=(12, 8))
# Display target image
plt.subplot(2, len(candidate_image_paths) + 1, 1)
plt.imshow(tensor_to_image(target_face))
plt.title("Target Image")
plt.axis("off")
# Display most similar image
if most_similar_face is not None:
plt.subplot(2, len(candidate_image_paths) + 1, 2)
plt.imshow(tensor_to_image(most_similar_face))
plt.title("Most Similar")
plt.axis("off")
# Display all candidates with similarity scores
for idx, (candidate_face, similarity) in enumerate(zip(candidate_faces, similarities)):
plt.subplot(2, len(candidate_image_paths) + 1, idx + len(candidate_image_paths) + 2)
if candidate_face is not None:
plt.imshow(tensor_to_image(candidate_face))
plt.title(f"Score: {similarity * 100:.2f}%")
else:
plt.title("No Face Detected")
plt.axis("off")
plt.tight_layout()
plt.show()
if most_similar_image_path is None:
raise ValueError("No faces detected in candidate images.")
return most_similar_image_path, highest_similarity
使用法
比較用の画像 URL:
image_url_target = 'https://d1mnxluw9mpf9w.cloudfront.net/media/7588/4x3/1200.jpg'
candidate_image_urls = [
    'https://beyondthesinglestory.wordpress.com/wp-content/uploads/2021/04/elon_musk_royal_society_crop1.jpg',
    'https://cdn.britannica.com/56/199056-050-CCC44482/Jeff-Bezos-2017.jpg',
    'https://cdn.britannica.com/45/188745-050-7B822E21/Richard-Branson-2003.jpg'
]

most_similar_image, similarity_score = find_most_similar(image_url_target, candidate_image_urls)
print(f"Most similar image: {most_similar_image}")
print(f"Similarity score: {similarity_score * 100:.2f}%")
結果
結論
この例では、facenet-pytorch の顔認識機能を紹介します。 顔検出と埋め込み生成を組み合わせることで、本人確認やコンテンツ フィルタリングなど、さまざまなアプリケーション用のツールを作成できます。
以上がPython と FaceNet による顔認識の詳細内容です。詳細については、PHP 中国語 Web サイトの他の関連記事を参照してください。

 Pythonの2つのリストを連結する代替品は何ですか?May 09, 2025 am 12:16 AM
Pythonに2つのリストを接続する多くの方法があります。1。オペレーターを使用しますが、これはシンプルですが、大きなリストでは非効率的です。 2。効率的ですが、元のリストを変更する拡張メソッドを使用します。 3。=演算子を使用します。これは効率的で読み取り可能です。 4。itertools.chain関数を使用します。これはメモリ効率が高いが、追加のインポートが必要です。 5。リストの解析を使用します。これはエレガントですが、複雑すぎる場合があります。選択方法は、コードのコンテキストと要件に基づいている必要があります。
 Python:2つのリストをマージする効率的な方法May 09, 2025 am 12:15 AM
Pythonリストをマージするには多くの方法があります。1。オペレーターを使用します。オペレーターは、シンプルですが、大きなリストではメモリ効率的ではありません。 2。効率的ですが、元のリストを変更する拡張メソッドを使用します。 3. Itertools.chainを使用します。これは、大規模なデータセットに適しています。 4.使用 *オペレーター、1つのコードで小規模から中型のリストをマージします。 5. numpy.concatenateを使用します。これは、パフォーマンス要件の高い大規模なデータセットとシナリオに適しています。 6.小さなリストに適したが、非効率的な追加方法を使用します。メソッドを選択するときは、リストのサイズとアプリケーションのシナリオを考慮する必要があります。
 コンパイルされた通信言語:長所と短所May 09, 2025 am 12:06 AM
compiledlanguagesOfferspeedandsecurity、foredlanguagesprovideeaseofuseandportability.1)compiledlanguageslikec arefasterandsecurebuthavelOnderdevelopmentsplat dependency.2)
 Python:ループのために、そして最も完全なガイドMay 09, 2025 am 12:05 AM
Pythonでは、forループは反復可能なオブジェクトを通過するために使用され、条件が満たされたときに操作を繰り返し実行するためにしばらくループが使用されます。 1)ループの例:リストを通過し、要素を印刷します。 2)ループの例:正しいと推測するまで、数値ゲームを推測します。マスタリングサイクルの原則と最適化手法は、コードの効率と信頼性を向上させることができます。
 Python concatenateリストを文字列に入れますMay 09, 2025 am 12:02 AM
リストを文字列に連結するには、PythonのJoin()メソッドを使用して最良の選択です。 1)join()メソッドを使用して、 '' .join(my_list)などのリスト要素を文字列に連結します。 2)数字を含むリストの場合、連結する前にマップ(str、数字)を文字列に変換します。 3) '、'などの複雑なフォーマットに発電機式を使用できます。 4)混合データ型を処理するときは、MAP(STR、Mixed_List)を使用して、すべての要素を文字列に変換できるようにします。 5)大規模なリストには、 '' .join(lage_li)を使用します
 Pythonのハイブリッドアプローチ:コンピレーションと解釈を組み合わせたMay 08, 2025 am 12:16 AM
pythonusesahybridapproach、コンコイリティレーショントビテコードと解釈を組み合わせて、コードコンピレッドフォームと非依存性bytecode.2)
 Pythonの「for」と「while」ループの違いを学びますMay 08, 2025 am 12:11 AM
keydifferencesは、「for」と「while "loopsare:1)" for "for" loopsareideal forterating overencesonownowiterations、while2) "for" for "for" for "for" for "for" for "for" for for for for "wide" loopsarebetterunuinguntinunuinguntinisisisisisisisisisisisisisisisisisisisisisisisisisisisations.un
 重複したPython ConcatenateリストMay 08, 2025 am 12:09 AM
Pythonでは、さまざまな方法でリストを接続して重複要素を管理できます。1)オペレーターを使用するか、すべての重複要素を保持します。 2)セットに変換してから、リストに戻ってすべての重複要素を削除しますが、元の順序は失われます。 3)ループを使用するか、包含をリストしてセットを組み合わせて重複要素を削除し、元の順序を維持します。


ホットAIツール

Undresser.AI Undress
リアルなヌード写真を作成する AI 搭載アプリ

AI Clothes Remover
写真から衣服を削除するオンライン AI ツール。

Undress AI Tool
脱衣画像を無料で

Clothoff.io
AI衣類リムーバー

Video Face Swap
完全無料の AI 顔交換ツールを使用して、あらゆるビデオの顔を簡単に交換できます。

人気の記事
ホットツール

MantisBT
Mantis は、製品の欠陥追跡を支援するために設計された、導入が簡単な Web ベースの欠陥追跡ツールです。 PHP、MySQL、Web サーバーが必要です。デモおよびホスティング サービスをチェックしてください。

AtomエディタMac版ダウンロード
最も人気のあるオープンソースエディター

MinGW - Minimalist GNU for Windows
このプロジェクトは osdn.net/projects/mingw に移行中です。引き続きそこでフォローしていただけます。 MinGW: GNU Compiler Collection (GCC) のネイティブ Windows ポートであり、ネイティブ Windows アプリケーションを構築するための自由に配布可能なインポート ライブラリとヘッダー ファイルであり、C99 機能をサポートする MSVC ランタイムの拡張機能が含まれています。すべての MinGW ソフトウェアは 64 ビット Windows プラットフォームで実行できます。

Dreamweaver Mac版
ビジュアル Web 開発ツール

ゼンドスタジオ 13.0.1
強力な PHP 統合開発環境

