


前の投稿では、Laravel で支払い処理を処理するための 2 つの異なる方法を検討しました。
- ハードコードされたサービス バインディング
- コンテキストバインディング。
どちらの方法も効果的ではありますが、実行時の条件 (ユーザー入力、構成設定など) に基づいて支払い処理業者を動的に選択する場合には制限があります。
この 3 番目の最後のパートでは、より柔軟なアプローチ、つまりファクトリー パターンの使用について見ていきます。この設計パターンにより、コンテキストに基づいて PaymentProcessorInterface の適切な実装を選択することができます (リクエストに応じて Stripe か PayPal を選択するなど)。
ファクトリ パターンの実装
ファクトリ パターンは、実行時にさまざまな実装を動的に解決するためのスケーラブルなソリューションを提供します。設定方法を段階的に説明します。
ステップ 1: ファクトリ インターフェイスを作成する
まず、さまざまな支払いプロセッサを解決する方法の概要を説明する PaymentProcessorFactoryInterface を定義しましょう。
<?php namespace App\Contracts;

interface PaymentProcessorFactoryInterface
{
    public function getProcessor(string $provider): PaymentProcessorInterface;
}
このインターフェイスにより、作成するファクトリには getProcessor メソッドが追加され、指定された引数 (例: 'ストライプ' または 'ペイパル') に基づいて適切な支払いプロセッサを返す役割を果たします。
ステップ 2: ファクトリ実装を作成する
次に、プロバイダーの入力に基づいて適切な支払いプロセッサを解決するファクトリを実装します。
<?php namespace App\Services;

use App\Contracts\PaymentProcessorInterface;
use App\Contracts\PaymentProcessorFactoryInterface;
use App\Services\StripePaymentProcessor;
use App\Services\PayPalPaymentProcessor;

class PaymentProcessorFactory implements PaymentProcessorFactoryInterface
{
    public function getProcessor(string $provider): PaymentProcessorInterface
    {
        switch ($provider) {
            case 'stripe':
                return new StripePaymentProcessor(); // Can be resolved via the container if needed
            case 'paypal':
                return new PayPalPaymentProcessor(); // Can also be resolved via the container
            default:
                throw new \Exception("Unsupported payment provider: $provider");
        }
    }
}
このファクトリは、実行時に提供された入力に基づいて正しい支払いプロセッサを動的に選択します。この例では、StripePaymentProcessor と PayPalPaymentProcessor の新しいインスタンスを直接返します。必要に応じて、管理を改善するために、これらのクラスを Laravel のサービス コンテナから解決することもできます。
ステップ 3: Stripe および PayPal プロセッサを実装する
PaymentProcessorInterface を実装する StripePaymentProcessor クラスと PayPalPaymentProcessor クラスの両方があることを確認してください。
例: StripePaymentProcessor
<?php namespace App\Services;

use App\Contracts\PaymentProcessorInterface;

class StripePaymentProcessor implements PaymentProcessorInterface
{
    public function createPayment(float $amount, string $currency, array $paymentDetails): array
    {
        // Stripe-specific implementation
    }

    public function processPayment(array $paymentData): array
    {
        // Stripe-specific implementation
    }

    public function refundPayment(string $transactionId, float $amount): bool
    {
        // Stripe-specific implementation
    }
}
例: PayPalPaymentProcessor
同様に、StripePaymentProcessor と同じパターンに従って PayPalPaymentProcessor クラスを実装します。
ステップ 4: サービス コンテナでファクトリをバインドする
Laravel アプリケーション全体でファクトリーを利用できるようにするには、PaymentProcessorFactory を Laravel のサービスコンテナにバインドする必要があります。これは AppServiceProvider で行うことができます。
AppProvidersAppServiceProvider.php の register メソッド内に次のコードを追加します。
public function register()
{
    $this->app->singleton(\App\Contracts\PaymentProcessorFactoryInterface::class, \App\Services\PaymentProcessorFactory::class);
}
このバインディングは、PaymentProcessorFactoryInterface がリクエストされるたびに PaymentProcessorFactory を使用するように Laravel に指示し、アプリケーション全体でファクトリのインスタンスが 1 つだけ存在するようにします。
ステップ 5: コントローラーでのファクトリーの使用
ファクトリが設定されたので、それをコントローラーに挿入して、リクエスト入力などの実行時データに基づいて適切な支払いプロセッサを動的に選択できます。
例: PaymentController
<?php namespace App\Http\Controllers;

use App\Contracts\PaymentProcessorFactoryInterface;
use Illuminate\Http\Request;

class PaymentController extends Controller
{
    protected $paymentProcessorFactory;

    public function __construct(PaymentProcessorFactoryInterface $paymentProcessorFactory)
    {
        $this->paymentProcessorFactory = $paymentProcessorFactory;
    }

    public function makePayment(Request $request)
    {
        $provider = $request->input('provider'); // E.g., 'stripe' or 'paypal'
        $amount = $request->input('amount');
        $currency = $request->input('currency');
        $paymentDetails = $request->input('details');

        // Get the appropriate payment processor based on the provider
        $paymentProcessor = $this->paymentProcessorFactory->getProcessor($provider);

        // Use the selected payment processor to create a payment
        $response = $paymentProcessor->createPayment($amount, $currency, $paymentDetails);

        return response()->json($response);
    }
}
このコントローラーでは、依存関係注入を通じて PaymentProcessorFactoryInterface を注入します。支払いがリクエストされると、リクエストから支払いプロバイダー (Stripe や PayPal など) を特定し、それを工場に渡し、適切な支払いプロセッサを動的に解決します。
ステップ 6: さまざまな決済プロバイダーの処理
この設定では、コントローラーはリクエスト内のプロバイダー名を切り替えるだけで、さまざまな支払いプロバイダーを動的に処理できるようになりました。この方法は、ロジックを重複させたり、コードを特定の実装に緊密に結合したりせずに、複数の支払いゲートウェイを処理する必要がある場合に特に強力です。
結論
Laravel 11 でファクトリー パターンを使用すると、実行時にさまざまな支払いプロセッサを選択するための非常に柔軟なアプローチが提供されます。ここで説明した手順の概要は次のとおりです。
- Interface et implémentation d'usine : création d'une usine qui résout dynamiquement le processeur de paiement correct en fonction d'une entrée de chaîne.
- Implémentations du processeur : garantie que les classes StripePaymentProcessor et PayPalPaymentProcessor implémentent PaymentProcessorInterface.
- Liaison du conteneur de service : reliez l'usine dans le conteneur de service pour permettre une injection facile tout au long de l'application. Sélection dynamique dans les contrôleurs : utilisation de l'usine à l'intérieur d'un contrôleur pour sélectionner et utiliser dynamiquement le processeur de paiement approprié en fonction des données d'exécution.
Principes de conception de logiciels et modèles de conception
Nous avons commencé ce tutoriel en 3 parties en utilisant un seul processeur de paiement, avec une sélection codée en dur, puis nous avons utilisé une configuration dans le code ("temps de compilation") en utilisant Laravel Service Container Binding, puis dans cette partie nous avons continué à refactoriser avec le design principes et modèles de conception à l'esprit, ce qui nous a permis de refactoriser le code, obtenant :
- Flexibilité dynamique : le modèle d'usine permet la sélection de différents processeurs de paiement au moment de l'exécution, ce qui rend votre application plus flexible et évolutive.
- Couplage lâche : en injectant l'usine, vos contrôleurs sont faiblement couplés aux processeurs de paiement, ce qui facilite l'ajout ou le remplacement de passerelles de paiement à l'avenir.
- Maintenabilité : cette approche fournit une base de code plus propre et plus maintenable, en particulier lorsqu'il s'agit de plusieurs options de paiement.
Avec cette configuration, nous disposons désormais d'un système puissant et flexible pour gérer les paiements dans Laravel. Si nous avons besoin de prendre en charge des processeurs supplémentaires, nous pouvons facilement étendre l'usine pour prendre en charge et modifier la logique de sélection des fournisseurs, et gérer différents scénarios de logique métier.
以上がファクトリパターンを使用したLaravelでの動的支払プロセッサの選択の詳細内容です。詳細については、PHP 中国語 Web サイトの他の関連記事を参照してください。

 11ベストPHP URLショートナースクリプト(無料およびプレミアム)Mar 03, 2025 am 10:49 AM
多くの場合、キーワードと追跡パラメーターで散らかった長いURLは、訪問者を阻止できます。 URL短縮スクリプトはソリューションを提供し、ソーシャルメディアやその他のプラットフォームに最適な簡潔なリンクを作成します。 これらのスクリプトは、個々のWebサイトにとって価値があります
 Instagram APIの紹介Mar 02, 2025 am 09:32 AM
2012年のFacebookによる有名な買収に続いて、Instagramはサードパーティの使用のために2セットのAPIを採用しました。これらはInstagramグラフAPIとInstagram Basic Display APIです。
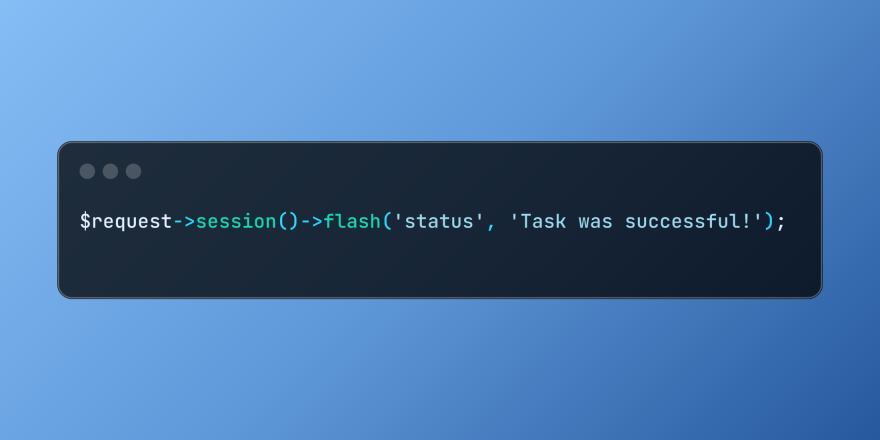 Laravelでフラッシュセッションデータを使用しますMar 12, 2025 pm 05:08 PM
Laravelは、直感的なフラッシュメソッドを使用して、一時的なセッションデータの処理を簡素化します。これは、アプリケーション内に簡単なメッセージ、アラート、または通知を表示するのに最適です。 データは、デフォルトで次の要求のためにのみ持続します。 $リクエスト -
 LaravelのバックエンドでReactアプリを構築する:パート2、ReactMar 04, 2025 am 09:33 AM
これは、LaravelバックエンドとのReactアプリケーションの構築に関するシリーズの2番目と最終部分です。シリーズの最初の部分では、基本的な製品上場アプリケーションのためにLaravelを使用してRESTFUL APIを作成しました。このチュートリアルでは、開発者になります
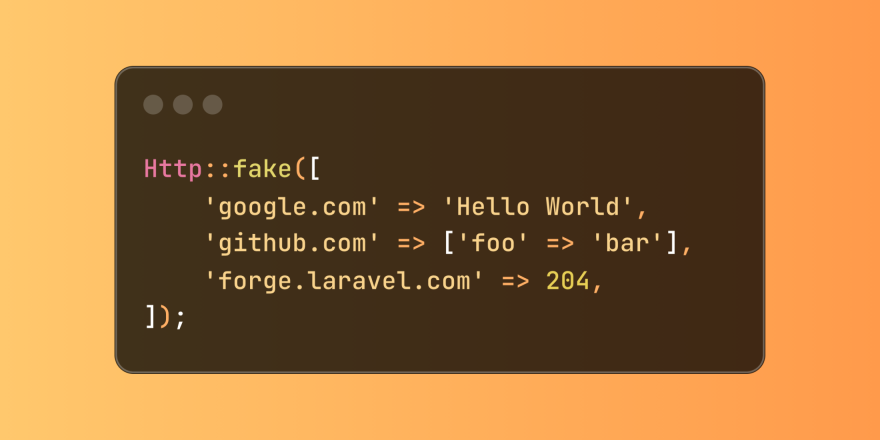 Laravelテストでの簡略化されたHTTP応答のモッキングMar 12, 2025 pm 05:09 PM
Laravelは簡潔なHTTP応答シミュレーション構文を提供し、HTTP相互作用テストを簡素化します。このアプローチは、テストシミュレーションをより直感的にしながら、コード冗長性を大幅に削減します。 基本的な実装は、さまざまな応答タイプのショートカットを提供します。 Illuminate \ support \ facades \ httpを使用します。 http :: fake([[ 'google.com' => 'hello world'、 'github.com' => ['foo' => 'bar']、 'forge.laravel.com' =>
 PHPのカール:REST APIでPHPカール拡張機能を使用する方法Mar 14, 2025 am 11:42 AM
PHPクライアントURL(CURL)拡張機能は、開発者にとって強力なツールであり、リモートサーバーやREST APIとのシームレスな対話を可能にします。尊敬されるマルチプロトコルファイル転送ライブラリであるLibcurlを活用することにより、PHP Curlは効率的なexecuを促進します
 Codecanyonで12の最高のPHPチャットスクリプトMar 13, 2025 pm 12:08 PM
顧客の最も差し迫った問題にリアルタイムでインスタントソリューションを提供したいですか? ライブチャットを使用すると、顧客とのリアルタイムな会話を行い、すぐに問題を解決できます。それはあなたがあなたのカスタムにより速いサービスを提供することを可能にします
 2025 PHP状況調査の発表Mar 03, 2025 pm 04:20 PM
2025 PHP Landscape Surveyは、現在のPHP開発動向を調査しています。 開発者や企業に洞察を提供することを目的とした、フレームワークの使用、展開方法、および課題を調査します。 この調査では、現代のPHP Versioの成長が予想されています


ホットAIツール

Undresser.AI Undress
リアルなヌード写真を作成する AI 搭載アプリ

AI Clothes Remover
写真から衣服を削除するオンライン AI ツール。

Undress AI Tool
脱衣画像を無料で

Clothoff.io
AI衣類リムーバー

AI Hentai Generator
AIヘンタイを無料で生成します。

人気の記事
ホットツール

ゼンドスタジオ 13.0.1
強力な PHP 統合開発環境

SublimeText3 中国語版
中国語版、とても使いやすい

SublimeText3 Linux 新バージョン
SublimeText3 Linux 最新バージョン

メモ帳++7.3.1
使いやすく無料のコードエディター

ドリームウィーバー CS6
ビジュアル Web 開発ツール

