ホームページ >システムチュートリアル >Windowsシリーズ >Windows 10および11の「ディスプレイドライバーの起動に失敗しました」エラーを修正する10の方法
Windows 10および11の「ディスプレイドライバーの起動に失敗しました」エラーを修正する10の方法
- 尊渡假赌尊渡假赌尊渡假赌オリジナル
- 2024-09-18 13:47:071067ブラウズ
ディスプレイ ドライバーは、Windows オペレーティング システム (または任意の OS) と GPU 間の通信を容易にします。ただし、ディスプレイ ドライバーに問題が発生した場合、「ディスプレイ ドライバーの起動に失敗しました」エラーなどの予期しないエラーが表示されます。
このエラーの主な原因には、問題のある接続、古いドライバーまたは破損したドライバー、レジストリの問題、およびハードウェアの問題が含まれます。エラーを解決し、グラフィック カードが問題なく動作するようにするには、次の 10 の方法を試してください。
1.グラフィックドライバーを再起動します
より高度な修正に入る前に、Windows PC のグラフィック ドライバーを再起動してください。この方法はすべての GPU メーカーに適用されるため、NVIDIA、AMD、または Intel GPU を搭載した PC で動作します。
Windows Ctrl Shift B キーボード ショートカットを一度に押して、再起動を開始します。画面がちらつき、数秒間暗くなる場合もあります。その後、表示が再び表示されます。
ラップトップで外部ディスプレイを使用している場合、再起動後に外部ディスプレイの接続は復元されません。外部ディスプレイの画面を拡張または複製するには、設定アプリを開いて再設定する必要があります。
2.電源付きの VGA-USB アダプターを使用します
「ディスプレイ ドライバーの読み込みに失敗しました」エラーにより、Windows は基本ディスプレイ ドライバーに切り替わります。ただし、基本的な VGA-USB アダプタを使用して USB 経由で外部モニタに接続する場合は、電源付きの VGA-USB アダプタに切り替える必要があります。これは、新しい GPU が VGA 標準をサポートしていないためです。
したがって、VGA などの古い入力オプションを備えたモニターに接続する必要がある場合は、電源付きの VGA-USB アダプターを使用してください。また、GPU を含むコンポーネントのすべての物理ケーブル接続を検査します。
3.グラフィックス カード ドライバーを更新します
ドライバーが古く破損しているとエラーが発生したり、新しい OS アップデートでうまく動作しなくなる可能性があります。したがって、デバイス マネージャーを使用して更新する必要があります。その方法は次のとおりです:
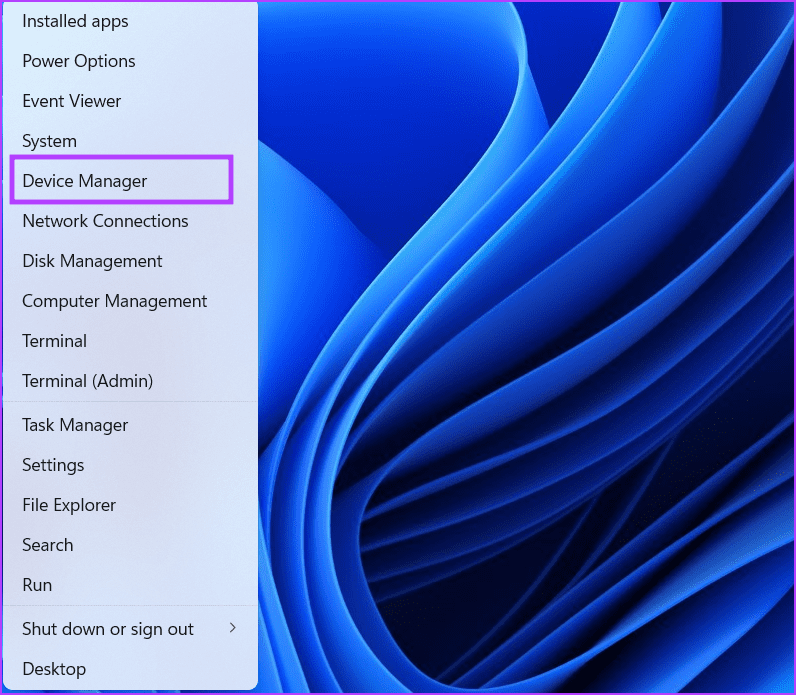
ステップ 1: Windows キー X ショートカットを押して、パワー ユーザー メニューを開きます。 [デバイス マネージャー] オプションをクリックします。
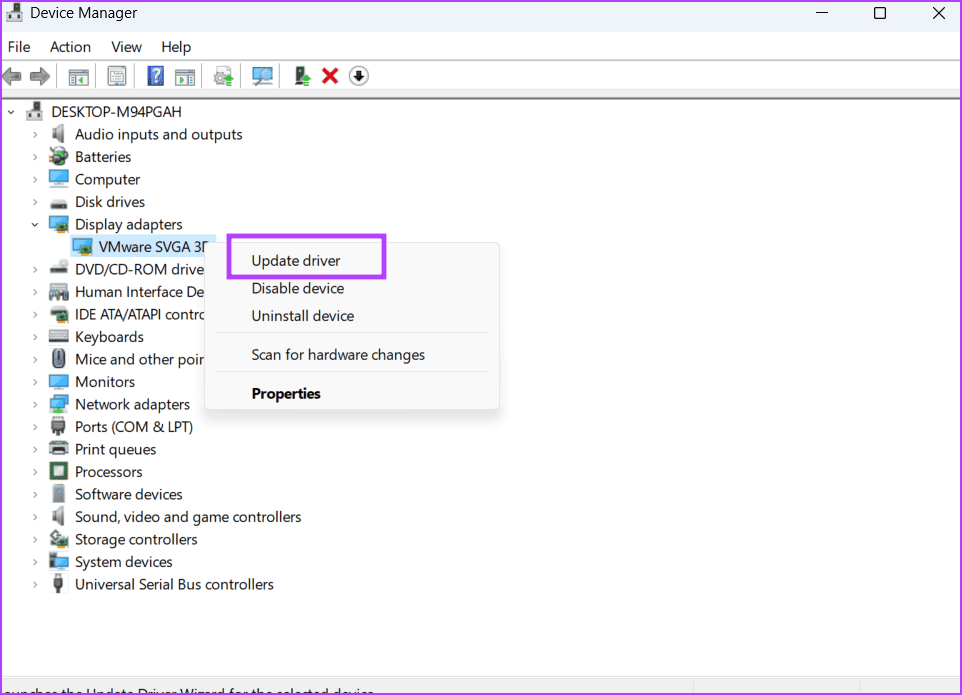
ステップ 2: 「ディスプレイ アダプター」オプションをクリックします。次に、GPU 名を右クリックし、[ドライバーの更新] オプションを選択します。
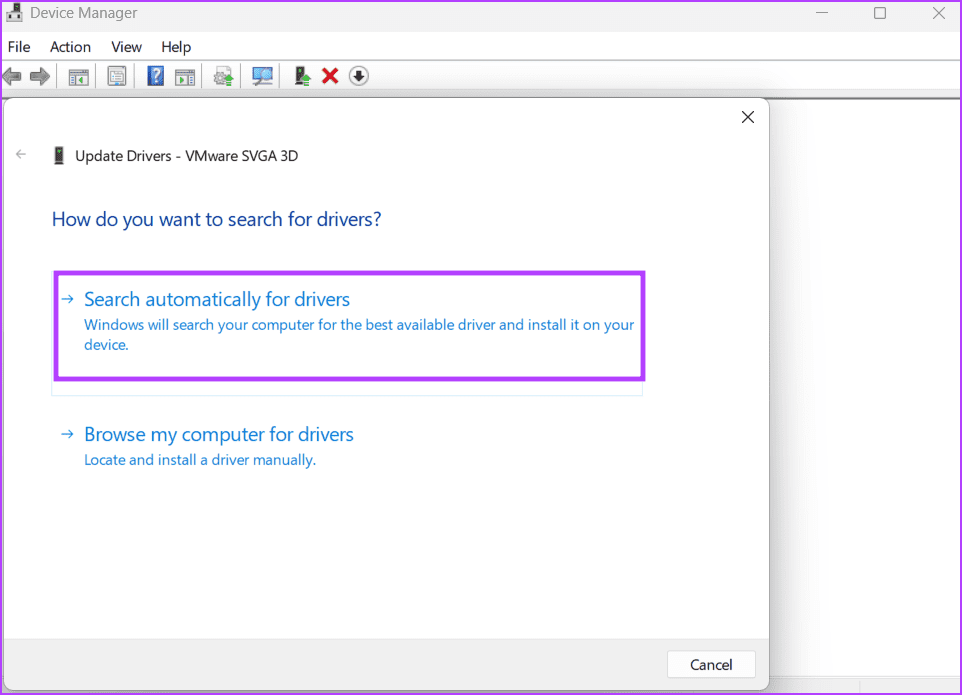
ステップ 3: 「ドライバーを自動的に検索」オプションをクリックします。 PC 用の最新の GPU ドライバーがダウンロードされ、インストールされるまで待ちます。
ステップ 4: デバイス マネージャーを閉じます。
4.ハードウェアとデバイスのトラブルシューティング ツールを実行します
ハードウェアとデバイスのトラブルシューティングでは、PC の問題を特定して修正できます。 Microsoft はこのツールを削除する予定ですが、コマンド プロンプトを使用してアクセスすることはできます。その方法は次のとおりです:
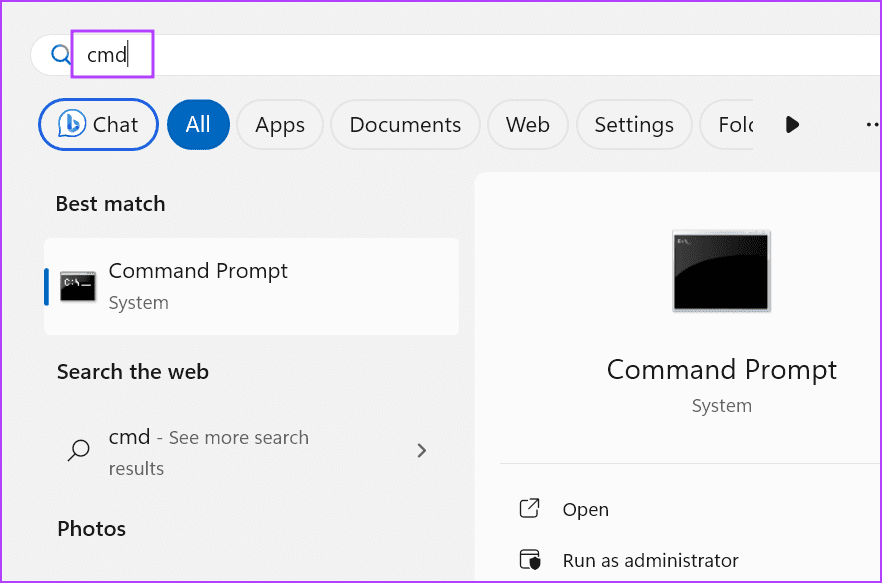
ステップ 1: Windows キーを押して、[スタート] メニューを開きます。検索ボックスに「cmd 」と入力し、Ctrl Shift Enter キーボード ショートカットを同時に押します。
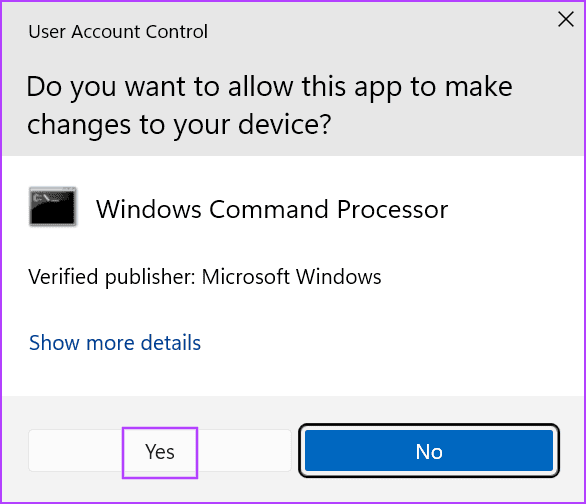
ステップ 2: ユーザー アカウント制御ウィンドウが起動します。 [はい] ボタンをクリックして、管理者権限でコマンド プロンプトを開きます。
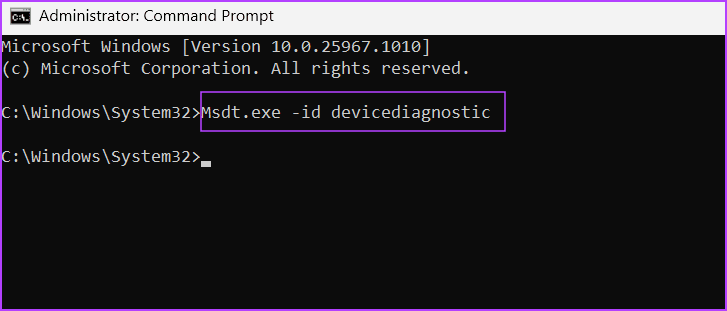
ステップ 3: 次のコマンドを入力し、Enter キーを押して、ハードウェアとデバイスのトラブルシューティング ツールを起動します。
<code>Msdt.exe -id devicediagnostic</code>
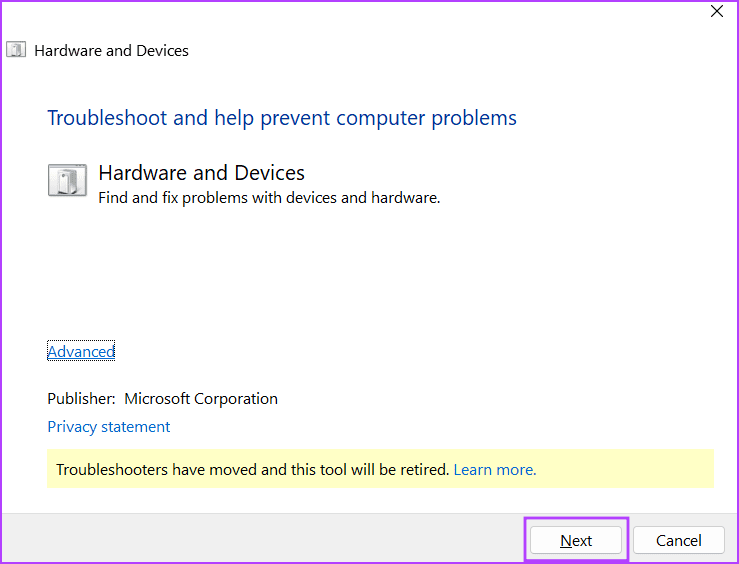
ステップ 4: 「次へ」ボタンをクリックします。
Step 5: Wait for the utility to identify and automatically fix problems on your PC.
Step 6: Close the troubleshooter window.
5. Tweak Windows Performance Settings
You must change the Windows Performance settings to fix your PC’s ‘display driver failed to load’ issue. This method worked wonders for some users whose Desktop Window Management program crash was the reason behind the display driver problem. Here’s how:
Step 1: Press the Windows key to open the Start menu. Type the following command in the search box and press Enter to launch the advanced setting window:
<code>%windir%\system32\SystemPropertiesPerformance.exe</code>
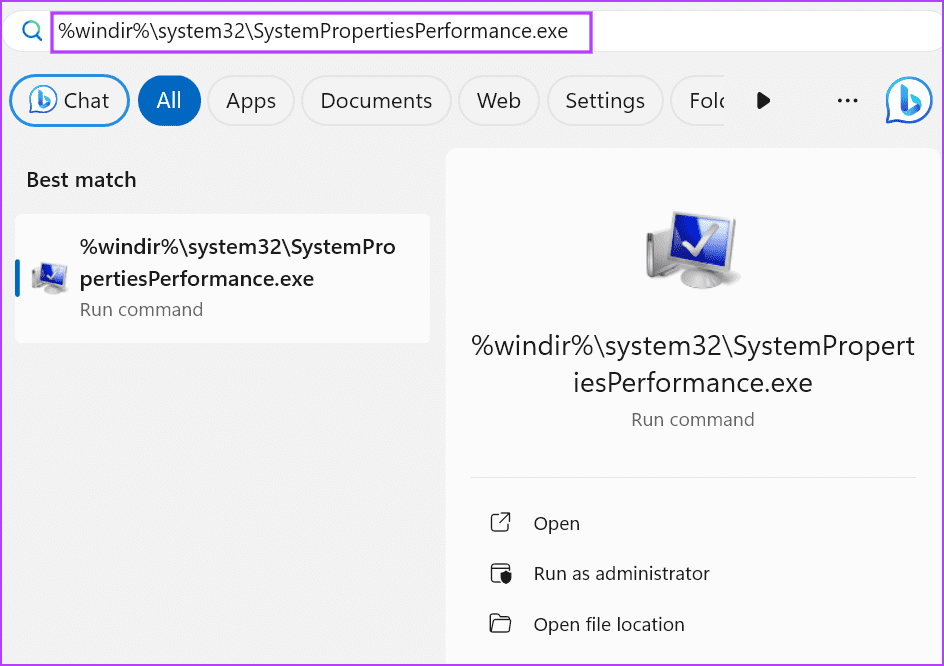
Step 2: Click on the ‘Adjust for best performance’ radio button.
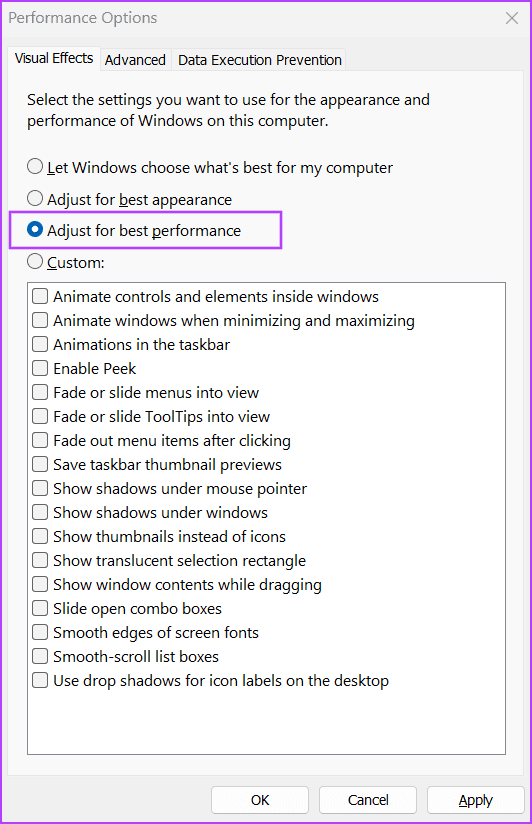
Step 3: Click on the Apply button and then click on the OK button.
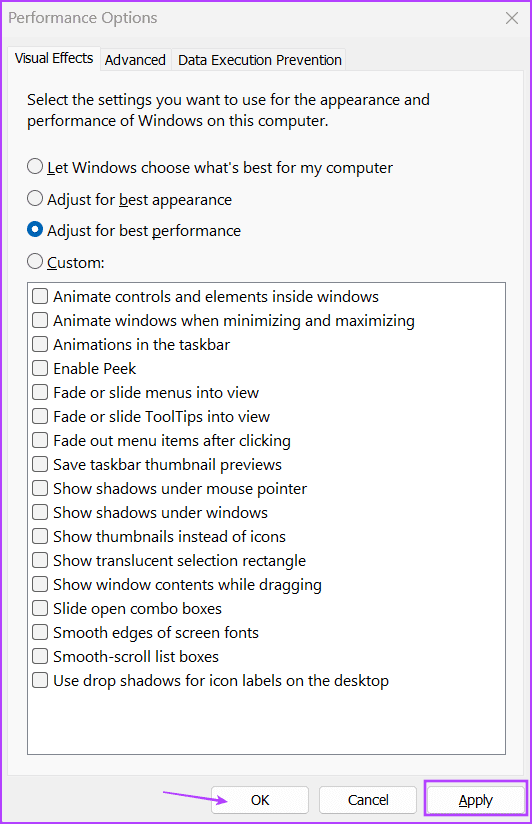
Step 4: Restart your PC.
6. Remove Graphics Card Driver Using DDU and Manually Reinstall
If updating the graphics card drivers and running the hardware and devices troubleshooter doesn’t have any effect, and you still see the ‘failed to initialize display adapter’ error, you must remove and reinstall the GPU drivers. For this, you can use the Display Driver Uninstaller (DDU) tool, which wipes all the remnant files related to the GPU drivers. Here’s how:
Step 1: Download the portable version of the Display Driver Uninstaller (DDU) tool.
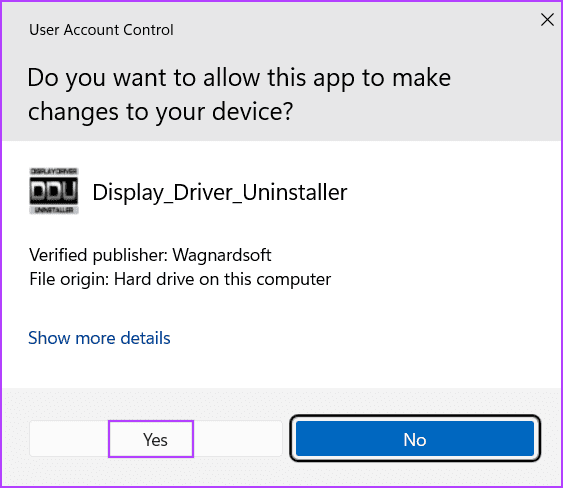
Step 2: Extract the tool and launch it using the executable file. When the User Account Control window pops up, click on the Yes button.
Step 3: Click on the Select device type drop-down list. Then click on the GPU option.
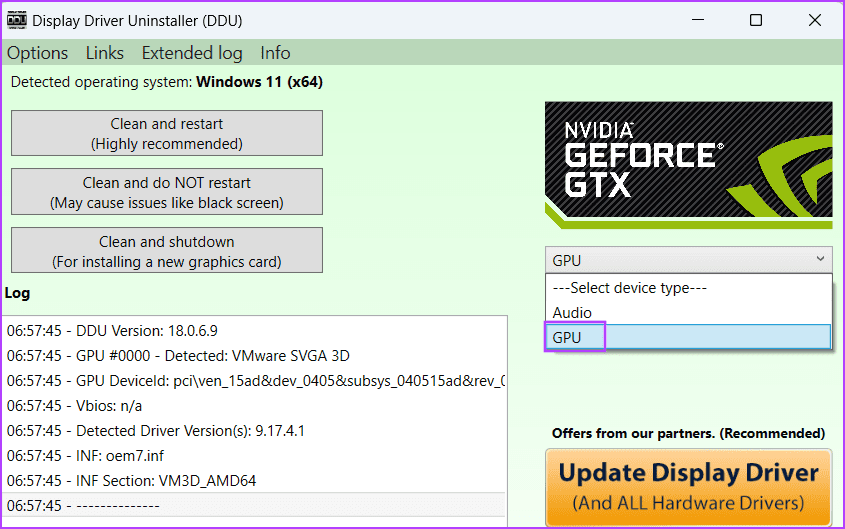
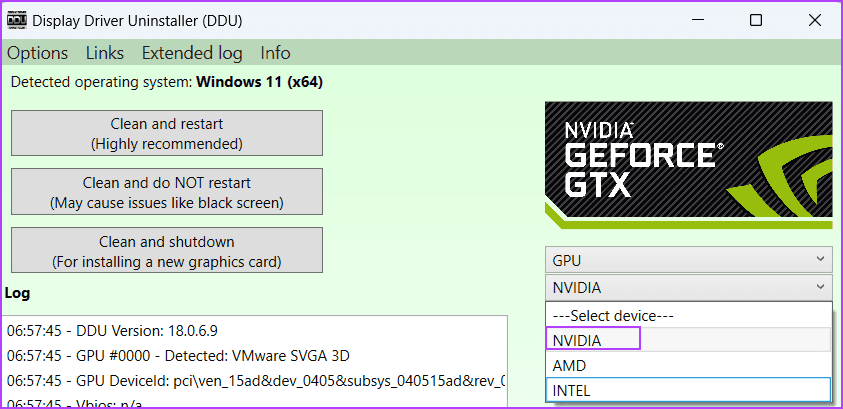
Step 4: Click on the device drop-down list to expand it. Select your GPU name in the list.
Step 5: Click on the Clean and restart option.
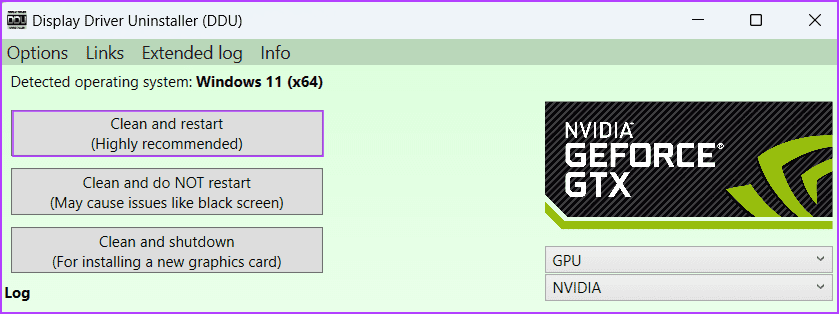
Step 6: Display Driver Uninstaller will start the GPU driver removal process and restart your PC.
Download the latest version of the graphics drivers from your GPU manufacturer’s website and install it on your PC.
7. Modify the System Registry
You can modify the TDR values to resolve this bothersome graphics driver in Windows 11. This change will make Windows wait longer for a response from the GPU. But before doing that, create a registry backup and export it to an external storage drive. Then, repeat the following steps:
Step 1: Press the Windows key to open the Start menu. Type cmd in the search box and simultaneously press Ctrl + Shift + Enter keyboard shortcut.

Step 2: The User Account Control window will open. Click on the Yes button to launch the Command Prompt with admin privileges.

Step 3: Type the following command and press Enter to set a timeout of 60 seconds:
<code>reg add "HKEY_LOCAL_MACHINE\SYSTEM\CurrentControlSet\Control\GraphicsDrivers" /v TdrDelay /t REG_DWORD /d 60 /f</code>
Step 4: Execute the following command to increase the time before Windows throws a bug-check:
<code>reg add "HKEY_LOCAL_MACHINE\SYSTEM\CurrentControlSet\Control\GraphicsDrivers" /v TdrDdiDelay /t REG_DWORD /d 60 /f</code>
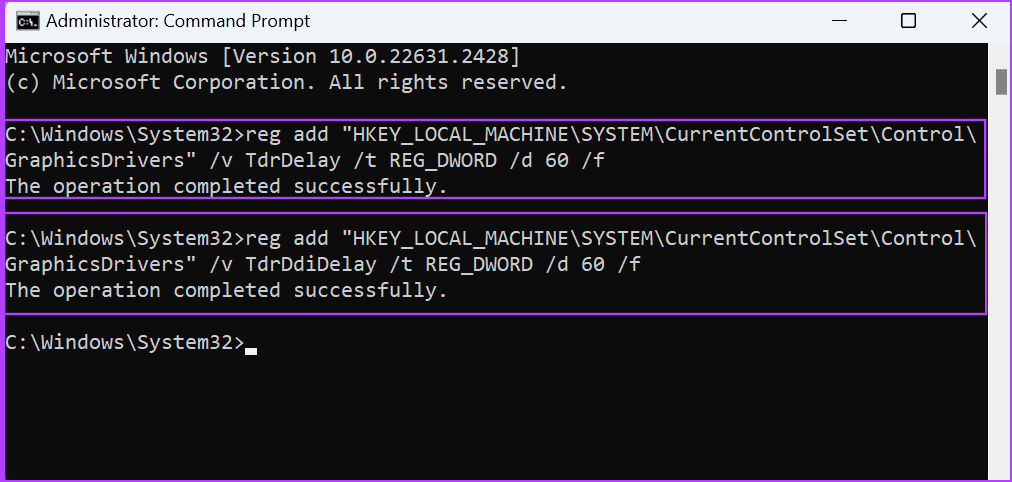
Step 5: Close the Command Prompt window and restart your PC.
8. Use System Restore
If modifying the registry failed to impact the error, try applying a System Restore point. Here’s how:
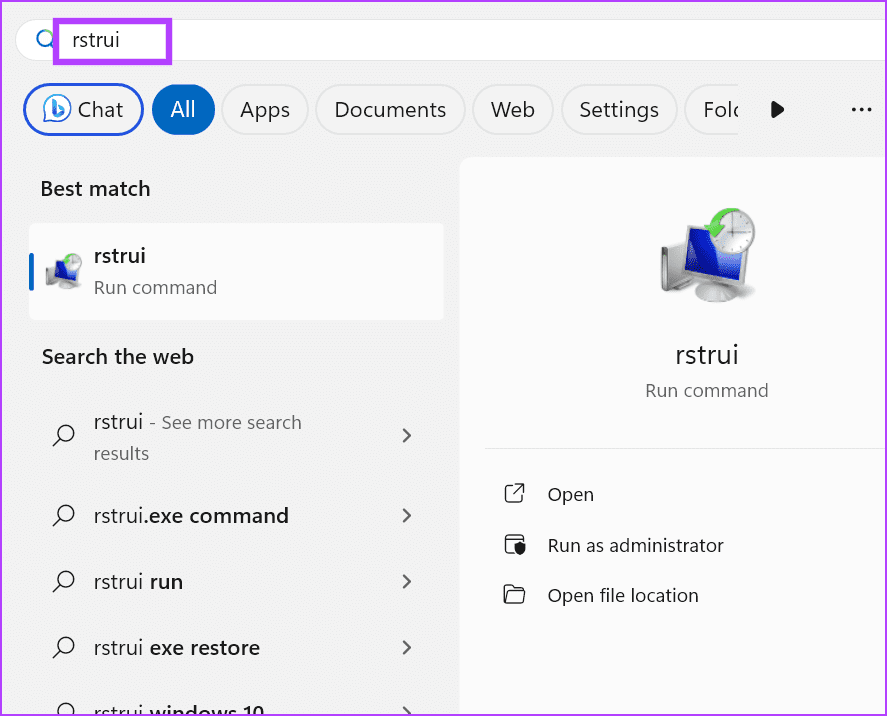
Step 1: Press the Windows key to open the Start menu. Type rstrui in the search bar and press Enter to open the System Restore window.
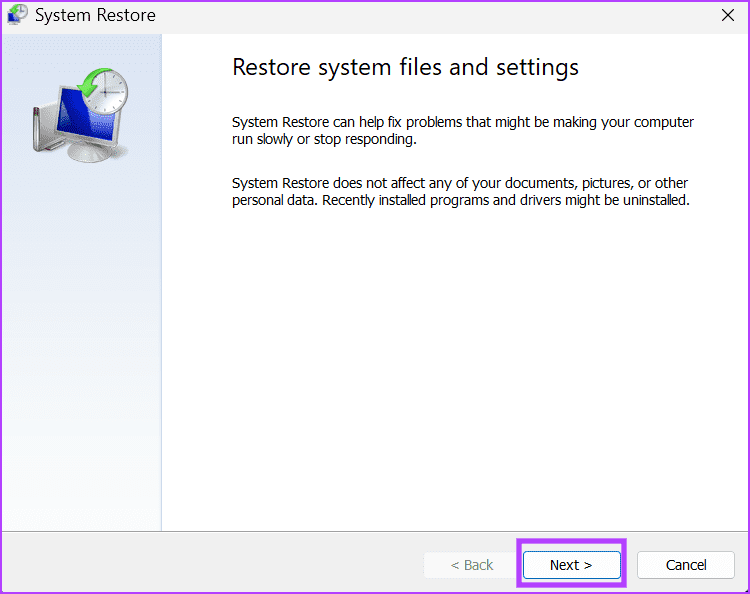
Step 2: Click on the Next button.
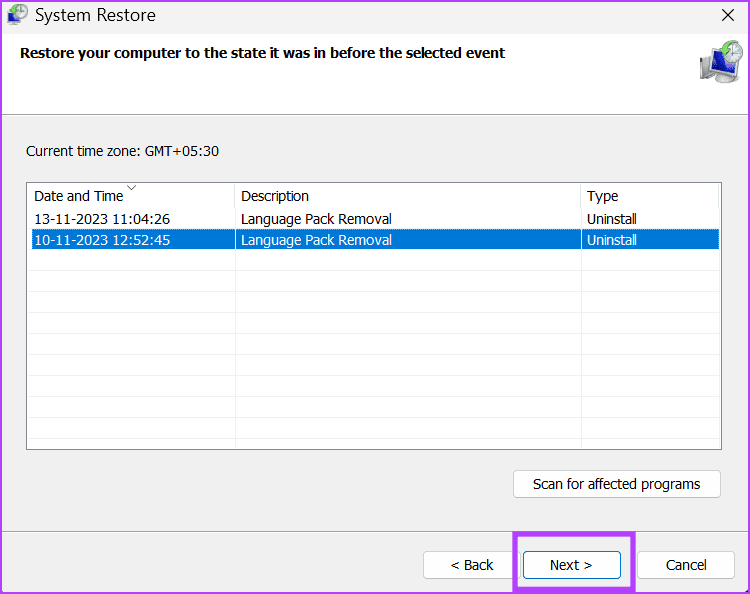
Step 3: Pick a restore point from the list and follow the on-screen instructions to apply the restore points on your PC.
9. Reset Your PC
Performing an In-place Upgrade is a great way to keep all the personal files and installed apps. But since it will keep the installed drivers, it is better to reset your PC. You can choose to save the personal files but will have to install the GPU drivers and all other programs manually. Here’s how to do it:
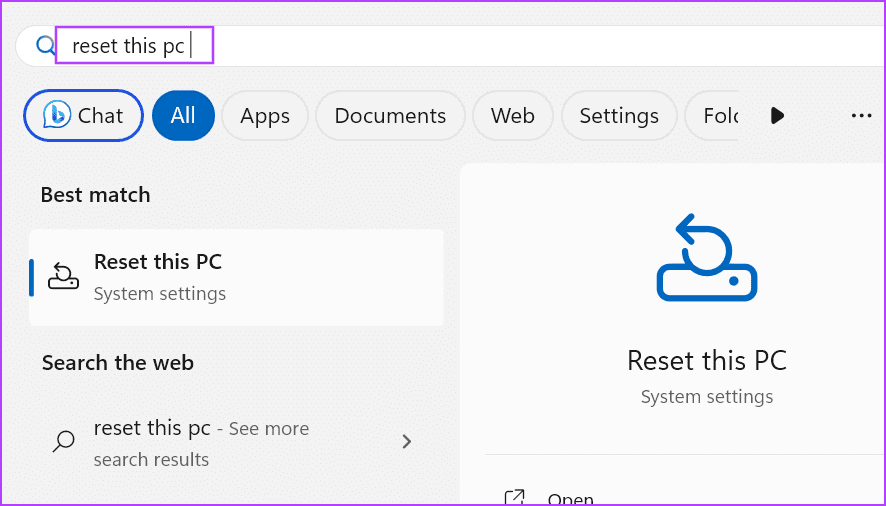
Step 1: Press the Windows key to open the Start menu. Type reset this pc in the search bar and press Enter to open the Settings app.
Step 2: Go to the Recovery options section. Click on the Reset PC button.
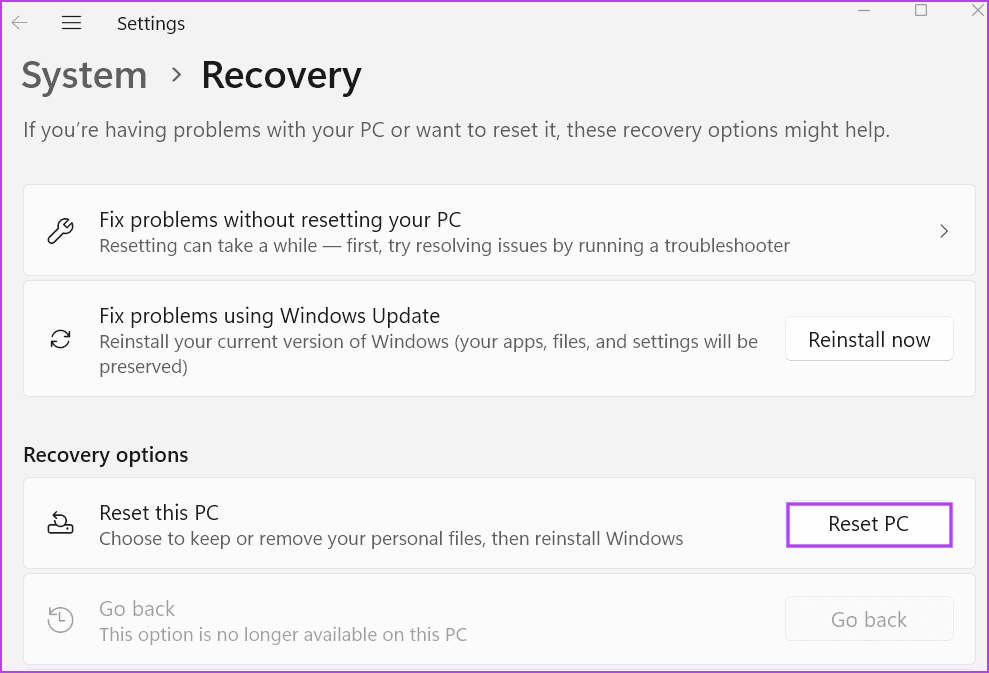
Step 3: Select the Keep my files in the Reset this PC window to save your personal files from deletion.
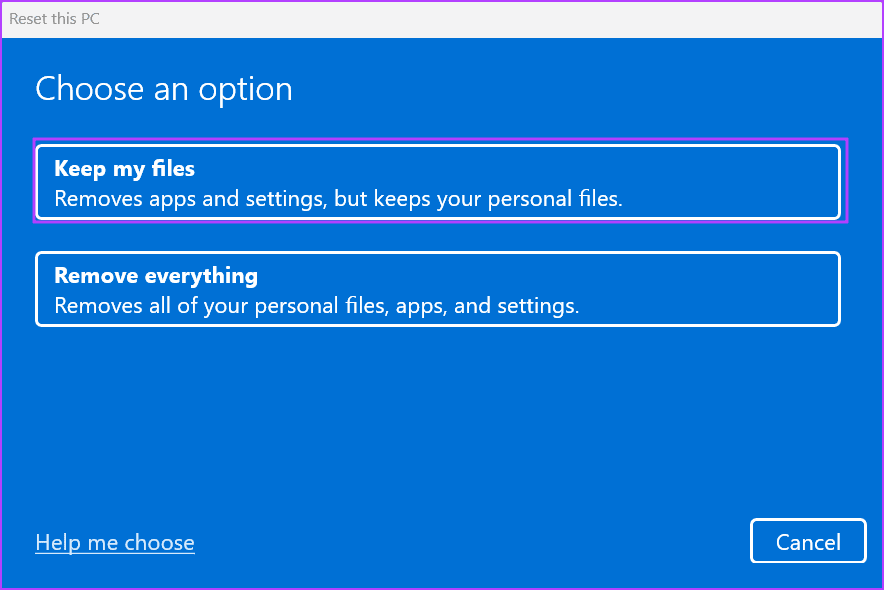
Follow the on-screen instructions to begin the reset process. Your PC will restart several times to reinstall Windows and boot to the lock screen.
After logging in, download and install all the system drivers from your OEM manufacturer’s website or using the driver disk or ISO file provided by your manufacturer. In the case of a custom PC, you must download drivers for each component separately.
10. Get Your GPU and PSU Checked
After exhausting all the software-related fixes, if you still face the display driver issue, it’s time to get the GPU inspected by a technician for hardware defects. Some users also face issues due to a weak or faulty power supply unit, so ensure get that checked and replaced, if required.
Fix GPU Issues
These were the ten methods to fix the ‘Display Driver Failed to Start’ error in Windows 10 and 11 PCs. Restart GPU drivers, inspect physical connections, and use a powered VGA-USB adapter. After that, update or reinstall the drivers, adjust the Windows performance settings, and modify the system registry. Lastly, do a system reset and replace faulty hardware.
以上がWindows 10および11の「ディスプレイドライバーの起動に失敗しました」エラーを修正する10の方法の詳細内容です。詳細については、PHP 中国語 Web サイトの他の関連記事を参照してください。

