
ホームページ >Java >&#&チュートリアル >Spring Security によるマイクロサービスの保護: JWT の実装
Spring Security によるマイクロサービスの保護: JWT の実装

- PHPzオリジナル
- 2024-08-24 06:42:38667ブラウズ
JSON ウェブトークン (JWT)
JWT (JSON Web Token) は、二者間 (クライアントとサーバーなど) で情報を JSON オブジェクトとして安全に送信するための方法です。コンパクトかつ URL セーフになるように設計されているため、URL やヘッダー内で簡単に渡すことができます。
- ヘッダー
- ペイロード
- 署名
ヘッダー
ヘッダーは通常、トークンのタイプ (JWT) と使用されている署名アルゴリズム (HMAC SHA256 や RSA など) の 2 つの部分で構成されます。
{
"alg":"HS256",
"type":"JWT"
}
ペイロード
ここに実際のデータが保存されます。これには、ユーザー ID、ロール、有効期限、その他のクレーム (ユーザーまたはセッションに関するデータ) などの情報が含まれる場合があります。
{
"メール":"ayushstwt@gmail.com",
"名前":"アユシュ"
}
署名
トークンの整合性を保証します。これは、トークンが変更されていないことを保証するセキュリティ機能です。これは、指定されたアルゴリズムを使用して、エンコードされたヘッダーとペイロードを秘密キーと組み合わせることで作成されます。この署名は、サーバーがトークンが正当なものであり、改ざんされていないことを検証するのに役立ちます。
JWTのメリット
資格情報を繰り返し送信する必要はありません: JWT を使用すると、リクエストのたびにユーザー名とパスワードを送信する必要がありません。代わりに、一度ログインすると、サーバーからトークンが与えられます。その後、リクエストごとにこのトークンを送信して身元を証明し、プロセスの安全性と効率性を高めます。
組み込みの有効期限: 各 JWT には有効期限があり、これは特定の期間のみ有効であることを意味します。これにより、トークンが何らかの方法で傍受された場合に長期にわたる悪用のリスクが軽減されます。有効期限が切れると、ユーザーは再度ログインして新しいトークンを取得する必要があり、セキュリティ層が追加されます。
Spring Boot を使用した JWT は、ログイン後にトークンを発行することでユーザー認証を安全に管理します。これらのトークンはリクエストごとに送信されるため、資格情報を繰り返し送信することなく、安全でステートレスな通信が確保されます。
ステートレス通信 は、サーバーが過去のリクエストを記憶していないことを意味します。各リクエストには必要なもの (JWT など) がすべて含まれるため、サーバーはセッション情報を保存しません。
Java Spring Boot アプリケーションに JWT を実装するには、いくつかの手順が必要です。開始するための簡単な概要を次に示します:
1.依存関係を追加
必要な依存関係を pom.xml ファイルに含めます
                <dependency>
            <groupId>io.jsonwebtoken</groupId>
            <artifactId>jjwt-api</artifactId>
            <version>0.12.5</version>
        </dependency>
        <dependency>
            <groupId>io.jsonwebtoken</groupId>
            <artifactId>jjwt-impl</artifactId>
            <version>0.12.5</version>
            <scope>runtime</scope>
        </dependency>
        <dependency>
            <groupId>io.jsonwebtoken</groupId>
            <artifactId>jjwt-jackson</artifactId>
            <version>0.12.5</version>
            <scope>runtime</scope>
        </dependency>
JWT を使用して Spring-Boot アプリケーションを作成するために必要なすべての依存関係
<?xml version="1.0" encoding="UTF-8"?>
<project xmlns="http://maven.apache.org/POM/4.0.0" xmlns:xsi="http://www.w3.org/2001/XMLSchema-instance"
    xsi:schemaLocation="http://maven.apache.org/POM/4.0.0 https://maven.apache.org/xsd/maven-4.0.0.xsd">
    <modelVersion>4.0.0</modelVersion>
    <parent>
        <groupId>org.springframework.boot</groupId>
        <artifactId>spring-boot-starter-parent</artifactId>
        <version>3.3.3</version>
        <relativePath/> <!-- lookup parent from repository -->
    </parent>
    <groupId>com.tier3Hub</groupId>
    <artifactId>user-auth-service</artifactId>
    <version>0.0.1-SNAPSHOT</version>
    <name>user-auth-service</name>
    <description>The user-auth-service is a microservice responsible for handling user authentication and authorization within a distributed system. It is designed to manage user login, registration, and secure access to various services using robust security practices. This service implements authentication mechanisms like JSON Web Tokens (JWT) and integrates with OAuth 2.0 for third-party authentication. Built with Spring Boot, it ensures scalability, reliability, and easy integration with other microservices in the system.</description>
    <url/>
    <licenses>
        <license/>
    </licenses>
    <developers>
        <developer/>
    </developers>
    <scm>
        <connection/>
        <developerConnection/>
        <tag/>
        <url/>
    </scm>
    <properties>
        <java.version>21</java.version>
    </properties>
    <dependencies>
        <dependency>
            <groupId>org.springframework.boot</groupId>
            <artifactId>spring-boot-starter-actuator</artifactId>
        </dependency>
        <dependency>
            <groupId>org.springframework.boot</groupId>
            <artifactId>spring-boot-starter-data-jpa</artifactId>
        </dependency>
        <dependency>
            <groupId>org.springframework.boot</groupId>
            <artifactId>spring-boot-starter-security</artifactId>
        </dependency>
        <dependency>
            <groupId>org.springframework.boot</groupId>
            <artifactId>spring-boot-starter-web</artifactId>
        </dependency>
        <dependency>
            <groupId>io.jsonwebtoken</groupId>
            <artifactId>jjwt-api</artifactId>
            <version>0.12.5</version>
        </dependency>
        <dependency>
            <groupId>io.jsonwebtoken</groupId>
            <artifactId>jjwt-impl</artifactId>
            <version>0.12.5</version>
            <scope>runtime</scope>
        </dependency>
        <dependency>
            <groupId>io.jsonwebtoken</groupId>
            <artifactId>jjwt-jackson</artifactId>
            <version>0.12.5</version>
            <scope>runtime</scope>
        </dependency>
        <dependency>
            <groupId>com.mysql</groupId>
            <artifactId>mysql-connector-j</artifactId>
            <scope>runtime</scope>
        </dependency>
        <dependency>
            <groupId>org.projectlombok</groupId>
            <artifactId>lombok</artifactId>
            <optional>true</optional>
        </dependency>
        <dependency>
            <groupId>org.springframework.boot</groupId>
            <artifactId>spring-boot-starter-test</artifactId>
            <scope>test</scope>
        </dependency>
        <dependency>
            <groupId>org.springframework.security</groupId>
            <artifactId>spring-security-test</artifactId>
            <scope>test</scope>
        </dependency>
        <dependency>
            <groupId>org.springframework.boot</groupId>
            <artifactId>spring-boot-starter-validation</artifactId>
        </dependency>
        <dependency>
            <groupId>org.springdoc</groupId>
            <artifactId>springdoc-openapi-starter-webmvc-ui</artifactId>
            <version>2.5.0</version>
        </dependency>
        <dependency>
            <groupId>org.modelmapper</groupId>
            <artifactId>modelmapper</artifactId>
            <version>3.1.1</version>
        </dependency>
    </dependencies>

    <build>
        <plugins>
            <plugin>
                <groupId>org.springframework.boot</groupId>
                <artifactId>spring-boot-maven-plugin</artifactId>
                <configuration>
                    <excludes>
                        <exclude>
                            <groupId>org.projectlombok</groupId>
                            <artifactId>lombok</artifactId>
                        </exclude>
                    </excludes>
                </configuration>
            </plugin>
        </plugins>
    </build>

</project>
次のようなさまざまな種類の依存関係を使用しています
- Spring Boot Starter Actuator: 3.3.3 - モニタリングやヘルスチェックなどの実稼働対応機能を追加します。
- Spring Boot Starter Data JPA: 3.3.3 - JPA サポートによるデータベースの対話を簡素化します。
- Spring Boot Starter Security: 3.3.3 - 認証や認可などのセキュリティ機能を提供します。
- Spring Boot Starter Web: 3.3.3 - RESTful サービスを含む Web アプリケーションの構築をサポートします。
- JJWT API: 0.12.5 - 安全なトークン管理のために JWT の作成と解析を処理します。
- JJWT Impl: 0.12.5 - コアの JWT 機能を実装します。
- JJWT Jackson: 0.12.5 - Jackson を使用した JWT JSON 解析を有効にします。
- MySQL コネクタ: ランタイム - アプリケーションを MySQL データベースに接続します。
- ロンボク島: 指定なし - 注釈を使用して定型コードを削減します。
- Spring Boot Starter Test: 3.3.3 - Spring Boot アプリケーションのテスト サポートを提供します。
- Spring Security Test: 3.3.3 - セキュリティ構成のテストに役立ちます。
- Spring Boot Starter Validation: 3.3.3 - リクエスト オブジェクトとレスポンス オブジェクトの検証サポートを追加します。
- SpringDoc OpenAPI Starter WebMVC UI: 2.5.0 - API ドキュメント用に Swagger UI を統合します。
- ModelMapper: 3.1.1 - 異なるレイヤー間のオブジェクト マッピングを簡素化します。
*2.プロジェクト構造 *

3. application.properties ファイル
に構成を追加します。
spring.application.name=user-auth-service

server.port=8000

spring.datasource.url=jdbc:mysql://localhost:3306/auth_services
spring.datasource.username=root
spring.datasource.password=ayush@123

spring.jpa.hibernate.ddl-auto=update
spring.jpa.show-sql=true

#debug logs
logging.level.org.springframework.security=debug

spring.main.allow-circular-references=true
4. USER エンティティを作成します
package com.tier3Hub.user_auth_service.entity;

import jakarta.persistence.*;
import lombok.AllArgsConstructor;
import lombok.Builder;
import lombok.Data;
import lombok.NoArgsConstructor;

import java.time.LocalDateTime;
import java.util.List;

@AllArgsConstructor
@NoArgsConstructor
@Data
@Builder
@Table
@Entity(name = "User")
public class User {
    @Id
    @GeneratedValue(strategy = GenerationType.IDENTITY)
    private Long id;
    private String username;
    private String password;
    private String email;
    private String phoneNumber;
    private List<String> roles;
    private LocalDateTime createdAt;
    private LocalDateTime updatedAt;
}
** 5. サービス、リポジトリのクラス、インターフェイスを作成します**
リポジトリ.java
package com.tier3Hub.user_auth_service.Repository;

import com.tier3Hub.user_auth_service.entity.User;
import org.springframework.data.jpa.repository.JpaRepository;

public interface AuthRepository extends JpaRepository<User, Long> {

    User findByUsername(String username);
}
サービス.java
package com.tier3Hub.user_auth_service.service;

import com.tier3Hub.user_auth_service.dto.LoginResponse;
import com.tier3Hub.user_auth_service.dto.RegisterDTO;
import com.tier3Hub.user_auth_service.dto.RegisterResponse;

public interface AuthService {
    RegisterResponse register(RegisterDTO registerDTO);
}
6.ログインとサインインのリクエストとレスポンス用の DTO を作成します
loginDTO.java を作成する
package com.tier3Hub.user_auth_service.dto;

import jakarta.validation.constraints.NotBlank;
import jakarta.validation.constraints.Size;
import lombok.AllArgsConstructor;
import lombok.Data;
import lombok.NoArgsConstructor;

@AllArgsConstructor
@NoArgsConstructor
@Data
public class LoginDTO {
    @NotBlank(message = "Username is required")
    @Size(min = 3, max = 20, message = "Username must be between 3 and 20 characters")
    private String username;

    @NotBlank(message = "Password is required")
    private String password;
}
loginResponse.java
package com.tier3Hub.user_auth_service.dto;

import lombok.AllArgsConstructor;
import lombok.Builder;
import lombok.Data;
import lombok.NoArgsConstructor;

@Data
@AllArgsConstructor
@NoArgsConstructor
@Builder
public class LoginResponse {
    private String accessToken;
    private String tokenType = "Bearer";
}
DTO.java を登録
package com.tier3Hub.user_auth_service.dto;

import jakarta.validation.constraints.Email;
import jakarta.validation.constraints.NotBlank;
import jakarta.validation.constraints.Size;
import lombok.AllArgsConstructor;
import lombok.Data;
import lombok.NoArgsConstructor;

@AllArgsConstructor
@NoArgsConstructor
@Data
public class RegisterDTO {
    @NotBlank(message = "Username is required")
    @Size(min = 3, max = 20, message = "Username must be between 3 and 20 characters")
    private String username;

    @NotBlank(message = "Password is required")
    @Size(min = 8, message = "Password must be at least 8 characters")
    private String password;

    @NotBlank(message = "Email is required")
    @Email(message = "Email should be valid")
    private String email;
}
RegisterResponse.java
package com.tier3Hub.user_auth_service.dto;

import lombok.AllArgsConstructor;
import lombok.Data;
import lombok.NoArgsConstructor;

import java.time.LocalDateTime;

@AllArgsConstructor
@NoArgsConstructor
@Data
public class RegisterResponse {
    private Long id;
    private String username;
    private String email;
    private LocalDateTime createdAt;
    private LocalDateTime updatedAt;
}
*7. API からカスタム応答を送信するには、ResponseHandler.java *
を使用します。
package com.tier3Hub.user_auth_service.utils;

import org.springframework.http.HttpStatus;
import org.springframework.http.ResponseEntity;

import java.util.HashMap;
import java.util.Map;

public class ResponseHandler {
    public static ResponseEntity<Object> generateResponse(String message, HttpStatus status, Object responseObj) {
        Map<String, Object> map = new HashMap<String, Object>();
        map.put("message", message);
        map.put("status", status.value());
        map.put("data", responseObj);
        return new ResponseEntity<Object>(map, status);
    }

}
8. for storing some constants we create the class inside the utils package that is ApplicationConstants.java
package com.tier3Hub.user_auth_service.utils;

public class AppConstants {
    public static final String[] PUBLIC_URLS = { "/v3/api-docs/**", "/swagger-ui/**", "/api/auth/register/**", "/api/auth/login/**","/api/auth/registerAdmin/**" };
}
9. for converting the object one to another we use the dependency that is model mapper for configuration that we create the class inside the config package that is ApplicationConfigs.java
package com.tier3Hub.user_auth_service.config;

import org.modelmapper.ModelMapper;
import org.springframework.context.annotation.Bean;
import org.springframework.context.annotation.Configuration;

@Configuration
public class ApplicationConfigs {
    @Bean
    public ModelMapper modelMapper()
    {
        return new ModelMapper();
    }
}
**
This is the basic setup that we do for every spring-boot application we create now securing the rest endpoint with JWT we started.
**
now inside the security package we create the class called JWTFilter.java
The JWTFilter is a custom Spring Security filter that intercepts HTTP requests to validate JWTs. It checks for the "Authorization" header, extracts the token, and retrieves the username. If the token is valid, it creates an authentication token with user details and sets it in the security context, allowing the application to recognize the authenticated user for further processing.
package com.tier3Hub.user_auth_service.security;

import jakarta.servlet.FilterChain;
import jakarta.servlet.ServletException;
import jakarta.servlet.http.HttpServletRequest;
import jakarta.servlet.http.HttpServletResponse;
import org.springframework.beans.factory.annotation.Autowired;
import org.springframework.security.authentication.UsernamePasswordAuthenticationToken;
import org.springframework.security.core.context.SecurityContextHolder;
import org.springframework.security.core.userdetails.UserDetails;
import org.springframework.security.core.userdetails.UserDetailsService;
import org.springframework.security.web.authentication.WebAuthenticationDetailsSource;
import org.springframework.stereotype.Service;
import org.springframework.web.filter.OncePerRequestFilter;

import java.io.IOException;

@Service
public class JWTFilter extends OncePerRequestFilter {
    @Autowired
    private UserDetailsService userDetailsService;

    @Autowired
    private JWTUtil jwtUtil;

    @Override
    protected void doFilterInternal(HttpServletRequest request, HttpServletResponse response, FilterChain chain) throws ServletException, IOException {
        String authorizationHeader = request.getHeader("Authorization");
        String username = null;
        String jwt = null;
        if (authorizationHeader != null && authorizationHeader.startsWith("Bearer ")) {
            jwt = authorizationHeader.substring(7);
            username = jwtUtil.extractUsername(jwt);
        }
        if (username != null) {
            UserDetails userDetails = userDetailsService.loadUserByUsername(username);
            if (jwtUtil.validateToken(jwt)) {
                UsernamePasswordAuthenticationToken auth = new UsernamePasswordAuthenticationToken(userDetails, null, userDetails.getAuthorities());
                auth.setDetails(new WebAuthenticationDetailsSource().buildDetails(request));
                SecurityContextHolder.getContext().setAuthentication(auth);
            }
        }
        chain.doFilter(request, response);
    }
}
create the class JWTUtil.java
The JWTUtil class manages JWT operations, including extracting usernames and expiration dates from tokens. It generates new tokens using a secret key and validates existing tokens by checking their expiration. The class uses HMAC for signing and includes methods to parse claims and determine if tokens are expired, ensuring secure authentication and authorization in the application.
package com.tier3Hub.user_auth_service.security;

import io.jsonwebtoken.Claims;
import io.jsonwebtoken.Jwts;
import io.jsonwebtoken.security.Keys;
import org.springframework.stereotype.Service;

import javax.crypto.SecretKey;
import java.util.Date;
import java.util.HashMap;
import java.util.Map;

@Service
public class JWTUtil {

    private String SECRET_KEY = "TaK+HaV^uvCHEFsEVfypW#7g9^k*Z8$V";

    private SecretKey getSigningKey() {
        return Keys.hmacShaKeyFor(SECRET_KEY.getBytes());
    }

    public String extractUsername(String token) {
        Claims claims = extractAllClaims(token);
        return claims.getSubject();
    }

    public Date extractExpiration(String token) {
        return extractAllClaims(token).getExpiration();
    }

    private Claims extractAllClaims(String token) {
        return Jwts.parser()
                .verifyWith(getSigningKey())
                .build()
                .parseSignedClaims(token)
                .getPayload();
    }

    private Boolean isTokenExpired(String token) {
        return extractExpiration(token).before(new Date());
    }

    public String generateToken(String username) {
        Map<String, Object> claims = new HashMap<>();
        return createToken(claims, username);
    }

    private String createToken(Map<String, Object> claims, String subject) {
        return Jwts.builder()
                .claims(claims)
                .subject(subject)
                .header().empty().add("typ","JWT")
                .and()
                .issuedAt(new Date(System.currentTimeMillis()))
                .expiration(new Date(System.currentTimeMillis() + 1000 * 60 * 50)) // 5 minutes expiration time
                .signWith(getSigningKey())
                .compact();
    }

    public Boolean validateToken(String token) {
        return !isTokenExpired(token);
    }
}
*configure the Spring security and add some modifictaion we create the class SecurityConfig.java *
The SecurityConfig class sets up security for the application using Spring Security. It defines access rules, allowing public endpoints while restricting others based on user roles. The class incorporates a JWT filter to validate tokens and uses BCrypt for password encoding. It also configures an authentication manager with a custom user details service for secure user authentication.
package com.tier3Hub.user_auth_service.config;

import com.tier3Hub.user_auth_service.security.JWTFilter;
import com.tier3Hub.user_auth_service.service.UserInfoConfigManager;
import com.tier3Hub.user_auth_service.utils.AppConstants;
import org.springframework.beans.factory.annotation.Autowired;
import org.springframework.context.annotation.Bean;
import org.springframework.context.annotation.Configuration;
import org.springframework.security.authentication.AuthenticationManager;
import org.springframework.security.config.annotation.authentication.builders.AuthenticationManagerBuilder;
import org.springframework.security.config.annotation.authentication.configuration.AuthenticationConfiguration;
import org.springframework.security.config.annotation.web.builders.HttpSecurity;
import org.springframework.security.config.annotation.web.configuration.EnableWebSecurity;
import org.springframework.security.config.annotation.web.configurers.AbstractHttpConfigurer;
import org.springframework.security.crypto.bcrypt.BCryptPasswordEncoder;
import org.springframework.security.crypto.password.PasswordEncoder;
import org.springframework.security.web.SecurityFilterChain;
import org.springframework.security.web.authentication.UsernamePasswordAuthenticationFilter;

@Configuration
@EnableWebSecurity
public class SecurityConfig {
    @Autowired
    private JWTFilter jwtFilter;

    @Autowired
    private UserInfoConfigManager userInfoConfigManager;

    @Bean
    public SecurityFilterChain securityFilterChain(HttpSecurity http) throws Exception {
        return http.authorizeHttpRequests(request -> request
                        .requestMatchers(AppConstants.PUBLIC_URLS).permitAll()
                        .requestMatchers("/api/test/public/hello/**").hasAnyRole("USER","ADMIN")
                        .requestMatchers("/api/test/private/**").hasRole("ADMIN")
                        .anyRequest()
                        .authenticated())
                .csrf(AbstractHttpConfigurer::disable)
                .addFilterBefore(jwtFilter, UsernamePasswordAuthenticationFilter.class)
                .build();
    }

    @Autowired
    public void configureGlobal(AuthenticationManagerBuilder auth) throws Exception {
        auth.userDetailsService(userInfoConfigManager).passwordEncoder(passwordEncoder());
    }

    @Bean
    public PasswordEncoder passwordEncoder() {
        return new BCryptPasswordEncoder();
    }

    @Bean
    public AuthenticationManager authenticationManager(AuthenticationConfiguration auth) throws Exception {
        return auth.getAuthenticationManager();
    }
}
The securityFilterChain method configures access rules for different API endpoints in the Spring application. It permits public URLs and applies role-based access control for user and admin roles. Role-based authentication restricts resource access based on user roles (e.g., USER, ADMIN). In Spring Boot, you define roles and configure security settings in the SecurityConfig class to specify access permissions. During user registration, assign roles, and use annotations like @PreAuthorize to enforce role checks in controllers. This approach enhances security, allows easy permission management, and simplifies user access rights as the application scales. Implementing role-based auth provides flexibility and maintainability for your user management system. CSRF protection is disabled, and a custom JWT filter is added to authenticate requests based on JSON Web Tokens, ensuring secure and controlled access to resources.
configureGlobal method handle configures global authentication settings in a Spring application. It uses a custom user details service for loading user data and a BCrypt password encoder for secure password hashing. Additionally, it provides an AuthenticationManager bean for handling authentication processes, ensuring a secure and efficient user authentication system that leverages strong password management practices.
create the endpoints for register and login
package com.tier3Hub.user_auth_service.Controller;


import com.tier3Hub.user_auth_service.dto.LoginDTO;
import com.tier3Hub.user_auth_service.dto.LoginResponse;
import com.tier3Hub.user_auth_service.dto.RegisterDTO;
import com.tier3Hub.user_auth_service.security.JWTUtil;
import com.tier3Hub.user_auth_service.service.AuthService;
import com.tier3Hub.user_auth_service.service.UserInfoConfigManager;
import com.tier3Hub.user_auth_service.utils.ResponseHandler;
import jakarta.validation.Valid;
import org.springframework.beans.factory.annotation.Autowired;
import org.springframework.http.HttpStatus;
import org.springframework.http.ResponseEntity;
import org.springframework.security.authentication.AuthenticationManager;
import org.springframework.security.authentication.UsernamePasswordAuthenticationToken;
import org.springframework.security.core.Authentication;
import org.springframework.security.core.context.SecurityContext;
import org.springframework.security.core.userdetails.UserDetails;
import org.springframework.web.bind.annotation.PostMapping;
import org.springframework.web.bind.annotation.RequestBody;
import org.springframework.web.bind.annotation.RequestMapping;
import org.springframework.web.bind.annotation.RestController;

@RestController
@RequestMapping("/api/auth")
public class AuthController {
    @Autowired
    JWTUtil jwtUtil;

    @Autowired
    AuthService authService;

    @Autowired
    AuthenticationManager authenticationManager;

    @Autowired
    private UserInfoConfigManager userInfoConfigManager;

    @PostMapping("/register")
    public ResponseEntity<Object> register(@Valid @RequestBody RegisterDTO registerDTO) {
        return ResponseHandler.generateResponse("User registered successfully", HttpStatus.OK, authService.register(registerDTO));
    }

    @PostMapping("/login")
    public ResponseEntity<Object> login(@Valid @RequestBody LoginDTO loginDTO) {
        try {
            Authentication authenticate = authenticationManager
                    .authenticate(new UsernamePasswordAuthenticationToken(loginDTO.getUsername(), loginDTO.getPassword()));
            UserDetails userDetails = userInfoConfigManager.loadUserByUsername(loginDTO.getUsername());
            String jwt = jwtUtil.generateToken(userDetails.getUsername());
            LoginResponse loginResponse = LoginResponse
                    .builder()
                    .accessToken(jwt)
                    .build();
            return ResponseHandler.generateResponse("User logged in successfully", HttpStatus.OK, loginResponse);
        }
        catch (Exception e)
        {
            return new ResponseEntity<>("Incorrect username or password", HttpStatus.BAD_REQUEST);
        }
    }
}
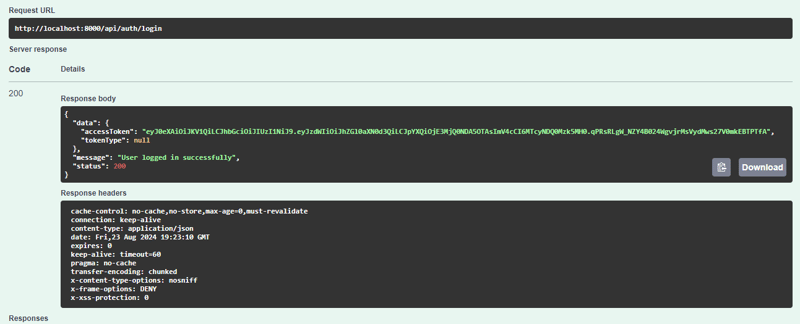
This login method in the AuthController handles user login requests. It takes a LoginDTO containing the username and password, validates them, and attempts authentication using the AuthenticationManager. Upon successful authentication, it retrieves user details and generates a JWT token using the JWTUtil class. The token is then included in a LoginResponse object and returned with a success message. If authentication fails, it catches the exception and returns a "Incorrect username or password" response with a 400 status code.
generateToken(String username): This method creates an empty claims map and calls the createToken method with the username as the subject. It serves as the entry point for token generation.
c*reateToken(Map claims, String subject):* This method builds the JWT using the Jwts.builder(). It sets the claims, subject, and token metadata, such as issue date and expiration time (set to 5 minutes). The token is then signed with a secret key and compacted into a string format for transmission.
Testing
now we run the application
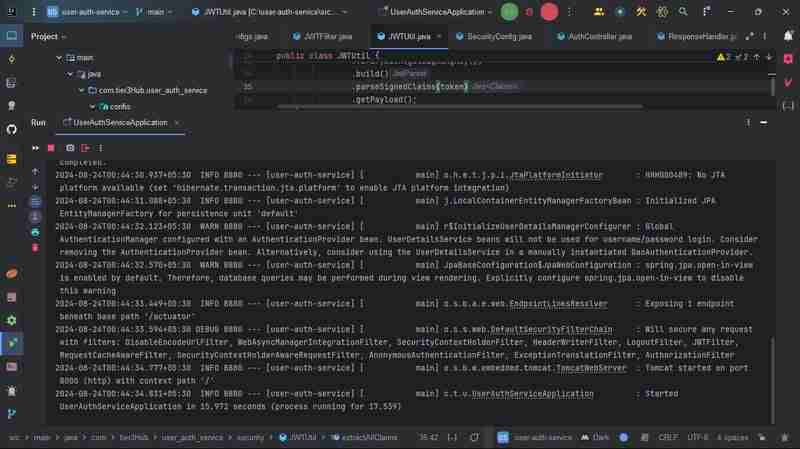
and hit the URL here our application is runing on 8000 port
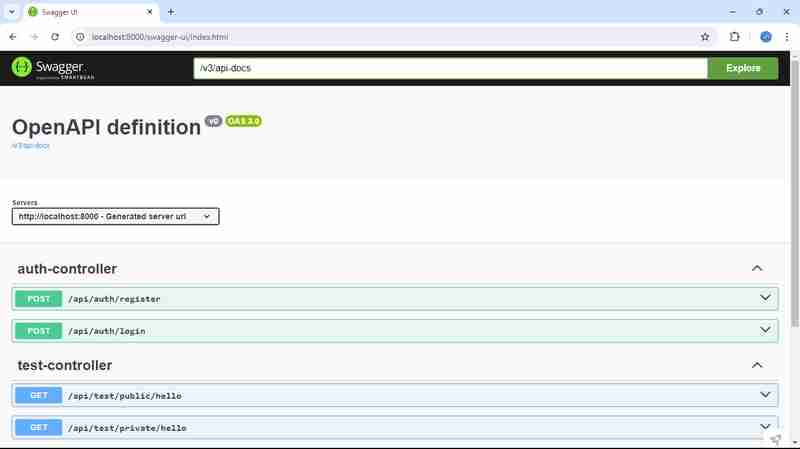
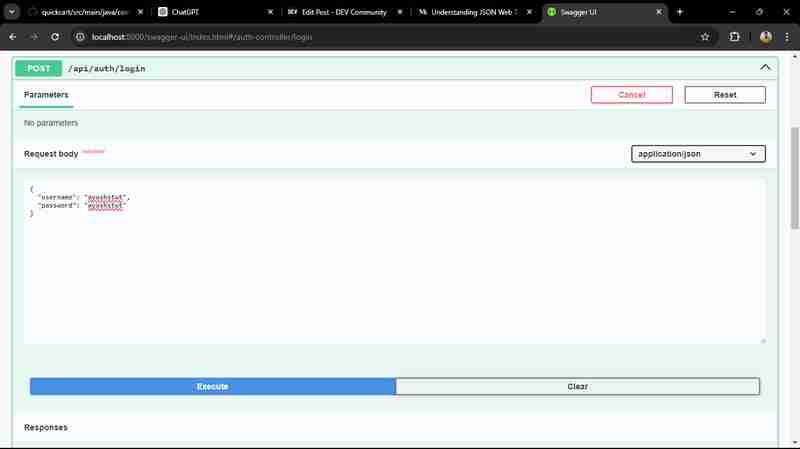
http://localhost:8000/swagger-ui/index.html
プロジェクトで Swagger を使用すると、API のドキュメントとテストが強化されます。開発者が API を探索し、リクエスト/レスポンス構造を理解し、ドキュメントから直接エンドポイントをテストするためのユーザーフレンドリーなインターフェイスを提供します。 Swagger を統合すると、コードの注釈に基づいて API ドキュメントを自動生成できるようになり、フロントエンド開発者とバックエンド開発者の両方が効率的に共同作業しやすくなります。
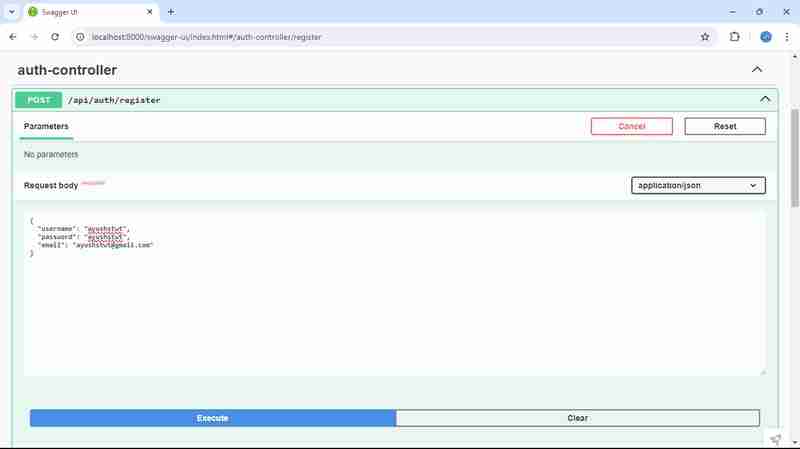
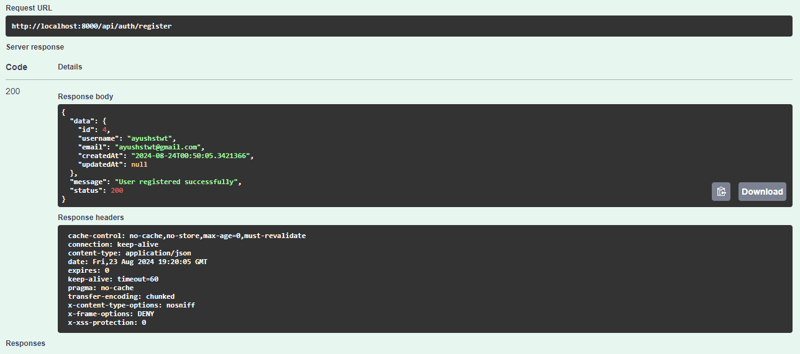
まずユーザーを登録します
次のような応答が得られます
その後、ユーザーをログインします
次のような応答が得られます
結論
このプロジェクトは、Spring Boot アプリケーションで JWT (JSON Web Token) を使用してロールベースの認証を実装します。これは、ユーザーが登録してログインし、割り当てられたロール (USER や ADMIN など) に基づいてアクセスを許可する JWT を受け取る安全な認証メカニズムを備えています。 SecurityConfig クラスはアクセス許可を構成し、パブリック エンドポイントに誰でもアクセスできるようにしながら、機密性の高い操作を許可されたユーザーのみに制限します。 JWTUtil クラスは、トークンの作成、検証、およびユーザーの抽出を処理します。全体として、この設定によりセキュリティが強化され、アプリケーション全体でシームレスで堅牢なアクセス制御が可能になります。
このプロジェクトでは、ユーザーの認証と認可に Spring Security を活用する包括的なセキュリティ フレームワークを採用しています。 AuthController はユーザーの登録とログインを容易にし、認証が成功すると JWT を生成します。アプリケーションは JWTFilter を使用してリクエストをインターセプトし、トークンを検証して、認証されたユーザーのみが保護されたリソースにアクセスできるようにします。役割ベースのアクセス制御を統合することにより、このプロジェクトは柔軟で安全なユーザー管理システムを提供します。この設計により、セキュリティが向上するだけでなく、繰り返しログインする必要性が最小限に抑えられるため、ユーザー エクスペリエンスも向上します。全体として、スケーラブルで安全なマイクロサービスを構築するための強固な基盤を築きます。
私の GitHub リポジトリでユーザー認証サービスの完全なソース コードを探索できます。このプロジェクトでは、ユーザー登録、ログイン、認証に JWT を使用した安全なアクセスなどのさまざまな機能を紹介します。自由にチェックしたり、投稿したり、独自のプロジェクトの参考として使用したりしてください!
GitHub リポジトリ: https://github.com/ishrivasayush/user-auth-service
JSON Web Token (JWT) について詳しく知りたい方は、jwt.io にアクセスすることをお勧めします。このリソースでは、JWT の仕組み、構造、実践例など、JWT に関する包括的な情報を提供します。これは、最新の Web アプリケーションに不可欠なトークンベースの認証と認可を理解するための優れた出発点となります。初心者でも、知識を新たにしたい場合でも、jwt.io はユーザー セッションを安全に管理するための貴重な洞察を提供します。
以上がSpring Security によるマイクロサービスの保護: JWT の実装の詳細内容です。詳細については、PHP 中国語 Web サイトの他の関連記事を参照してください。