
ホームページ >バックエンド開発 >Python チュートリアル >OpenCV による画像圧縮の完全ガイド
OpenCV による画像圧縮の完全ガイド

- PHPzオリジナル
- 2024-08-21 06:01:321152ブラウズ
画像圧縮は、視覚的な品質を維持しながら、画像をより効率的に保存および送信できるようにする、コンピューター ビジョンにおける重要なテクノロジです。理想的には、小さなファイルを最高の品質で提供したいと考えています。ただし、トレードオフを考慮して、どちらがより重要かを決定する必要があります。
このチュートリアルでは、理論と実践的なアプリケーションをカバーしながら、OpenCV を使用した画像圧縮について説明します。最後には、コンピューター ビジョン プロジェクト (またはその他のプロジェクト) で写真を適切に圧縮する方法を理解できるようになります。
画像圧縮とは何ですか?
画像圧縮とは、許容可能なレベルの視覚的な品質を維持しながら、画像のファイル サイズを削減することです。圧縮には主に 2 つのタイプがあります:
- 可逆圧縮: すべての元のデータを保存し、正確な画像の再構築を可能にします。
- 非可逆圧縮: ファイル サイズを小さくするために一部のデータを破棄し、画質が低下する可能性があります。
画像を圧縮する理由
よく聞くように「ディスク容量が安い」のであれば、なぜ画像を圧縮する必要があるのでしょうか?小規模な規模では画像圧縮はあまり重要ではありませんが、大規模な規模では非常に重要になります。
たとえば、ハード ドライブにいくつかの画像がある場合、それらを圧縮して数メガバイトのデータを保存できます。ハードドライブがテラバイト単位で測定される場合、これは大きな影響はありません。しかし、ハード ドライブに 100,000 枚の画像がある場合はどうなるでしょうか?いくつかの基本的な圧縮により、リアルタイムの時間とコストが節約されます。パフォーマンスの観点から見ても、それは同じです。 Web サイトに大量の画像があり、1 日に 10,000 人が Web サイトにアクセスする場合、圧縮が重要になります。
これを行う理由は次のとおりです:
- ストレージ要件の削減: 同じスペースにより多くの画像を保存できます
- 高速伝送: Web アプリケーションや帯域幅に制約のあるシナリオに最適です
- 処理速度の向上: 小さい画像ほど読み込みと処理が速くなります
画像圧縮の背後にある理論
画像圧縮技術は 2 種類の冗長性を利用します:
- 空間的冗長性: 隣接するピクセル間の相関
- 色の冗長性: 隣接する領域の色の値の類似性
空間的冗長性は、ほとんどの自然画像では隣接するピクセルが同様の値を持つ傾向があるという事実を利用します。これにより、スムーズなトランジションが作成されます。ある領域から別の領域への自然な流れがあるため、多くの写真が「本物に見える」のです。隣接するピクセルの値が大きく異なる場合、「ノイズの多い」画像が得られます。ピクセルを単一の色にグループ化し、画像を小さくすることで、トランジションの「滑らかさ」を低下させるためにピクセルが変更されました。
色の冗長性 は、画像内の隣接する領域がどのように類似した色を共有することが多いかに焦点を当てています。青い空や緑の野原を思い浮かべてください。画像の大部分が非常に似た色の値を持っている可能性があります。グループ化して単色にしてスペースを節約することもできます。

OpenCV は、これらのアイデアを扱うための強力なツールを提供します。たとえば、OpenCV の cv2.inpaint() 関数は、空間的冗長性を使用して、近くのピクセルからの情報を使用して画像の欠落または破損した領域を埋めます。 OpenCV では、開発者は cv2.cvtColor() を使用して、色の冗長性に関して複数の色空間間で画像を変換できます。特定の種類の画像をエンコードする場合、一部の色空間が他の色空間よりも効果的であるため、これは多くの圧縮技術の前処理ステップとしてある程度役立ちます。
ここでこの理論の一部をテストしてみます。遊んでみましょう。
画像圧縮の実践
OpenCV の Python バインディングを使用して画像を圧縮する方法を見てみましょう。このコードを書き出すかコピーします:
ソースコードはここから入手することもできます
import cv2
import numpy as np

def compress_image(image_path, quality=90):
    # Read the image
 img = cv2.imread(image_path)

    # Encode the image with JPEG compression
 encode_param = [int(cv2.IMWRITE_JPEG_QUALITY), quality]
 _, encoded_img = cv2.imencode('.jpg', img, encode_param)

    # Decode the compressed image
 decoded_img = cv2.imdecode(encoded_img, cv2.IMREAD_COLOR)

    return decoded_img

# Example usage
original_img = cv2.imread('original_image.jpg')
compressed_img = compress_image('original_image.jpg', quality=50)

# Display results
cv2.imshow('Original', original_img)
cv2.imshow('Compressed', compressed_img)
cv2.waitKey(0)
cv2.destroyAllWindows()

# Calculate compression ratio
original_size = original_img.nbytes
compressed_size = compressed_img.nbytes
compression_ratio = original_size / compressed_size
print(f"Compression ratio: {compression_ratio:.2f}")
この例には、2 つのパラメーターを取る compress_image 関数が含まれています。
- 画像パス (画像が配置されている場所)
- 品質 (希望する画像の品質)
次に、元の画像をoriginal_imgに読み込みます。次に、同じ画像を 50% 圧縮して、新しいインスタンス (compressed_image) にロードします。
次に、元の画像と圧縮された画像を並べて表示できるように表示します。
次に、圧縮率を計算して表示します。
この例は、OpenCV で JPEG 圧縮を使用して画像を圧縮する方法を示します。品質パラメータは、ファイル サイズと画質のトレードオフを制御します。
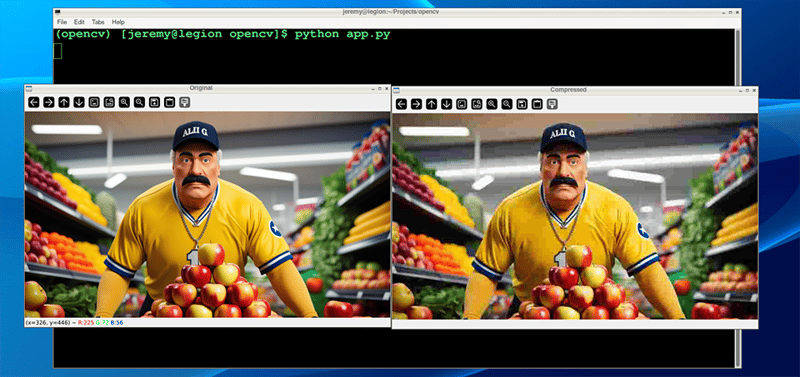
実行してみましょう:

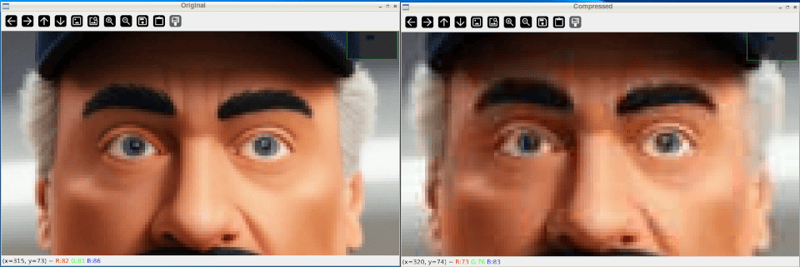
While intially looking at the images, you see little difference. However, zooming in shows you the difference in the quality:
And after closing the windows and looking at the files, we can see the file was reduced in size dramatically:

Also, if we take it down further, we can change our quality to 10%
compressed_img = compress_image('sampleimage.jpg', quality=10)
And the results are much more drastic:
And the file size results are more drastic as well:

You can adjust these parameters quite easily and achieve the desired balance between quality and file size.
Evaluating Compression Quality
To assess the impact of compression, we can use metrics like:
- Mean Squared Error (MSE)
Mean Squared Error (MSE) measures how different two images are from each other. When you compress an image, MSE helps you determine how much the compressed image has changed compared to the original.
It does this by sampling the differences between the colors of corresponding pixels in the two images, squaring those differences, and averaging them. The result is a single number: a lower MSE means the compressed image is closer to the original. In comparison, a higher MSE means there's a more noticeable loss of quality.
Here's some Python code to measure that:
def calculate_mse(img1, img2):
    return np.mean((img1 - img2) ** 2)

mse = calculate_mse(original_img, compressed_img)
print(f"Mean Squared Error: {mse:.2f}")
Here's what our demo image compression looks like:

- Peak Signal-to-Noise Ratio (PSNR)
Peak Signal-to-Noise Ratio (PSNR) is a measure that shows how much an image's quality has degraded after compression. This is often visible with your eyes, but it assigns a set value. It compares the original image to the compressed one and expresses the difference as a ratio.
A higher PSNR value means the compressed image is closer in quality to the original, indicating less loss of quality. A lower PSNR means more visible degradation. PSNR is often used alongside MSE, with PSNR providing an easier-to-interpret scale where higher is better.
Here is some Python code that measures that:
def calculate_psnr(img1, img2):
 mse = calculate_mse(img1, img2)
    if mse == 0:
        return float('inf')
 max_pixel = 255.0
    return 20 * np.log10(max_pixel / np.sqrt(mse))

psnr = calculate_psnr(original_img, compressed_img)
print(f"PSNR: {psnr:.2f} dB")
Here's what our demo image compression looks like:
"Eyeballing" your images after compression to determine quality is fine; however, at a large scale, having scripts do this is a much easier way to set standards and ensure the images follow them.
Let's look at a couple other techniques:
Advanced Compression Techniques
For more advanced compression, OpenCV supports various algorithms:
- PNG Compression:
You can convert your images to PNG format, which has many advantages. Use the following line of code, and you can set your compression from 0 to 9, depending on your needs. 0 means no compression whatsoever, and 9 is maximum. Keep in mind that PNGs are a "lossless" format, so even at maximum compression, the image should remain intact. The big trade-off is file size and compression time.
Here is the code to use PNG compression with OpenCV:
cv2.imwrite('compressed.png', img, [cv2.IMWRITE_PNG_COMPRESSION, 9])
And here is our result:
Note: You may notice sometimes that PNG files are actually larger in size, as in this case. It depends on the content of the image.
- WebP Compression:
You can also convert your images to .webp format. This is a newer method of compression that's gaining in popularity. I have been using this compression on the images on my blog for years.
In the following code, we can write our image to a webp file and set the compression level from 0 to 100. It's the opposite of PNG's scale because 0, because we're setting quality instead of compression. This small distinction matters, because a setting of 0 is the lowest possible quality, with a small file size and significant loss. 100 is the highest quality, which means large files with the best image quality.
Here's the Python code to make that happen:
cv2.imwrite('compressed.webp', img, [cv2.IMWRITE_WEBP_QUALITY, 80])
And here is our result:

These two techniques are great for compressing large amounts of data. You can write scripts to compress thousands or hundreds of thousands of images automatically.
Conclusion
Image compression is fantastic. It's essential for computer vision tasks in many ways, especially when saving space or increasing processing speed. There are also many use cases outside of computer vision anytime you want to reduce hard drive space or save bandwidth. Image compression can help a lot.
By understanding the theory behind it and applying it, you can do some powerful things with your projects.
Remember, the key to effective compression is finding the sweet spot between file size reduction and maintaining acceptable visual quality for your application.
Thanks for reading, and feel free to reach out if you have any comments or questions!
以上がOpenCV による画像圧縮の完全ガイドの詳細内容です。詳細については、PHP 中国語 Web サイトの他の関連記事を参照してください。