ホームページ >バックエンド開発 >Python チュートリアル >AppSignal を使用して Python Django アプリのパフォーマンスを監視する
AppSignal を使用して Python Django アプリのパフォーマンスを監視する
- WBOYWBOYWBOYWBOYWBOYWBOYWBOYWBOYWBOYWBOYWBOYWBOYWBオリジナル
- 2024-08-14 20:37:08533ブラウズ
遅いシステムを観察すると、私たちの最初の本能は、それを失敗とラベル付けすることかもしれません。この思い込みは広範囲に広まっており、基本的な真実を浮き彫りにしています。つまり、パフォーマンスはアプリケーションの成熟度と実稼働への準備の同義語であるということです。
Web アプリケーションでは、ミリ秒単位でユーザー インタラクションの成功か失敗が決まるため、リスクは非常に高くなります。パフォーマンスは単なる技術的なベンチマークではなく、ユーザー満足度と運用効率の基礎です。
パフォーマンスは、CPU やメモリの使用率、応答時間、スケーラビリティ、スループットなどの指標によって定量化される、さまざまなワークロードにおけるシステムの応答性をカプセル化したものです。
この記事では、AppSignal が Django アプリケーションのパフォーマンスを監視および強化する方法を検討します。
始めましょう!
Django パフォーマンス監視の要点
Django アプリケーションで最適なパフォーマンスを達成するには、多面的なアプローチが必要です。これは、効率的に実行し、拡張しても効率を維持するアプリケーションを開発することを意味します。このプロセスでは主要な指標が重要であり、最適化の取り組みを導くための具体的なデータを提供します。これらの指標のいくつかを見てみましょう。
パフォーマンス監視の主要な指標
- 応答時間: これはおそらく、ユーザー エクスペリエンスを示す最も直接的な指標です。ユーザーのリクエストが処理され、応答が返されるまでにかかる時間を測定します。 Django アプリケーションでは、データベース クエリ、ビュー処理、ミドルウェア操作などの要因が応答時間に影響を与える可能性があります。
- スループット: スループットとは、アプリケーションが指定された時間枠内に処理できるリクエストの数を指します。
- エラー率: エラー (4xx および 5xx HTTP 応答) の頻度は、コード、データベース クエリ、またはサーバー構成の問題を示している可能性があります。エラー率を監視することで、ユーザー エクスペリエンスを低下させる可能性がある問題を迅速に特定して修正できます。
- データベース パフォーマンス メトリック: これらには、リクエストあたりのクエリ数、クエリ実行時間、データベース接続の効率が含まれます。
- 同時ユーザーの処理: 複数のユーザーが Django アプリケーションに同時にアクセスする場合、遅延なくすべてのユーザーに効率的にサービスを提供できることが重要です。
私たちが構築するもの
この記事では、高トラフィックのイベントに対応できる Django ベースの e コマース ストアを構築し、AppSignal を統合して監視、最適化し、負荷がかかってもシームレスにスケーリングできるようにします。また、パフォーマンスを向上させるために AppSignal を使用して既存のアプリケーションを強化する方法 (この場合は Open edX 学習管理システム) も示します。
プロジェクトのセットアップ
前提条件
この手順を進めるには、次のものが必要です:
- Python 3.12.2
- AppSignal がサポートするオペレーティング システム
- AppSignal アカウント
- Django の基本的な知識
プロジェクトの準備
次に、プロジェクトのディレクトリを作成し、GitHub からクローンを作成しましょう。すべての要件をインストールし、移行を実行します。
mkdir django-performance && cd django-performance
python3.12 -m venv venv
source venv/bin/activate
git clone -b main https://github.com/amirtds/mystore
cd mystore
python3.12 -m pip install -r requirements.txt
python3.12 manage.py migrate
python3.12 manage.py runserver
次に、127.0.0.1:8000 にアクセスします。次のようなものが表示されるはずです:

この Django アプリケーションは、ユーザーに製品リスト、詳細、チェックアウト ページを提供するシンプルな e-commerce ストア です。アプリの複製とインストールが正常に完了したら、Django createsuperuser 管理コマンドを使用してスーパーユーザーを作成します。
次に、アプリケーションでいくつかのプロダクトを作成しましょう。まず、次のコマンドを実行して、Django アプリケーションにシェルを実行します。
python3.12 manage.py shell
3 つのカテゴリと 3 つの製品を作成します:
from store.models import Category, Product

# Create categories
electronics = Category(name='Electronics', description='Gadgets and electronic devices.')
books = Category(name='Books', description='Read the world.')
clothing = Category(name='Clothing', description='Latest fashion and trends.')

# Save categories to the database
electronics.save()
books.save()
clothing.save()

# Now let's create new Products with slugs and image URLs
Product.objects.create(
    category=electronics,
    name='Smartphone',
    description='Latest model with high-end specs.',
    price=799.99,
    stock=30,
    available=True,
    slug='smartphone',
    image='products/iphone_14_pro_max.png'
)

Product.objects.create(
    category=books,
    name='Python Programming',
    description='Learn Python programming with this comprehensive guide.',
    price=39.99,
    stock=50,
    available=True,
    slug='python-programming',
    image='products/python_programming_book.png'
)

Product.objects.create(
    category=clothing,
    name='Jeans',
    description='Comfortable and stylish jeans for everyday wear.',
    price=49.99,
    stock=20,
    available=True,
    slug='jeans',
    image='products/jeans.png'
)
ここでシェルを閉じてサーバーを実行します。次のようなものが表示されるはずです:

AppSign をインストールする
プロジェクトに AppSignal と opentelemetry-instrumentation-django をインストールします。
これらのパッケージをインストールする前に、資格情報を使用して AppSignal にログインしてください (30 日間の無料トライアルにサインアップできます)。組織を選択したら、ナビゲーション バーの右上にある アプリの追加 をクリックします。言語として Python を選択すると、push-api-key を受け取ります。
仮想環境がアクティブ化されていることを確認し、次のコマンドを実行します。
python3.12 -m pip install appsignal==1.2.1
python3.12 -m appsignal install --push-api-key [YOU-KEY]
python3.12 -m pip install opentelemetry-instrumentation-django==0.45b0
CLI プロンプトにアプリ名を入力します。インストール後、プロジェクトに __appsignal__.py という新しいファイルが表示されるはずです。
Now let's create a new file called .env in the project root and add APPSIGNAL_PUSH_API_KEY=YOUR-KEY (remember to change the value to your actual key). Then, let's change the content of the __appsignal__.py file to the following:
# __appsignal__.py
import os
from appsignal import Appsignal

# Load environment variables from the .env file
from dotenv import load_dotenv
load_dotenv()

# Get APPSIGNAL_PUSH_API_KEY from environment
push_api_key = os.getenv('APPSIGNAL_PUSH_API_KEY')

appsignal = Appsignal(
    active=True,
    name="mystore",
    push_api_key=os.getenv("APPSIGNAL_PUSH_API_KEY"),
)
Next, update the manage.py file to read like this:
# manage.py
#!/usr/bin/env python
"""Django's command-line utility for administrative tasks."""
import os
import sys

# import appsignal
from __appsignal__ import appsignal # new line


def main():
    """Run administrative tasks."""
    os.environ.setdefault("DJANGO_SETTINGS_MODULE", "mystore.settings")

    # Start Appsignal
    appsignal.start() # new line

    try:
        from django.core.management import execute_from_command_line
    except ImportError as exc:
        raise ImportError(
            "Couldn't import Django. Are you sure it's installed and "
            "available on your PYTHONPATH environment variable? Did you "
            "forget to activate a virtual environment?"
        ) from exc
    execute_from_command_line(sys.argv)


if __name__ == "__main__":
    main()
We've imported AppSignal and started it using the configuration from __appsignal.py.
Please note that the changes we made to manage.py are for a development environment. In production, we should change wsgi.py or asgi.py. For more information, visit AppSignal's Django documentation.
Project Scenario: Optimizing for a New Year Sale and Monitoring Concurrent Users
As we approach the New Year sales on our Django-based e-commerce platform, we recall last year's challenges: increased traffic led to slow load times and even some downtime. This year, we aim to avoid these issues by thoroughly testing and optimizing our site beforehand. We'll use Locust to simulate user traffic and AppSignal to monitor our application's performance.
Creating a Locust Test for Simulated Traffic
First, we'll create a locustfile.py file that simulates simultaneous users navigating through critical parts of our site: the homepage, a product detail page, and the checkout page. This simulation helps us understand how our site performs under pressure.
Create the locustfile.py in the project root:
# locustfile.py
from locust import HttpUser, between, task

class WebsiteUser(HttpUser):
    wait_time = between(1, 3)  # Users wait 1-3 seconds between tasks

    @task
    def index_page(self):
        self.client.get("/store/")

    @task(3)
    def view_product_detail(self):
        self.client.get("/store/product/smartphone/")

    @task(2)
    def view_checkout_page(self):
        self.client.get("/store/checkout/smartphone/")
In locustfile.py, users primarily visit the product detail page, followed by the checkout page, and occasionally return to the homepage. This pattern aims to mimic realistic user behavior during a sale.
Before running Locust, ensure you have a product with the smartphone slug in the Django app. If you don't, go to /admin/store/product/ and create one.
Defining Acceptable Response Times
Before we start, let's define what we consider an acceptable response time. For a smooth user experience, we aim for:
- Homepage and product detail pages: under 1 second.
- Checkout page: under 1.5 seconds (due to typically higher complexity).
These targets ensure users experience minimal delay, keeping their engagement high.
Conducting the Test and Monitoring Results
With our Locust test ready, we run it to simulate the 500 users and observe the results in real time. Here's how:
- Start the Locust test by running locust -f locustfile.py in your terminal, then open http://localhost:8089 to set up and start the simulation. Set the Number of Users to 500 and set the host to http://127.0.0.1:8000
- Monitor performance in both Locust's web interface and AppSignal. Locust shows us request rates and response times, while AppSignal provides deeper insights into our Django app's behavior under load.
After running Locust, you can find information about the load test in its dashboard:

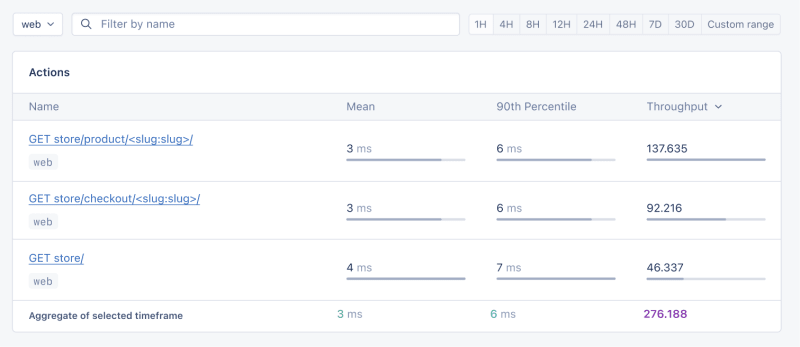
Now, go to your application page in AppSignal. Under the Performance section, click on Actions and you should see something like this:

- Mean: This is the average response time for all the requests made to a particular endpoint. It provides a general idea of how long it takes for the server to respond. In our context, any mean response time greater than 1 second could be considered a red flag, indicating that our application's performance might not meet user expectations for speed.
- 90th Percentile: This is the response time at the 90th percentile. For example, for GET store/, we have 7 ms, which means 90% of requests are completed in 7 ms or less.
- Throughput: The number of requests handled per second.
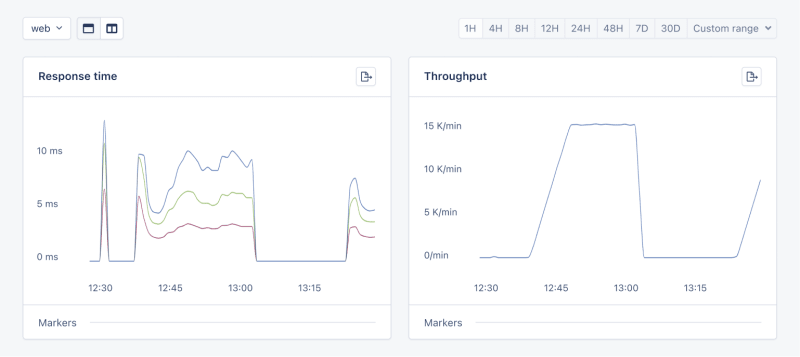
Now let's click on the Graphs under Performance:

We need to prepare our site for the New Year sales, as response times might exceed our targets. Here's a simplified plan:
- Database Queries: Slow queries often cause performance issues.
- Static Assets: Ensure static assets are properly cached. Use a CDN for better delivery speeds.
- Application Resources: Sometimes, the solution is as straightforward as adding more RAM and CPUs.
Database Operations
Understanding Database Performance Impact
When it comes to web applications, one of the most common sources of slow performance is database queries. Every time a user performs an action that requires data retrieval or manipulation, a query is made to the database.
If these queries are not well-optimized, they can take a considerable amount of time to execute, leading to a sluggish user experience. That's why it's crucial to monitor and optimize our queries, ensuring they're efficient and don't become the bottleneck in our application's performance.
Instrumentation and Spans
Before diving into the implementation, let's clarify two key concepts in performance monitoring:
- Instrumentation
- Spans
Instrumentation is the process of augmenting code to measure its performance and behavior during execution. Think of it like fitting your car with a dashboard that tells you not just the speed, but also the engine's performance, fuel efficiency, and other diagnostics while you drive.
Spans, on the other hand, are the specific segments of time measured by instrumentation. In our car analogy, a span would be the time taken for a specific part of your journey, like from your home to the highway. In the context of web applications, a span could represent the time taken to execute a database query, process a request, or complete any other discrete operation.
Instrumentation helps us create a series of spans that together form a detailed timeline of how a request is handled. This timeline is invaluable for pinpointing where delays occur and understanding the overall flow of a request through our system.
Implementing Instrumentation in Our Code
With our PurchaseProductView, we're particularly interested in the database interactions that create customer records and process purchases. By adding instrumentation to this view, we'll be able to measure these interactions and get actionable data on their performance.
Here's how we integrate AppSignal's custom instrumentation into our Django view:
# store/views.py
# Import OpenTelemetry's trace module for creating custom spans
from opentelemetry import trace
# Import AppSignal's set_root_name for customizing the trace name
from appsignal import set_root_name

# Inside the PurchaseProductView
def post(self, request, *args, **kwargs):
    # Initialize the tracer for this view
    tracer = trace.get_tracer(__name__)

    # Start a new span for the view using 'with' statement
    with tracer.start_as_current_span("PurchaseProductView"):
        # Customize the name of the trace to be more descriptive
        set_root_name("POST /store/purchase/<slug>")

        # ... existing code to handle the purchase ...

        # Start another span to monitor the database query performance
        with tracer.start_as_current_span("Database Query - Retrieve or Create Customer"):
            # ... code to retrieve or create a customer ...

            # Yet another span to monitor the purchase record creation
            with tracer.start_as_current_span("Database Query - Create Purchase Record"):
                # ... code to create a purchase record ...
See the full code of the view after the modification.
In this updated view, custom instrumentation is added to measure the performance of database queries when retrieving or creating a customer and creating a purchase record.
Now, after purchasing a product in the Slow events section of the Performance dashboard, you should see the purchase event, its performance, and how long it takes to run the query.

purchase is the event we added to our view.
Using AppSignal with an Existing Django App
In this section, we are going to see how we can integrate AppSignal with Open edX, an open-source learning management system based on Python and Django.
Monitoring the performance of learning platforms like Open edX is highly important, since a slow experience directly impacts students' engagement with learning materials and can have a negative impact (for example, a high number of users might decide not to continue with a course).
Integrate AppSignal
Here, we can follow similar steps as the Project Setup section. However, for Open edX, we will follow Production Setup and initiate AppSignal in wsgi.py. Check out this commit to install and integrate AppSignal with Open edX.
Monitor Open edX Performance
Now we'll interact with our platform and see the performance result in the dashboard.
Let's register a user, log in, enroll them in multiple courses, and interact with the course content.
Actions
Going to Actions, let's order the actions based on their mean time and find slow events:

As we can see, for 3 events (out of the 34 events we tested) the response time is higher than 1 second.
Host Metrics
Host Metrics in AppSignal show resource usage:

私たちのシステムは重負荷ではありません (負荷平均は 0.03 です) が、メモリ使用量は高くなります。
リソース使用量が特定の条件に達したときに通知を受け取るトリガーを追加することもできます。たとえば、メモリ使用量が 80% を超えたときにトリガーを設定して通知を受け取り、機能停止を防ぐことができます。

条件に達すると、次のような通知が表示されます:

セロリのタスク監視
Open edX では、証明書の生成、評価、一括メール機能などの非同期タスクや長時間実行タスクに Celery を使用します。
タスクとユーザーの数によっては、これらのタスクの一部は長時間実行され、プラットフォームでパフォーマンスの問題を引き起こす可能性があります。
たとえば、何千人ものユーザーがコースに登録しており、それらのユーザーを再スコアリングする必要がある場合、このタスクには時間がかかることがあります。タスクがまだ実行中であるため、自分の成績がダッシュボードに反映されないというユーザーからの苦情を受ける可能性があります。 Celery タスク、そのランタイム、リソース使用量に関する情報が得られると、アプリケーションの重要な洞察と改善の可能性が得られます。
AppSignal を使用して Open edX で Celery タスクをトレースし、ダッシュボードで結果を確認してみましょう。まず、必要な要件がインストールされていることを確認します。次に、このコミットのように Celery のパフォーマンスをトレースするタスクを設定しましょう。
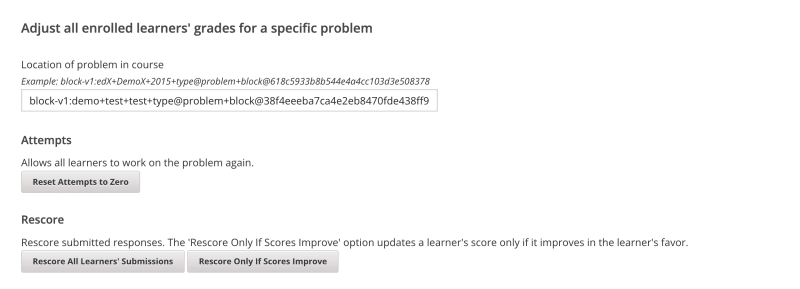
次に、Open edX ダッシュボードでいくつかのタスクを実行して、試行をリセットし、学習者の提出物を再採点してみましょう。

AppSignal の パフォーマンス ダッシュボードに移動します -> スローイベント すると、次のようなものが表示されます:

Celery をクリックすると、Open edX で実行されたすべてのタスクが表示されます。

これは、タスクが予想よりも長く実行されているかどうかを確認するのに役立つ優れた情報であり、考えられるパフォーマンスのボトルネックに対処できます。
以上です!
まとめ
この記事では、AppSignal が Django アプリのパフォーマンスに関する洞察をどのように得られるかを説明しました。
同時ユーザー数、データベース クエリ、応答時間などのメトリクスを含む、単純な e-commerce Django アプリケーションを監視しました。
ケーススタディとして、AppSignal を Open edX と統合し、パフォーマンス監視が、特にプラットフォームを使用する学生のユーザー エクスペリエンスを向上させるのにどのように役立つかを明らかにしました。
コーディングを楽しんでください!
追伸Python の投稿を報道後すぐに読みたい場合は、Python Wizardry ニュースレターを購読して、投稿を 1 つも見逃さないようにしてください。
以上がAppSignal を使用して Python Django アプリのパフォーマンスを監視するの詳細内容です。詳細については、PHP 中国語 Web サイトの他の関連記事を参照してください。

