ホームページ >バックエンド開発 >Python チュートリアル >Django アプリのデプロイ: 外部 Celery を使用した EC アプリ ランナー
Django アプリのデプロイ: 外部 Celery を使用した EC アプリ ランナー
- 王林オリジナル
- 2024-08-08 22:54:121421ブラウズ
ちょっと待ってください...

本番環境に移行するのに忙しいという状況に誰もが遭遇したことがありますが、展開プラットフォームの選択には多くの要因が考慮されます。そうですね、AWS を使います。通常、プラットフォームに固執した後は、アーキテクチャ、コスト、信頼性、スケーラビリティ、可用性、実現可能性などのいくつかの要素に頼ることができます。何だと思う!!! AWS はこれらすべてにおいて信頼されているため、これは 信頼性、スケーラビリティ、可用性、実現可能性 に関するものではありません。このチュートリアルでは、Django アプリのいくつかのアーキテクチャの良い点と悪い点を特定します。
次に進む前に、何が起こっているのかを完全に理解するために、いくつかの前提条件を理解しましょう。
:) このチュートリアルに含まれるすべてのコードは、オープンソースとして利用可能になります。ご自由に足跡を書き込んでください。
前提条件
次に進む前に、次のことを行う必要があります。
- AWS アカウントをお持ちです
- Django の知識がある
- キューイング、タスク、ブローカーとは何かを理解する
キャッシュとは何か、なぜキャッシュするのか
キャッシュは、頻繁にアクセスされるデータを高速アクセスの場所に一時的に保存し、このデータの取得にかかる時間を短縮するために使用される技術です。 AWS では、キャッシュによりプライマリ データベースと API の負荷が最小限に抑えられ、アプリケーションのパフォーマンスとスケーラビリティが向上し、エンドユーザーの応答時間が短縮されます。
効率を高め、待ち時間を短縮し、コストを削減するためにキャッシュを使用します。キャッシュはデータをアプリケーションの近くに保存することで、データベース クエリの頻度、ネットワーク トラフィック、および計算負荷を軽減します。これにより、データの取得が高速化され、ユーザー エクスペリエンスが向上し、リソース使用量が最適化されます。これは高トラフィックのアプリケーションにとって重要です。
ウォーミングアップをしましょう

EC2:
Elastic Compute Engine の正式な意味から、EC2 は AWS データセンターにある Web サーバーです。言い換えれば、EC2 は AWS から取得できる仮想的なものです。利用可能なすべての機能を備えた「従量課金制プラン」を非常に安い月額料金で入手できます。AWS アプリランナー:
これは、Web アプリケーションと API の実行とスケーリングを簡素化し、開発者がインフラストラクチャ管理なしでコード リポジトリやコンテナ イメージから迅速にデプロイできるようにするフルマネージド サービスです。セロリとジャンゴセロリ:
Celery は、Python でリアルタイム処理を行うためのオープンソースの分散タスク キューです。 Django Celery は Celery を Django フレームワークと統合し、Django アプリケーション内での非同期タスクの実行、定期タスク、およびバックグラウンド ジョブ管理を可能にします。このテクノロジーの使用例はさまざまです。これには、通信サービス (SMS、電子メール)、スケジュールされたジョブ (Cron)、およびデータ集約、機械学習モデルのトレーニング、ファイル処理などのバックグラウンド データ処理タスクが含まれます。Amazon RDS (リレーショナル データベース サービス):
これは、クラウドでのリレーショナル データベースのセットアップ、運用、スケーリングを簡素化するマネージド データベース サービスです。 MySQL、PostgreSQL、Oracle、SQL Server などのさまざまなデータベース エンジンをサポートし、自動バックアップ、パッチ適用、高可用性を提供し、ユーザーをデータベース管理タスクから解放します。
このコンテキストでの EC2 と App Runner の比較
アーキテクチャ
アプリがどのように構成され、展開セットアップがどのように動作するかを調べてみましょう。
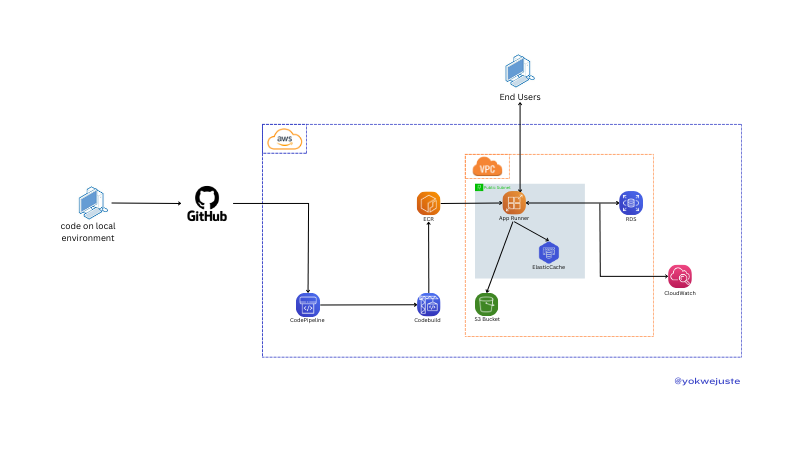
AWS App Runner (ECR) を使用したデプロイメントのセットアップ

コードを GitHub にプッシュし、CodePipeline ワークフローをトリガーします。 CodePipeline は CodeBuild を使用して、リリースのバージョン管理のために Elastic Container Registry (ECR) に保存される Docker イメージを作成します。このチュートリアルでは、Virtual Private Cloud (VPC) 構成をスキップします。 CloudWatch を使用してログを継続的に監視することで、アプリケーションの健全性を確保します。さらに、静的ファイル用に AWS RDS および S3 によって提供される Postgres を使用するためのプロジェクトの迅速な設定も可能です。AWS EC2 インスタンスによるデプロイ

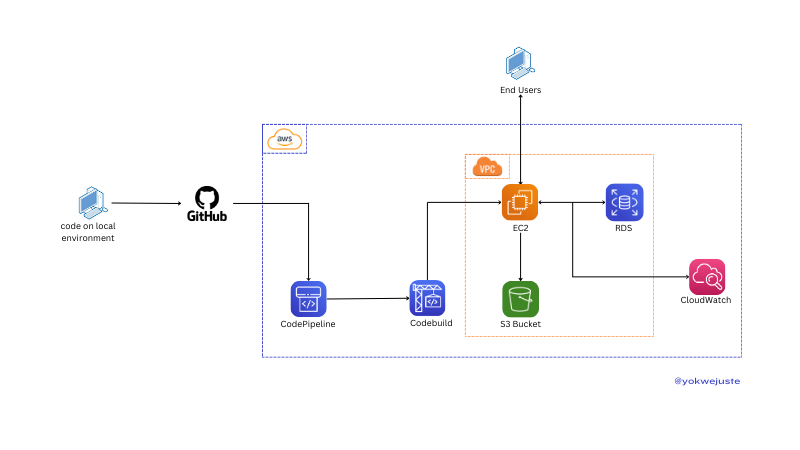
同様のプロセスを使用して、バージョン管理と ECR を省略し、コードを GitHub にプッシュし、CodePipeline をトリガーします。CodePipeline は、CodeBuild を使用して、バージョン管理のために ECR に保存される Docker イメージを作成します。 EC2 インスタンスはこれらのイメージをプルして VPC 内にアプリケーションをデプロイし、エンドユーザーがアクセスできるようにします。アプリケーションは、データ ストレージの場合は RDS、静的ファイルの場合は S3 と対話し、CloudWatch によって監視されます。必要に応じて、certbot. などのオプションを使用して、このインスタンスに SSL 構成を追加できます。
価格比較表
ここでは、一般的な使用シナリオに基づいた EC2 と App Runner の仮想の価格比較を示します。
| Service | Component | Cost Breakdown | Example Monthly Cost (Estimate) |
|---|---|---|---|
| EC2 | Instance Usage | t2.micro (1 vCPU, 1 GB RAM) | .50 |
| Storage | 30 GB General Purpose SSD | .00 | |
| Data Transfer | 100 GB Data Transfer | .00 | |
| Total | .50 | ||
| App Runner | Requests | 1 million requests | .00 |
| Compute | 1 vCPU, 2 GB RAM, 30 hours/month | .00 | |
| Data Transfer | 100 GB Data Transfer | .00 | |
| Total | .00 |
管理のしやすさ
これら 2 つのリソースの管理方法について簡単にまとめてみましょう。
| Factor | EC2 | App Runner |
|---|---|---|
| Setup | Manual setup required | Fully managed service |
| Management Overhead | High - requires OS updates, security patches, etc. | Low - abstracts infrastructure management |
| Configuration | Extensive control over instance configuration | Limited control, focuses on simplicity |
スケーラビリティ
| Factor | EC2 | App Runner |
|---|---|---|
| Scaling Setup | Manual setup of Auto Scaling groups | Automatic scaling based on traffic |
| Scaling Management | Requires configuration and monitoring | Managed by AWS, seamless scaling |
| Flexibility | High - granular control over scaling policies | Simplified, less flexible |
導入速度
| Factor | EC2 | App Runner |
|---|---|---|
| Deployment Time | Slower - instance provisioning and configuration | Faster - managed deployment |
| Update Process | May require downtime or rolling updates | Seamless updates |
| Automation | Requires setup of deployment pipelines | Simplified, integrated deployment |
カスタマイズと制御
| Factor | EC2 | App Runner |
|---|---|---|
| Customization | Extensive - full control over environment | Limited - managed environment |
| Control | High - choose specific instance types, storage, etc. | Lower - focus on ease of use |
| Flexibility | High - suitable for specialized configurations | Simplified for standard web applications |
安全
| Factor | EC2 | App Runner |
|---|---|---|
| Security Control | High - detailed control over security configurations | Simplified security management |
| Management | Requires manual configuration of security groups, IAM | Managed by AWS, less granular control |
| Compliance | Extensive options for compliance configurations | Simplified compliance management |
プロジェクトのセットアップ
私たちのプロジェクトの比較はプロジェクトの設定自体に依存していないことを前提としています。 AWS の celery 構成を使用した基本的な Django アプリケーションを用意します。
Django を使用した基本的なプロジェクトを進めていきます。
依存関係のインストールとプロジェクトの作成:
コマンドは以下の順序で実行する必要があります:
# Project directory creation
mkdir MySchedular && cd MySchedular

# Creating an isolated space for the project dependencies
python -m venv venv && source venv/bin/activate

# Dependencies installation
pip install django celery redis python_dotenv

# Creating project and app
django-admin startproject my_schedular . && python manage.py startapp crons

# Let's add a few files to the project skeleton
touch my_schedular/celery.py crons/urls.py crons/tasks.py
この時点で、次のようにしてプロジェクトのスケルトンを確認できます:
tree -I "venv|__pycache__" .
そして現時点ではこれを持っているはずです
    .
    ├── crons
    │   ├── __init__.py
    │   ├── admin.py
    │   ├── apps.py
    │   ├── migrations
    │   │   └── __init__.py
    │   ├── models.py
+   │   ├── tasks.py
    │   ├── tests.py
+   │   ├── urls.py
    │   └── views.py
    ├── manage.py
    └── my_schedular
        ├── __init__.py
        ├── asgi.py
+       ├── celery.py
        ├── settings.py
        ├── urls.py
        └── wsgi.py

    3 directories, 16 files
コードとロジック
アプリのロジックに数行を追加し、このプロジェクトの別のマイルストーンをカバーすることで、次に進むことができます。
1- セロリの準備
# my_schedular/celery.py

from __future__ import absolute_import, unicode_literals
import os
from celery import Celery

os.environ.setdefault('DJANGO_SETTINGS_MODULE', 'myproject.settings')

app = Celery('myproject')

app.config_from_object('django.conf:settings', namespace='CELERY')

app.autodiscover_tasks()

@app.task(bind=True)
def debug_task(self):
    print(f'Request: {self.request!r}')
2- セロリ変数を上書きしてブローカーを設定しましょう
# my_schedular/settings.py

CELERY_BROKER_URL = os.getenv('CELERY_BROKER_URL ')
CELERY_RESULT_BACKEND = os.getenv('CELERY_RESULT_BACKEND')
3- init.py を更新して、Django の起動時にアプリが確実に読み込まれるようにします。
# my_schedular/__init__.py
from __future__ import absolute_import, unicode_literals

from .celery import app as celery_app

__all__ = ('celery_app',)
4- タスクを作成します
# crons/tasks.py
from celery import shared_task
import time

@shared_task
def add(x, y):
    time.sleep(10)
    return x + y
5- ここで、単純な Json 応答を含む単純なビューを追加しましょう。
# crons/views.py
from django.http import JsonResponse
from crons.tasks import add

def index(request):
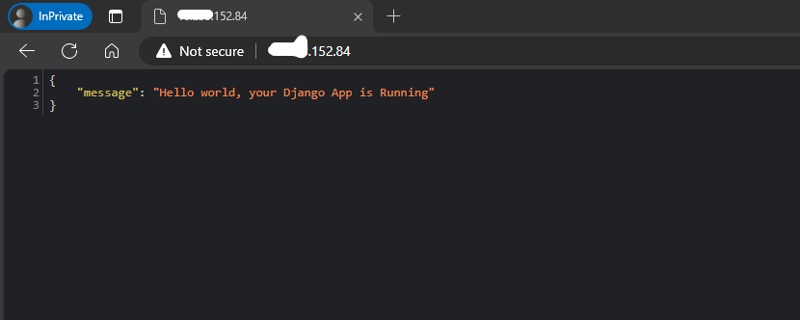
    return JsonResponse({"message": "Hello world, your Django App is Running"})

def add_view(request):
    result = add.delay(4, 6)
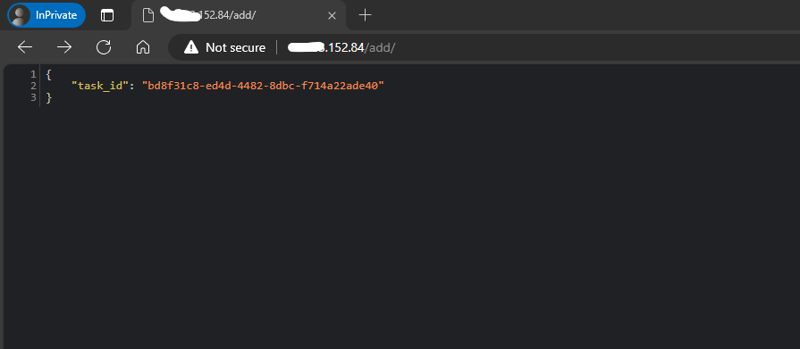
    return JsonResponse({'task_id': result.id})
6- アクセスを可能にするエンドポイントがなければ、ビューを持つことはできません
# crons/urls.py
from django.urls import path

from crons.views import add_view, index

urlpatterns = [
    path('', index, name='index'),
    path('add/', add_view, name='add'),
]
7- アプリの URL をプロジェクト全体の一般的な urls.py に追加します。
# my_schedular/urls.py
from django.contrib import admin
from django.urls import include, path

urlpatterns = [
    path('admin/', admin.site.urls),
    path('/', include('crons.urls')),
]
環境変数の追加:
# .env
SECRET_KEY=
DEBUG=
CELERY_BROKER_URL=
CELERY_RESULT_BACKEND=
これらすべての手順を適切にフォローアップすると、次の出力が得られます。

AWS環境のセットアップ
AWS に出荷しているため、いくつかのリソースを
に設定する必要があります新しい VPC (仮想プライベート クラウド) の作成
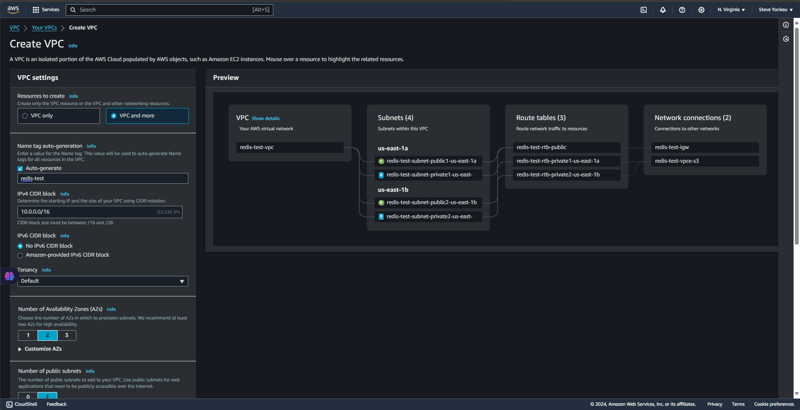
私たちは、リソース間の安全なアクセスと通信のために、隔離された環境とネットワークを作成します。
セキュリティグループの作成
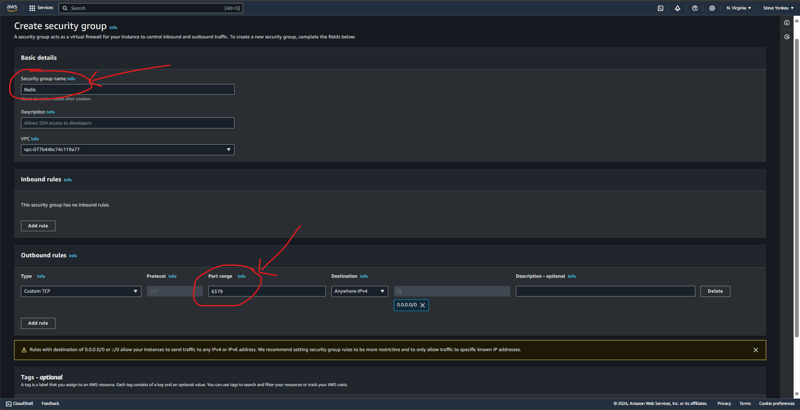
以前に作成した VPC の下にセキュリティ グループを作成し、受信ルールと送信ルールを合わせて TCP ポート 6379 (Redis ポート) に追加します。
ElasticCache から RedisOSS を作成する
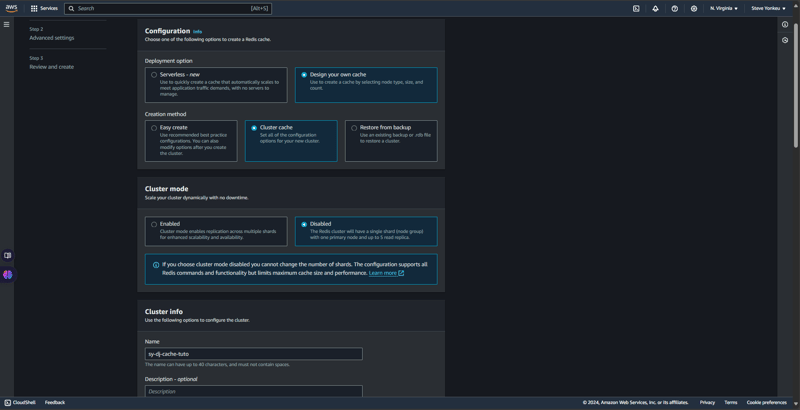
基本的に、AWS Elastic Cache はキャッシュに関して 2 つの種類、つまり RedisOSS と memCache を提供します。 RedisOSS は高度なデータ構造と永続化機能を提供しますが、Memcached はよりシンプルで、キーと値のペアの高速キャッシュに重点を置いています。 Redis は、Memcached とは異なり、レプリケーションとクラスタリングもサポートしています。仕事に戻り、Redis に戻ります。
Elastic Container Registry (ECR) のセットアップ
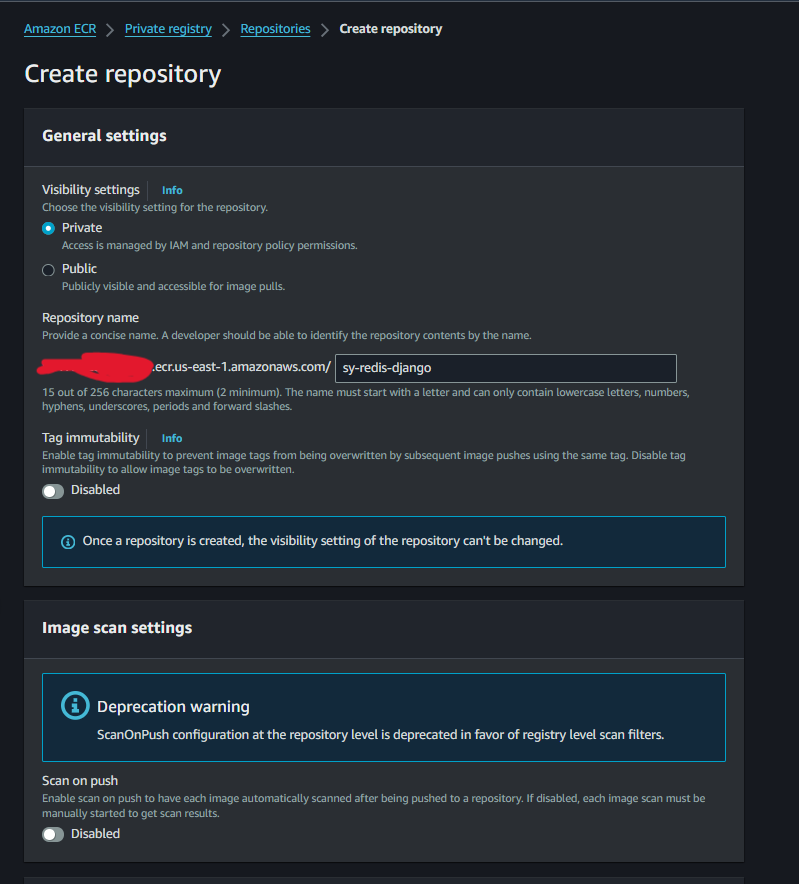
ECR イメージの作成は非常にシンプルかつ簡単です。
1: App Runner をデプロイするためのアップデート
以下の手順に従って、アプリ ランナーを実行します。
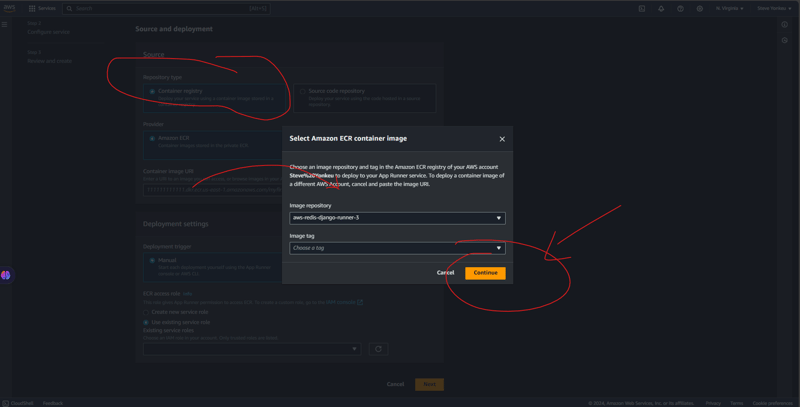
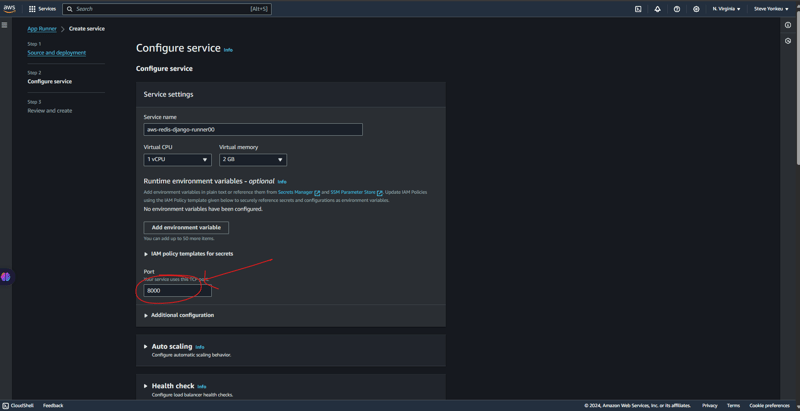
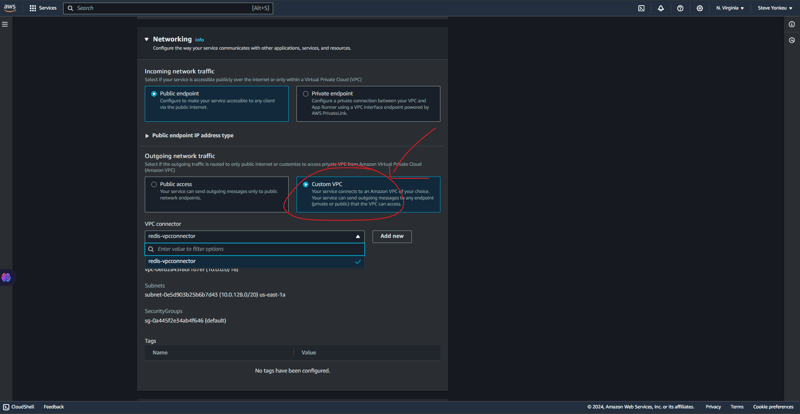
ここでは非常に技術的になる必要があります。 VPC は、ほとんどのリソースが置かれている安全なネットワークです。アプリランナーは VPC 内に見つからないため、これらのリソース間の通信に安全な手段を提供する必要があります。
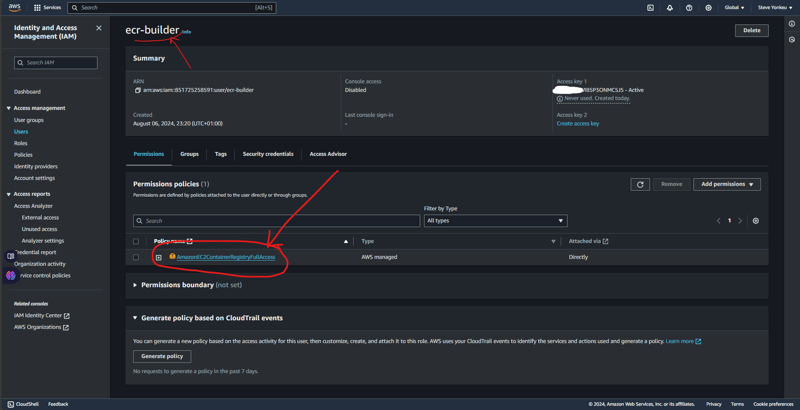
資格情報 ユーザーの資格情報
このチュートリアルでは、ワークフローを ECR に接続するための承認が必要になります。次に、AmazonEC2ContainerRegistryFullAccess アクセス許可ポリシーを追加して、イメージを AWS ECR にプッシュできるようにします。
結果
すべてが完了すると、このツリー構造が完成します。
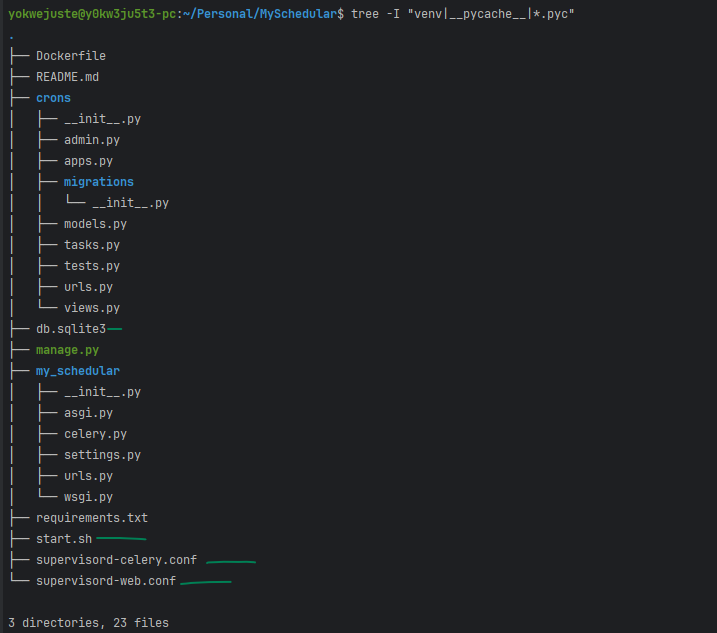

このチュートリアルのコードベース全体は My GitHub にあります。
TWO: Deploying to an EC2
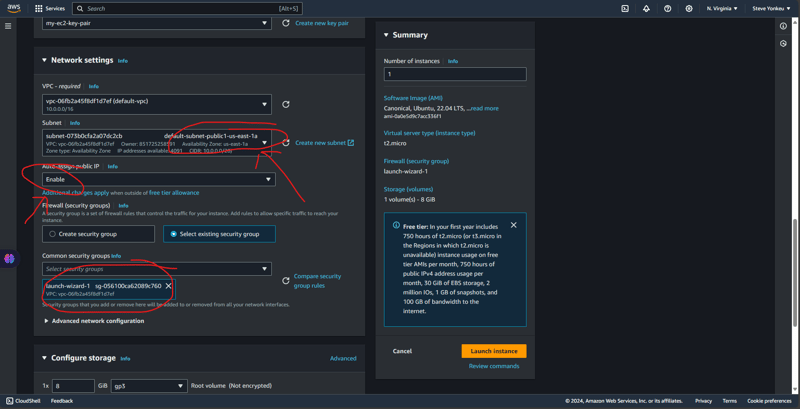
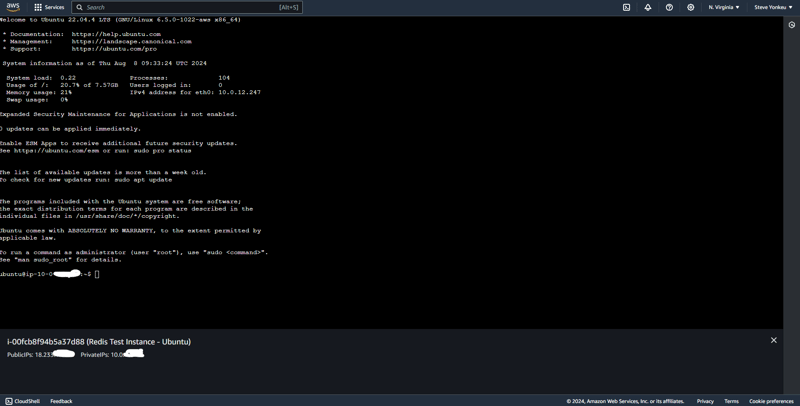
We will go with one the easiest EC2 to setup and the one having a free tier, an ubuntu EC2 instance. And The same code base that was used above is the same we are using here.
Creating an EC2
![EC2 1]https://dev-to-uploads.s3.amazonaws.com/uploads/articles/rk8waijxkthu1ule91fn.png)
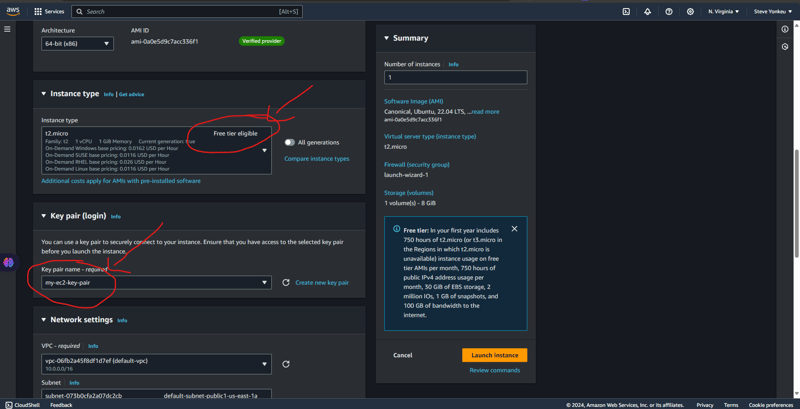
Alternatively, we can setup the security group separately.


Setting up the EC2
Run this script to install necessary dependencies
#!/bin/bash

# Update the package list and upgrade existing packages
sudo apt-get update
sudo apt-get upgrade -y

# Install Python3, pip, and other essentials
sudo apt-get install -y python3-pip python3-dev libpq-dev nginx curl

# Install Redis
sudo apt-get install -y redis-server

# Start and enable Redis
sudo systemctl start redis.service
sudo systemctl enable redis.service

# Install Supervisor
sudo apt-get install -y supervisor

# Install virtualenv
sudo pip3 install virtualenv

# Setup your Django project directory (adjust the path as needed)
cd ~/aws-django-redis

# Create a virtual environment
virtualenv venv

# Activate the virtual environment
source venv/bin/activate

# Install Gunicorn and other requirements
pip install gunicorn
pip install -r requirements.txt

# Create directories for logs if they don't already exist
sudo mkdir -p /var/log/aws-django-redis
sudo chown -R ubuntu:ubuntu /var/log/aws-django-redis

# Supervisor Configuration for Gunicorn
echo "[program:aws-django-redis]
command=$(pwd)/venv/bin/gunicorn --workers 3 --bind 0.0.0.0:8000 my_schedular.wsgi:application
directory=$(pwd)
autostart=true
autorestart=true
stderr_logfile=/var/log/aws-django-redis/gunicorn.err.log
stdout_logfile=/var/log/aws-django-redis/gunicorn.out.log
user=ubuntu
" | sudo tee /etc/supervisor/conf.d/aws-django-redis.conf

# Supervisor Configuration for Celery
echo "[program:celery]
command=$(pwd)/venv/bin/celery -A my_schedular worker --loglevel=info
directory=$(pwd)
autostart=true
autorestart=true
stderr_logfile=/var/log/aws-django-redis/celery.err.log
stdout_logfile=/var/log/aws-django-redis/celery.out.log
user=ubuntu
" | sudo tee /etc/supervisor/conf.d/celery.conf

# Reread and update Supervisor
sudo supervisorctl reread
sudo supervisorctl update
sudo supervisorctl restart all

# Set up Nginx to proxy to Gunicorn
echo "server {
    listen 80;
    server_name <your_vm_ip>;

    location / {
        proxy_pass http://127.0.01:8000;
        proxy_set_header Host \$host;
        proxy_set_header X-Real-IP \$remote_addr;
        proxy_set_header X-Forwarded-For \$proxy_add_x_forwarded_for;
        proxy_set_header X-Forwarded-Proto \$scheme;
    }

    error_log  /var/log/nginx/aws-django-redis_error.log;
    access_log /var/log/nginx/aws-django-redis_access.log;
}" | sudo tee /etc/nginx/sites-available/aws-django-redis

# Enable the Nginx site configuration
sudo ln -s /etc/nginx/sites-available/aws-django-redis /etc/nginx/sites-enabled/
sudo rm /etc/nginx/sites-enabled/default

# Test Nginx configuration and restart Nginx
sudo nginx -t
sudo systemctl restart nginx
Results
This setup is available on GitHub on the dev branch, have a look and open a PR.
Pricing and Setup Comparison Table
| Feature / Service | Self-Managed on EC2 (Free Tier) | Fully Managed AWS Services |
|---|---|---|
| EC2 Instance | t2.micro - Free for 750 hrs/mo | Not applicable |
| Application Hosting | Self-managed Django & Gunicorn | AWS App Runner (automatic scaling) |
| Database | Self-managed PostgreSQL | Amazon RDS (managed relational DB) |
| In-Memory Cache | Redis on the same EC2 | Amazon ElastiCache (Redis) |
| Task Queue | Celery with Redis | AWS managed queues (e.g., SQS) |
| Load Balancer | Nginx (self-setup) | AWS Load Balancer (integrated) |
| Static Files Storage | Serve via Nginx | Amazon S3 (highly scalable storage) |
| Log Management | Manual setup (Supervisor, Nginx, Redis) | AWS CloudWatch (logs and monitoring) |
| Security | Manual configurations | AWS Security Groups, IAM roles |
| Scaling | Manual scaling | Automatic scaling |
| Maintenance | Manual updates and patches | Managed by AWS |
| Pricing | Minimal (mostly within free tier) | Higher due to managed services |
コストの概要
- AWS 無料利用枠を使用したセットアップ: 無料利用枠の制限内にある場合は、基本的に無料です。使用量が無料枠の許容範囲を超えると、潜在的な費用が発生する可能性があります。
- すべての有料 AWS サービスを使用したセットアップ: EC2、Elasticache、RDS 用の 1 つの t2.micro インスタンスの継続運用を想定し、データ転送とストレージの追加コストを想定し、月額約 41.34 ドルと見積もられます。
注: 料金は概算であり、地域や特定の AWS の料金変更によって異なる場合があります。特定の要件に応じた最も正確なコスト見積もりを得るには、常に現在の AWS 料金ページを確認してください。
分析
- EC2 でのセルフマネージド: このアプローチは、特に AWS 無料利用枠を使用した場合にコスト効率が高くなります。より多くのセットアップと手動メンテナンスが必要ですが、環境を完全に制御できます。小規模または低予算のプロジェクトに最適です。
- フルマネージド AWS サービス: これにより運用コストは増加しますが、インフラストラクチャの管理、スケーリング、メンテナンスに関連するワークロードは軽減されます。これは、大規模なアプリケーション、または操作の簡素化とスケーリングが優先される場合に適しています。
まとめ
いやぁぁぁぁぁぁぁぁ!!!残念ながら、この件に関する要約はありません。はい、理解を深めるために前に戻ってください。
結論
学習の道のりは長く、難しく見えるかもしれませんが、一度に 1 つのリソースを使って知識を継続的に追加することで、目的と目標を達成することができます。
以上がDjango アプリのデプロイ: 外部 Celery を使用した EC アプリ ランナーの詳細内容です。詳細については、PHP 中国語 Web サイトの他の関連記事を参照してください。


