ホームページ >ウェブフロントエンド >jsチュートリアル >FeedRika API を使用した傾向分析ツールの構築 - パート I - セットアップ
FeedRika API を使用した傾向分析ツールの構築 - パート I - セットアップ
- WBOYWBOYWBOYWBOYWBOYWBOYWBOYWBOYWBOYWBOYWBOYWBOYWBオリジナル
- 2024-07-20 09:16:39804ブラウズ
FeedRika APIを使用したトレンド分析ツールの構築
私は最近、感情スコアや関連カテゴリとともに最新の世界ニュースを提供する FeedRika という素晴らしい News API サービスに出会いました。無料の使用枠があるので、試してみて、それで何が構築できるかを確認してみようと思いました。
私のアイデアの 1 つは、企業やトピックがニュースでどのように取り上げられたかを確認するためのツールを構築することでした。

Google トレンドのグラフを見ると、公共の場での用語の人気度がわかりますが、これは検索ボリュームのみを反映しています。周りの感情がポジティブなのかネガティブなのかはわかりません。そこで、ニュースを精査して、そのトピックが好意的に書かれているかどうかを確認し、同様のグラフを表示するツールを構築しましょう。
このツールを構築するために行う大まかな手順は次のとおりです。
- ユーザーから検索するトピックを収集します
- トピックに一致するニュース記事を Feedrika から取得します
- 返された記事をループし、各記事の感情スコアを抽出します
- これらのスコアをグラフにプロットして視覚的に表示します
- 平均センチメント、ポジティブ/ネガティブの合計など、トピックに関する追加の統計を生成するための計算を行います...
- ソースのニュース記事をユーザーに表示して、トピックをさらに詳しく調査できるようにします。
始める前に
Feedrika Web サイトから API キーを取得して、操作するニュース記事を取得できるようにしましょう。
feedrika.com にアクセスして、アカウントにサインアップしてください。
サインアップすると、プロフィール ページ feedrika.com/profile に API キーが表示され、クレジット残高と、行ったリクエストを示すリクエスト ログが表示されます。

プラットフォームの選択
このツールは HTML、CSS、JavaScript だけで構築できますが、プライベート API キーを使用する必要があり、それをインターネット上で公然と送信するのは得策ではないため、node と Express を使用してサーバー上の API キーを非表示にしましょうSide を環境変数として使用し、非公開にしておきます。
このチュートリアルは完全な初心者向けに調整するつもりなので、すでにノードと Express に精通している場合は、自由にスキップして、より興味深い部分に進んでください。
設定:
1. ノードとエクスプレス
Node ランタイム環境がインストールされていることを確認してください。そうでない場合は、ここで入手できます。
ローカル マシン上にこのプロジェクトのディレクトリを作成し、その中に移動します。
ターミナルで npm init -y を実行して、ノード プロジェクトをデフォルトで初期化します。
npm iexpress を実行して、Express フレームワークをインストールします。
Express は、アプリケーション内でページと API ルートを提供できるようにするシンプルな Web サーバーです。セットアップが簡単で広く使用されているため、オンラインでヘルプを見つけたり、トラブルシューティングを行ったりするのも簡単です。
VSCode またはお気に入りの IDE でフォルダーを開いて、中を見てください。

node_modules フォルダー、package.json ファイル、および package-lock.json ファイルが必要です。
2. 最初のルートの作成
ユーザーをアプリにようこそするインデックス ページを作成しましょう
プロジェクトのルートに新しいファイル「welcome.html」を作成します。開始するには、基本情報のみを入力してください
    <meta charset="UTF-8">
    <meta name="viewport" content="width=device-width, initial-scale=1.0">
    <title>Welcome</title>


    <h1>This is my news trends app!</h1>
最初のルートを設定して、誰かがアプリを開いたときにこの welcome.html ページを返しましょう
アプリのルートに「index.js」ファイルを作成し、Express フレームワークをインポートします。
// Import the express framework
express = require("express");

// tell node that we are creating an express app
const app = express();

// define the port that the server will run on
const port = 3000;

// define the route for the index page
app.get("/", (req, res) => {
 res.sendFile(__dirname + "/welcome.html");
});

// Start the server and tell the app to listen for incoming connections on the port
app.listen(port, () => {
  console.log(`Server running at http://localhost:${port}`);
});
進捗状況をテストしてみましょう。
ターミナルからノードindex.jsを実行します。サーバーが実行中であることを示す確認メッセージが表示されます

ターミナル内のリンクをクリックするか、ブラウザに貼り付けて、ようこそページが表示されることを確認します

3. 環境変数
API キーを保存するための環境変数を設定しましょう。
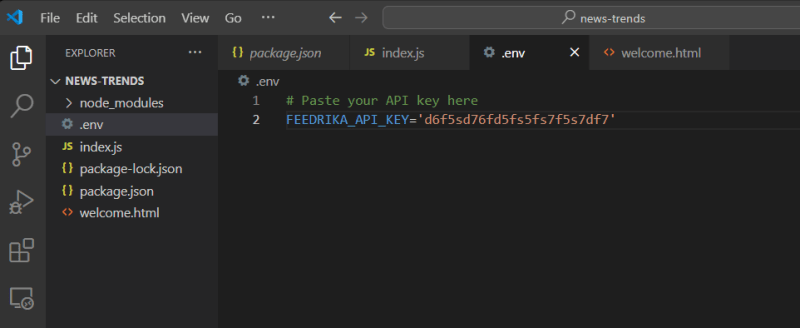
プロジェクトのルートに新しいファイル「.env」を作成します。
ここの Feedrika プロフィール ページから API キーをコピーして貼り付けます

Let's also add a '.gitignore' file so we don't accidently upload this private key to the web

Now for some housekeeping
We don't want to start and stop the server from the terminal every time we make an edit to the app so let's setup auto reloading.
Open your package.json file and add these lines to the script object
"start": "node index.js",
"dev": "nodemon index.js -w"

We are using nodemon with the '-w' flag to watch for changes in our root folder and restart the server.
Now we can start our server with the npm run dev command and it will automatically watch for changes and restart the server for us.
If you get an error about not recognizing nodemon run this to install it globally and try again:
npm i nodemon -g
Okay that completes the setup, lets move on to building out our App!
Let's update the welcome page and add a search box to ask for topics
    <meta charset="UTF-8">
    <meta name="viewport" content="width=device-width, initial-scale=1.0">
    <title>Welcome</title>
    <link rel="stylesheet" href="styles.css">


    <div id="container">
        <h1>News trends</h1>
        <h3>Search for a topic to get started</h3>
        <form class="search-form" action="/search" method="get">
            <input type="text" name="topic" placeholder="Search for a topic">
            <button type="submit">Search</button>
        </form>
    </div>
Setup Stylesheets
Create a 'public' folder in the root of your project that will host our client side javascript, css and image files.
Add a 'styles.css' file to the public folder and add some basic styles for the welcome page

styles.css:
/* Import the Inter font */
@import url('https://fonts.googleapis.com/css2?family=Inter:wght@400;700&display=swap');

body {
    margin: 0;
    padding: 0;
    font-family: 'Inter', sans-serif;
}

#container {
    width: 100%;
    height: 100vh;
    display: flex;
    flex-direction: column;
    justify-content: center;
    align-items: center;
}

/* SEARCH FORM */

.search-form input {
    padding: 1em;
    border: 1px solid #ccc;
    border-radius: 8px;
}

.search-form button {
    padding: 1em;
    border: 1px solid #ccc;
    border-radius: 8px;
    background-color: #313131;
    cursor: pointer;
    color: #fff;
}
Now we need to tell express how to serve these static files so open 'index.js' and add this line:
app.use(express.static("public"));

You should be able to see the changes reflected right away, refresh the page in your browser and confirm

Great! Let's now tell express how to handle this form submission
If you notice the form it submits to a '/search' endpoint so let's setup this route and handle the form submission
Open up your 'index.js' file and add these lines
// define the route for the /search endpoint
app.get("/search", (req, res) => {
  // get the query string from the request
  let query = req.query.topic;
  // send the query string back as the response
  res.send(query);
});

Let's test it out, go to your browser and enter a search term in the box and click submit
You should see a response from the server which shows your search term, like this

Good Job!
Now that we have a search route working let's plug-in the FeedRika API and fetch news for the topic.
Coming soon Part II - Fetching Data
以上がFeedRika API を使用した傾向分析ツールの構築 - パート I - セットアップの詳細内容です。詳細については、PHP 中国語 Web サイトの他の関連記事を参照してください。

