


一、web框架本质
1.基于socket,自己处理请求
#!/usr/bin/env python3
#coding:utf8
import socket
def handle_request(client):
 #接收请求
 buf = client.recv(1024)
 print(buf)
 #返回信息
 client.send(bytes('<h1 id="welcome-liuyao-webserver">welcome liuyao webserver</h1>','utf8'))
def main():
 #创建sock对象
 sock = socket.socket()
 #监听80端口
 sock.bind(('localhost',8000))
 #最大连接数
 sock.listen(5)
 print('welcome nginx')
 #循环
 while True:
 #等待用户的连接,默认accept阻塞当有请求的时候往下执行
 connection,address = sock.accept()
 #把连接交给handle_request函数
 handle_request(connection)
 #关闭连接
 connection.close()
if __name__ == '__main__':
 main()
2.基于wsgi
WSGI,全称 Web Server Gateway Interface,或者 Python Web Server Gateway Interface ,是为 Python 语言定义的 Web 服务器和 Web 应用程序或框架之间的一种简单而通用的接口。自从 WSGI 被开发出来以后,许多其它语言中也出现了类似接口。
WSGI 的官方定义是,the Python Web Server Gateway Interface。从名字就可以看出来,这东西是一个Gateway,也就是网关。网关的作用就是在协议之间进行转换。
WSGI 是作为 Web 服务器与 Web 应用程序或应用框架之间的一种低级别的接口,以提升可移植 Web 应用开发的共同点。WSGI 是基于现存的 CGI 标准而设计的。
很多框架都自带了 WSGI server ,比如 Flask,webpy,Django、CherryPy等等。当然性能都不好,自带的 web server 更多的是测试用途,发布时则使用生产环境的 WSGI server或者是联合 nginx 做 uwsgi 。
python标准库提供的独立WSGI服务器称为wsgiref。
#!/usr/bin/env python
#coding:utf-8
#导入wsgi模块
from wsgiref.simple_server import make_server

def RunServer(environ, start_response):
 start_response('200 OK', [('Content-Type', 'text/html')])
 return [bytes("welcome webserver".encode('utf8'))]

if __name__ == '__main__':
 httpd = make_server('', 8000, RunServer)
 print ("Serving HTTP on port 8000...")
 httpd.serve_forever()
 #接收请求
 #预处理请求(封装了很多http请求的东西)
请求过来后就执行RunServer这个函数。
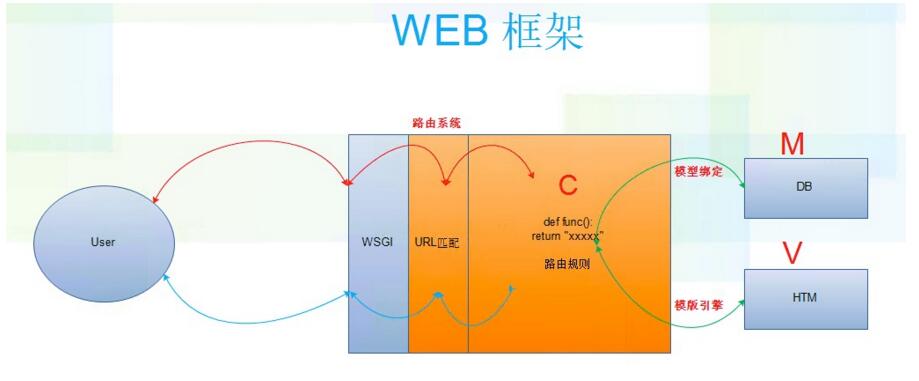
原理图:
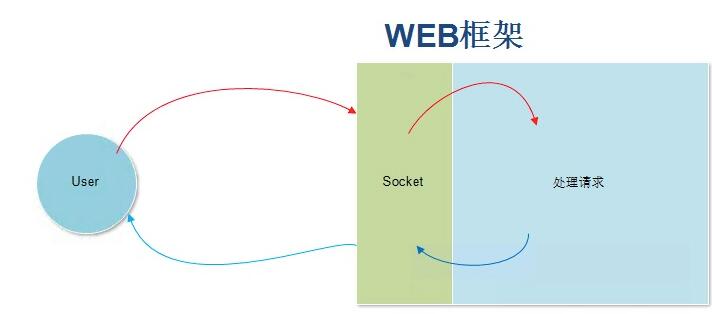
当用户发送请求,socket将请求交给函数处理,之后再返回给用户。
二、自定义web框架
python标准库提供的wsgiref模块开发一个自己的Web框架
之前的使用wsgiref只能访问一个url
下面这个可以根据你访问的不同url请求进行处理并且返回给用户
#!/usr/bin/env python
#coding:utf-8
from wsgiref.simple_server import make_server
def RunServer(environ, start_response):
 start_response('200 OK', [('Content-Type','text/html')])
 #根据url的不同,返回不同的字符串
 #1 获取URL[URL从哪里获取?当请求过来之后执行RunServer,
 #wsgi给咱们封装了这些请求,这些请求都封装到了,environ & start_response]
 request_url = environ['PATH_INFO']
 print (request_url)
 #2 根据URL做不同的相应
 #print environ #这里可以通过断点来查看它都封装了什么数据
 if request_url == '/login':
  return [bytes("welcome login",'utf8')]
 elif request_url == '/reg':
  return [bytes("welcome reg",'utf8')]
 else:
  return [bytes('<h1 id="no-found">404! no found</h1>','utf8')]

if __name__ == '__main__':
 httpd = make_server('', 8000, RunServer)
 print ("Serving HTTP on port 8000...")
 httpd.serve_forever()
当然 以上虽然根据不同url来进行处理,但是如果大量url的话,那么代码写起来就很繁琐。
所以使用下面方法进行处理
#!/usr/bin/env python
#coding:utf-8
from wsgiref.simple_server import make_server
def index():
return [bytes('<h1 id="index">index</h1>','utf8')]
def login():
return [bytes('<h1 id="login">login</h1>','utf8')]
def reg():
return [bytes('<h1 id="reg">reg</h1>','utf8')]
def layout():
return [bytes('<h1 id="layout">layout</h1>','utf8')]
#定义一个列表 把url和上面的函数做一个对应
urllist = [
('/index',index),
('/login',login),
('/reg',reg),
('/layout',layout),
]
def RunServer(environ, start_response):
start_response('200 OK', [('Content-Type','text/html')])
#根据url的不同,返回不同的字符串
#1 获取URL[URL从哪里获取?当请求过来之后执行RunServer,wsgi给咱们封装了这些请求,这些请求都封装到了,environ & start_response]
request_url = environ['PATH_INFO']
print (request_url)
#2 根据URL做不同的相应
#print environ #这里可以通过断点来查看它都封装了什么数据
#循环这个列表 找到你打开的url 返回url对应的函数
for url in urllist:
if request_url == url[0]:
return url[1]()
else:
#url_list列表里都没有返回404
return [bytes('<h1 id="not-found">404 not found</h1>','utf8')]
if __name__ == '__main__':
httpd = make_server('', 8000, RunServer)
print ("Serving HTTP on port 8000...")
httpd.serve_forever()
三、模板引擎
对应上面的操作 都是根据用户访问的url返回给用户一个字符串的 比如return xxx
案例:
首先写一个index.html页面
内容:
<!DOCTYPE html>
<html lang="en">
<head>
<meta charset="UTF-8">
<title>index</title>
</head>
<body>
<h1 id="welcome-index">welcome index</h1>
</body>
</html>
login.html页面
内容:
<!DOCTYPE html>
<html lang="en">
<head>
 <meta charset="UTF-8">
 <title>login</title>
</head>
<body>
 <h1 id="welcome-login">welcome login</h1>
 <form>
  user:<input type="text"/>
  pass:<input type="password"/>
  <button type="button">login in</button>
 </form>
</body>
</html>
python代码:
#!/usr/bin/env python
#coding:utf-8
from wsgiref.simple_server import make_server
def index():
 #把index页面读进来返回给用户
 indexfile = open('index.html','r+').read()
 return [bytes(indexfile,'utf8')]
def login():
 loginfile = open('login.html','r+').read()
 return [bytes(loginfile,'utf8')]
urllist = [
 ('/login',login),
 ('/index',index),
]
def RunServer(environ, start_response):
 start_response('200 OK', [('Content-Type','text/html')])
 #根据url的不同,返回不同的字符串
 #1 获取URL[URL从哪里获取?当请求过来之后执行RunServer,wsgi给咱们封装了这些请求,这些请求都封装到了,environ & start_response]
 request_url = environ['PATH_INFO']
 print (request_url)
 #2 根据URL做不同的相应
 #print environ #这里可以通过断点来查看它都封装了什么数据
 for url in urllist:
  #如果用户请求的url和咱们定义的rul匹配
  if request_url == url[0]:
   #执行
   return url[1]()
 else:
  #url_list列表里都没有返回404
  return [bytes('<h1 id="not-found">404 not found</h1>','utf8')]
if __name__ == '__main__':
 httpd = make_server('', 8000, RunServer)
 print ("Serving HTTP on port 8000...")
 httpd.serve_forever()
但是以上内容只能返回给静态内容,不能返回动态内容
那么如何返回动态内容呢
自定义一套特殊的语法,进行替换
使用开源工具jinja2,遵循其指定语法
index.html 遵循jinja语法进行替换、循环、判断
先展示大概效果,具体jinja2会在下章django笔记来进行详细说明
index.html页面
内容:
<!DOCTYPE html>
<html lang="en">
<head>
 <meta charset="UTF-8">
 <title>Title</title>
</head>
<body>
 <!--general replace-->
 <h1 id="name">{{ name }}</h1>
 <h1 id="age">{{ age }}</h1>
 <h1 id="time">{{ time }}</h1>

 <!--for circular replace-->
 <ul>
  {% for item in user_list %}
   <li>{{ item }}</li>
  {% endfor %}
 </ul>
 <!--if else judge-->
 {% if num == 1 %}
  <h1 id="num">num == 1</h1>
 {% else %}
  <h1 id="num">num == 2</h1>
 {% endif %}
</body>
</html>
python代码:
#!/usr/bin/env python
#-*- coding:utf-8 -*-
import time
#导入wsgi模块
from wsgiref.simple_server import make_server
#导入jinja模块
from jinja2 import Template
def index():
 #打开index.html
 data = open('index.html').read()
 #使用jinja2渲染
 template = Template(data)
 result = template.render(
  name = 'yaoyao',
  age = '18',
  time = str(time.time()),
  user_list = ['linux','python','bootstarp'],
  num = 1
 )
 #同样是替换为什么用jinja,因为他不仅仅是文本的他还支持if判断 & for循环 操作
 #这里需要注意因为默认是的unicode的编码所以设置为utf-8
 return [bytes(result,'utf8')]
urllist = [
 ('/index',index),
]
def RunServer(environ, start_response):
 start_response('200 OK', [('Content-Type', 'text/html')])
 #根据url的不同,返回不同的字符串
 #1 获取URL[URL从哪里获取?当请求过来之后执行RunServer,
 # wsgi给咱们封装了这些请求,这些请求都封装到了,environ & start_response]
 request_url = environ['PATH_INFO']
 print(request_url)
 #2 根据URL做不同的相应
 #循环这个列表
 for url in urllist:
  #如果用户请求的url和咱们定义的rul匹配
  if request_url == url[0]:
   print (url)
   return url[1]()
 else:
  #urllist列表里都没有返回404
  return [bytes('<h1 id="not-found">404 not found</h1>','utf8')]
if __name__ == '__main__':
 httpd = make_server('', 8000, RunServer)
 print ("Serving HTTP on port 8000...")
 httpd.serve_forever()
四、MVC和MTV
1.MVC
全名是Model View Controller,是模型(model)-视图(view)-控制器(controller)的缩写,一种软件设计典范,用一种业务逻辑、数据、界面显示分离的方法组织代码,将业务逻辑聚集到一个部件里面,在改进和个性化定制界面及用户交互的同时,不需要重新编写业务逻辑。MVC被独特的发展起来用于映射传统的输入、处理和输出功能在一个逻辑的图形化用户界面的结构中。
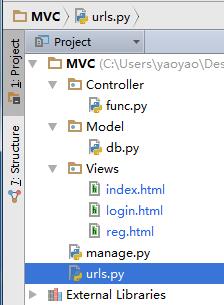
将路由规则放入urls.py
操作urls的放入controller里的func函数
将数据库操作党风model里的db.py里
将html页面等放入views里
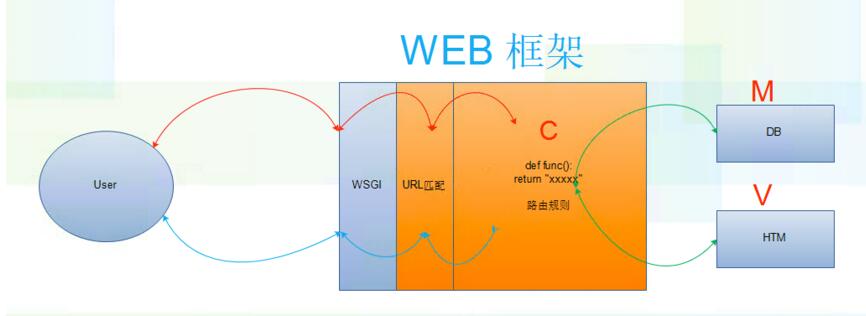
原理图:
2.MTV
Models 处理DB操作
Templates html模板
Views 处理函数请求
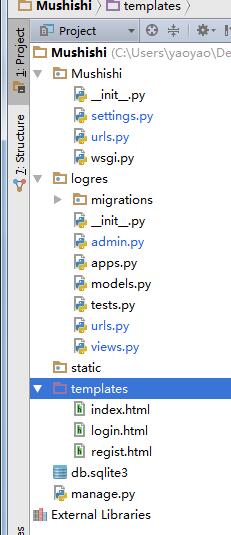
原理图:
以上就是本文的全部内容,希望对大家的学习有所帮助。

 Pythonを使用した科学コンピューティングでアレイはどのように使用されていますか?Apr 25, 2025 am 12:28 AM
Arraysinpython、特にvianumpy、arecrucialinscientificComputing fortheirefficienty andversitility.1)彼らは、fornumericaloperations、data analysis、andmachinelearning.2)numpy'simplementation incensuresfasteroperationsthanpasteroperations.3)arayableminablecickick
 同じシステムで異なるPythonバージョンをどのように処理しますか?Apr 25, 2025 am 12:24 AM
Pyenv、Venv、およびAnacondaを使用して、さまざまなPythonバージョンを管理できます。 1)Pyenvを使用して、複数のPythonバージョンを管理します。Pyenvをインストールし、グローバルバージョンとローカルバージョンを設定します。 2)VENVを使用して仮想環境を作成して、プロジェクトの依存関係を分離します。 3)Anacondaを使用して、データサイエンスプロジェクトでPythonバージョンを管理します。 4)システムレベルのタスク用にシステムPythonを保持します。これらのツールと戦略を通じて、Pythonのさまざまなバージョンを効果的に管理して、プロジェクトのスムーズな実行を確保できます。
 標準のPythonアレイでnumpyアレイを使用することの利点は何ですか?Apr 25, 2025 am 12:21 AM
numpyarrayshaveveraladvantages-averstandardpythonarrays:1)thealmuchfasterduetocベースのインプレンテーション、2)アレモレメモリ効率、特にlargedatasets、および3)それらは、拡散化された、構造化された形成術科療法、
 アレイの均質な性質はパフォーマンスにどのように影響しますか?Apr 25, 2025 am 12:13 AM
パフォーマンスに対する配列の均一性の影響は二重です。1)均一性により、コンパイラはメモリアクセスを最適化し、パフォーマンスを改善できます。 2)しかし、タイプの多様性を制限し、それが非効率につながる可能性があります。要するに、適切なデータ構造を選択することが重要です。
 実行可能なPythonスクリプトを作成するためのベストプラクティスは何ですか?Apr 25, 2025 am 12:11 AM
craftexecutablepythonscripts、次のようになります
 numpyアレイは、アレイモジュールを使用して作成された配列とどのように異なりますか?Apr 24, 2025 pm 03:53 PM
numpyarraysarasarebetterfornumeroperations andmulti-dimensionaldata、whilethearraymoduleissuitable forbasic、1)numpyexcelsinperformance and forlargedatasentassandcomplexoperations.2)thearraymuremememory-effictientivearientfa
 Numpyアレイの使用は、Pythonで配列モジュール配列の使用と比較してどのように比較されますか?Apr 24, 2025 pm 03:49 PM
NumPyArraySareBetterforHeavyNumericalComputing、whilethearrayarayismoreSuitableformemory-constrainedprojectswithsimpledatatypes.1)numpyarraysofferarays andatiledance andpeperancedatasandatassandcomplexoperations.2)thearraymoduleisuleiseightweightandmemememe-ef
 CTypesモジュールは、Pythonの配列にどのように関連していますか?Apr 24, 2025 pm 03:45 PM
ctypesallowsinging andmanipulatingc-stylearraysinpython.1)usectypestointerfacewithclibrariesforperformance.2)createc-stylearraysfornumericalcomputations.3)passarraystocfunctions foreffientientoperations.how、how、becuutiousmorymanagemation、performanceo


ホットAIツール

Undresser.AI Undress
リアルなヌード写真を作成する AI 搭載アプリ

AI Clothes Remover
写真から衣服を削除するオンライン AI ツール。

Undress AI Tool
脱衣画像を無料で

Clothoff.io
AI衣類リムーバー

Video Face Swap
完全無料の AI 顔交換ツールを使用して、あらゆるビデオの顔を簡単に交換できます。

人気の記事
ホットツール

WebStorm Mac版
便利なJavaScript開発ツール

Safe Exam Browser
Safe Exam Browser は、オンライン試験を安全に受験するための安全なブラウザ環境です。このソフトウェアは、あらゆるコンピュータを安全なワークステーションに変えます。あらゆるユーティリティへのアクセスを制御し、学生が無許可のリソースを使用するのを防ぎます。

SublimeText3 Linux 新バージョン
SublimeText3 Linux 最新バージョン

MantisBT
Mantis は、製品の欠陥追跡を支援するために設計された、導入が簡単な Web ベースの欠陥追跡ツールです。 PHP、MySQL、Web サーバーが必要です。デモおよびホスティング サービスをチェックしてください。

SublimeText3 Mac版
神レベルのコード編集ソフト(SublimeText3)
ホットトピック
 7700
7700 15164014139352128725123029