ホームページ >ウェブフロントエンド >jsチュートリアル >jQuery jcrop プラグインを使用してスクリーンショットを撮る方法_jquery
jQuery jcrop プラグインを使用してスクリーンショットを撮る方法_jquery
- WBOYWBOYWBOYWBOYWBOYWBOYWBOYWBOYWBOYWBOYWBOYWBOYWBオリジナル
- 2016-05-16 17:13:382219ブラウズ
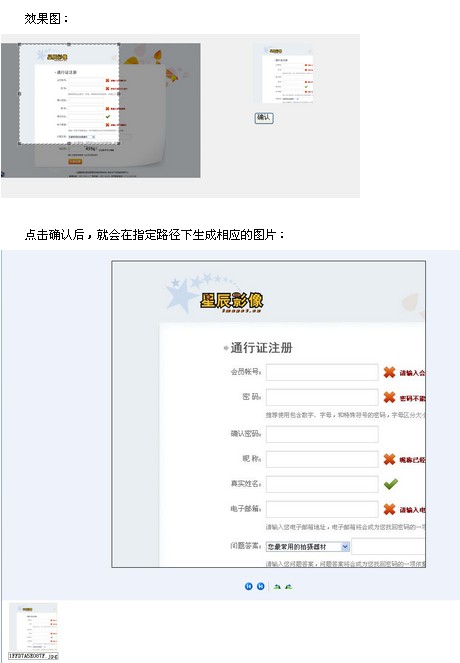
背景の画像を切り取ります。
アバターインターセプトの原理: フロントデスクで jcrop を使用して、x 軸座標、y 軸座標、スライスの高さ、スライスの幅を取得し、これら 4 つの値をバックエンドに渡します
。バックグラウンドでの増幅処理が必要です。セクションを N 倍に拡大します (N = フロントに表示される元の画像/アバター)。つまり、X = 高です。
例:
JSP:
<フォームアクション="" Method="post" id="crop_form">
;input type ="hidden" id="y" name="y" />
次に、jcrop を使用します。 jcrop を使用する前に、jcrop をダウンロードする必要があります: http://deepliquid.com/content/Jcrop.html。
ダウンロードした圧縮パッケージを解凍すると、Jcorp のスタイル ファイルが /css の下に配置され、いくつかの簡単なサンプル (index.html) が /demo の下に配置されていることがわかります。はこのフォルダーに配置されます)、Jcorp で最も重要なスクリプト ファイルは /js の下に配置されます。使用する必要があるファイルは 3 つだけです: jquery.Jcrop.css、jquery.Jcrop.js、JQuery.js
使用法:
function CutImage (){
$("#srcImg").Jcrop( {
アスペクト比 : 1,
onChange : showCoords,
onSelect : showCoords,
minSize :[200,200]
} );
//単純なイベント ハンドラー、onChange、onSelect イベントに応答し、
関数 showCoords(obj) を呼び出します {
$("#x").val(obj.x); $("#y").val(obj.y);
$("#w").val(obj.w);
$("#h").val( obj. h);
if (parseInt(obj.w) > 0) {
//表示領域の幅(および高さ)と幅を計算して、プレビュー領域画像のズーム率を計算しますクリッピングの (および高さ) 比率は
var rx = $("#preview_box").width() / obj.w;
var ry = $("#preview_box").height() / obj.h;
//比率の値によって画像のスタイルと表示を制御します
$("#previewImg").css( {
// プレビュー画像の幅は計算された比率値と元の画像の幅の積
height : Math.round(rx * $("#srcImg").height()) "px", //プレビュー画像の高さは比率値と元画像の高さの積を計算します
marginLeft: "-" Math.round(rx * obj.x) "px",
marginTop: "-" Math.round(ry * obj.y) " px"
});
}
}
}
onSelect: showPreview,
アスペクト比: 1
});
This method is to assign the object generated by Jcrop to a global variable, which will make the operation more convenient.
Through the above js, the four values of X-axis coordinate, Y-axis coordinate, height H, and width W are passed to the background. The background only needs to enlarge and then cut based on these four values
That’s it.
Action
/**
* Crop avatar
*/
public String cutImage(){
/*
* Get parameters
* x,y,w,h,bigImage
*/
HttpServletRequest request = (HttpServletRequest) ActionContext.getContext ().get(ServletActionContext.HTTP_REQUEST);
int x = Integer.valueOf(request.getParameter("x"));
int y = Integer.valueOf(request.getParameter("y"));
int w = Integer.valueOf(request.getParameter("w"));
int h = Integer.valueOf(request.getParameter("h"));
String bigImage = request.getParameter( "bigImage");
//Get the real path of the file
//Get the file name
String[] imageNameS = bigImage.split("/");
String imageName = imageNameS[ imageNameS.length-1];
//Formal path of the file
String imagePath = getSavePath() "\" imageName;
//Cut the image
ImageCut imageCut = new ImageCut();
imageCut.cutImage(imagePath, x, y, w, h);
//After the avatar is cropped, save the image path to the user
UserBean userBean = (UserBean) request.getSession( ).getAttribute("userBean");
userBean.setUserPhoto(bigImage);
//Save avatar
UserCenterService centerService = new UserCenterService();
centerService.updatePhoto(userBean);
//Save the modified user into the session
request.getSession().setAttribute("userBean", userBean);
return "updatePhoto";
}
}
Crop image tool class: ImageCut.java
public class ImageCut {
/* *
* Image cutting
* @param imagePath Original image address
* @param x Target slice coordinates X-axis starting point
* @param y Target slice coordinates Y-axis starting point
* @param w Target Slice width
* @param h Target slice height
*/
public void cutImage(String imagePath, int x,int y,int w,int h){
try {
Image img;
ImageFilter cropFilter;
/ / Read source image
BufferedImage bi = ImageIO.read(new File(imagePath));
int srcWidth = bi.getWidth(); // Source image width
int srcHeight = bi.getHeight() ; // Source image height
// If the original image size is larger than the slice size, cut it
if (srcWidth >= w && srcHeight >= h) {
Image image = bi. getScaledInstance(srcWidth, srcHeight,Image.SCALE_DEFAULT);
int x1 = x*srcWidth/400;
int y1 = y*srcHeight/270;
int w1 = w*srcWidth/400;
int h1 = h*srcHeight/270;
cropFilter = new CropImageFilter(x1, y1, w1, h1);
img = Toolkit.getDefaultToolkit().createImage(new FilteredImageSource(image. getSource(), cropFilter));
BufferedImage tag = new BufferedImage(w1, h1,BufferedImage.TYPE_INT_RGB);
Graphics g = tag.getGraphics();
g.drawImage(img, 0, 0 , null); // Draw the reduced image
g.dispose();
// Output as a file
ImageIO.write(tag, "JPEG", new File(imagePath));
}
} catch (IOException e) {
e.printStackTrace();
}
}
}


