Maison >interface Web >js tutoriel >Javascript implémente les compétences d'effet d'affichage publicitaire du diaporama Taobao_javascript
Javascript implémente les compétences d'effet d'affichage publicitaire du diaporama Taobao_javascript
- WBOYWBOYWBOYWBOYWBOYWBOYWBOYWBOYWBOYWBOYWBOYWBOYWBoriginal
- 2016-05-16 16:02:061260parcourir
L'exemple de cet article décrit la méthode d'utilisation de JavaScript pour obtenir l'effet d'affichage des publicités diaporama Taobao. Partagez-le avec tout le monde pour votre référence. Les détails sont les suivants :
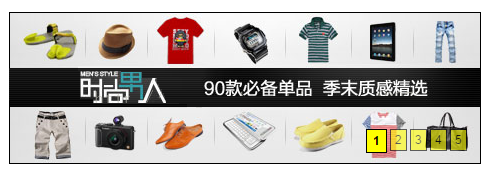
1. Les rendus sont les suivants :

2. Partie code :
Partie du code JS :
function getClass(oParent,name){
var arr=[];
var oBj=oParent.getElementsByTagName("*");
for(var i=0;i<oBj.length;i++){
if(oBj[i].className==name){
arr.push(oBj[i]);
}
}
return arr;
}
function startmove(obj,json,fnEnd){
var cur=0;
clearInterval(obj.timer);
obj.timer=setInterval(function(){
var oStop=true;
for(var attr in json){
if(attr=='opacity'){
cur=Math.round(parseFloat(getStyle(obj,attr)*100));
}else{
cur=parseInt(getStyle(obj,attr));
}
var speed=(json[attr]-cur)/10;
speed=speed>0?Math.ceil(speed):Math.floor(speed);
if(cur!=json[attr]){
oStop=false;
}
if(attr=='opacity'){
obj.style[attr]=(cur+speed)/100;
obj.style.filter="alpha(opacity:"+cur+speed+")";
}else{
obj.style[attr]=cur+speed+"px";
}
}
if(oStop){
clearInterval(obj.timer);
if(fnEnd)fnEnd();
}
},30);
};
function getStyle(obj,name){
if(obj.currentStyle){
return obj.currentStyle[name];
}else{
return getComputedStyle(obj,false)[name];
}
};
Partie CSS :
*{ margin: 0px; padding: 0px; }
img{
border: none; width: 470px; height: 150px;
float: left;
}
.pic_body li{
width: 470px; height: 150px;
float: left; z-index: 3001; }
ul{
 list-style: none; position: absolute; top: 0px; left: 0px;
 width: 470px; height: 150px; background: yellow; z-index: 3000;
}
#div1{ border: 1px solid black; width: 470px; height: 150px;
 position: relative; margin: 100px auto; padding: 0px;
 overflow: hidden;
}
#div1 ol{ bottom: 10px; right: 10px;
position: absolute; z-index: 9999;
}
ol li{ background: yellow; float: left;
display: inline; margin-right: 3px; padding: 3px 4px;
position: relative; top: 0px; left: 0px;
font-family: arial; font-size: 12px;
cursor: pointer; filter: alpha(opacity:60); opacity: 0.6;
border: 1px solid black;
}
.active{ background: yellow; font-weight: bolder;
padding: 4px 6px; filter: alpha(opacity:100); opacity: 1;
}
Partie HTML :
<!DOCTYPE html>
<html>
<head lang="en">
  <meta charset="UTF-8">
  <title></title>
  <link href="css.css" rel="stylesheet" type="text/css">
  <script src="myscript.js"></script>
  <script>
    window.onload=function() {
      var now = 0;
      var oDiv = document.getElementById('div1');
      var oOl = oDiv.getElementsByTagName('ol')[0];
      var oLi = oOl.getElementsByTagName('li');
      var oUl = getClass(oDiv, 'pic_body')[0];
      for(var i=0;i<oLi.length;i++){
        oLi[i].index=i;
        oLi[i].onclick=function(){
          now=this.index;
          tab();
        };
      }
      function tab(){
        for(var i=0;i<oLi.length;i++){
          oLi[i].className='';
        }
        oLi[now].className='active';
        startmove(oUl,{top:-150*now});
      };
      function next(){
        now++;
        if(now==oLi.length){
          now=0;
        }
        tab();
      };
      var timer=setInterval(next,3000);
      oUl.onmouseover=function(){
        clearInterval(timer);
      };
      oUl.onmouseout=function(){
        timer=setInterval(next,3000);
      };
    }
  </script>
</head>
<body>
<div id="div1">
  <ol>
    <li class="active">1</li>
    <li>2</li>
    <li>3</li>
    <li>4</li>
    <li>5</li>
  </ol>
  <ul class="pic_body">
    <li><img src="image/1.jpg"></li>
    <li><img src="image/2.jpg"></li>
    <li><img src="image/3.jpg"></li>
    <li><img src="image/4.jpg"></li>
    <li><img src="image/5.jpg"></li>
  </ul>
</div>
</body>
</html>
J'espère que cet article sera utile à la conception de la programmation JavaScript de chacun.
Déclaration:
Le contenu de cet article est volontairement contribué par les internautes et les droits d'auteur appartiennent à l'auteur original. Ce site n'assume aucune responsabilité légale correspondante. Si vous trouvez un contenu suspecté de plagiat ou de contrefaçon, veuillez contacter admin@php.cn
Article précédent:JQuery se souvient du nom d'utilisateur et du mot de passe pour implémenter la fonction de connexion automatique la prochaine fois_jqueryArticle suivant:JQuery se souvient du nom d'utilisateur et du mot de passe pour implémenter la fonction de connexion automatique la prochaine fois_jquery
Articles Liés
Voir plus- Une analyse approfondie du composant de groupe de liste Bootstrap
- Explication détaillée du currying de la fonction JavaScript
- Exemple complet de génération de mot de passe JS et de détection de force (avec téléchargement du code source de démonstration)
- Angularjs intègre l'interface utilisateur WeChat (weui)
- Comment basculer rapidement entre le chinois traditionnel et le chinois simplifié avec JavaScript et l'astuce permettant aux sites Web de prendre en charge le basculement entre les compétences en chinois simplifié et traditionnel_javascript

