Maison >interface Web >js tutoriel >Comment implémenter des commentaires d'une seule page à l'aide de Laravel avec AngularJS et PHP_AngularJS
Comment implémenter des commentaires d'une seule page à l'aide de Laravel avec AngularJS et PHP_AngularJS
- WBOYoriginal
- 2016-05-16 15:53:461913parcourir
Code complet : https://github.com/scotch-io/laravel-angular-comment-app
Actuellement, Laravel et Angular sont devenus des outils très célèbres dans le monde du développement Web. Laravel est connu pour introduire un contenu de qualité dans la communauté PHP, et Angular est connu pour ses outils frontaux étonnants et sa simplicité. La combinaison de ces deux cadres semble être la prochaine étape logique.
Dans notre environnement d'utilisation, nous utiliserons Laravel comme API RESTful backend et Angular comme frontend pour créer une simple application de commentaires d'une seule page.
Voici un exemple simple montrant comment commencer à utiliser les deux techniques, alors n'ayez pas peur des éléments supplémentaires de la base de données, comment gérer les sous-commentaires, etc.
Qu'allons-nous créer
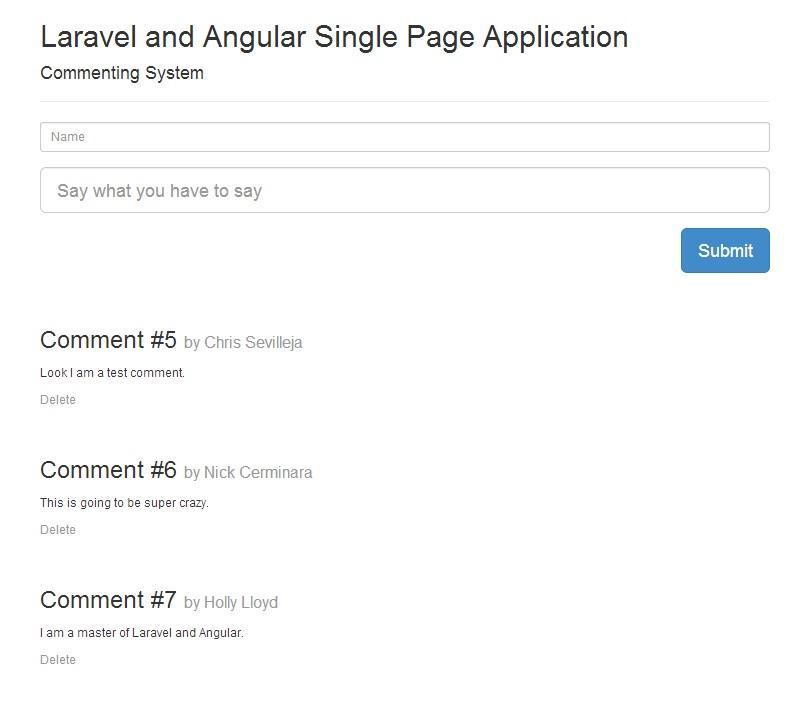
Il s'agira d'une simple demande d'évaluation d'une page :
- L'API RESTful Laravel gère l'obtention, la création et la suppression de commentaires
- Le front-end Angular est responsable de l'affichage des formulaires et des commentaires que nous avons créés ;
- Possibilité de créer de nouveaux commentaires et de les ajouter à notre liste d'actualisation de page W/O
- Possibilité de supprimer des commentaires et de les supprimer de la liste d'actualisation de la page W/O.
Dans l’ensemble, ce sont des concepts très simples. Nous nous concentrons sur les subtilités de la façon dont Laravel et Angular fonctionnent ensemble.

Backend Laravel
Configuration de Laravel
Continuez à configurer votre Laravel, nous effectuerons quelques travaux de base pour permettre à notre backend d'ajouter, supprimer, modifier et vérifier les commentaires :
- Créer une migration de base de données
- Insérez des exemples de commentaires dans la base de données
- Créer une table de routage pour notre API
- Créez une table de routage « obtenir tout » et laissez Angular l'acheminer
- Créer un contrôleur de ressources pour les commentaires
Préparation de la migration de la base de données
Nous voulons une structure simple pour stocker les commentaires, qui ne doit inclure que le contenu et l'auteur. Créons une migration Laravel pour créer des commentaires.
Exécutons la commande artisan pour créer une migration de commentaires afin de pouvoir créer une table de commentaires dans notre base de données :
php artisan migrate:make create_comments_table --create=comments
Nous utiliserons le générateur de schéma Laravel pour créer les champs "Contenu" et "Auteur" requis. Laravel crée également les colonnes id et timestamps afin que nous sachions quand ce commentaire a été ajouté. Voici le code du formulaire de commentaire :
// app/database/migrations/####_##_##_######_create_comments_table.php
...

  /**
   * Run the migrations.
   *
   * @return void
   */
  public function up()
  {
    Schema::create('comments', function(Blueprint $table)
    {
      $table->increments('id');

      $table->string('text');
      $table->string('author');

      $table->timestamps();
    });
  }
...
Assurez-vous d'avoir ajusté les paramètres de la base de données dans le fichier "app/config/database.php" avec les informations d'identification correctes. Maintenant, nous lançons la migration pour créer cette table avec les colonnes requises :
php artisan migrate

Modèle de commentaire
Nous utiliserons le modèle Laravel Eloquent pour interagir avec la base de données. C'est simple à faire, créons un modèle : "app/models/Comment.php":
<?php
// app/models/Comment.php
class Comment extends Eloquent {
// let eloquent know that these attributes will be available for mass assignment
protected $fillable = array('author', 'text');
}
Maintenant que nous avons la table et le modèle, ajoutons un exemple de données à la table via Laravel Seeding.
Base de données de graines
Nous avons besoin de quelques commentaires pour tester certaines choses. Créons un fichier torrent et insérons trois exemples de commentaires dans la base de données.
Créez un fichier : "app/database/seeds/CommentTableSeeder.php" et ajoutez le code suivant :
<?php
// app/database/seeds/CommentTableSeeder.php
class CommentTableSeeder extends Seeder
{
public function run()
{
DB::table('comments')->delete();
Comment::create(array(
'author' => 'Chris Sevilleja',
'text' => 'Look I am a test comment.'
));
Comment::create(array(
'author' => 'Nick Cerminara',
'text' => 'This is going to be super crazy.'
));
Comment::create(array(
'author' => 'Holly Lloyd',
'text' => 'I am a master of Laravel and Angular.'
));
}
}
Pour appeler ce fichier seeder, nous devons modifier "app/database/seeds/DatabaseSeeder.php" et ajouter le code suivant :
  // app/database/seeds/DatabaseSeeder.php
...

  /**
   * Run the database seeds.
   *
   * @return void
   */
  public function run()
  {
    Eloquent::unguard();

    $this->call('CommentTableSeeder');
    $this->command->info('Comment table seeded.');
  }

...
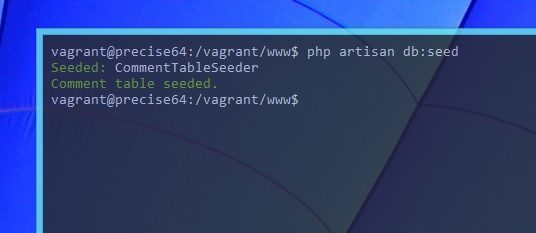
Maintenant, nous faisons fonctionner notre semoir via la commande artisanale.
php artisan db:seed

Nous avons maintenant une base de données avec une table de commentaires, un modèle Eloquent et quelques exemples de bases de données. Ce n'est pas une mauvaise journée de travail. . . Mais nous sommes loin d'avoir terminé.
Contrôleur de ressources de commentaires (app/controllers/CommentController.php)
Nous utiliserons le contrôleur de ressources Laravel pour gérer les fonctions de l'API de commentaires. Parce qu'Angular est utilisé pour afficher une ressource et créer et mettre à jour des formulaires, sans créer ni modifier de fonctions, nous créerons un contrôleur de ressources via la commande artisan.
Créons un contrôleur de ressources en utilisant artisan.
php artisan controller:make CommentController --only=index,store,destroy
对于示例应用,我们只会在资源控制器中使用这三个函数。为了扩展,你要包含所有的诸如更新、显示等函数,来实现一个更成熟的应用。

我们已经创建了控制器,就不需要创建和编辑函数啦,因为Angular,而不是Laravel会处理显示表单的工作。Laravel只负责把数据返回给前端。只为了想让事情简单化,我们也从实例应用提出了更新函数。我们将处理创建、显示和删除评论。
要回传数据,我们想以JSON形式返回数据。我们来浏览一下新建的控制器并添加相应的函数。
<?php
// app/controllers/CommentController.php
class CommentController extends \BaseController {
/**
* Send back all comments as JSON
*
* @return Response
*/
public function index()
{
return Response::json(Comment::get());
}
/**
* Store a newly created resource in storage.
*
* @return Response
*/
public function store()
{
Comment::create(array(
'author' => Input::get('author'),
'text' => Input::get('text')
));
return Response::json(array('success' => true));
}
/**
* Remove the specified resource from storage.
*
* @param int $id
* @return Response
*/
public function destroy($id)
{
Comment::destroy($id);
return Response::json(array('success' => true));
}
}
你可以看到用Laravel和Eloquent处理增删改查多么容易。处理我们所需的函数简直难以置信的简单。
随着控制器的准备完成,我们后端最后要做的一件事就是路由。
我们的路由表(app/routes.php)
随着数据库的准备就绪,我们来处理Laravel应用的路由表吧。既然它有自己的路由,我们将会用到路由表发送数据给前端。我们也要给后台API提供路由表,从而可以让人访问我们的评论数据。
让我们创建Angular指向路由表。我们需要一个主页路由表和一个发送用户给Angular的“全部获取”路由表。这保证了用户无论怎样都能访问我们的网站,它们会被路由到Angular前端。
我们将以...(请击鼓)...api作为API路由表前缀。通过这种方式,如果有人想获取所有的评论,他们将使用URL:http://example.com/api/comments 。这只是有意义的前进和一些基础API创建的好策略。
<?php
// app/routes.php
// =============================================
// HOME PAGE ===================================
// =============================================
Route::get('/', function()
{
// we dont need to use Laravel Blade
// we will return a PHP file that will hold all of our Angular content
// see the "Where to Place Angular Files" below to see ideas on how to structure your app
return View::make('index'); // will return app/views/index.php
});
// =============================================
// API ROUTES ==================================
// =============================================
Route::group(array('prefix' => 'api'), function() {
// since we will be using this just for CRUD, we won't need create and edit
// Angular will handle both of those forms
// this ensures that a user can't access api/create or api/edit when there's nothing there
Route::resource('comments', 'CommentController',
array('only' => array('index', 'store', 'destroy')));
});
// =============================================
// CATCH ALL ROUTE =============================
// =============================================
// all routes that are not home or api will be redirected to the frontend
// this allows angular to route them
App::missing(function($exception)
{
return View::make('index');
});
我们现在有路由表来处理Laravel要做的三件主要事情。
处理“全部获取”路由表:在Laravel里,你可以用几种方式实现这个。通常,用以上代码并得到整个应用的“全部获取”不太理想。另一种选择是,你可以使用Laravel控制器的丢失方法来获取路由表。
测试所有的路由表 让我们确保所需的路由表都有了。我们会用到artisan查看所有的路由表:
php artisan routes
这个命令让我们看到所有的路由表以及一个自上而下的应用视图。

从上图我们能看到HTTP动词和获取所有评论,获取、创建和销毁一条评论的路由表。在API路由表的顶部,可以看到一个用户如何通过主页路由表路由到Angular的。
后台完成
终于!我们Laravel API的后台也完成了。我们已经做了很多,但还有很多工作要做。我们已经建立并播种了数据库,创建了模型和控制器,也建好了路由表。我们来继续完成Angular前端的工作。
将Angular文件放在哪
我看到这个问题很多次被问到了。我到底应该把Angular文件放在哪呢,还有如何使Laravel和Angular一起工作。
让Angular来处理前端,我们需要Laravel将用户导向到index.php文件。我们可以把它放在几个不同的地方。默认情况下,当你使用:
// app/routes.php
Route::get('/', function() {

  return View::make('index');

});
这将返回app/views/index.php。Laravel默认情况下将在app/views文件夹查找。
一些人想要将Angular文件和Laravel 文件完全分开。他们想要让他们的整个应用程序放在public文件夹中。这样做很简单:只需要将默认的View的位置设置为public文件夹即可。可以通过修改app/config/view.php文件来完成设置。
// app/config/view.php
...

  // make laravel look in public/views for view files
  'paths' => array(__DIR__.'/../../public/views'),

...
现在,return View::make('index') 将会查找public/views/index.php文件。你完全可以配置你想如何组织你的app。一些人认为将整个Angular应用程序放在public文件夹中好处比较多,这样可以很容易的处理路由并且如果将来有需要的话,可以完全的将后端的RESTful API 和前端的Angular区分开来。
为了Angular能进行路由,那么你的部分文件需被放置在public 文件夹中,但是这已经超出了本文的范围。
让我们假设所有东西都使用默认,并且我们的主视图文件是在我们的app/ views 文件夹下,然后我们继续。
使用Laravel和Angular 路由 如果使用Laravel和Angular 路由时冲突了,会导致很多的问题。Laravel将作为主路由掌控你的应用程序。Angular 路由只会发生在, 当Laravel路由我们的用户, 到Angular主路由(index.php)这种情况。 这就是为什么我们使用Laravel掌控所有的路由。Laravel将处理API路由和将任意不知如何路由的请求发送到Angular。然后,你可以为你的Angular 应用设置所有的路由来处理出不同的视图。
前端的Angular
准备我们的应用程序
我们的Angular程序中的每一件事都要在public文件夹中处理。这可以有助于我们将它和后端的app文件夹中的文件很好的区分开来。
让我们看一下我们的public文件夹中的组织结构。我们创建了模块化的Angular程序,因为这是最佳实践。现在,我们程序分成的各个部分很容易进行测试和处理。
- - public/
- ----- js/
- ---------- controllers/ // where we will put our angular controllers
- --------------- mainCtrl.js
- ---------- services/ // angular services
- --------------- commentService.js
- ---------- app.js
Angular Service public/js/services/commentService.js
我们的Angular service是我们通过HTTP调用Laravel API 的一个主要的位置。它非常的简明易懂,我们使用了 Angular $http service.
// public/js/services/commentService.js
angular.module('commentService', [])

  .factory('Comment', function($http) {

    return {
      // get all the comments
      get : function() {
        return $http.get('/api/comments');
      },

      // save a comment (pass in comment data)
      save : function(commentData) {
        return $http({
          method: 'POST',
          url: '/api/comments',
          headers: { 'Content-Type' : 'application/x-www-form-urlencoded' },
          data: $.param(commentData)
        });
      },

      // destroy a comment
      destroy : function(id) {
        return $http.delete('/api/comments/' + id);
      }
    }

  });
这就是我们的Angular service,包含了3个不同的函数。这些是我们唯一所需要的函数,因为它们将会和我们Laravel中的路由api相对应。
我们的service将会返回一个promise对象。这些将会用来处理我们的控制器。这里的命名约定同样也和我们的Laravel控制器保持一致。
完成了我们的Angular service,让我们开始着手我们的控制器并使用它。
Angular控制器public/js/controllers/mainCtrl.js
该控制器实现了我们应用的绝大部分功能。我们在这里面创建处理提交表单和删除评论的函数。
// public/js/controllers/mainCtrl.js
angular.module('mainCtrl', [])

  // 在控制器中诸如Comment服务
  .controller('mainController', function($scope, $http, Comment) {
    // 持有新评论所有表单数据的对象
    $scope.commentData = {};

    // 调用显示加载图标的变量
    $scope.loading = true;

    // 先获取所有的评论,然后绑定它们到$scope.comments对象     // 使用服务中定义的函数
    // GET ALL COMMENTS ====================================================
    Comment.get()
      .success(function(data) {
        $scope.comments = data;
        $scope.loading = false;
      });

    // 处理提交表单的函数
    // SAVE A COMMENT ======================================================
    $scope.submitComment = function() {
      $scope.loading = true;

      // 保存评论。在表单间传递评论
      // 使用在服务中创建的函数
      Comment.save($scope.commentData)
        .success(function(data) {

          // 如果成功,我们需要刷新评论列表
          Comment.get()
            .success(function(getData) {
              $scope.comments = getData;
              $scope.loading = false;
            });

        })
        .error(function(data) {
          console.log(data);
        });
    };

    // 处理删除评论的函数
    // DELETE A COMMENT ====================================================
    $scope.deleteComment = function(id) {
      $scope.loading = true;

      // 使用在服务中创建的函数
      Comment.destroy(id)
        .success(function(data) {

          // 如果成功,我们需要刷新评论列表
          Comment.get()
            .success(function(getData) {
              $scope.comments = getData;
              $scope.loading = false;
            });

        });
    };

  });
正如你在控制器中看到的,我们已经注入了Comment服务并使用它来实现主要的功能:获得,保存以及删除。使用这样的服务避免用$http get或put来污染我们的控制器。
连接到我们的应用public/js/app.js
在Angular方面,我们已经创建了服务和控制器。现在让我们将一起连接起来,这样我们可以使用ng-app和ng-controller将它应用到我们的应用中。
这就是创建Angular应用的代码。我们将把服务和控制器注入。这是最佳实践的做法,这能够使我们的应用程序模块化,且各个不同部分都是可测可扩展的。
// public/js/app.js
var commentApp = angular.module('commentApp', ['mainCtrl', 'commentService']);
就这样,没有太多工作。现在我们切实实现了我们的观点,我们可以看Angular的各部分是如何一起工作的。
我们的主视图app/views/index.php
到目前为止,在做完一切准备工作后,我们仍然不能从浏览器中看到任何内容。因为Laravel控制着我们的主路由,我们需要定义我们的视图文件,且将所有路由请求返回return View::make('index');。
让我们先创建视图。我们将使用我们已创建的所有Angular内容。我们已已使用Angular创建的主要部分将是我们将在index.php中主要使用的部件:
- ng-app和ng-controller:通过将它们附加到body标签上来应用它们
- ng-repeat:通过循环将评论显示到模板中
- submitComment():使用ng-submit将这个函数附加到表单上
- Loading Icons:我们将创建一个称作loading的变量。如果它被设为true,我们将显示一个加载图标并隐藏评论
- deleteComment():我们将附加这个函数到一个删除链接,以便我们删除评论
现在让我们来写实现我们观点的实际代码。我们将对主要重要的部分做注释,这样我们就能够看到一切是如何正常工作的。
<!-- app/views/index.php -->
<!doctype html>
<html>
<head>
  <meta charset="UTF-8">
  <title>Laravel and Angular Comment System</title>

  <!-- CSS -->
  <link rel="stylesheet" href="//netdna.bootstrapcdn.com/bootstrap/3.1.0/css/bootstrap.min.css"> <!-- load bootstrap via cdn -->
  <link rel="stylesheet" href="//netdna.bootstrapcdn.com/font-awesome/4.0.3/css/font-awesome.min.css"> <!-- load fontawesome -->
  <style>
    body     { padding-top:30px; }
    form     { padding-bottom:20px; }
    .comment   { padding-bottom:20px; }
  </style>

  <!-- JS -->
  <script src="//ajax.googleapis.com/ajax/libs/jquery/2.0.3/jquery.min.js"></script>
  <script src="//ajax.googleapis.com/ajax/libs/angularjs/1.2.8/angular.min.js"></script> <!-- load angular -->

  <!-- ANGULAR -->
  <!-- all angular resources will be loaded from the /public folder -->
    <script src="js/controllers/mainCtrl.js"></script> <!-- load our controller -->
    <script src="js/services/commentService.js"></script> <!-- load our service -->
    <script src="js/app.js"></script> <!-- load our application -->

</head>
<!-- declare our angular app and controller -->
<body ng-app="commentApp" ng-controller="mainController">
<div class="col-md-8 col-md-offset-2">

  <!-- PAGE TITLE =============================================== -->
  <div>
    <h2>Laravel and Angular Single Page Application</h2>
    <h4>Commenting System</h4>
  </div>

  <!-- NEW COMMENT FORM =============================================== -->
  <form ng-submit="submitComment()"> <!-- ng-submit will disable the default form action and use our function -->

    <!-- AUTHOR -->
    <div>
      <input type="text" class="form-control input-sm" name="author" ng-model="commentData.author" placeholder="Name">
    </div>

    <!-- COMMENT TEXT -->
    <div>
      <input type="text" class="form-control input-lg" name="comment" ng-model="commentData.text" placeholder="Say what you have to say">
    </div>

    <!-- SUBMIT BUTTON -->
    <div class="form-group text-right">
      <button type="submit" class="btn btn-primary btn-lg">Submit</button>
    </div>
  </form>

  <!-- LOADING ICON =============================================== -->
  <!-- show loading icon if the loading variable is set to true -->
  <p ng-show="loading"><span class="fa fa-meh-o fa-5x fa-spin"></span></p>

  <!-- THE COMMENTS =============================================== -->
  <!-- hide these comments if the loading variable is true -->
  <div ng-hide="loading" ng-repeat="comment in comments">
    <h3>Comment #{{ comment.id }} <small>by {{ comment.author }}</h3>
    <p>{{ comment.text }}</p>

    <p><a href="#" ng-click="deleteComment(comment.id)">Delete</a></p>
  </div>

</div>
</body>
</html>

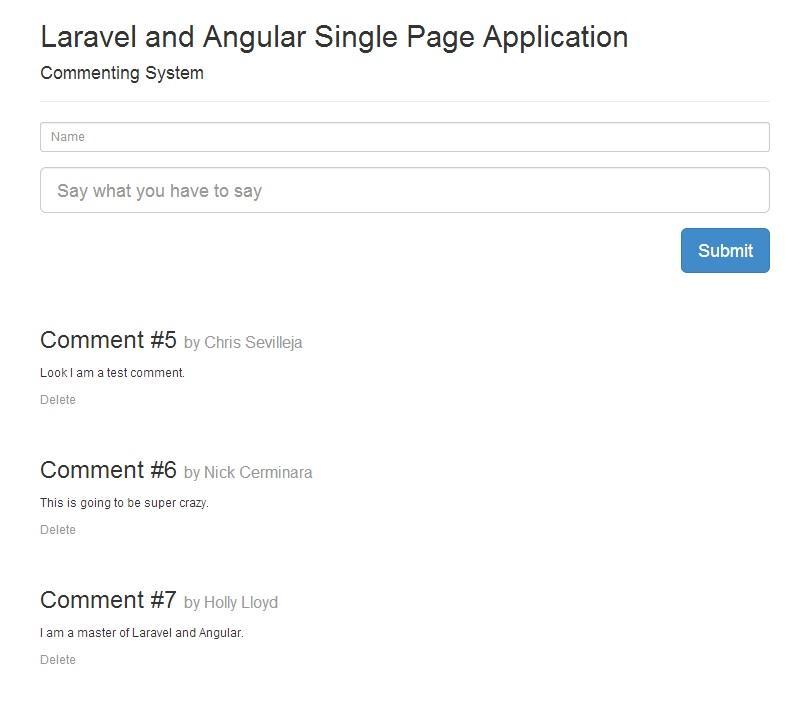
现在我们终于实现了我们的观点,将所有已创造的部分组合了起来。你可以去试玩一下这个应用。所有部件都应很好地结合在一起,评论的创建和删除也应该不用刷新页面。
测试
确保你测试了 Github repo 的应用.下面是做好这一过程的步骤
- 复制 repo:git clone git@github.com:scotch-io/laravel-angular-comment-app
- 安装Laravel:composer install --prefer-dist
- 修改数据库连接 inapp/config/database.php
- 数据迁移 database:php artisan migrate
- 打好种子 database:php artisan db:seed
- 浏览你的应用!
结论
以往本文在介绍使用 Laravel 和Angular上为你提供了帮助. 你可以在此基础上创建使用更多API的 Laravel 应用, 甚至创建自己的 Angular routing .
Articles Liés
Voir plus- Une analyse approfondie du composant de groupe de liste Bootstrap
- Explication détaillée du currying de la fonction JavaScript
- Exemple complet de génération de mot de passe JS et de détection de force (avec téléchargement du code source de démonstration)
- Angularjs intègre l'interface utilisateur WeChat (weui)
- Comment basculer rapidement entre le chinois traditionnel et le chinois simplifié avec JavaScript et l'astuce permettant aux sites Web de prendre en charge le basculement entre les compétences en chinois simplifié et traditionnel_javascript

