Maison >interface Web >js tutoriel >Comment utiliser la technologie jQuery pour développer une navigation de page de style iOS menu_jquery
Comment utiliser la technologie jQuery pour développer une navigation de page de style iOS menu_jquery
- WBOYWBOYWBOYWBOYWBOYWBOYWBOYWBOYWBOYWBOYWBOYWBOYWBoriginal
- 2016-05-16 15:48:131015parcourir
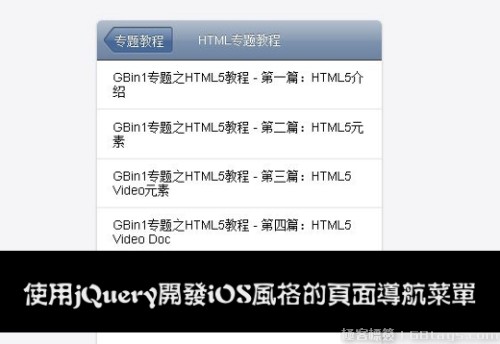
Rendu :


Les systèmes d'exploitation et les méthodes de navigation de style IOS deviennent de plus en plus populaires sur le marché. Dans le didacticiel jQuery d'aujourd'hui, nous présentons comment générer une navigation dans les menus de style iPhone.
Code HTML
Nous utilisons 25edfb22a4f469ecb59f1190150159c6 intégré pour générer le contenu du menu et l'inclure dans les balises c787b9a589a3ece771e842a6176cf8e9
<nav>
<h1>导航菜单</h1>
<ul>
<li>
<h2>专题教程</h2>
<ul>
<li>
<h3>HTML专题教程</h3>
<ul>
<li><a href="http://www.gbin1.com/tutorials/html5-tutorial/html5-introduction">GBin1专题之HTML5教程 - 第一篇:HTML5介绍</a></li>
<li><a href="http://www.gbin1.com/tutorials/html5-tutorial/html5-new-elements">GBin1专题之HTML5教程 - 第二篇:HTML5元素</a></li>
<li><a href="http://www.gbin1.com/tutorials/html5-tutorial/html5-video">GBin1专题之HTML5教程 - 第三篇:HTML5 Video元素</a></li>
<li><a href="http://www.gbin1.com/tutorials/html5-tutorial/html5-video-doc">GBin1专题之HTML5教程 - 第四篇:HTML5 Video Doc</a></li>
<li><a href="http://www.gbin1.com/tutorials/html5-tutorial/html5-audio">GBin1专题之HTML5教程 - 第五篇:HTML5 Audio元素</a></li>
</ul>
<li>
<h3>GBin1热点秀</h3>
<ul>
<li><a href="http://www.gbin1.com/tutorials/hotspot/hotspot1/">GBin1专题之Web热点秀#1</a>
<li><a href="http://www.gbin1.com/tutorials/hotspot/hotspot2/">GBin1专题之Web热点秀#2</a>
<li><a href="http://www.gbin1.com/tutorials/hotspot/hotspot3/">GBin1专题之Web热点秀#3</a>
</ul>

</ul>
Javascript
$(function(){

var nav = $("nav"),
navTitle = nav.children().first(),
navTitleLabel = navTitle.text(),
mainList = navTitle.next(),
subLevels = mainList.find("ul"),
hiddenClass = "hidden";

nav.addClass("js");
mainList.find("a:last-child").addClass("files");
subLevels.addClass(hiddenClass);

navTitle.wrap($("<div/>")).before($("<a/>", {
href: "#",
className: hiddenClass,
click: function(e){
var $this = $(this),
activeList = subLevels.filter(":visible:last"),
activeListParents = activeList.parents("ul");
navTitle.text($this.text());
if(activeListParents.length > 2)
$this.text(activeListParents.eq(1).prev().text());
else if (activeListParents.length > 1)
$this.text(navTitleLabel)
else
$this.addClass(hiddenClass).empty();
setTimeout(
function(){
activeList.addClass(hiddenClass);
}, slideDuration - 100
);
mainList.css("left", parseInt(mainList.css("left")) + navWidth + "px");
e.preventDefault();
}
}));

subLevels.prev().wrap($("<a/>", {
href:"#",
click: function(e){
var $this = $(this);
backArrow.removeClass(hiddenClass).text(navTitle.text());
navTitle.text($this.text());
$this.next().removeClass(hiddenClass);
mainList.css("left", parseInt(mainList.css("left")) - navWidth + "px");
e.preventDefault();
}
}));

var backArrow = navTitle.prev(),
navWidth = nav.width(),
firstSubLevel = subLevels.eq(0),
docStyle = document.documentElement.style,
slideDuration = 0,
timingRatio = 1000;

if(docStyle.WebkitTransition !== undefined)
slideDuration = parseFloat(
firstSubLevel.css("-webkit-transition-duration")
) * timingRatio;

if(docStyle.MozTransition !== undefined)
slideDuration = parseFloat(
firstSubLevel.css("-moz-transition-duration")
) * timingRatio;

if(docStyle.OTransition !== undefined)
slideDuration = parseFloat(
firstSubLevel.css("-o-transition-duration")
) * timingRatio;

});
CSS
body {
font-size: 14px;
font-family: Arial;
background:#f5f5f8;
}
.js {
position:absolute;
width:320px;
height:480px;
top:50%;
left:50%;
margin:-280px 0 0 -160px;
overflow:hidden;
-webkit-border-radius:5px;
-moz-border-radius:5px;
border-radius:5px;
background:#fff;
-webkit-box-shadow:0 1px 2px rgba(0,0,0,.25);
-moz-box-shadow:0 1px 2px rgba(0,0,0,.25);
box-shadow:0 1px 2px rgba(0,0,0,.25);
}
.js .files {
background-image:none;
}
.js .hidden {
display:none;
}
.js * {
font-size:14px;
font-weight:400;
margin:0;
padding:0;
list-style:none;
}
.js > div {
position:relative;
z-index:1;
height:44px;
text-align:center;
font-size:14px;
line-height:44px;
color:#fff;
text-shadow:0 -1px 0 rgba(0,0,0,.4);
background:#7f94b0;
background:-webkit-gradient(
linear,
0 0,
0 100%,
color-stop(0,#b5c0ce),
color-stop(0.5,#889bb3),
color-stop(0.51,#7f94b0),
color-stop(1,#6d83a1)
);
background:-moz-linear-gradient(
top center,
#b5c0ce,
#889bb3 22px,
#7f94b0 23px,
#6d83a1
);
border-bottom:1px solid #2d3033;
-webkit-border-top-left-radius:5px;
-webkit-border-top-right-radius:5px;
-moz-border-radius-topleft:5px;
-moz-border-radius-topright:5px;
border-top-left-radius:5px;
border-top-right-radius:5px;
}
.js > div a {
height:31px;
top:7px;
left:20px;
font-size:14px;
line-height:31px;
color:#fff;
background:url('../images//center.png');
}
.js > div a, .js > div a:before, .js > div a:after {
position:absolute;
}
.js > div a:before {
left:-13px;
content:url('../images//left.png');
}
.js > div a:after {
right:-10px;
top:0;
content:url('../images//right.png');
}
.js > div a:active {
opacity:.65;
}
.js a {
text-decoration:none;
}
.js ul a {
display:block;
color:#000;
padding:.8em 18px;
border-bottom:1px solid #e0e0e0;
background:url('images/next.png') no-repeat 94% 50%;
}
.js ul a:hover {
background-color:#edf3fe;
}
.js a:focus {
outline:none;
}
.js ul {
position:absolute;
top:0;
padding-top:45px;
width:100%;
-webkit-transition:left .4s ease-out;
-moz-transition:left .4s ease-out;
-o-transition:left .4s ease-out;
}
.js ul {
left:0;
}
.js ul ul {
left:320px;
}
Déclaration:
Le contenu de cet article est volontairement contribué par les internautes et les droits d'auteur appartiennent à l'auteur original. Ce site n'assume aucune responsabilité légale correspondante. Si vous trouvez un contenu suspecté de plagiat ou de contrefaçon, veuillez contacter admin@php.cn
Article précédent:Comment utiliser js pour copier une partie du texte dans les compétences link_javascriptArticle suivant:Comment utiliser js pour copier une partie du texte dans les compétences link_javascript
Articles Liés
Voir plus- Une analyse approfondie du composant de groupe de liste Bootstrap
- Explication détaillée du currying de la fonction JavaScript
- Exemple complet de génération de mot de passe JS et de détection de force (avec téléchargement du code source de démonstration)
- Angularjs intègre l'interface utilisateur WeChat (weui)
- Comment basculer rapidement entre le chinois traditionnel et le chinois simplifié avec JavaScript et l'astuce permettant aux sites Web de prendre en charge le basculement entre les compétences en chinois simplifié et traditionnel_javascript

