Maison >Java >javaDidacticiel >Comment obtenir la valeur dans application.yml au Springboot
Comment obtenir la valeur dans application.yml au Springboot
- WBOYWBOYWBOYWBOYWBOYWBOYWBOYWBOYWBOYWBOYWBOYWBOYWBavant
- 2023-06-03 18:43:131909parcourir
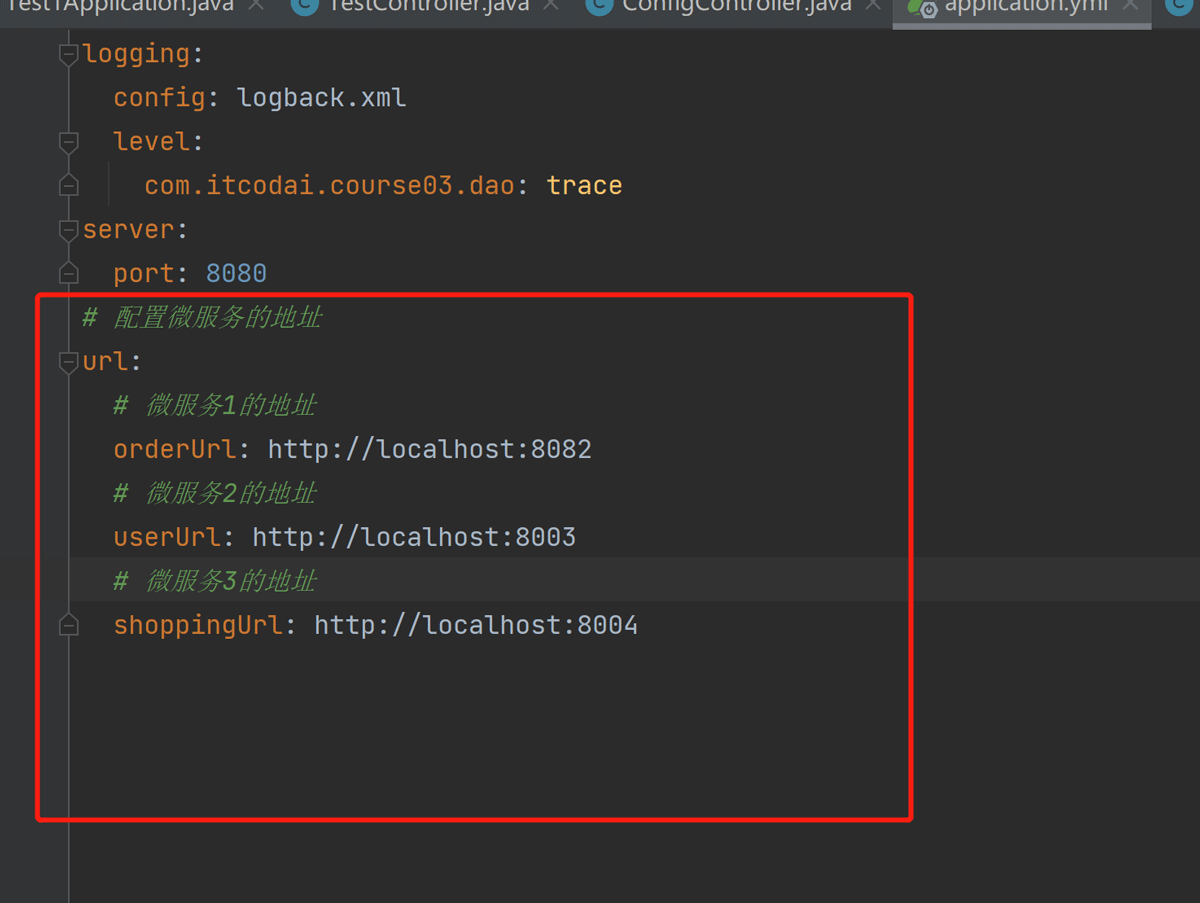
Dans les projets, certaines informations de configuration sont souvent nécessaires. Ces informations peuvent avoir des configurations différentes dans l'environnement de test et dans l'environnement de production, et peuvent devoir être modifiées ultérieurement en fonction des conditions commerciales réelles. Nous ne pouvons pas coder en dur ces configurations dans le code. Il est préférable de les écrire dans le fichier de configuration. Par exemple, vous pouvez écrire ces informations dans le fichier application.yml . application.yml 文件中。

那么,怎么在代码里获取或者使用这个地址呢?有2个方法。
方法一:
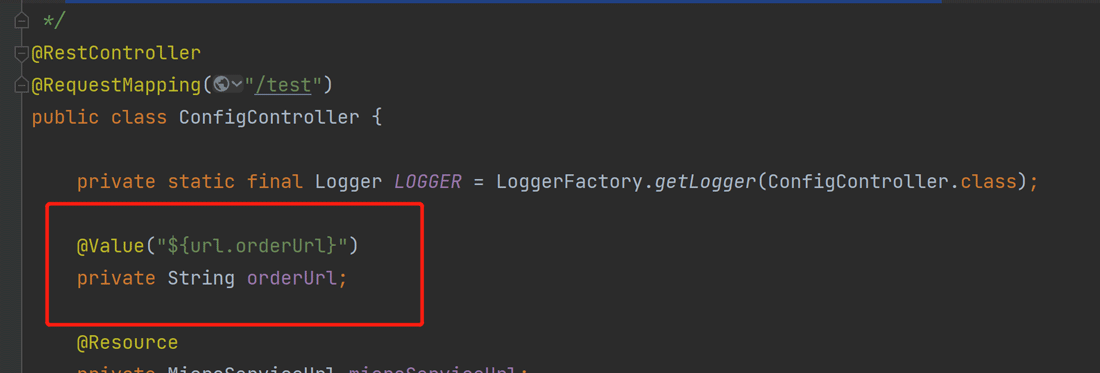
我们可以通过@Value 注解的 ${key} 即可获取配置文件(application.yml)中和 key 对应的 value 值,这个方法适用于微服务比较少的情形

方法二:
在实际项目中,遇到业务繁琐,逻辑复杂的情况,需要考虑封装一个或多个配置类。比如,如果一个业务需要同时使用微服务1、微服务2和微服务3,那么这些微服务将被调用。
如果这样一个个去使用 @Value 注解引入相应的微服务地址的话,太过于繁琐。
也许实际业务中,远远不止这三个微服务,甚至十几个都有可能。对于这种情况,我们可以先定义一个 MicroServiceUrl

Donc , comment ? Comment obtenir ou utiliser cette adresse en code ? Il existe 2 méthodes.
Méthode 1 :
Nous pouvons obtenir la valeur correspondant à la clé dans le fichier de configuration (application.yml) grâce au ${key} annoté avec @Value. Cette méthode convient à ceux qui en ont relativement peu. microservices. Situation
Méthode 2 :
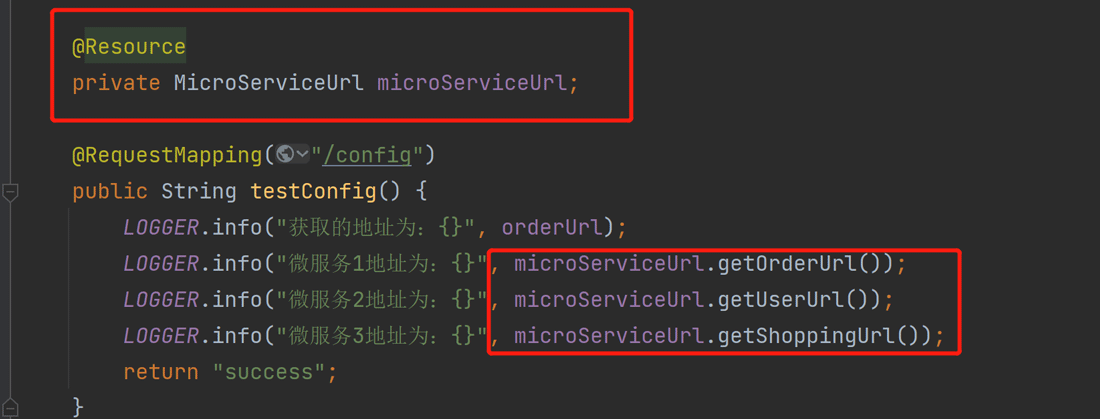
 Dans les projets réels, lorsque vous rencontrez des affaires complexes et une logique complexe, vous devez envisager d'encapsuler une ou plusieurs classes de configuration. Par exemple, si une entreprise doit utiliser simultanément le microservice 1, le microservice 2 et le microservice 3, alors ces microservices seront appelés. 🎜Il serait trop fastidieux d'utiliser l'annotation @Value pour introduire une à une les adresses de microservices correspondantes. 🎜🎜Peut-être que dans les affaires réelles, il existe bien plus que ces trois microservices, voire plus d'une douzaine. Pour cette situation, nous pouvons d'abord définir une classe
 MicroServiceUrl pour enregistrer spécifiquement l'URL du microservice🎜import org.springframework.boot.context.properties.ConfigurationProperties;
import org.springframework.stereotype.Component;
@Component
@ConfigurationProperties(prefix = "url")
public class MicroServiceUrl {
private String orderUrl;
private String userUrl;
private String shoppingUrl;
public String getOrderUrl() {
return orderUrl;
}
public void setOrderUrl(String orderUrl) {
this.orderUrl = orderUrl;
}
public String getUserUrl() {
return userUrl;
}
public void setUserUrl(String userUrl) {
this.userUrl = userUrl;
}
public String getShoppingUrl() {
return shoppingUrl;
}
public void setShoppingUrl(String shoppingUrl) {
this.shoppingUrl = shoppingUrl;
}
}🎜🎜Ajouter des dépendances :🎜🎜<dependency> <groupId>org.springframework.boot</groupId> <artifactId>spring-boot-configuration-processor</artifactId> <optional>true</optional> </dependency>🎜La configuration actuelle est écrite pour le moment. besoin d'ajouter des dépendances dans le code Introduisez les URL de ces microservices une par une et injectez directement la classe de configuration que vous venez d'écrire via l'annotation @Resource à utiliser. Voici le contrôleur de test : 🎜🎜🎜🎜
import com.example.test1.config.MicroServiceUrl;
import org.slf4j.Logger;
import org.slf4j.LoggerFactory;
import org.springframework.beans.factory.annotation.Value;
import org.springframework.web.bind.annotation.RequestMapping;
import org.springframework.web.bind.annotation.RestController;
import javax.annotation.Resource;

/**
* 获取配置文件(application.yml)中和 key 对应的 value 值
* 2种方法
*/
@RestController
@RequestMapping("/test")
public class ConfigController {

private static final Logger LOGGER = LoggerFactory.getLogger(ConfigController.class);

@Value("${url.orderUrl}")
private String orderUrl;

@Resource
private MicroServiceUrl microServiceUrl;

@RequestMapping("/config")
public String testConfig() {
LOGGER.info("获取的地址为:{}", orderUrl);
LOGGER.info("微服务1地址为:{}", microServiceUrl.getOrderUrl());
LOGGER.info("微服务2地址为:{}", microServiceUrl.getUserUrl());
LOGGER.info("微服务3地址为:{}", microServiceUrl.getShoppingUrl());
return "success";
}
}.Ce qui précède est le contenu détaillé de. pour plus d'informations, suivez d'autres articles connexes sur le site Web de PHP en chinois!

