Maison >Java >javaDidacticiel >Comment démarrer un fil d'écoute pour effectuer des tâches dans Springboot
Comment démarrer un fil d'écoute pour effectuer des tâches dans Springboot
- WBOYavant
- 2023-05-21 20:28:121363parcourir
springboot démarre un fil d'écoute pour effectuer des tâches
public class StartApplicationListener implements ApplicationListener<ContextRefreshedEvent> {

    @Override
    public void onApplicationEvent(ContextRefreshedEvent contextRefreshedEvent) {
        ApplicationContext applicationContext = contextRefreshedEvent.getApplicationContext();
        ApplicationContext parent = applicationContext.getParent();
        if (parent == null) {
            CacheManager cacheManager = applicationContext.getBean(CacheManager.class);
            Cache cache = cacheManager.getCache(MsConstants.NODE_CACHE_NAME);
           new Thread(new Runnable() {
               @Override
               public void run() {
                  //代码

               }
           }).start();
        }
    }
public static void main(String[] args) {
SpringApplication app = new SpringApplication(FigureServerApplication.class);
app.addListeners(new StartApplicationListener());
app.run(args);
}Processus de création d'événements d'écoute dans springboot
Dans le projet Spring Boot, vous pouvez utiliser l'annotation @Async pour implémenter le traitement asynchrone, et l'écoute d'événements a deux types : Des méthodes synchrones et asynchrones sont disponibles.
Étapes générales des événements
1 : Définir un événement.
2 : Créez un auditeur.
3 : Assurez-vous que l'auditeur est à l'intérieur du conteneur.
4 : Publiez l'événement pour le tester.
Sans plus tarder, décrivons brièvement les démos de plusieurs méthodes différentes.
Tout d’abord, créons un projet Springboot.
Premier type
1 : Définissez un événement et devez hériter de ApplicationEvent
public class MyEvent extends ApplicationEvent {
    public MyEvent(Object source) {
        super(source);
        System.out.println("我是一个事件,目前在事件的构造器内");
    }
}
2 : Créez un écouteur. Implémentez directement l'interface ApplicationListener et réécrivez la méthode onApplicationEvent.
public class MyEventListener implements ApplicationListener<MyEvent> {
    @Override
    public void onApplicationEvent(MyEvent event) {
        System.out.println("现在开始执行监听器中的内容,我是直接实现ApplicationListener接口的方式进行的");
        System.out.println("event.getSource() = " + event.getSource());
    }
}
3 : Ajoutez manuellement l'écouteur au conteneur d'application et publiez l'événement.
@SpringBootApplication
public class EventTestApplication {
    public static void main(String[] args) {
//        SpringApplication.run(EventTestApplication.class, args);
        //第一种:自己手动将监听器添加到application中
        SpringApplication application = new SpringApplication(EventTestApplication.class);
        //添加监听器
        application.addListeners(new MyEventListener());
        ConfigurableApplicationContext context = application.run(args);
        //进行发布事件
        context.publishEvent(new MyEvent("Event数据源"));
        context.close();
    }
}
4 : Démarrez le cours de démarrage principal et effectuez le test d'impression.
Le deuxième type
1 : Identique au premier type 1
2 : Créer un auditeur.
/**
 *第二种:打上Compoent注解,  将事件监听器自动加入到应用容器中
 * 这种方式不需要手动加入到容器中。
 * */
@Component
public class MyEventListener2 implements ApplicationListener<MyEvent> {
    @Override
    public void onApplicationEvent(MyEvent event) {
        System.out.println("现在开始执行监听器中的内容,我是打Compoent注解的方式进行的");
        System.out.println("event.getSource() = " + event.getSource());
    }
}
3 : Publiez l'événement puis effectuez des tests de démarrage.
@SpringBootApplication
public class EventTestApplication {
    public static void main(String[] args) {
        ConfigurableApplicationContext context = SpringApplication.run(EventTestApplication.class, args);
        //发布事件
        context.publishEvent(new MyEvent("source"));
        context.close();
    }
}
Le troisième type
utilise tous des annotations
1 : Identique au premier type 1
2 : Créer un auditeur.
/**
 *第三种:采用@EventListener注解的方式,不需要在类上实现ApplicationListener接口。
 * 直接采用的是通过注解,将方法标识为一个监听器。
 * */
@Component
public class MyEventListener3 {
    @Async//异步注解。开启一个新线程。 去掉此注解则会变成同步监听。
    @EventListener(classes = MyEvent.class)
    public void TestListener(MyEvent myEvent){
        System.out.println("我是@EventListener注解的方式实现的监听器");
        System.out.println("myEvent.getSource() = " + myEvent.getSource());
    }
}
3 : Publiez l'événement puis effectuez des tests de démarrage.
@SpringBootApplication
public class EventTestApplication {
    public static void main(String[] args) {
        ConfigurableApplicationContext context = SpringApplication.run(EventTestApplication.class, args);
        //发布事件
        context.publishEvent(new MyEvent("source"));
        context.close();
    }
}
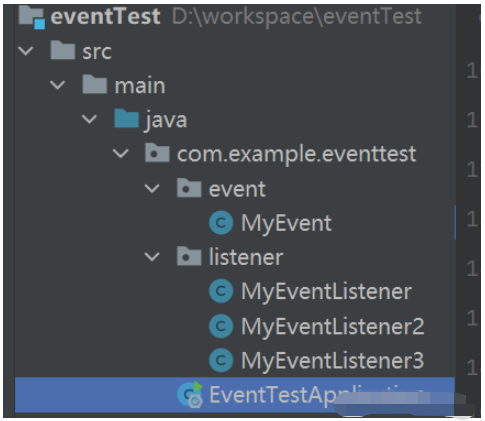
Ce qui suit est le schéma de structure du code :

Ce qui précède est le contenu détaillé de. pour plus d'informations, suivez d'autres articles connexes sur le site Web de PHP en chinois!

